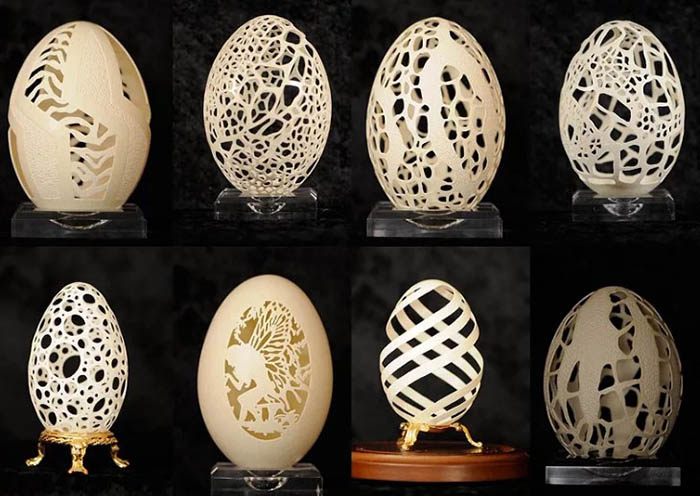
Egg carving is considered a recognized and professional art, because the work is very painstaking and complex. However, the result will be amazing. Goose, chicken, ostrich and quail shells are suitable for creating amazing and unusual works, in particular with a diorama inside.
Difficulty of work
Eggshell carving is an ancient art that was developed in Ancient China.. At that time, people gave carved crafts for birthdays or weddings. Initially, chicken eggs were painted reddish using natural dyes, and then the technique of carving ornaments on the shell was mastered.
Today, museums in China contain items that have survived from the period of the Qing and Ming dynasties. These works were created by masters of the 14th-17th centuries, and are striking in their unique and beautiful appearance. Precious stones, beads, and gold threads were used as decoration.
Many cultures consider eggs to be a symbol of fertility, so they are used to perform folk rituals and sacraments. Today, most craftsmen are engaged in this type of creativity, while there are special carving schools, and museums hold exhibitions with competitions on this topic.
High skill in this art form is considered not only the creation of patterns with ornaments on the surface, but also the processing of the shell to apply relief patterns.
Goose, ostrich and chicken eggs are suitable for carving., it is also acceptable to use quail shells. This type of work is considered a painstaking and delicate process, which will be varied and interesting.
You can master the technique of carving on eggshells at home, using a small set of tools. However, the first time you may not be able to create a craft, because the shell is characterized by fragile and thin walls.
In this regard, you will have to spend some time to master the work and gain the necessary experience in decorating products.
The process of creating an openwork and delicate pattern on a fragile shell is not a quick one. To make one craft, you will have to spend about 7-30 days. In this regard, you need to be patient and perform all movements as carefully as possible, because as the end of the work approaches, the shell will resemble a sieve.
If you make an awkward move, the workpiece will be destroyed, so you should not take the work on order. This is explained by the fact that time will be limited, and you need to forget about your personal vision of the future composition.
During carving, the master can feel in which places the shell is stronger and thicker, because this material is not uniform. Sometimes it is necessary to skip a certain bump, a depression, playing them out in a certain pattern. In this case, the appearance of the egg can give a hint or allow you to change the plan. In this work, it is impossible to make 2 identical crafts.
Carving on eggshells, as an unusual form of creativity, can be mastered by anyone. However, you need to be patient with desire and allocate time. At the same time, there are different techniques of carving on eggshells.
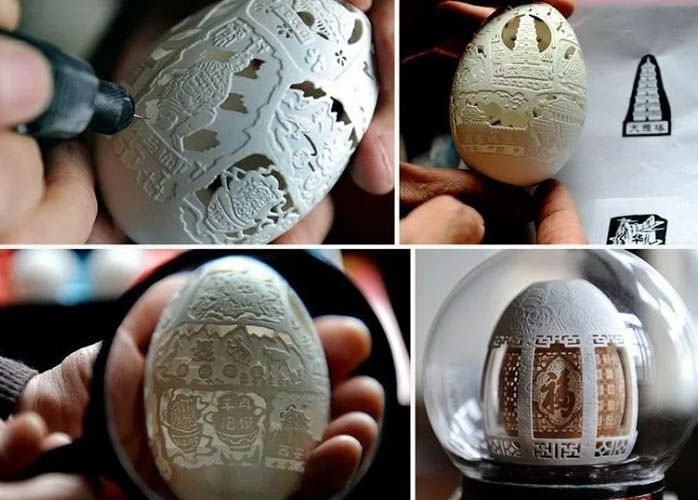
Often, craftsmen prefer to make flat patterns and create portraits or sculptural compositions, removing unnecessary layers around the lines. Sometimes the artist can combine carving with drawing.
Preparing the egg for work
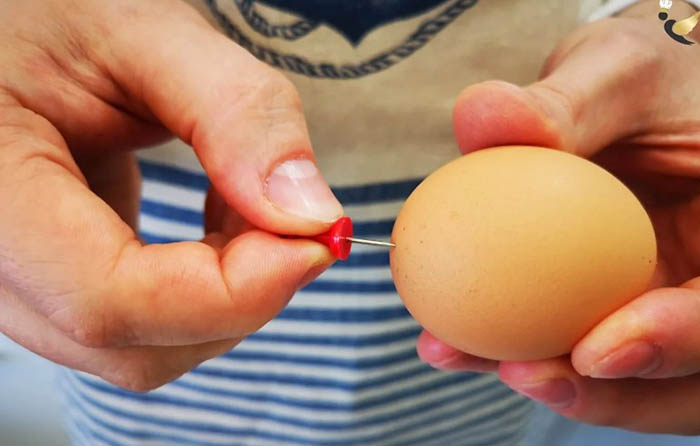
The shell should be taken from a raw egg., so before carving, the product must be rinsed well and freed from its internal contents. For these purposes, it is recommended to use a thin drill or a needle to make a hole in the shell on the blunt part of the egg.
It is important to remember that the rod should only reach the white. The yolk should be kept intact.
After making a hole, you need to use a syringe to extract the egg's internal contents. If you don't have this tool, you can use a faster option to remove the insides. In this case, you should make a similar hole on the opposite side of the egg and blow into it a little so that the remaining contents come out.
To thoroughly wash the inner walls of the product, you need to inject water into the egg using a syringe several times. To ensure that the shell is completely clean, it is recommended to close the upper and lower holes with two fingers and shake the egg in your hand.
To create a neat work, it is necessary to get rid of the thin film that is inside. When cutting out pieces of shell, unsightly rags will remain on the edges of the cuts due to the presence of this film. As a result, the product will have an uneven outline.
It is not possible to carefully remove the film through small holes in the egg, so you need to prepare a solution:
| Components | Volume |
| White | 250 ml |
| Water | 250 ml |
Directions for use:
- Fill a glass container with water. Then add bleach to the liquid.
- Place the egg without its contents into the prepared solution and leave for several hours.
- The film dissolution process lasts about 30 minutes. However, the procedure can take several hours, but not more than 4 hours.
- After the specified time, visually inspect the surface of the eggshell. If the film peels off, remove the product from the solution and rinse with water several times. Use a syringe for this purpose.
What you will need
Carving on eggshells requires preparation of tools and materials:
- acrylic varnish, spray varnish (it is acceptable to use transparent varnish for the nail plate);
- drill or mini drill;
- varnish for the finishing coat or coloring pigments for painting the craft;
- a magnifying glass with a respirator and protective glasses if your eyes are sensitive;
- a soft fabric material that will act as a table pad;
- a regular pencil or a needle to scratch the pattern;
- scalpel or a small sharp knife;
- raw egg;
- template as needed.
To do the work, it is permissible to use ostrich, goose, duck, turkey or chicken eggs. The shade can be any: black, greenish, beige, brown or white. However, if the surface is dark, the pattern will be more difficult to apply.
In this case, you will also need to prepare a needle or a white wax pencil. For carving, it is recommended to choose eggs from an adult bird, because such a shell is characterized by stronger and thicker walls.
The set of drills must include a powder puff to polish the workpiece. If this material is not available, it is permissible to string a round felt plate on the drill. The drills are presented in the form of metal sticks with a ball at the end.
The drill is often used by dentists and jewelers. This tool is presented in the form of a miniature drill, which is comfortable to hold in your hand. At the same time, the device operates on electric power.
The modern tool works almost silently and is also equipped with different functional modes. Due to the design of the drill, it is permissible to change the attachments, depending on the strength of the material and the clarity of the work that needs to be done.
Unlike stationary models, hand-held models are more practical and compact, so they will not take up much space.
When choosing a device model, you need to focus on your personal needs:
- For home use, you should not buy an expensive tool with high speed. It is recommended to use a budget device intended for home or small workshop.
- It is necessary to take into account the material. When working with the shell, the tool must be precise, because the workpiece is fragile.
A mini drill is a universal device that can replace a milling machine, grinder and electric drill. Despite its compact size, the device is equipped with different attachments, so it can perform various functions.
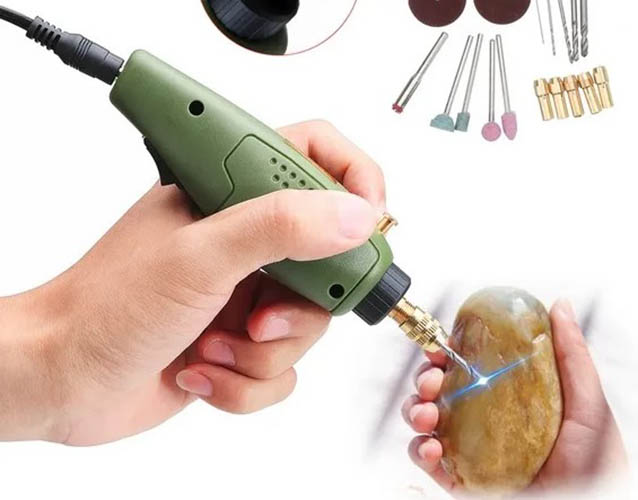
The standard electric tool is very popular because it is equipped with a flexible shaft, which provides maneuverability during the processing of thin products. As a result, it is possible to achieve high-quality work of any complexity. However, the device will only work from the network.
There is a mobile device on sale that has a battery. This tool is practically no different from the standard one, but it will cost more.
The choice of a tool for carving on the shell will depend on personal preferences and financial capabilities. Beginners are advised to pay attention to a regular drill, which is suitable for home use. The main thing is to prepare a set of necessary cutters, which should be well sharpened.
Surface treatment
Carving on eggshells requires preliminary processing of the product surface. For this purpose, an empty egg should be immersed in special solutions and left for several hours. Thanks to this procedure, the material will be more durable and the surface will be bleached.
Often this type of processing is necessary to create complex ornaments in the form of relief patterns.
Applying an image
Carving on eggshells allows you to create various beautiful ornaments and drawings on the surface of the product. The design can be anything, it all depends on your own imagination. It is also acceptable to look at illustrations in photographs and books.
Step-by-step instructions for applying the design:
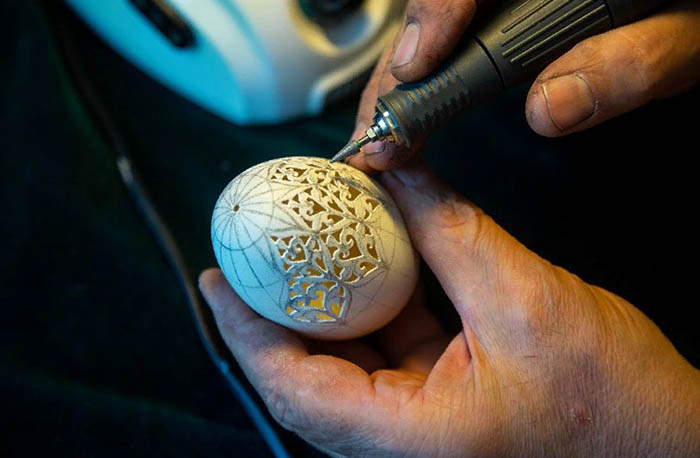
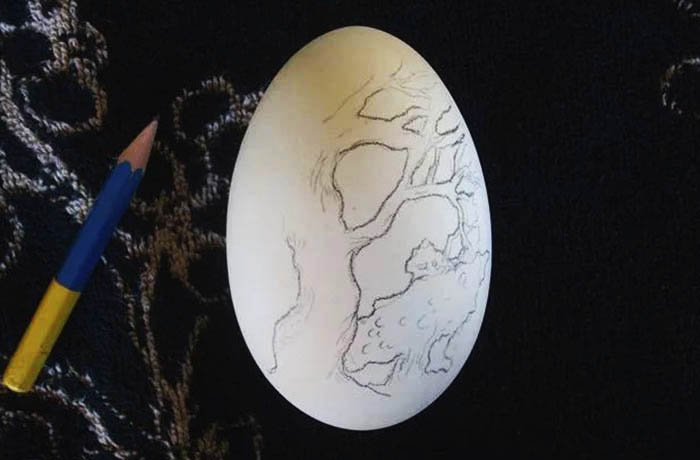
- Initially, make a blank using a pencil. This will allow you to carefully draw the chosen pattern on the surface of the shell.
- Then transfer the drawing to the egg. For these purposes, it is acceptable to simply draw a pattern with a pencil or use carbon paper. For convenience, use a stapler to attach the carbon paper to the sheet with the drawing with the part that does not copy. Apply the blank to the eggshell. To prevent the surface of the product from being stained with a black shade from the carbon paper, perform all actions carefully.
- For convenience, highlight in red the areas that need to be cut out initially.
- While carving, put on protective glasses and use a magnifying glass to see better.
- Cover the table surface with foam rubber or fabric to protect the shell from minor cracks if the egg falls on hard furniture.
- The work should be done at high speed, so use the appropriate cutters. In the areas that are marked with a red tint, drill holes. Initially, cut out grooves along the edges of the drawing. Do not insert the nozzle very deeply.
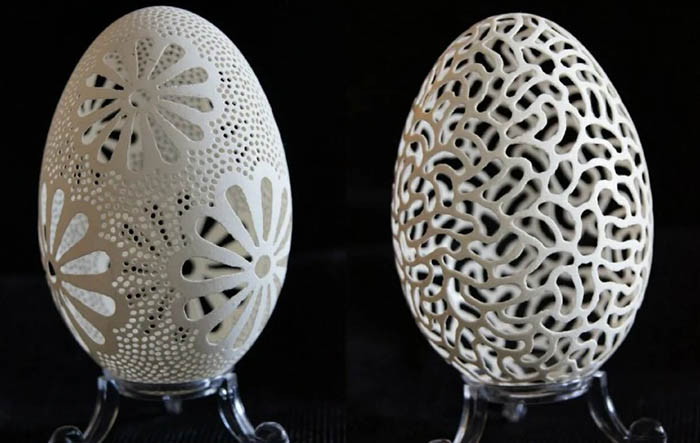
- Afterwards, completely saw out the holes marked in red. This work is considered a fragile art, therefore, to be on the safe side, it is recommended to make the partitions thicker to prevent deformation of the craft.
- Cut out an openwork pattern, diverging in rings from the main pattern. Go over the entire surface of the egg. This is considered a painstaking and difficult moment in this work.
- Use a sharp knife or polishing stone to remove any uneven areas.
- If desired, you can place a backlight inside the eggshell or behind the product. As a result, the beautiful lace ornament will be clearly visible.
Tips for Beginners
Tips for beginners:
- Beginner needlewomen are advised to make the shell more durable to prevent deformation of the workpiece during work. For this purpose, 1 half of the product must be treated with varnish and completely dried. Then turn over and coat the second half of the egg with varnish.
- To make the finished product brighter, the workpiece can be painted with acrylic paints.
- Despite the fact that the shell is fragile, this material is durable. If you store the finished work correctly, the product will last for a long time. For these purposes, the workpiece must be coated with a varnish and stored on a stand behind glass.
- The finished craft will look good when hung. In this case, it is recommended to tie the product with a rope or ribbon. As a result, the carved shell will become an impressive, beautiful and wonderful gift for everyone.
- Before applying the design, it is advisable to cover the work area with a soft fabric or sponge. If the shell accidentally hits the hard surface of the table, the egg will not break, because the backing will protect it.
- Beginners are advised to choose simple designs. After gaining the first experience, it is permissible to move on to more complex designs.
- When carving, it is difficult to hold the egg firmly, and you cannot put pressure on the shell. However, everything will come with experience. Often, the workpiece should be held with bare hands, because beginners' gloves can twist around the cutter. Only vinyl material is suitable for work, because it will fit tightly around your fingers and hands.
- To prevent the egg from slipping in your hand, it is permissible to pre-grind the surface of the workpiece with fine sandpaper. As a result, the product will hold more firmly during the carving process.
- To avoid inhaling dust particles that appear while the drill is running, you need to wear a respirator or mask. This will protect your lungs.
- For convenience, it is permissible to use a stand to apply and cut out the pattern.
- For creative work, it is recommended to buy quail, duck and goose eggs from birds living in the village or countryside and having the opportunity to peck shells with sand. Such birds will have a stronger shell.
- The collected product intended for carving should not be stored for a long period of time. Otherwise, the shell will become damp and brittle.
- When treating the inner walls of the shell with chlorine, it is necessary to thoroughly wash the workpiece with water, otherwise the shell will become damp and brittle.
- When using Emu eggshells, you need to think through the composition of the carving with precision. This is due to the fact that this shell is characterized by several layers of shade, which must be used correctly and beautifully.
Carving on shells is considered painstaking work that takes a lot of time, so it requires perseverance. As a result, the finished craft can be an impressive and beautiful gift for any holiday.
However, it is advisable to give such a product to an adult, because the eggshell is very fragile. Otherwise, the result of several hours of work can be ruined in a few seconds.
Video about eggshell carving