The "Confusion" pattern is not difficult knitting, as a detailed diagram helps beginner needlewomen understand the process of knitting various patterns. Such an ornament gives the finished fabric relief and volume.
Since ancient times, there has been a belief that a hand-knitted thing preserves the warmth of its creator, a piece of his soul, which cannot be bought for any money. Thanks to their knitting skills, young craftswomen who follow fashion can dress in charming, exquisite things, and will not be like others.
The exciting and calm activity of knitting has a beneficial effect on the psychological and physical health of the craftswoman:
- improves posture;
- distracts from the daily hustle and bustle;
- relaxes tense muscles;
- saves the budget, which is important.
Pattern Confusion knitting. Schemes and description for beginners.
The pattern of the knitting knot, schematically has many varieties of knitting. It is performed by alternating front and back loops. This type of knitting is often called pearl or rice knitting, because the result looks like mother-of-pearl jewelry or grains of a cereal plant.
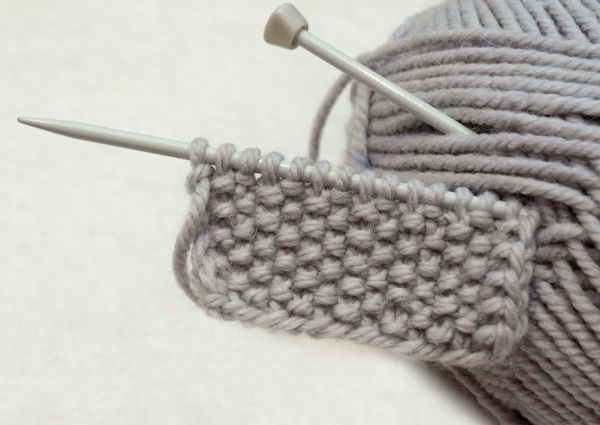
The fabric of the tangled weave is the same on both sides and has a fairly dense and textured structure., as a result of which it is used to strengthen stocking knitting, to align edges and to make pockets, collars and other individual details.
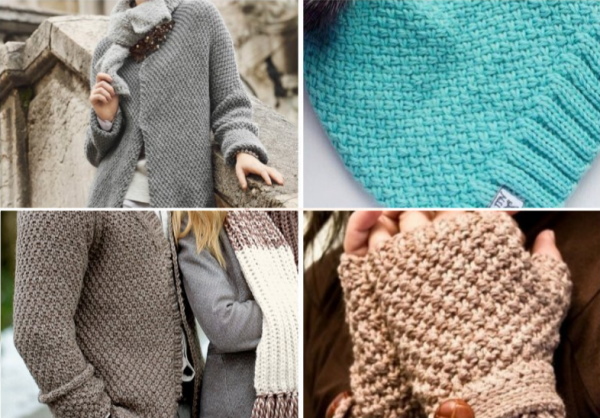
Lovely ladies who love needlework and have more than one knitted item in their wardrobe know about the role of ornaments in this type of applied art. With the help of a correctly selected pattern, you can add effect and piquancy to any, even the most uncomplicated creation. The pattern Confusion with knitting needles, schematically is one of the simplest, and at the same time, the drawing is beautiful in execution.
The diagram of the small confusion looks like this:
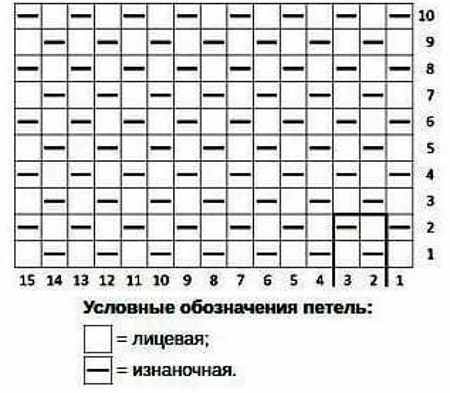
The pattern is easy to follow, it is always important to remember about the edge loops: remove the first one without knitting, knit the last one purlwise.
Then knit:
1 row: knit alternately: 1 front, 1 back.
2nd row: change the direction of knitting: knit purl stitches over the front loops and vice versa.
You don't even have to look at the diagram, analyze the product, and continue working until the desired dimensions. When performing a small tangle, it is impossible to get confused, it is better to learn to knit various patterns from it.
Pattern Confusion knitting in a circle
The Confusion pattern with knitting needles, the diagram of which is suitable for execution in a circle, used in the manufacture of socks, mittens and some other products.
The use of circular knitting has a special feature - in order not to get confused in the shifting of the pattern, the number of loops on the knitting needles should be odd. This small nuance will help to knit the necessary loops, looking at the work.
The pattern and its execution are the same as in the previous description, only when working in a circle, the edge loops are not knitted:
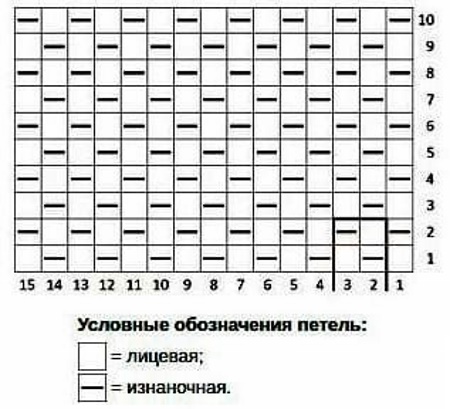
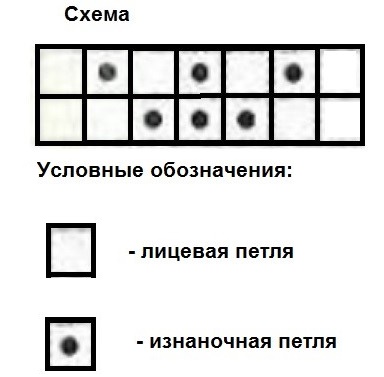
When using a large tangle, the fabric becomes more embossed, the pattern looks like oblong pebbles or grains, That's why it's called rice pattern.
The principle of this work is similar to the previous one, the only difference is that you need to shift the pattern through a row. The fabric is double-sided, so it is better to mark the front side with something. A pin or a contrasting thread will come in handy.
The scheme is very simple:
1st row: knit 1 knit, 1 purl to the end
2nd row: according to the pattern
3rd row: shift one loop: knit over purl, and vice versa
4th row: according to the pattern
Next you need to continue working, repeating 4 rows.
To make large rice, odd loops are cast on with circular knitting needles.
The diagram and the principle of its execution are similar to the previous description, without edge loops. It is imperative to leave a noticeable mark at the beginning of the work so as not to get confused with the shift, and the work will go more smoothly.
The rice pattern can be done in other ways. You can use larger elastic bands with alternation through 2 or 3 loops. The movement of the pattern is also done at your discretion: either in each or through a row. The result will be a different canvas.
Double-sided elastic band
Sometimes it is important that the knitting on the front and back looks the same. In this case, a good alternative would be to use pearl elastic. The result is a durable, soft and elastic creation. It is easy to stretch, but the shape is preserved. This pattern is great for knitting various items, such as scarves, snoods or hoods.
To make it, a regular elastic band and a tangled pattern are combined. It looks the same from the front side for knitting straight, turning rows and circular needles. The pattern is read taking into account the knitting method.
Description of the circuit implementation:
Knit what is inside the stars to the end of the row, not forgetting about the edge loops.
1st r: *k2, p3*
2nd row: * P1, K1 *
Continue to the desired size, repeating the pattern of two rows.
When working with circular knitting needles, the same pattern is used, only the second row is started with a front loop.
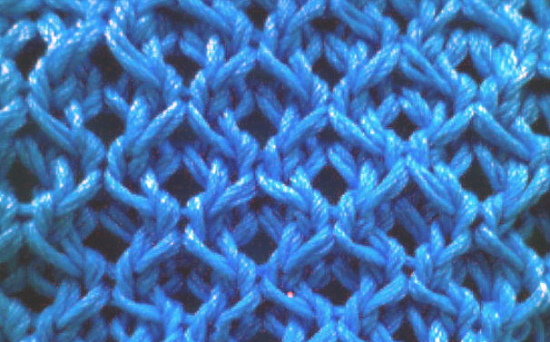
Pearl pattern with intertwined loops.
To make this pattern you will need an additional knitting needle. If you have a little skill, it is not difficult to make. The product made in this way looks chic, more voluminous than the previous patterns.
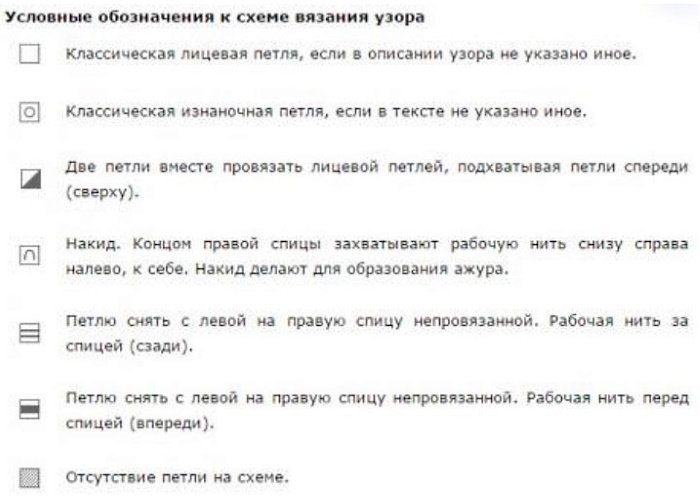
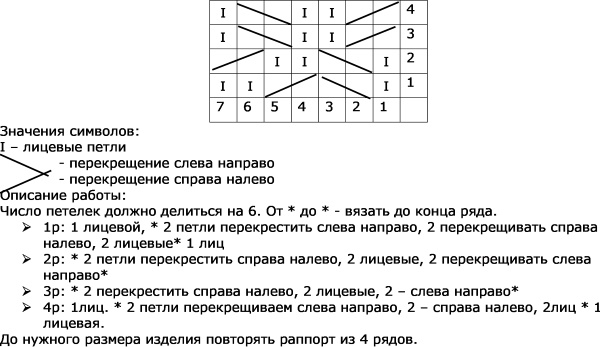
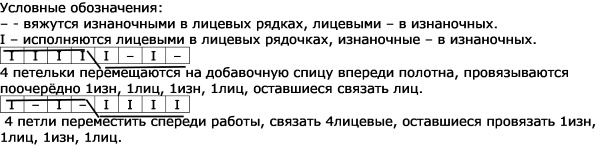
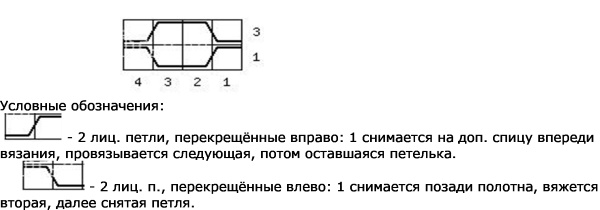
Meanings of symbols:
I – facial;
— – purl;
| — | — intertwined loops
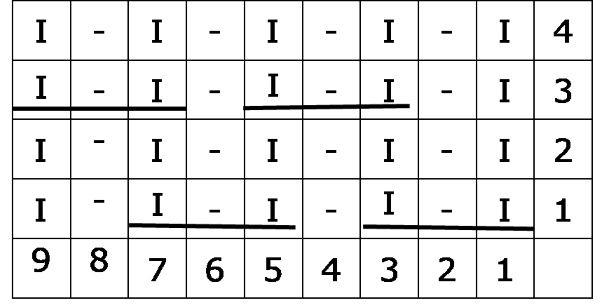
The main thing is to always remember about edge loops. Repeat from * to * until you reach the end of the loops in the row.
The work continues with a rapport of 3 rows.
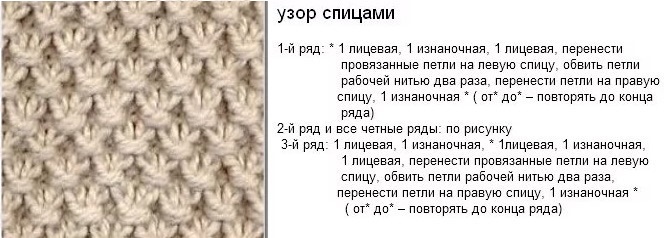
Pattern "Putanka with a yarn over"
The additional threads thrown over the knitting needle give the tangles, or pearl patterns, splendor. There are many versions of performing work with yarn overs. For example, the honeycomb pattern, which is basic for knitting many things.
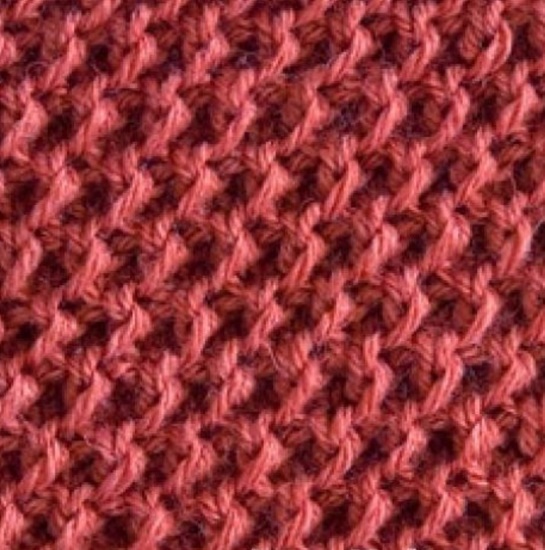
The fabric knitted with honeycombs with small cells is very similar to a rice pattern.
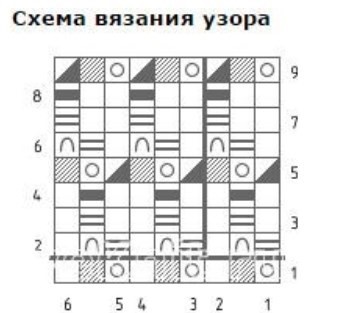
Description of working with the scheme:
As an axiom for making the outer loops: at the beginning of the work, remove the first one without knitting, knit the last one purlwise to align the edge of the fabric. What is inside the stars should be done until the end of the row.
Then:
- 1st row: * 1purl, 1k*
- 2 row: * Remove 1 loop without knitting, leaving the yarn at the back of the work, throw on an additional thread, 1 front. *
- 3rd row: * 1 knit, remove yarn over without knitting, thread at the back of the fabric, 1 knit. *
- 4 rows: * 1 purl, remove from yourself, yarn in front of work, 1 purl. *
- Row 5: * knit 2 loops together as if to knit, 1 purl. *
- Row 6: *yarn over, slip 1 stitch, purl 1.*
- 7th row: * 2 persons., remove yarn over knitted, yarn behind work*
- 8th row: * yarn over is removed away from you, thread in front of work, 2 purl.*
- Row 9: *1 out., 2 loops are knitted as 1 front.*
The further creation is repeated from the 2nd to the 9th rows.
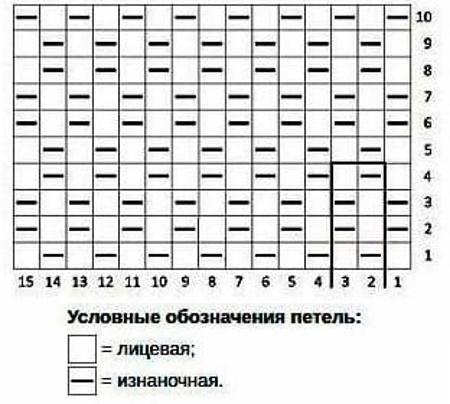
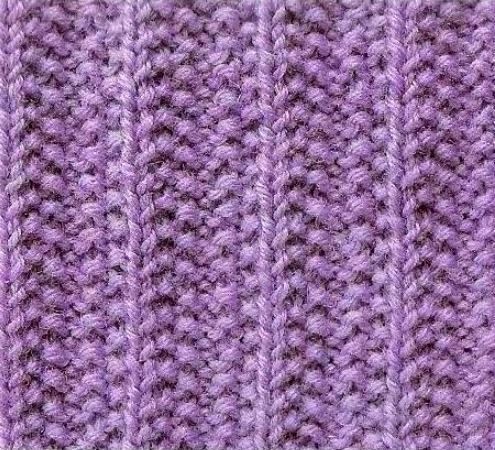
One-way elastic
Typically, the bottom edge of large items such as cardigans, sweaters, jumpers and coats begins with elastic, and it is also used to trim the cuffs of the sleeves and the neckline. In this case, you can try to link the following option:
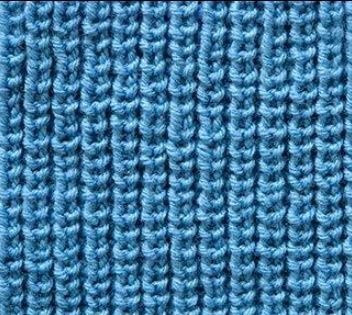
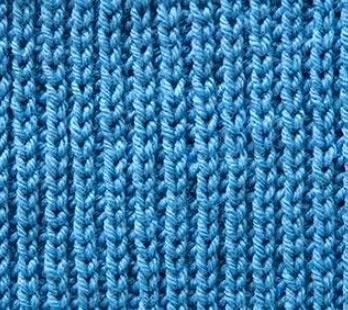
Unlike the previous patterns presented, this one looks different from the front and back. One direction of the fabric looks like an English rib, the second - like a tangle pattern.
One-way elastic pattern:
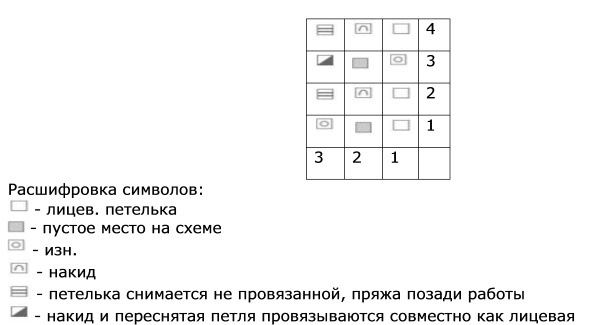
Description:
To complete the pattern, the required number of loops must be even. Then, what is inside the stars must be knitted to the end of the row, making sure to make edge loops.
- 1st row: in turn: 1 front, 1 back.
- 2nd row: *1 knit, slip 1 purl*
- 3rd row: * yarn over and slipped stitch knit together, 1 purl.*
- 4th row: like the second.
The work is repeated until the desired length is reached.
This pattern can be done with circular needles. The working algorithm is the same, an even number of loops, no edge loops:
- *1 knit, 1 purl*
- *thrown yarn over, 1 move, 1 purl*
- * yarn over and slipped stitch are knitted, 1 purl*.
Continue the pattern until the required fabric size is reached from the second row.
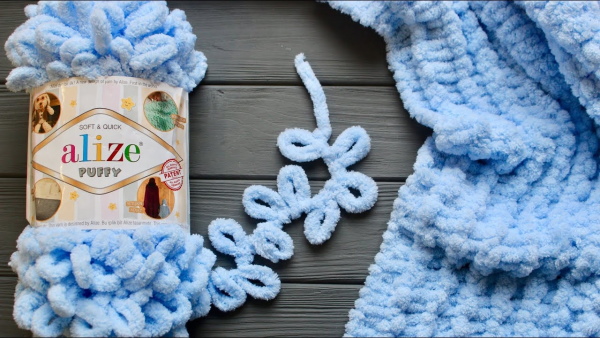
Pattern Confusion from Alize Puffy
Recently, products knitted from Turkish yarn Alize Puffy have become increasingly popular. These are soft plush threads made of 100% polyester with lush loops. Perfect for teaching handicrafts even to children.
When working with this yarn, you can even not use knitting needles or a crochet hook, just weave ready loops. Working with these threads is quick, interesting and safe, they are hypoallergenic.
This product has a wide color palette, including the fashionable ombre batik coloring, when in one skein there is a smooth transition from rich to light shades. The main thing to remember is that these are quite thick threads:
| Thread type | Length in 100 grams (meter) |
| Puffy | 9.2 |
| Puffy fine | 14 |
Therefore, it is better to buy more at once. Usually, stores offer packages of five 100-gram skeins, or there are spools weighing 500 grams on sale.
Home blankets, rugs and decorations made from Puffy Alize yarn will look impeccable and elegant. Things knitted from this yarn are voluminous, embossed and very fluffy, pleasant to the touch. When caring for them, washing will not harm, it will only give the products even more volume and softness.
Even the simplest satin stitch looks great in items made from these threads, and when combined with more complex patterns, items become spectacular and sophisticated.
Pattern diagram and description:

The pearl pattern of Alize Puffy gives the knitted items together with the relief a sense of mystery and romanticism. A soft, elegant and cozy blanket made with a large tangle will warm you up on cold evenings. Fluffy mittens made in the same technique will not let your delicate hands freeze even in the most severe frosts. A hat made with a pearl pattern will not only warm you up, but also add a touch of mischief, playfulness and femininity to your image.
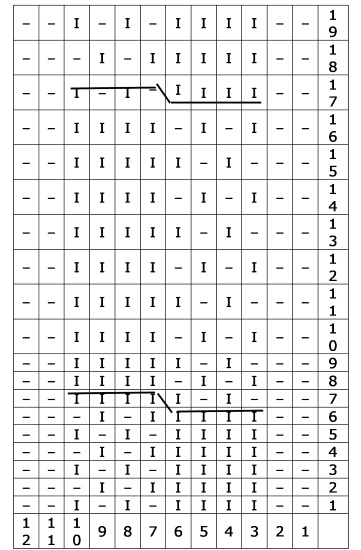
Pearl pattern with aran
Knitting with Aran was used in ancient Ireland, a country with a harsh climate. Fishermen wore sweaters with their own unique pattern, and in case of death, they were identified only by these patterns.
It is better to master this type of knitting with a simple and beautiful aran, which consists of truncated diamonds with a pearl pattern inside.
The diagram shows odd rows, even rows are knitted according to the pattern. The pattern rapport consists of 13 loops and 12 rows.
Having mastered simple patterns, you can move on to more intricate designs that will delight the eye with the beauty of intricate interweaving.
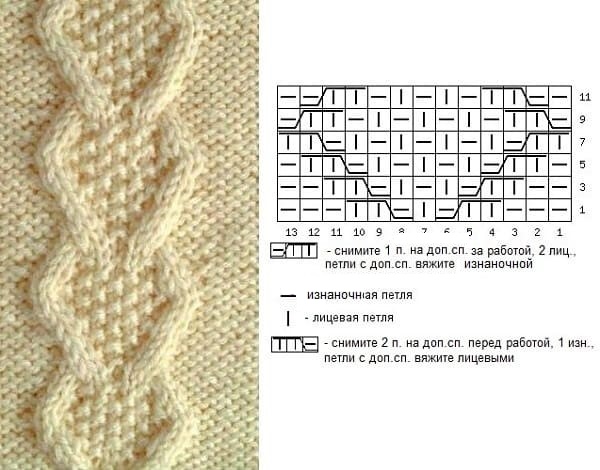
Pearl pattern with braids
Finished products are decorated by adding a pattern of braids or cords to the knitted fabric.
There are many known variations of these patterns: from the simplest interlacing of two loops for inexperienced needlewomen to voluminous and complex braids of any number of loops for masters of their craft.
An interesting figure - a pearl braid will add originality to the fabric, even a beginner knitter can do it.

Drawing diagram:
For the sample, 14 loops are cast on: 8 for the braid plus 2 on each side for the background and edges. The pattern is not complicated, but at first you will have to look at the diagram often, then it will become easier to work.
Procedure:
Always do edge stitches at the beginning and end of a row. Abbreviations: L – front loop, I – back loop.
- 1st row: 2I, 4L, 1I, 1L, 1I, 1L, 2I;
- 2p.: 3L, 1I, 1L, 5I, 2L;
- 3rd row: similar to 1st row;
- 4p.: similar to 2p.;
- 5p.: similar to 1p.;
- 6th row: similar to 2nd row;
- 7th row: 2I, 8 loops are crossed to the left side: move 4 loops to an additional knitting needle at the front of the work, knit 1I, 1L, 1I, 1L, knit the remaining ones, 2I;
- 8p.: 2L, 4I, 1L, 1I, 1L, 1I, 2L;
- 9p.: 3I, 1L, 1I, 5L, 2I;
- 10 rubles: 2L, 4I, 1L, 1I, 1L, 1I, 2L;
- 11,13 and 15p.: like 9p.;
- 12,14 and 16p.: like 10p.
- 17th row: 2I, cross 8 loops to the left: transfer 4 loops to an additional knitting needle at the front of the knitting, 4L, the remaining ones are 1I, 1L, 1I, 1L;
- 18r.: 3L, 1I, 1L, 5I, 2L;
- 19r.: 2I, 4L, 1I, 1L, 1I, 1L, 2I;
- 20p.: like 18p.
Once you gain experience, you can do more complex braids.
Pearl pattern with holes
To obtain voluminous and at the same time delicate items, a pearl pattern with holes is used.The intricate interweaving of threads gives the finished products volume and beauty.
It is not difficult at all to master this drawing.
Its diagram looks like this:
For this pattern, the number of loops is divisible by 4.
Job Description:
Don't forget about the edge loops at the beginning and end of the row. Knit what is inside the stars to the end of the row.
- 1st row: * cross 2 loops to the right, 2 to the left*;
- 2p: all loops purl;
- 3rd row: * cross 2 loops to the left, 2 to the right*;
- 4p: like 2p;
The pattern rapport consists of 4 loops and 3 rows. Then repeat the work until the required fabric size.
Mittens Confusion Pattern with Knitting Needles
The tangled stitch is the simplest and most popular pattern for knitting mittens. It makes this wardrobe item look thick and voluminous, giving them a fun look without reducing their comfort.
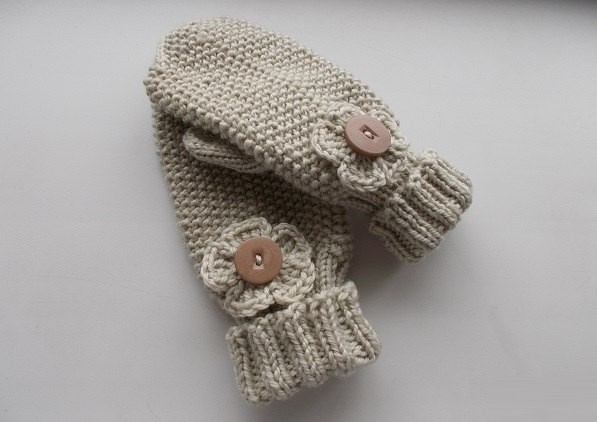
For mittens, it is better to use fine or coarse rice tangle.
Pearl pattern for hat
To knit berets, caps and hats, the pearl pattern opens up a vast space for the craftswoman's imagination. Everything depends on the thickness of the chosen yarn.
 You can link:
- a thick fluffy hat made of Alize Puffy;
- completely pearl pattern;
- elastic band, then move on to tangling;
- make the elastic band with pearls, and then move on to another pattern;
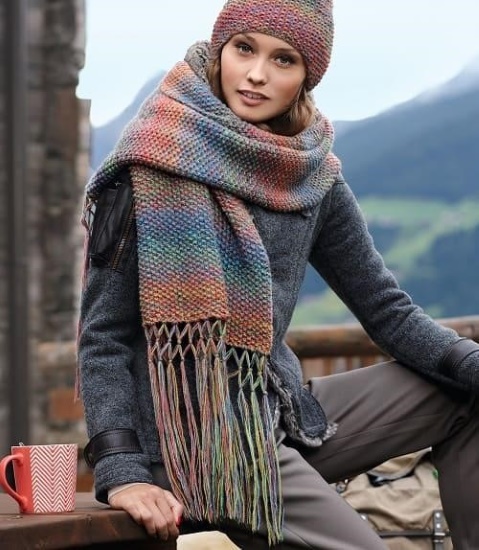
Pearl pattern for snood
A snood is a practical, warm and beautiful item. The classic model of this product is a long and wide closed scarf that drapes well. It can be knitted from various types of yarn.
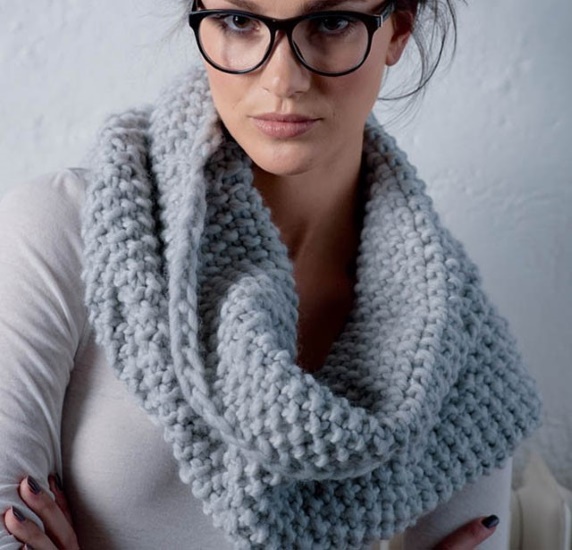
The pearl pattern is ideal for knitting snoods, the large and textured design decorates the face.
It can be worn as:
- collar-yoke;
- scarf;
- a headdress that won't ruin your hairstyle;
- as various wardrobe items;
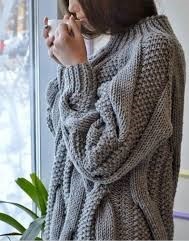
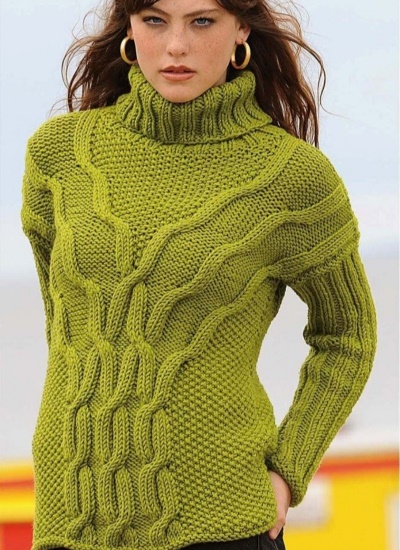
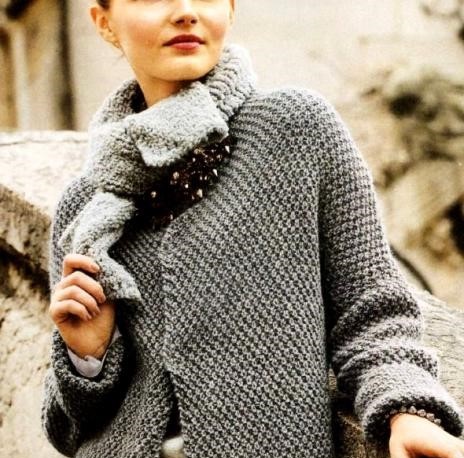
Pearl pattern for sweater (cardigan)
Especially elegant and charming are sweaters, cardigans and coats made using pearl knitting patterns. Large outerwear looks good, completely knitted with a tangle, or in combination with braids, plaits or arans.

Baby booties made using this pattern look very good, and they can be used to decorate socks, gloves and other items of clothing.
The use of tangle patterns knitted with knitting needles is successfully combined with many knitting patterns. Beautiful and textured things made with your own hands will give warmth, comfort and charm for many years.
Author of the article: Lily
Video on the topic: "Confusion" pattern with knitting needles
Knitting pattern "Confusion" - master class:
The tangle pattern is one of my favorites.