Smeshariki, like many other figures from modern cartoons, can be easily mold from plasticine It can be done on a sheet of cardboard (flat figures), in the form of three-dimensional figures and using additional objects, if you use the step-by-step instructions offered in the master classes.
The process of modeling is quite monotonous, and to make it interesting for the child, teachers choose stories or characters that are familiar and loved by children, whom they see almost every day.
Despite the simplicity of the event, in order for modeling with children to be successful, it is necessary not only to organize the process correctly, but also to prepare all the necessary materials and tools in advance. This will help not to be distracted during the work and to do everything in the best possible way.
Tools for modeling with children
It is easier to sculpt from plasticine if you use the necessary tool. The market offers a large number of different tools, both in sets and for individual sale.
Simple modeling kit
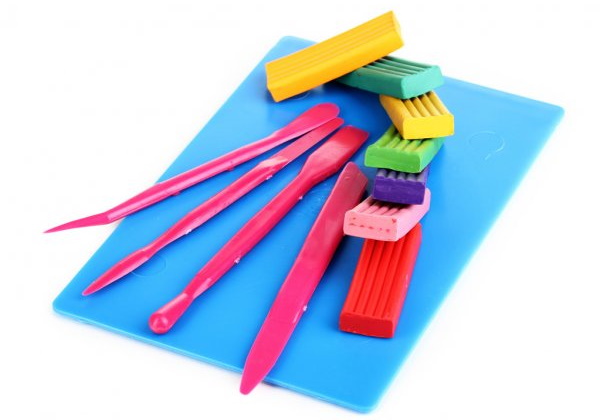
The standard set for working with plasticine includes the following tools:
- A small board or piece of plastic.
- Stacks of various shapes.
- A small rolling pin or other cylindrical object.
- Toothpicks, matches or similar wooden sticks.
- Various types of molds.
- Additional decorative elements.
- Soft cloth or napkins.
A small board, a piece of linoleum, a piece of plywood or fiberboard are needed to use them as a work table. The material for such use must be selected so that its surface is as smooth as possible. A smooth surface does not distort the figure molded by the author, since the plasticine almost does not stick to it.
The second necessary tool, stacks, helps to mold Smeshariki from plasticine step by step. Stacks are small plastic knives that help to cut off the required amount of plasticine and are used to create some characteristic shapes: dents, waves, protrusions.
A small rolling pin, a small piece of polyethylene pipe of small length and diameter, and another cylindrical object will help the child easily roll out a piece of plasticine into a flat blank.
Toothpicks, matches, slightly pointed wooden sticks with thin ends will help when working with small thin fragments of plasticine. They are indispensable when creating flat figures on cardboard.
Small molds or moulds are not a necessary tool, but they are very helpful if the author intends to sculpt a figure with the most precise dimensions or a figure with the correct geometry.
Additional decorative elements can be: beads, wire, threads, foil.
Soft rags or wipes are necessary for cleaning the surface during and after work. Another use is to clean the master's hands and tools.
Smeshariki made of plasticine on cardboard
It is not difficult to mold smeshariki from plasticine step by step, if you rely on the proposed instructions. The work will be in the form of a picture from plasticine on cardboard, on the theme of modeling Barash and Nyusha.
Necessary tools and materials:
- plasticine;
- modeling board;
- stack;
- a thick blunt needle or toothpick;
- a sheet of thick cardboard;
- two sheets of craft paper in different colors;
- small scissors;
- paper knife;
- PVA glue or other paper glue.
Note: If the work is to be performed by a child, it must be carried out under adult supervision, because sharp objects are used in the process.
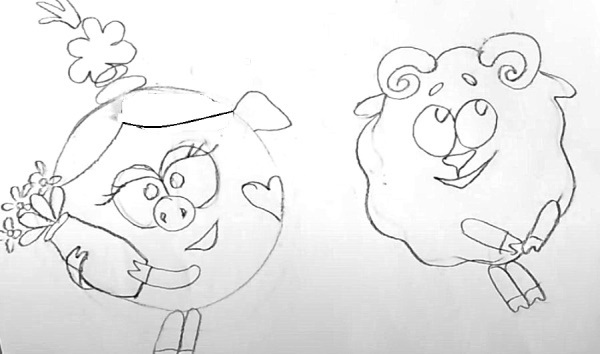
It is much easier to mold Smeshariki from plasticine if you first draw them with a pencil on a piece of paper. Such a sketch will be a kind of blank - a model.
The sculpting process itself looks something like this:
- Draw the plot on cardboard with a pencil (Fig. 1).
After creating the drawing, it is necessary to select the corresponding colors of plasticine for the characters of the picture. The colors of plasticine used in the work are summarized in the table.
| Object in the painting | Colors of plasticine |
| Nyusha | Pink, burgundy, purple, white, black, green, yellow. |
| Barash | Purple, blue, pink, black, white. |
| Field | Dark green, green, yellow, brown, orange, purple. |
| Clouds | Blue, brown, orange. |
| Hearts | Orange. |
To work, it is necessary to cut the plasticine into small pieces, which are subsequently rolled into thin sausages. The thickness of each of them is determined by the principle: the thinner, the better. The length is selected based on the place where it will be laid and the convenience of work. The thinner each sausage is rolled, the more beautiful the resulting picture will be.
- Laying out plasticine sausages along the contours of the drawing and filling the internal surfaces with them.
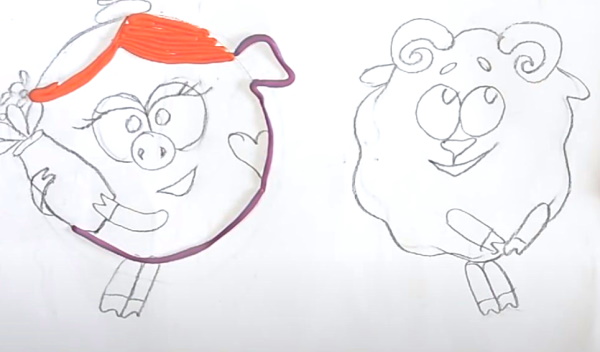
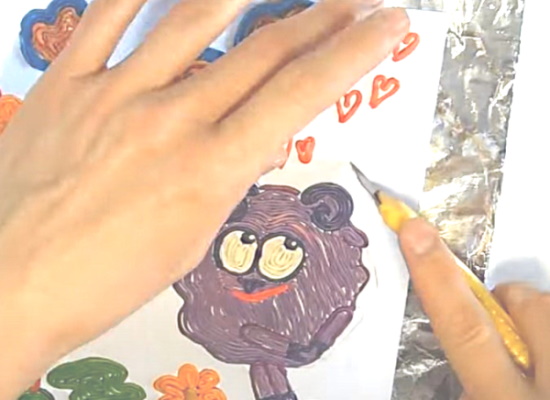
Start working with the outline of Nyusha’s body and making her hairstyle (Fig. 2).
Laying out the outlines of a drawing with plasticine sausages (rollers) is a simple process, accessible to a small author. Working on such a drawing helps a child develop perseverance, attentiveness, persistence, and develops fine motor skills of the hands.
A wooden stick or toothpick will make the job easier. This is clearly visible on Nyusha's head - the first sausage on the left side of her hairdo was laid with the help of a stick. The thin plasticine roll was first laid along the drawn line, then the tip of the stick was placed in the outer line of the head contour and the sausage was turned around it.
The next roll is placed from the end of the previous one close to the first one and is turned at the opposite end, which is clearly visible on the right side of the hairstyle.
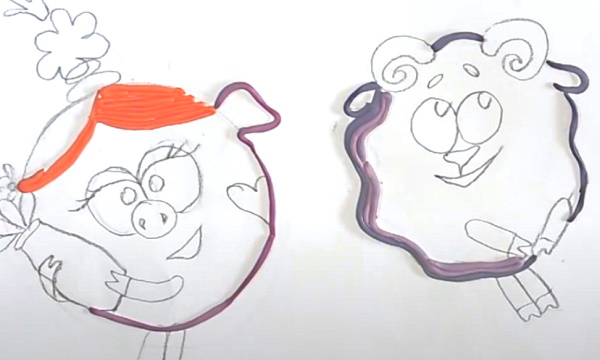
An example of laying out the sausages of the Barash contour (Fig. 3).
- The background details of the picture are drawn with a marker: a field, clouds and hearts. After finishing the work on creating the figures of Smeshariki, it is necessary to draw the background images with a marker or felt-tip pen: flowers and grass on the field, clouds in the sky and flying hearts.
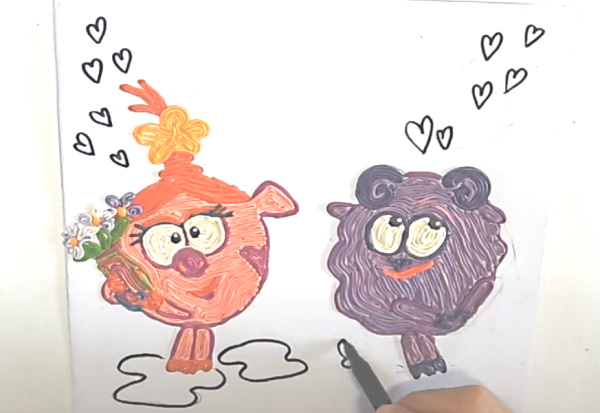
Drawing the background (Fig. 4).
After drawing the background, they start laying out the rolling again. Now they lay out the outlines of the background drawings with sausages. After laying out the outlines of the field background (flowers and grass), their inner parts are filled with sausages.
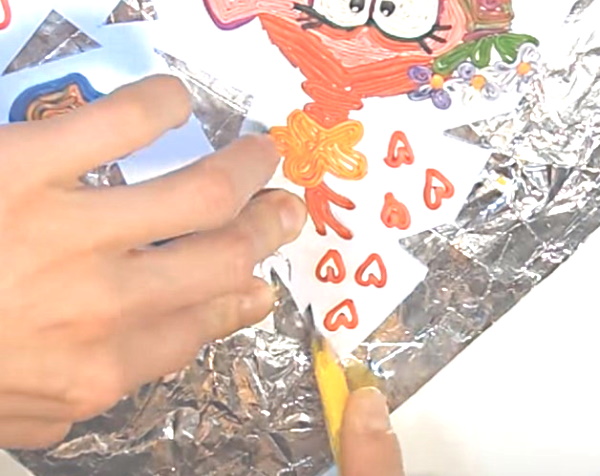
Clouds are made in the same way, and only the outlines of the hearts are left. When working with hearts, you need to remember that if the length of the sausage is longer than the perimeter of the heart, then the excess plasticine is carefully cut off with small scissors.
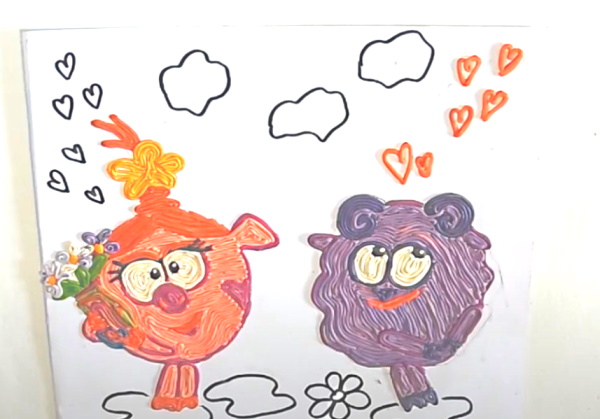
Making hearts (Fig. 5).
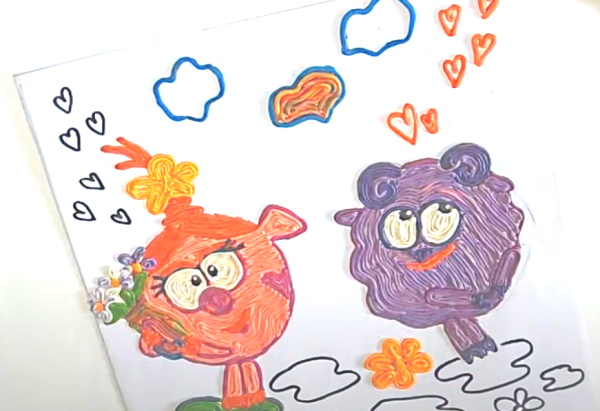
Making clouds and flowers (Fig. 6).
After finishing the work on creating the drawing, they begin to design the work. Design consists of cutting off excess parts of cardboard, selecting and gluing a common background substrate and making a frame.
- Cut off excess cardboard (Fig. 7).
The finished painting is placed on a modeling board or other work table, after placing a sheet of foil between the painting and the table. This backing is needed to better see the resulting contour of the cut-out area.
After the straight lines (triangles) have been cut out, their edges are trimmed with curly lines.
- Figured pruning (Fig. 8).
The curly lines of the final cut give the painting a more artistic look than straight lines.
- Selection of the general background (Fig. 9).

Having selected the necessary background color, the processed picture is placed on a sheet of paper of this color, its location is marked with inconspicuous lines or dots, and the picture is removed from the background. Having carefully turned the picture over, a thin layer of paper glue is applied to the back side, and it is placed on the background sheet according to the marks applied.
- The final step is gluing the frame (Fig. 10).
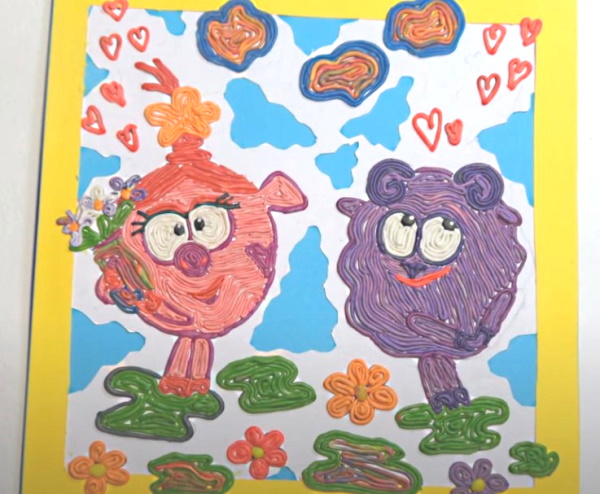
Having chosen the frame color, on a sheet of paper of this color, draw the contour lines. The outer size of the frame should match the size of the painting. The inner dimensions are made as follows: from the upper, left and right edges, step down 1 cm. The lower edge of the frame can be made 7-8 cm wide, which will allow leaving space for some inscription.
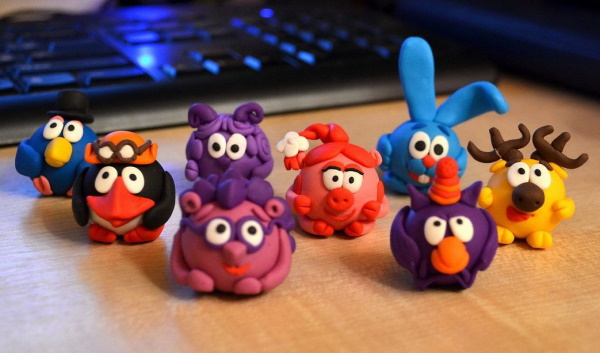
Volumetric figures of Smeshariki made of plasticine
You can mold Smeshariki from plasticine step by step not only by making flat pictures on cardboard, but also by making volumetric figures. Modeling such figures is no less interesting and more free in choosing sizes. The development of spatial thinking is another plus obtained from such work.
Hedgehog
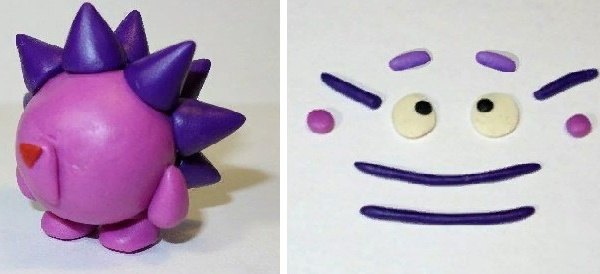
- The modeling of the Hedgehog begins with rolling a large ball of plasticine, which will be the body. From pieces of plasticine of appropriate sizes, arms and legs are made and glued in place.

Sculpting the head, arms and legs of the Hedgehog (Fig. 11).
- From blue plasticine, mold the Hedgehog's cone-shaped needles of the appropriate size and quantity. Glue the needles evenly into place.

Hedgehog needles (Fig. 12).
- The next step is to make additional parts: two red triangles for the nose and the tip of the tail, the tail itself in the form of a flat rectangle. Make two small balls and two small sausages of the same color as the body for the ears and eyebrows, two small white circles for the eyes.
Two small black balls will represent the pupils of the eyes. Two short blue sausages are the temples of the glasses, and two long rolls are bent into rings to create the lenses of these glasses.
- Gluing the tail. Additional details (Fig. 13).
Before gluing on additional details, draw a mouth on the Hedgehog using a stack or a toothpick.
The finished Hedgehog looks exactly like in the cartoon (Fig. 14).
The production of the Hedgehog is complete.
Kopatych
The Smeshariki figurine of Kopatych is made according to the same scheme as the Hedgehog figurine: a large ball is rolled out for the body, and Kopatych's arms and legs, made from 4 sausages, are attached to it. Kopatych's head is covered with a hat made from two flat circles. The thinner and wider circle depicts the brim of the hat, and the thicker, but smaller in diameter, the hat itself.
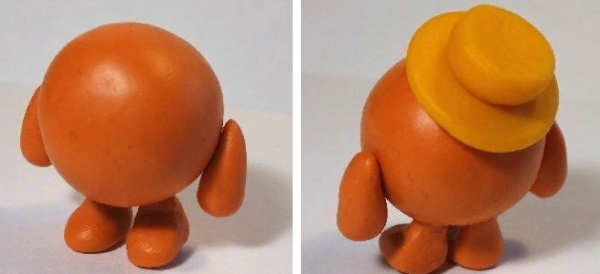
Beginning of Kopatych assembly (Fig. 15).
After gluing the hat, roll a medium-sized ball and glue it in place of Kopatych's tail. Make four more balls of this color - two large ones for the cheeks and two small ones for the ears.
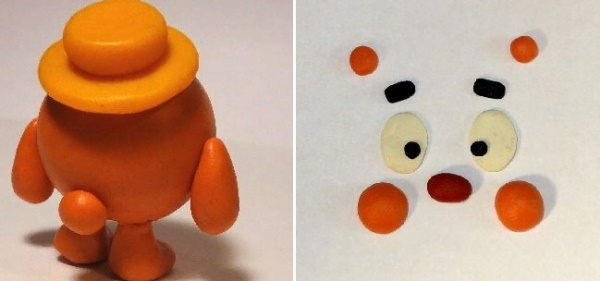
Tail and other additional details (Fig. 16).
Two white circles are made for the eyes, small black balls are for the pupils. Two small black sausages are Kopatych's eyebrows, and a brown sausage in the shape of a potato is the nose.
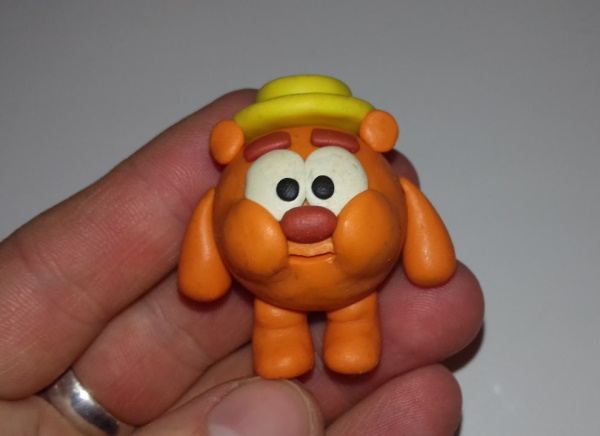
Ready Kopatych (Fig. 17).
To finish the work, just like with the Hedgehog, Kopatych's mouth is drawn with a stack. The outline of Kopatych's mouth should not be overly joyful, because, as is known, this hero is usually dissatisfied with something or does not understand something.
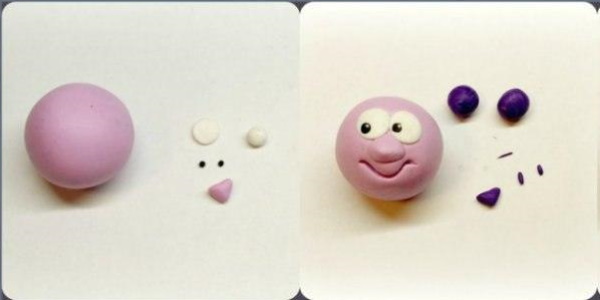
Losyash
The method of creating Losyash from plasticine is the same as for Hedgehog and Kopatych. Roll out a large ball of plasticine of the chosen colour – Losyash’s body.
- Having molded two medium balls from white plasticine, they are slightly flattened and attached to the body – these are the eyes. From the brown mass, a triangular sausage is made in the form of a nose and attached in place.
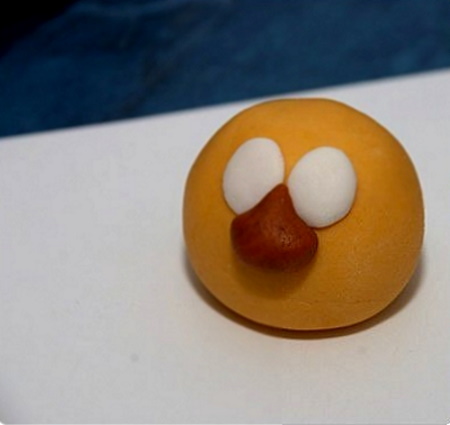
Body, eyes and nose of Losyash (Fig. 18).
- Roll out two small balls of black plasticine and make pupils, gluing the black balls closer to the nose onto the eyes. Make two thin sausages of plasticine of the same color as Losyash's body and glue them, adjusting them with a stack, above the eyes - eyebrows are formed. Make nostrils with a stack.
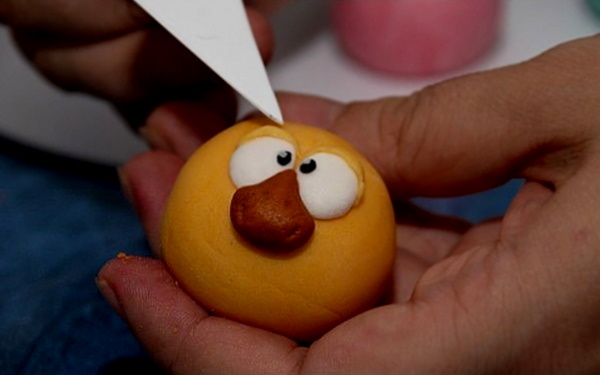
Making pupils and eyebrows (Fig. 19).
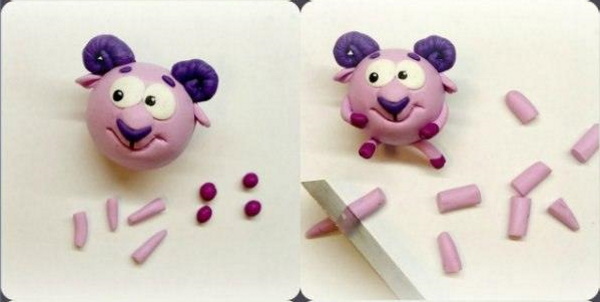
- Brown plasticine is selected for making horns. They are formed in the form of 4 sausages of the required size, which are then glued together in the form of the letter "Щ". The finished horns are glued to the head, turned in opposite directions, with the sausage that depicts the "tail" of the letter.
- From the main color plasticine, make figures of legs in the form of hearts, and handles in the form of even short sausages. On one side of each sausage-handle, make a dent with a stack, depicting Losyash's hoof. The mouth is made from a small sausage of the same color as the nose.
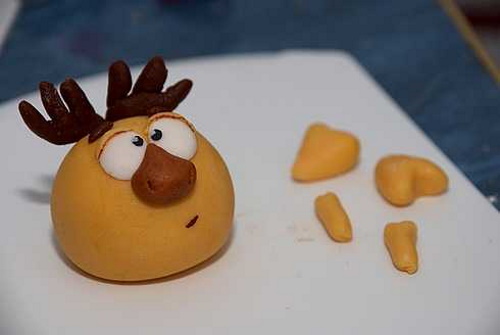
Horns, legs and arms of Losyash (Fig. 20).
- Having glued all the parts into place, we get the final result – the Losyash figure is ready.
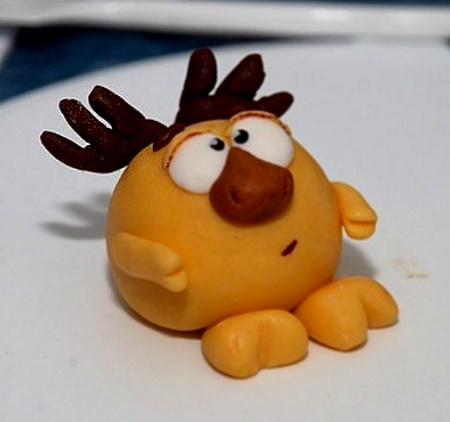
Ready Losyash (Fig. 21).
Nyusha
The process of making the Nyusha figurine is a little more complicated, but the technique is the same.
- The first step is to roll a large ball for Nyusha's body, two white circles for the eyes, and a pink, slightly flattened ball for her snout. Finish the snout by pressing two dents with a stack to represent the nostrils.

Head, eyes and nose (Fig. 22).
- Pupils are made from small balls of black plasticine. Eyebrows are made from uneven sausages (the middle of the sausage is thicker, the edges are thinner). Using a stack, thin sausages are glued on to represent eyelashes.
Creating Nyusha's face (Fig. 23).
- Roll out 2 round pancakes from the plasticine chosen for making the hairstyle and glue them symmetrically onto the head. Make 4 balls of the same color of the appropriate size, with each subsequent ball being slightly larger than the previous one.
To create a braid, slightly flatten the two largest balls, gather them together with the rest and stick them to the point where the round hairdos meet.
Hairstyle (Fig. 24).
- A small circle is made from white plasticine, on which a stack is used to divide it into 4 equal parts - this is Nyusha's bow. Having made several thin sausages, they are glued together with one edge into a single whole. The resulting tail is glued to the main braid and its creation is completed by attaching a bow.
Bow and tail of the braid (Fig. 25).
- Make 4 uniform short sausages and add hooves from plasticine of a different color to them.
Nyusha's arms and legs (Fig. 26).
- Having attached the arms and legs in place, they add a mouth by gluing on a sausage representing it. The figure is ready.
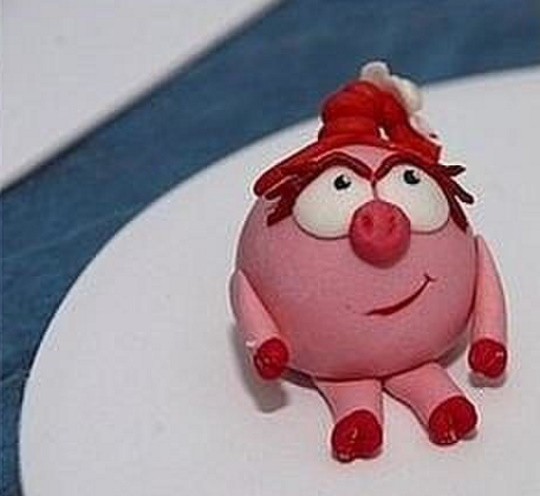
The finished Nyusha should smile naively, as always 😉 (Fig. 27).
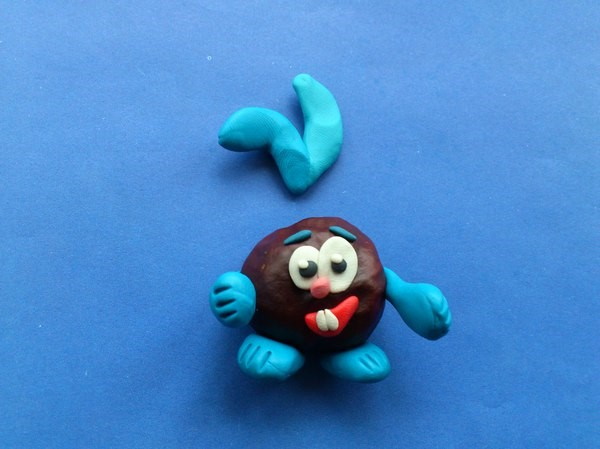
Krosh
- The Krosh figurine also starts with a large ball of plasticine of the desired color. After creating the body, mold 2 teardrop-shaped sausages for the nose, 2 medium white balls for the eyes and 2 small rectangles for the teeth. The balls for the eyes are flattened into circles and glued to the body tightly to each other.
- Under them, having connected both sausages with their large sides, glue the nose. Having glued two white rectangles under the nose, make teeth for Krosh. From plasticine of the same color as the body, roll 4 short sausages, with a thickening at one end, for the arms and legs. Ears are made from long sausages of the same color and shape.
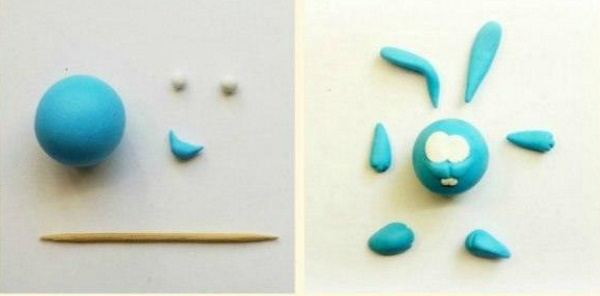
Beginning of sculpting Krosh (Fig. 28).
- A small pink plasticine ball is used to attach the nose, two thin sausages are used to highlight the eyebrows, and black balls are used to make the pupils. Krosh's arms, legs, and ears are glued into place.

Sculpting the eyebrows and nose (Fig. 29).
- The final stage of sculpting Krosh will be the creation of his ball. Roll a round brown ball, glue thin strips of black onto it and place it under Krosh's arm. Roll out the white ball and flatten it, then stick on the tail.
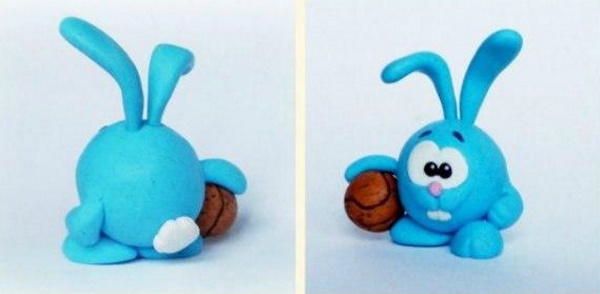
Ball and tail (Fig. 30).
Smesharik the rabbit - Krosh is ready.
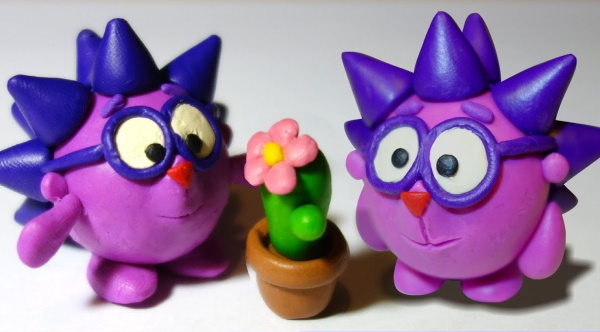
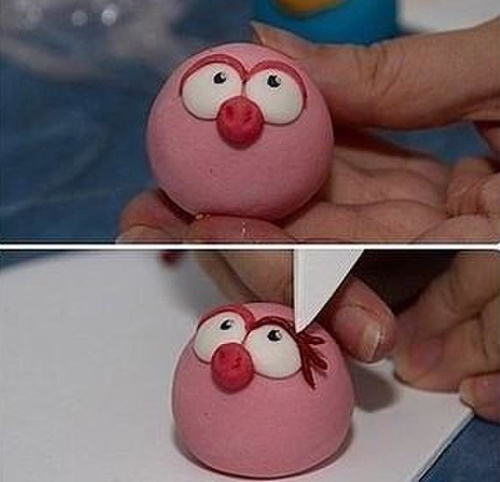
Owl
- By rolling out a ball of the chosen color and the required size from plasticine, you get the body of the Owl.
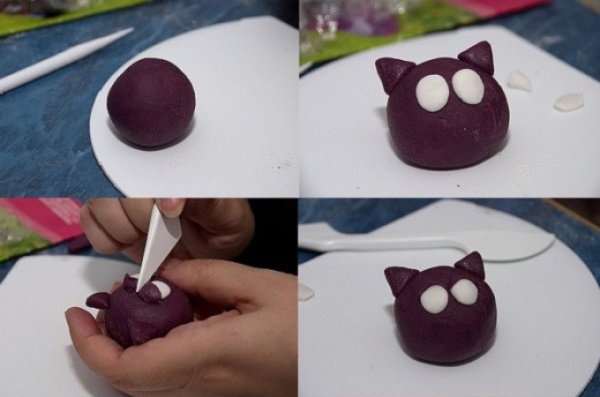
Initial stage of modeling (Fig. 31).
- From the plasticine used for the body, triangles are made, which are attached to the body - these are the ears of the Owl. Eyes are made from white circles, and a small ball is attached between them. By dividing the ball in half with a stack, but not completely, you get a beak.
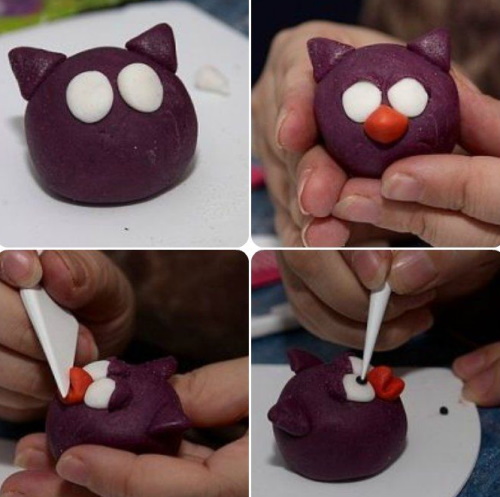
Eyes, ears and beak (Fig. 32).
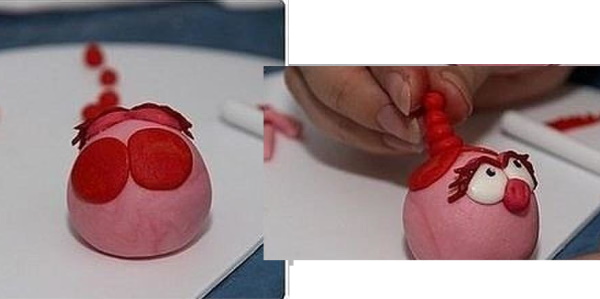
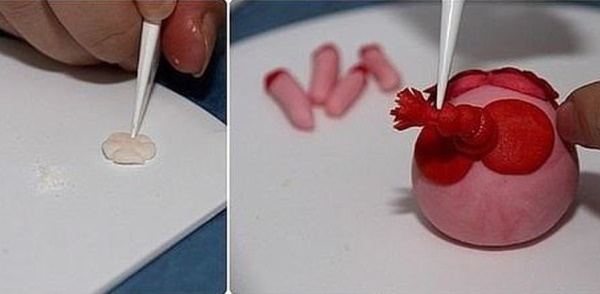
- Roll small black balls to make pupils. Small black sausages, divided at one end into three separate branches, represent paws.
Pupils and paws (Fig. 33).
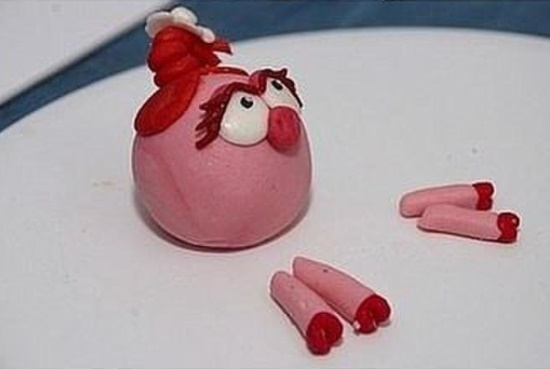
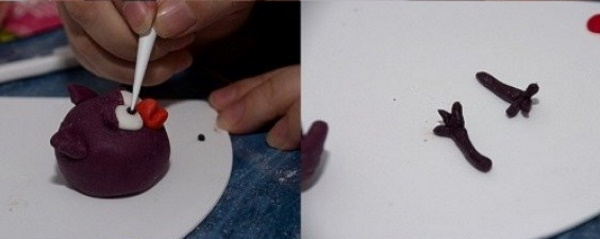
- From two flat triangular plates with rounded corners, make the wings. They are attached to the body with the narrow side. On the wide part, notches are made with a stack, depicting feathers. At the last stage, a braid is glued between the ears, made of two or three small balls, glued together.

Wings and braid of Owl (Fig. 34).
The figure of Sovunya is ready.
Barash
Sculpting the figure of Barash is the most difficult process. The difficulties lie in the horns, which are rolled from conical sausages and attached with the thick part, already rolled up, to Barash's head.
The modeling begins with rolling a large ball – the body. White circles are attached to it - eyes, a pink triangle - a nose, and small black balls - pupils. The mouth is pressed with a stack, and sausages of a different color are used to depict nostrils and eyebrows.
The initial stage of sculpting Barash (Fig. 35).
Having molded two small triangles, they make Barash's ears, from 4 thin sausages they mold the legs, from small pieces of sausages of a different color they create hooves. The wool is depicted as balls of different sizes, glued to Barash's body on all sides, except the front side.
Ears, legs and fur (Fig. 36).
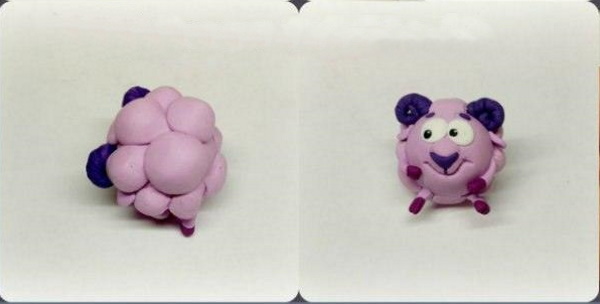
The figure of Barash is ready (Fig. 37).
Smeshariki made from plasticine and pine cones, chestnuts
You can mold smeshariki step by step not only from one plasticine, but also using some ready-made objects as additional material. Chestnuts and other nuts can be used as the body of the smeshariki, and everything else can be molded from plasticine.
Crumble using chestnut (Fig. 38).
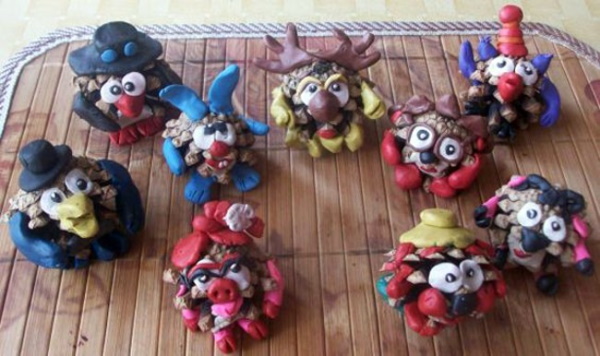
The pine cone, as an additional natural material, is also used as the body of the smesharik.
Using a pine cone as the body of Smeshariki and adding other body parts from plasticine, you can mold any of the Smeshariki. They will look unusual, but, as an option, you can use such elements as chestnuts or pine cones in modeling with children. This will make the modeling even more unusual and interesting for children.
Video about Smeshariki from plasticine
Master class on modeling Smeshariki from plasticine: