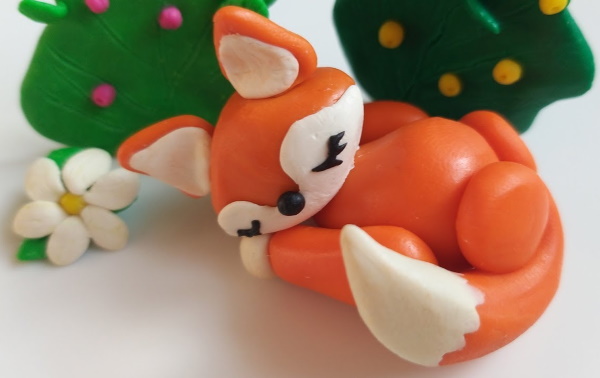
Watching cartoons based on folk tales with a fox will be a good way to get inspired modeling from plasticine this character. If the lesson is planned with a child, it is better to strictly adhere to the step-by-step work.
Tools and materials for modeling
Before starting sculpting, it is necessary to prepare materials and tools, namely:
- Orange plasticine, as well as small pieces of brown, white and black. This will be the main material.
- Wooden board, it can be replaced with paper or PVC.
- A stack that will be needed to work with small elements of the figure. If necessary, it can be replaced with a toothpick.
- Matches as additional fasteners. They are necessary to achieve a stronger connection of parts.
- Handy items for decoration or as main elements. These can be nutshells, acorns, cones.
Beginners will also need a visual example:
- finished fox figure;
- character image;
- text instruction.
Stages of modeling a fox from plasticine
The plasticine fox is made step by step after preparing the materials and tools.
The work takes place in the following stages:
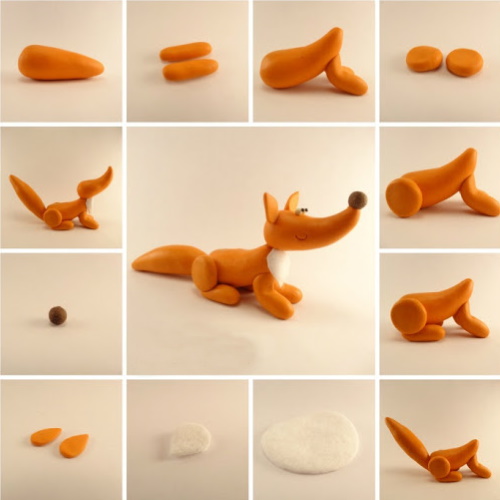
- Take pieces of orange and white plasticine. The latter should be about 3 times smaller.
- Mix the colors to create a muted yellowish hue.
- From the resulting mixture, mold the head. Its base will be a ball.
- Attach upward-pointing ears to the head, molded from the same piece of plasticine with a muted yellowish color. When connecting, carefully smooth out the joints between the fastened elements.
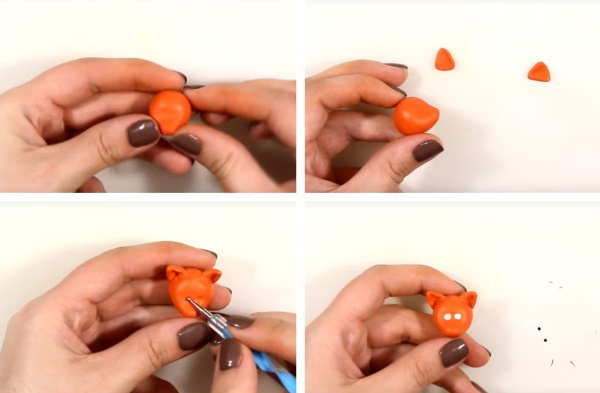
- Make the fox's nose. You will need the same mixture for this. The amount is about the same as for making the ears. Having molded a cone from the piece taken, attach it to the front part of the head, carefully smooth out the resulting unevenness.
- On the fox's muzzle, mold a mouth. To do this, pinch off a small piece from the main mixture, shape it into a ball, and then flatten it.
- Attach the mouth to the base of the nose.
- Lower the lower part of the mouth slightly to create a smile.
- Make a cut for the mouth. This can be done with a toothpick or a stack, depending on what was prepared before work.
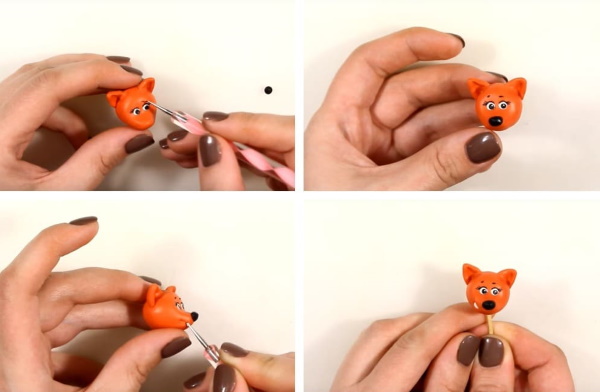
- Make eyes. For this, use a little white plasticine and even less gray. First, attach 2 white circles to the upper part of the face, and then make inclusions from black material. If you want the fox to have non-black pupils, take blue and make inclusions from it.
- After making the eyes, add a few more elements to the face: slanted eyebrows in black and the tip of the nose, which should be slightly raised upwards.
- Point the ears. Their tips can be made black.
- From the remaining light yellow mixture, make the body, limbs and tail.
- Since this fox is cartoonish, it wears clothes. To make them, a mixture of red and yellow pieces is used. The result of mixing is a bright orange mass.
- Make a jacket out of it and then dress the character in it.
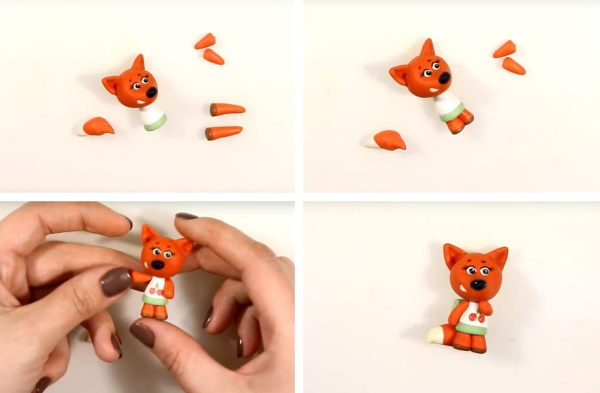
- Make pants from the bright orange mixture.
- After putting on the pants, attach the feet to the lower part of the legs using the same color material that was used to make the majority of the fox's body.
- Fasten all body parts together, giving them the appropriate shapes and carefully smoothing out all joints.
- Use white plasticine to decorate the tip of the tail.
Plasticine fox on paper
It is not necessary to make a three-dimensional figure from plasticine. You can make a flat fox by attaching the necessary elements to a sheet of paper.
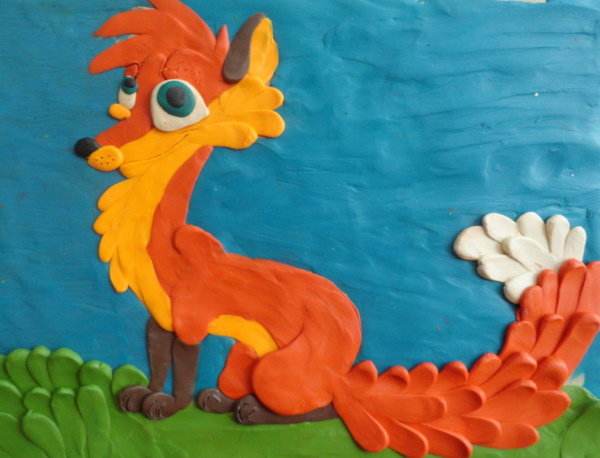
In this case, the plasticine fox will be made step by step as follows:
| No. | Stage | Description |
| 1 | Making the face | It is made of orange plasticine and a nose from a black piece. The muzzle should have an elongated shape, which is tapered at one end. A black nose is attached to it. |
| 2 | Making ears | The ears are made from black pieces of plasticine. First, you need to roll each of them into a sausage shape, and then give it a triangular shape. Both ears are attached to the top of the head. |
| 3 | Making the body and tail | For this, use 2 orange pieces and 1 white piece. Each of them is rolled into a sausage. The body should be slightly curved in the middle, and the tail should be symmetrically narrowed at both ends. The white sausage should be completely flattened and attached to the end of the tail. |
| 4 | Working with limbs | You need to roll 4 orange sausages of the same size and the same number of small white balls, each of which will be attached to the lower ends of the paws. |
| 5 | Combine the parts | All the parts are placed on paper and connected to each other. A white circle must be attached to the body between the front legs and the head, which will act as the abdomen. |
| 6 | Complete the muzzle | On the muzzle you need to make 2 eyes, using white and green plasticine for this. From pink plasticine, mold the cheeks. |
| 7 | Add fluffiness | To do this, you need to make many notches on the surface with a stack. |
Plasticine fox figures
A plasticine fox figurine can also be made using cones and cylinders.
Cone figurine
A plasticine fox is made step by step using cones as follows:
- Divide a piece of plasticine, the color of which corresponds to the color of the fox's fur, into 2 equal halves. Then divide 1 of them in half. As a result, 3 pieces are formed: 1 large and 2 small. The 1st will be needed to create the body, and the other 2 will be used to mold the head and tail.
- From the large piece and from 1 small piece mold 1 cone each. As a result you should get 2 cones of different sizes.
- Form ears on the small cone using the pinching method.
- Bend the sharp part of the cone slightly, forming the fox's muzzle, which rises slightly upward.
- Glue the created head to the large cone – to the body.
- The 3rd remaining piece of plasticine is used to make the tail. Roll it into an elongated cone or simply make a sausage.
- Attach the resulting tail to the body and wrap it around.
- Using black plasticine, add the missing elements to the animal's face. To do this, make eyes from 2 small balls and attach them to the upper part of the face. For the nose, take a larger ball and attach it to the end of the cone - to the tip of the elongated muzzle.
Decorating the fox is an optional step, but it is better not to leave the figure in one color, but to liven it up with splashes of white plasticine or bright clothes.
For example, you can:
- make the inner surfaces of the ears, the fox's chest, and the tip of its tail the same;
- add eyebrows sculpted from black plasticine;
- attach 2 orange paws to the front part of the body, and make their tips black;
- draw black eyebrows above the eyes;
- dress the fox in a bright jacket, pants or a sundress.
Figurine made of cones and a cylinder
The fox made of cones and a cylinder is made in the following steps:
- Form a thick cylinder from plasticine that matches the color of the fox's fur. It needs to be slightly flattened, make one large cut on each side and bend into an arc. At this point, the animal's body is ready.
- Proceed to create the head and tail. They are made in the same way as in the example described above.
- Attach the head and tail to the body. The resulting craft has good plasticity. You can change the position of the fox's paws, forcing it to take different poses. It can sit, walk, lie down. The child will like such a mobile toy.
- Decorate the fox figurine. Small additional decorative details include black eyebrows, white inner ear surface, white tail tip, black paw tips. You can also make the fox's mouth using a stack or toothpick.
From plasticine and a pine cone
Available material is often used in modeling – pine or spruce cones. They can also be used to make a plasticine fox. If you use your imagination, you can come up with many ways to use cones in combination with plasticine. One of the simple methods takes place in 10 stages.
However, before you start, you need to prepare materials and tools:
- Plasticine - orange, black, white, green. You will need orange plasticine most of all. You can take a little of the other colours.
- A stack that can be replaced with a toothpick.
- A wooden board or a sheet of paper.
- A few yellow leaves fallen from the trees.
- Pine cone.
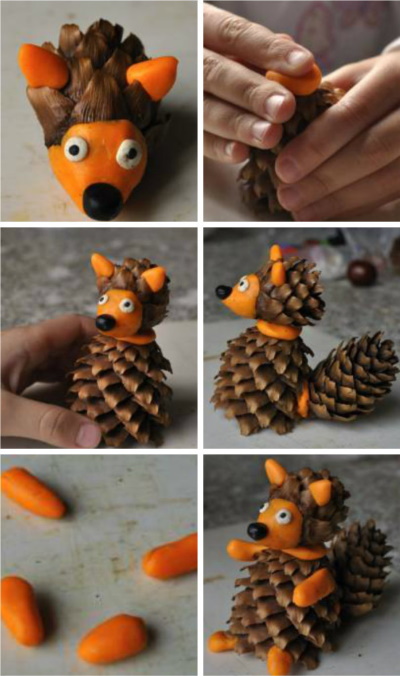
When everything is prepared, you can proceed to production:
- Using orange plasticine, mold 2 ears and an elongated cone-shaped muzzle.
- Make a small ball out of black plasticine and attach it to the tip of the muzzle – to the top of the cone.
- Attach all the plasticine parts to the pine cone. This should be done as follows: attach the cone to the spine with its base, and place a pair of ears above the muzzle.
- From a small piece of orange plasticine, mold a tongue and attach it to the underside of the elongated cone-shaped muzzle.
- Make eyes for the fox. For this, use pieces of white and green plasticine. First, mold 2 small white crescents, and then attach 1 green pupil to each of them.
- Each eye should have several eyelashes, which should be made from cuttings - tails of autumn leaves. Attach 5 such eyelashes to each eye.
- Attach the prepared structure to the upper part of the fox's face: it should be located between the muzzle and the ears.
- When the fox's face is ready, move on to creating its limbs and tail. This craft will have 2 limbs. They should be molded from orange plasticine. First, roll the pieces into a short thick sausage, and then make several cuts in the front part, which will imitate the spaces between the fingers.
- Attach both paws to the side of the cone.
- To make the tail, first roll a flat figure in the form of an elongated leaf out of orange plasticine and make several cuts along the sides along the entire perimeter.
- Attach the tail to the back of the cone and position it so that it is visible when the fox figurine is presented frontally.
- The craft is ready, all that remains is to lay out a lot of yellow leaves on a horizontal surface and place the resulting fox on them.
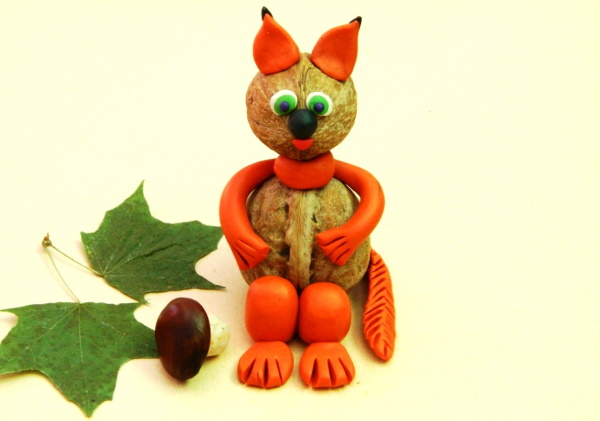
From plasticine and acorns
A beautiful fox can be made from plasticine and acorns. For such a craft, you need to prepare more orange plasticine, as well as some white, green, brown, and red. There should be 2 acorns - for the head and body.
In this case, the plasticine fox is made step by step as follows:
- Start with a cone-shaped muzzle and pointed ears. Glue a brown ball to the tip of the muzzle to imitate the nose.
- Place a small red tongue at the bottom of the muzzle. Attach all these elements to the acorn.
- Make eyes from white and green pieces. Make 2 flat circles from the white piece, and then attach 1 green circle to each of these circles, which will act as pupils.
- Attach both eyes to the head between the muzzle and the ears. A child trying to attach the fox face to the acorn may need some help from a parent, as play dough does not stick very well to smooth surfaces.
- Proceed to work on creating the lower part of the craft. The basis of the body will be another acorn. It is to it that the plasticine elements will be attached: 4 legs, a tail and a belly.
- Prepare 9 pieces of plasticine, most of which will be orange. 4 orange pieces are needed to create the lower limbs, 2 for the front paws, 2 more for the abdomen and 1 white piece – also for the abdomen.
- Work on the lower limbs. Each of them is represented by 2 balls: 1 round and 1 flattened. Attach both paws to the lower part of the body, the role of which in this case is played by an acorn.
- Make a fluffy fox tail. To do this, roll a piece of orange plasticine into a sausage and flatten it. To make this detail fluffier, you need to process it with a stack, making many short cuts along the edges.
- Attach the resulting tail to the lower part of the acorn, which serves as the body.
- Finish the upper part of the body. It is necessary to mold cones from 2 orange pieces and flatten them so that you get drop-shaped figures. These will be the front legs, which are attached to the acorn on the sides with the narrow side.
- Create a belly. It is made from 2 pieces - orange and white. Each piece needs to be rolled into a ball and flattened into a pancake, and then on the sides with a stack make many cuts that will imitate fluffiness. The orange part of the belly should be slightly larger compared to the white one.
- Attach the orange piece to the front of the body, and then place the white piece on top of it.
- Connect the head and body. For this, use a small piece of white plasticine. It will play the role of the neck.
With plasticine and a desire to create, you can make a cartoon fox figurine that will not be inferior in appearance to the bright Disney cartoon characters. After learning one of the simple and step-by-step sculpting methods, you can confidently take on the creation of a family of red animals. You can also make other animals, taking the fox sculpting techniques as a basis.
Video about making a fox from plasticine
How to make a fox from plasticine: