Hygienic cotton pads can be used for more than just their intended purpose. From this seemingly simple material, you can create real works of art. Making crafts from sponges is a fascinating activity for children of any age.
What's good about cotton pads
Cotton pads are ideal for children's creativity.
This material has the following advantages:
- safe during operation;
- easy to fold, glue and hold the desired shape;
- absorb paints well;
- small in size: diameter does not exceed 6 cm;
- the cost of the material is low.
Tools and improvised means
Crafts made from cotton pads for children can be placed on a flat surface (in the form of a picture) or be three-dimensional.
To create applique crafts you will need:
- a sheet of thick paper;
- cotton discs;
- scissors;
- plasticine;
- watercolor paints or gouache, felt-tip pens;
- paint brush;
- colored paper;
- glue.
To create three-dimensional crafts, among other things, you will need:
- wooden skewers;
- thread and needle;
- cardboard for making a frame or stand;
- stapler;
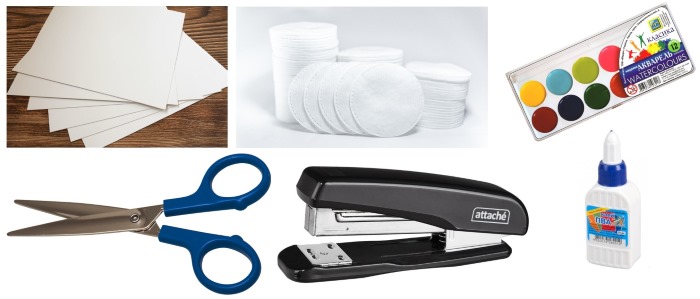
- mounting foam;
- colored silk or satin fabric;
- beads, small glitter and rhinestones for decoration.
General tips and recommendations for work
When creating crafts, you need to pay attention to the following:
- Cotton discs have a loose texture, so it is better to apply water-diluted paints in advance and dry well, after which cut out the necessary elements;
- It is better to highlight small elements with felt-tip pens;
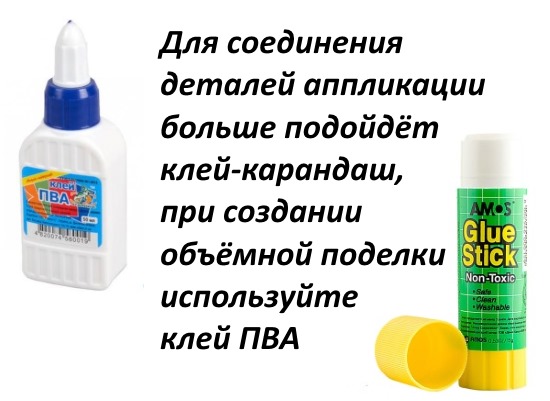
- A glue stick is more suitable for connecting the applique parts;
- When creating a three-dimensional craft, use PVA glue.
Methods for gluing cotton sponges to paper:
- Apply glue to the entire sheet of paper and assemble the elements into a composition.
- The finished parts are applied to the paper, the contours are outlined with a simple pencil, the selected areas are covered with glue, and the parts are glued along the contour.
- Lay out the entire composition of cotton disks on a sheet of paper, glue all the parts one by one, applying glue to the back side of the constituent elements.
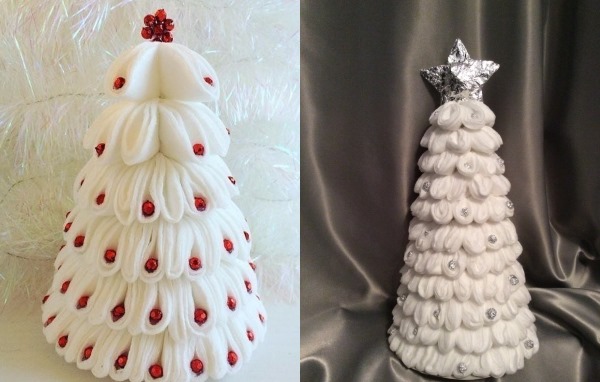
New Year tree
Crafts from cotton pads for children can be quite large. The New Year tree is one example of a large composition.
Materials and tools for work:
- a square sheet of cardboard for the frame (the side length should be at least 50 cm);
- cardboard to decorate the top;
- wooden skewer;
- cotton fiber discs (at least 400 pieces);
- glue in a tube;
- mounting tape;
- paints;
- stapler;
- white ribbon;
- beads and tinsel for decoration.
How to make a Christmas tree from cotton pads, instructions:
- First, you need to prepare the components from cotton pads as follows: each pad is folded in half along the diameter, the resulting semicircle is also folded in half, at a distance of 2 cm from the top, fasten the element with a stapler. Prepare the required number of parts.
- Draw a circle of the largest diameter on a sheet of cardboard and cut it out. Mark a sector that will be equal to ¼ of the circle and cut it out. Roll the workpiece into a cone, leaving a small opening at the top (the smaller the base of the cone, the more layers of cardboard and the higher the craft), fasten the joints with mounting tape.
- Cover the frame with white paint, decorate the base with white tape, and let dry.
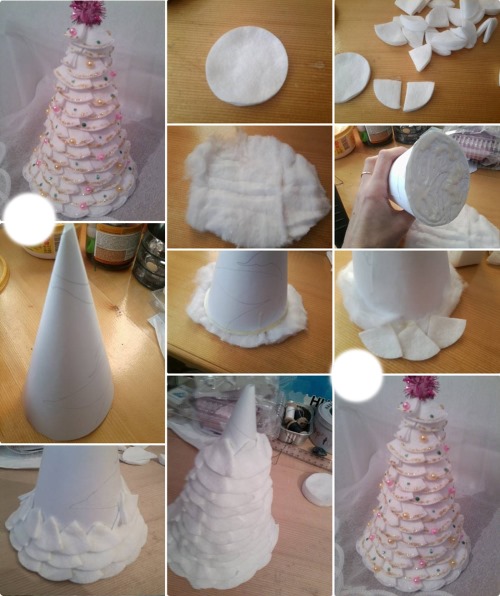
- The component elements made of cotton pads are glued to the frame in a circle. You need to start from the bottom of the base. The glue is applied to each part along the line of contact of the layers of the cotton pad. From the outside, the shape of the glued part will resemble a double Latin letter U.
- After completing the 1st circle, do the 2nd circle in the same way. Continue forming the figure to the top in a similar manner.
- Draw a star on a piece of cardboard, cut it out, place the figure on another piece of cardboard, trace the outline, cut it out (the figures should have a secret fold for gluing on the right side of each corner). Form folds from each corner to the center of the star. Glue both halves of the figure together, placing a skewer between them. Cover with bright paint.
- Insert a skewer into the hole at the top of the craft.
- Sew beads onto the Christmas tree elements and decorate with tinsel.
Spring flowers for March 8
For the applique "Spring Bouquet" you will need:
- cotton sponges - 31 pieces;
- colored cardboard;
- colored paper;
- glue;
- peas or multi-colored beads.
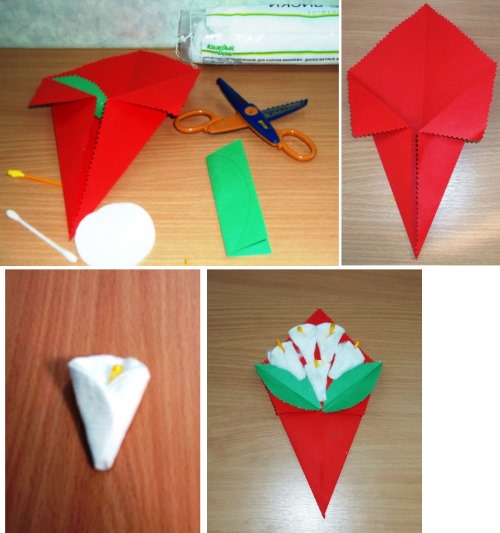
Work order:
- Form 6 flowers according to the following pattern: roll a cotton pad into a tight cone, glue it at the base, straighten the free part, decorate the middle of the flower with beads or peas.
- Place 5 flowers in the center of a sheet of cardboard horizontally in a circle, glue the 6th flower in the center perpendicular to the plane of the cardboard sheet.
- Cut out leaves from colored paper and glue them between the flowers.
- The next 5 flowers, larger in size, will be placed around the small bouquet. The scheme for making a large flower: 5 cotton pads are placed, overlapping each other, in a circle, the contact areas are glued.
- To decorate the middle, a small sheet of double-sided colored paper is folded into several layers to form a square, the center is secured with a stapler, a circle is cut out, a ball is formed, and it is glued to the center of the blank made of cotton pads.
- Glue the flowers to the cardboard, cut out the leaves and place them between the flowers.
Chick
Crafts made from cotton pads for children help develop the younger generation's understanding of the world around them through the creation of images of animals and birds.
How to make a chicken from cotton pads in 2 versions, materials for work:
- cotton sponges;
- paints and brush;
- colored cardboard;
- plasticine;
- felt-tip pens;
- glue and scissors.
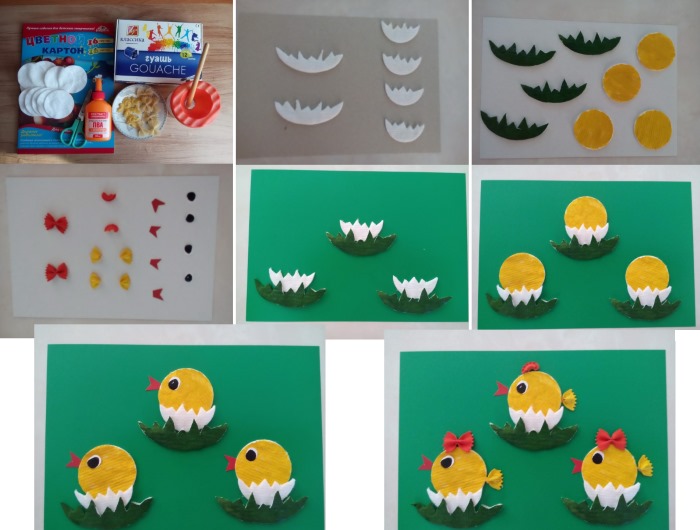
Option 1:
- cover a cotton fiber disk with yellow paint and dry;
- glue in the center of a sheet of cardboard;
- mold the lower limbs from plasticine and secure them under the yellow disk;
- cut out a beak and comb from a cotton pad, paint with a red marker, glue;
- Mark the eye with a black marker.
Option 2:
- For the craft you will need 2.5 cotton sponges, painted yellow. Whole disks are glued to a sheet of cardboard along a diagonal line, but so that they touch. The semicircular part will imitate the wing and is glued in the middle of the lower disk with an offset to the left, the semicircle is directed downwards.
- Sculpt the lower limbs, comb and beak from plasticine and attach to the blank.
- Draw an eye with a black marker.
Horse
For this craft you will need:
- drawing preparation;
- cotton discs;
- dark cardboard;
- light soft pencil;
- glue;
- scissors.
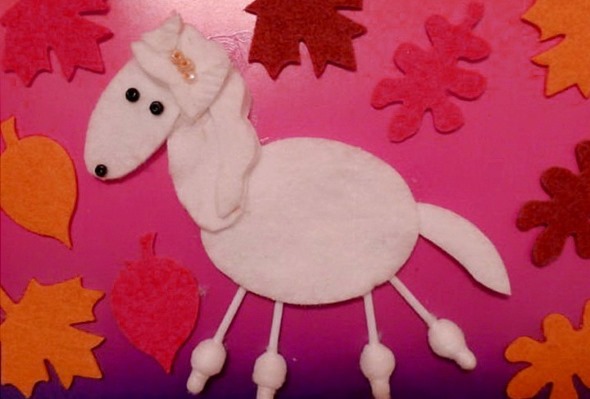
The cotton pad horse applique is made according to the following description:
- draw a sketch of the figure (make sure that the constituent parts of the figure are proportional and located naturally), cut it out, place it on a sheet of cardboard and trace the outline with a pencil;
- Place cotton pads on the sketch, mark and cut out the constituent elements;
- Glue all the parts one by one along the marked contours to the cardboard.
Rabbit
To make a craft applique with a picture of a rabbit, you will need:
- colored paper;
- colored cardboard;
- cotton pads;
- scissors;
- glue.
Instructions for implementation:
- Glue a whole cotton disk to the center of a sheet of cardboard: this will be the rabbit’s body.
- Cut the head out of another cotton pad, reducing its diameter by 1.5 - 2 cm. Glue it above the body.
- Draw and cut out ears, front and back limbs, cheeks from cosmetic disks. Use colored paper for eyes and nose.
- First glue the ears, cheeks and limbs to the blank. Let dry.
- Lastly, glue on the eyes and nose.
Poodle
To make a poodle using the applique technique, you will need the following materials and tools:
- a sheet of colored cardboard;
- cotton discs;
- a sheet of plain paper;
- simple and colored pencils;
- glue;
- scissors;
- stapler.
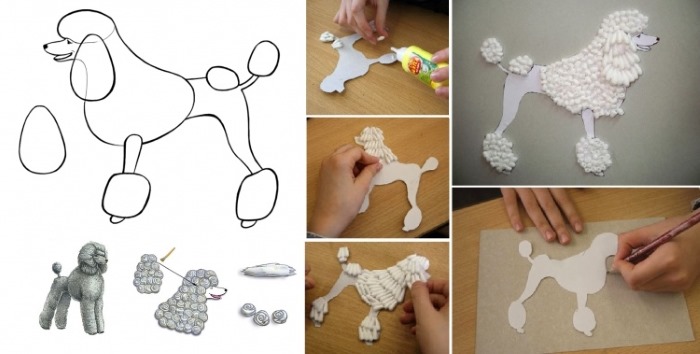
Manufacturing process:
- On a sheet of paper, draw the figure of the craft, clearly highlighting the areas that will be covered with cotton pads (head, ears, front part of the body, lower parts of the limbs and tail). The blank is cut out and glued to a sheet of cardboard.
- Cotton pads are prepared in one of the following two ways: the pad is folded in half, then in half again, the top corner is secured with a stapler; the pad is twisted into a bundle and secured with a stapler.
- Glue is applied to the selected areas of the dog's drawing using a brush.
- They glue the blanks made from cotton pads.
- Using colored pencils, draw the animal's eyes, nose and mouth.
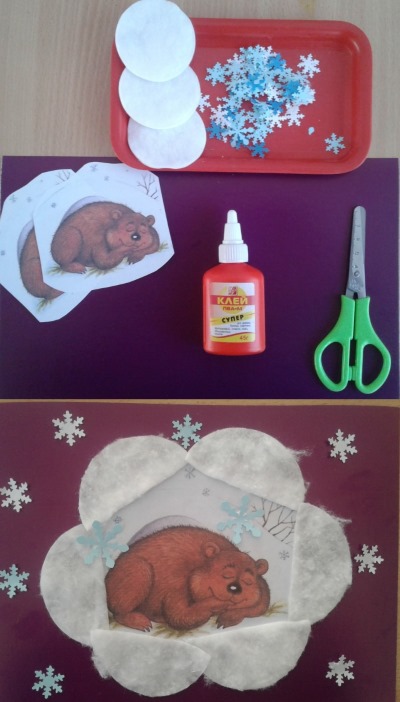
Teddy Bear
The teddy bear craft is very easy to make.
To work you will need:
- cotton pads;
- a sheet of colored cardboard;
- scissors;
- glue;
- colored pencils;
- black beads.
Recommendations for preparation:
- Glue a whole cotton pad to a sheet of cardboard at a distance of at least 3 cm from the bottom edge.
- Cut a circle of smaller diameter from a cotton sponge and glue it to the bottom of the large circle. This forms the body of the animal.
- On another cotton pad draw the animal's head, cut it out, and glue it above the body.
- Cut 4 small ovals for the limbs from cotton pads and glue them to the sides of the body, top and bottom.
- Cut out 2 small ovals for the ears from the disks and glue them to the blank.
- Glue black beads to the locations of the eyes and nose.
- Draw a mouth with a red pencil.
Bunnies
To make a children's craft "Bunnies", you need to prepare:
- a sheet of blue cardboard;
- several cotton discs;
- glue;
- scissors;
- colored pencils;
- 2 thin multi-colored ribbons.
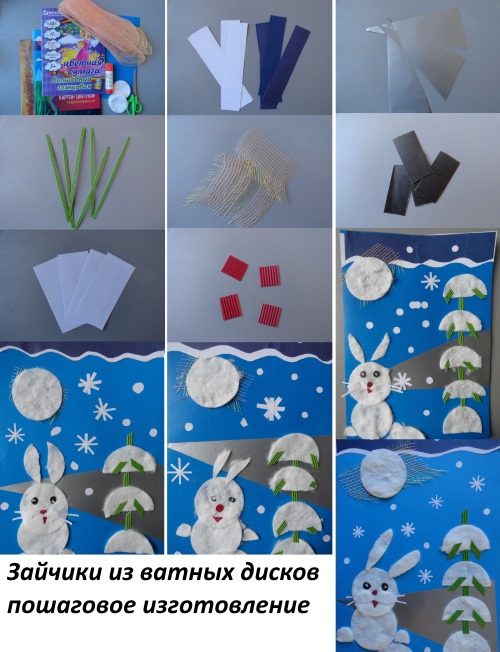
Manufacturing process:
- Visually divide the sheet of cardboard into 2 equal parts, each figure will be located on its own half.
- Glue a whole cotton pad to the cardboard at a distance of 3 cm from the bottom and right edges.
- Cut out the following pieces from cotton pads: a medium-sized circle for the head, 3 small circles for the limbs and tail, 2 ovals for the ears, and a small oval for the cheeks.
- On the left side, covering a small part of the already glued part, glue the head and ears. Glue the small oval horizontally at the bottom of the head.
- Glue the limbs below. Glue the tail to the upper back of the body.
- Dry the craft.
- Use colored pencils to draw the eyes and nose, color the ears. Tie the ribbon into a bow and attach it to the top of the head. The figure of the second animal is formed similarly on the other half of the cardboard sheet. On the main background, draw snowflakes.
Cow
To make an artistic craft, you will need the following tools and materials:
- a sheet of colored cardboard;
- cotton discs;
- sheet of paper;
- colored pencils;
- paints;
- glue;
- scissors.
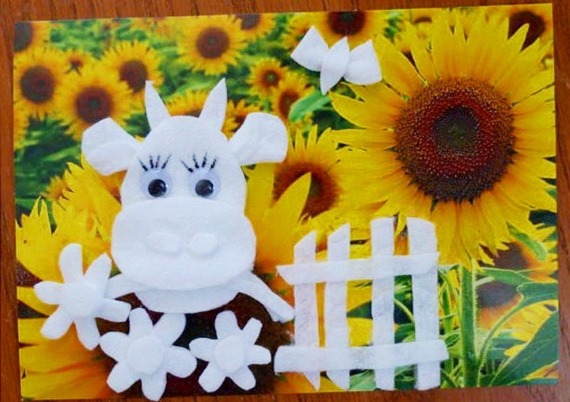
Procedure:
- Draw a picture of an animal on a sheet of paper, keeping the proportions. Cut it out.
- Place the blank on a sheet of cardboard and trace around the outline.
- Glue cotton pads to large areas of the animal's body. Draw smaller details first on cotton pads using a paper template. Cut out.
- Glue small elements along the outlined contours. Dry the craft.
- Use colored pencils to draw the eyes. Paint the animal's body, head, and limbs with paints. Draw flowers on the general background.
Ladybugs
The "Ladybugs" craft is two-layered.
To make it you will need:
- cotton pads;
- sheet of cardboard;
- scissors;
- paints;
- black pencil;
- light beads.
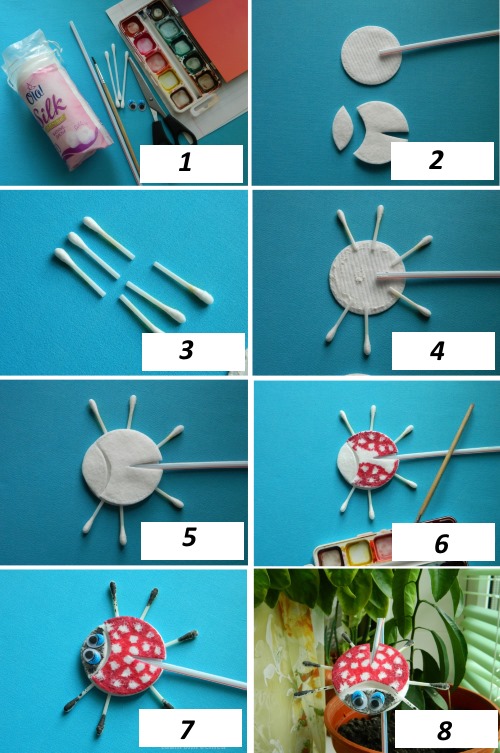
Manufacturing:
- Glue 3 cotton pads onto a sheet of cardboard at the greatest distance from each other.
- The next 3 small parts (insect heads) are cut out in the shape of a crescent from cotton pads and glued tightly to the first elements.
- Next, 3 cotton pads are cut in half and glued to large elements (to the body of each insect) at an angle to each other.
- Paint the head and visible part of the body of each insect with black paint. Paint the wings with red or yellow paint. Dry.
- Apply a few black dots to the wings with a thin brush. Glue beads to the eye locations. Draw whiskers and paws with a pencil.
White owl
To make a white owl from cosmetic discs, you will need:
- a sheet of dark cardboard;
- cotton discs;
- colored paper;
- glue;
- scissors;
- beads.
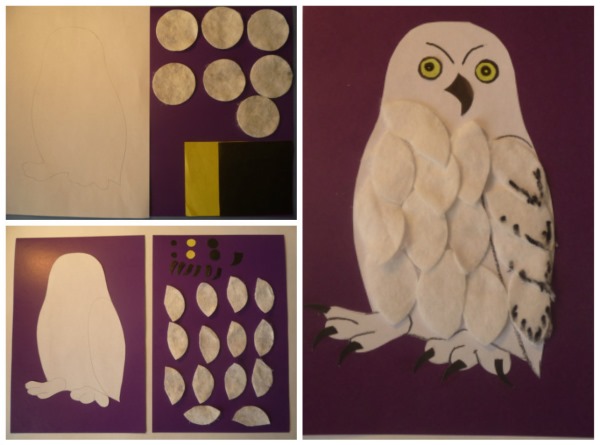
Step by step instructions:
- Cut off 1/3 of the cotton disk: the small part cut in half will form the eyebrows, the larger part will form the bird's head. Each piece of the blank is cut along the rounded edge, the cuts imitate the bird's feathers.
- The head is glued to the cardboard with the cut side up, the eyebrows are attached on top slightly below the cut line.
- A cotton pad with notches is glued under the larger part.
- The next disk is cut to size, the edges are notched, and both halves are attached to the right and left of the largest piece.
- Attach beads to the location of the eyes, cut out the beak from colored paper and glue it.
- Decorate the background of the craft with a suitable design.
Swan
To make this craft you will need:
- a sheet of blue cardboard;
- cotton sponges;
- scissors;
- glue;
- colored pencils.
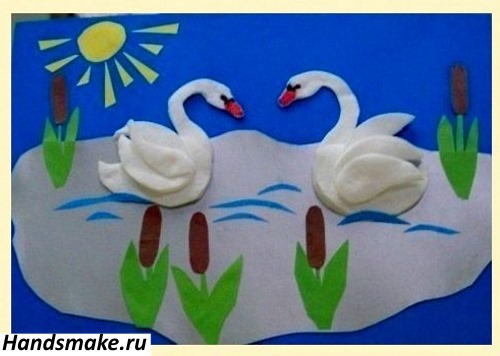
Work process:
- Cut the cotton pad in half and glue one half to a sheet of cardboard, cut side up.
- Cut another cotton pad into 3 equal parts. Glue the semicircular parts to the center of the 1st element, pointing upwards.
- Draw the neck and head of the bird on a cotton disk, cut it out and glue it to the blank.
- Use colored pencils to mark the eyes and beak.
Angel
Cotton pads can be used to create crafts for children not only using the applique technique, but also as the main material for New Year's decorations.
To make a New Year's angel toy, you will need:
- cotton sponges;
- beads;
- glue;
- threads;
- shiny paint;
- toothpick.
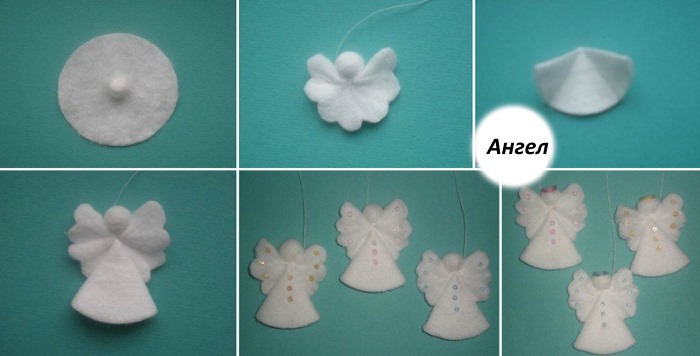
Steps to follow during production:
- Divide the cotton pad into 2 parts by layers.
- Place a bead in the middle of one half, close, secure with a thread, and spread the wings of the future angel figure.
- Fold the second half of the cotton pad along the diameter, place a toothpick perpendicular to the center line, roll it tightly into a cone, and glue it together.
- Apply glue to the 1st element below the bead and glue the cone-shaped part.
- Apply thin lines of paint to the edges of the figure elements.
Topiary from cotton pads
Topiary made of artificial flowers is a three-dimensional craft in the shape of a small tree with a spherical crown.
Necessary materials and tools for work:
- cotton fiber discs;
- beads;
- thread and needle;
- flower pot;
- glue;
- foam ball;
- colored tape;
- pencil;
- mounting foam.
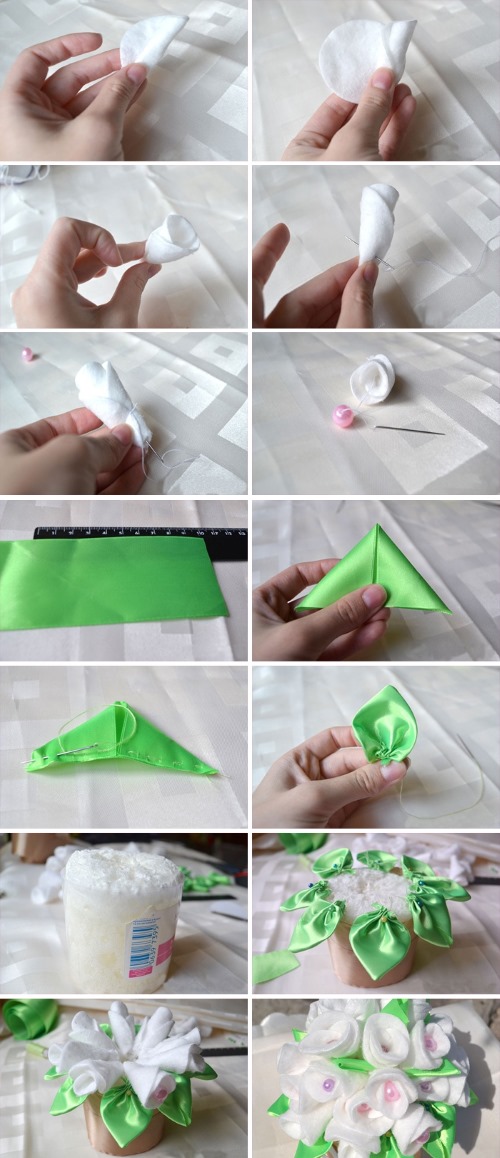
How to make a topiary yourself, work order:
- First, prepare the flowers according to the scheme: twist a cotton pad into a cone, secure the top with glue, and sew a bead in the middle of the bud.
- Place the foam ball on the pencil and secure with glue.
- Cover the ball with flowers, making sure the elements are positioned tightly.
- Wrap the tree trunk with tape.
- Fill the flower pot with foam, place the lower part of the stem in it, hold it until the material is completely dry, remove excess foam, decorate the top layer of foam with beads.
Fishes
To make a craft with fish you will need:
- a sheet of blue cardboard;
- cotton sponges;
- glue;
- scissors;
- colored pencils.
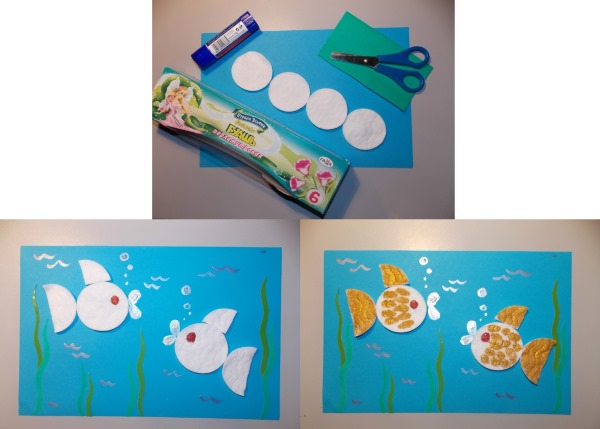
The order of making the craft:
- Glue cotton pads onto the cardboard at a distance of at least 5 cm from each other.
- Cut the next disk to the diameter and glue it tightly to the first elements (fish tails).
- From another cotton pad, cut 2 sectors at a right angle and glue them on top of the largest elements (fins).
- Use colored pencils to draw the eyes and decorate the overall background of the craft.
Snowman
To make a snowman from cotton sponges you will need:
- a sheet of regular sized colored cardboard;
- cosmetic cotton pads;
- glue;
- scissors;
- colored pencils;
- paints.
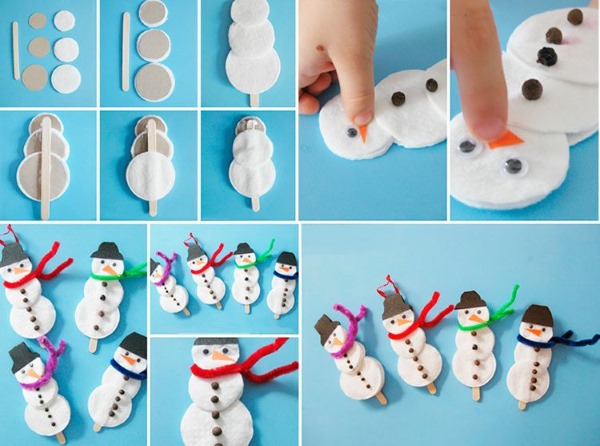
Sequence of actions during manufacturing:
- Glue the whole disc onto cardboard.
- On the next disk, draw a circle with a diameter 1 cm smaller than the diameter of the disk itself, cut it out, and glue it tightly above the 1st element.
- Cut out the third circle with a diameter 2 cm smaller than the 1st element and glue it above the 2nd element.
- Use colored pencils and paints to complete the remaining components and color the background.
DIY Cotton Pad Flowers
| Name of the flower | The required number of cotton pads to make one unit | Additional materials and tools |
| Rose | 5 | Wooden skewers, glue, colored paper |
| Chamomile | 6 | Colored paper and cardboard, scissors, glue |
| Snowdrop | 1 | Base sheet, colored paper, scissors, glue |
| Calla | 1 | Wooden skewers, cotton swabs, paints, colored paper, scissors, glue |
Roses
Making large flowers from cotton pads, procedure:
- Roll the first cotton pad into a cone, forming the center of the flower.
- The next 2 cotton disks are glued around the bud blank opposite each other.
- The next 2 petals are formed in a similar manner.
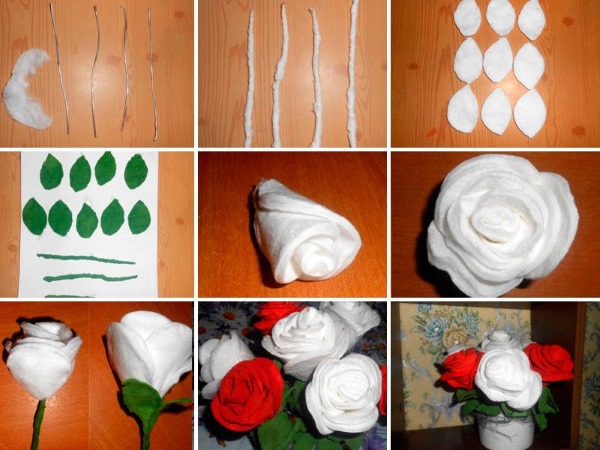
- Make the required number of flowers.
- Cut green paper into thin strips, wrap wooden skewers, forming the stems of the plant. Attach roses to the stems.
Chamomile
Making a craft applique with a daisy, instructions:
- The first 3 cotton disks are glued to a sheet of cardboard, arranged in a triangle and touching each other (1st tier of petals).
- The next 3 disks are glued on top of the 1st layer of petals, and they need to be placed between the petals of the 1st tier.
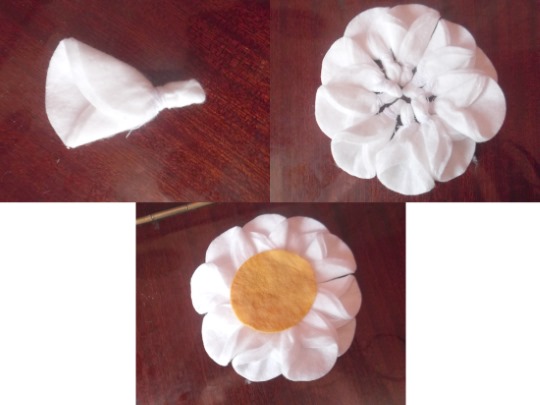
- Cut a circle out of yellow paper and glue it to the center of the flower.
- Cut out leaves from green paper and decorate the overall background.
Snowdrops
The procedure for making a craft with snowdrops using the applique technique:
- Draw a flower on a sheet of paper and cut it out.
- Place the blank on a cotton pad, trace around the outline, and cut out.

- Cut out stems and leaves from green paper and glue them onto cardboard to form a plant bush.
- Glue flowers to the ends of the stems.
Callas
Crafts from cotton pads for children can sometimes consist of 2 main materials. For example, to make calla lilies from cosmetic cotton pads, you will definitely need cotton swabs.
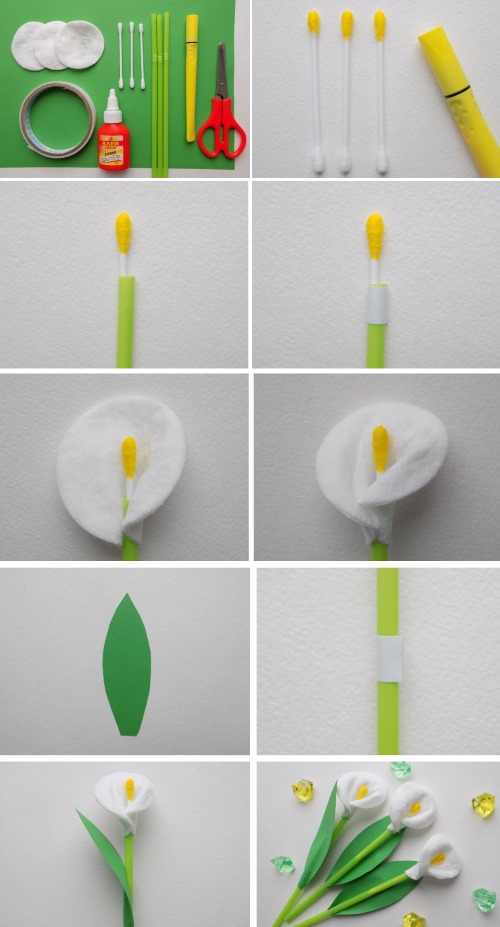
How to make calla lilies from cotton swabs and pads:
- Cut a cotton swab in half, soak the cotton wrap in yellow paint, and dry.
- Place the piece on a skewer and wrap the skewer in green paper.
- Place the skewer on the cotton pad, with the yellow element in the center of the circle.
- Apply glue to the cotton pad below the yellow element. Glue it around the stem.
Crafts made from cotton pads are varied in manufacturing techniques and complexity. Making such items is very useful for children's development. This exciting activity can interest even an adult.
Author: Doroshenko E. N.
Article formatting:Natalie Podolskaya
Video about crafts from cotton pads
Crafts from cotton pads for children: