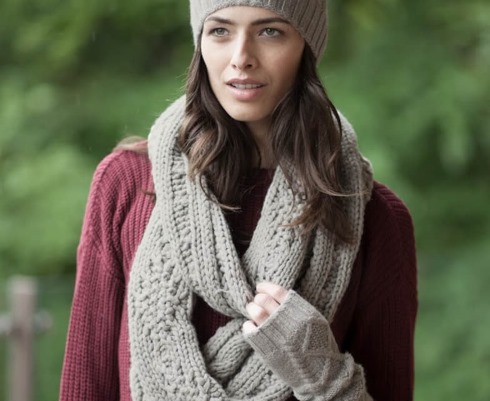
In cold weather, a scarf is a must-have item for both adults and children. But over the past few years, instead of classic scarves, fashionistas have increasingly been wearing the so-called snood scarf or snood. Knitting patterns can be found in needlewomen's magazines.
Snood scarf: distinctive features
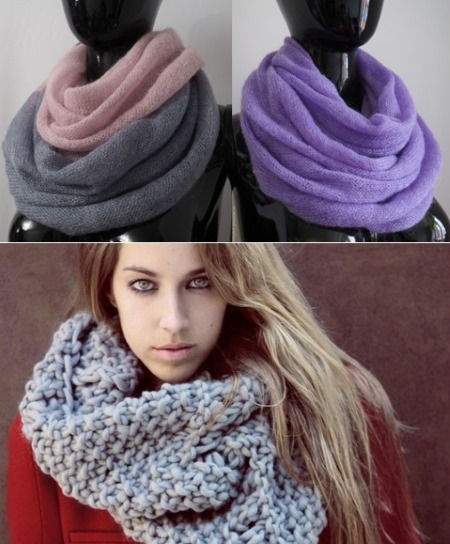
This model is different in that it is essentially a piece of fabric closed in a ring that is wound around the neck. You can also find such a name as "endless scarf". There are many varieties of snoods, depending on the width and number of turns.
You can knit a snood scarf with knitting needles if you understand the huge variety of patterns and descriptions that are presented on the Internet:
- Narrow and long snood - it is worn instead of a regular scarf, usually in several turns.
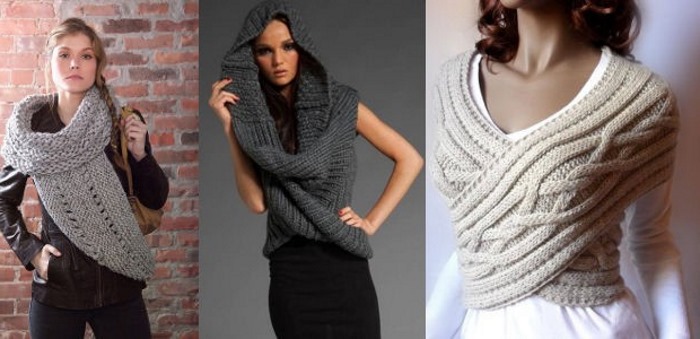
- Wide and long snood - this is a real transformer, which can be worn not only around the neck as a scarf, but also replace a headdress, and even worn as a vest or bolero.
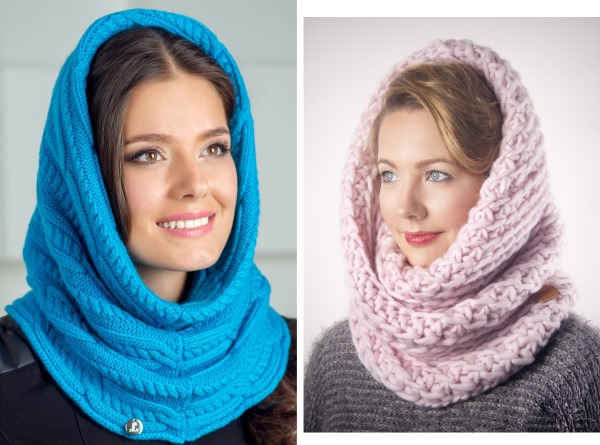
- Snood-pipe – is a wide and short scarf that is worn as a collar or hood.
The most important feature of any snood is its versatility. It is perfect for everyone, regardless of gender and age.
Current colors for a snood scarf
A snood is a full-fledged accessory, which means it often becomes a bright accent in an image. To knit such a scarf, you can choose bright and saturated colors, or muted shades, depending on the desired result.
Experts also recommend that the snood matches the color scheme of the gloves and headwear.. It is not necessary that they be of the same color. The main thing is that the shade matches.
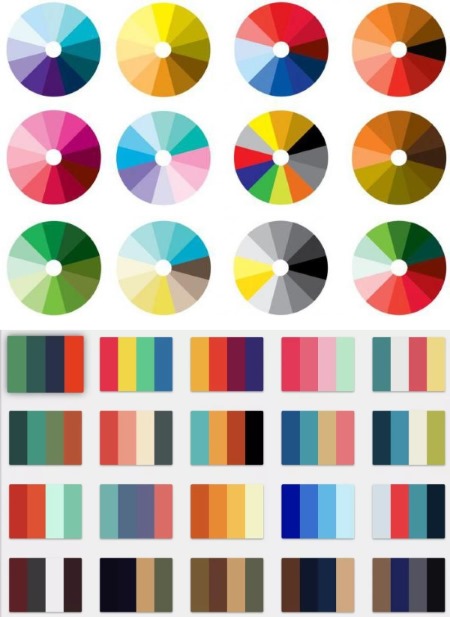
Another fashion trend is to choose several color accents that go together. For this, you can use special tables to choose the right color pairs.
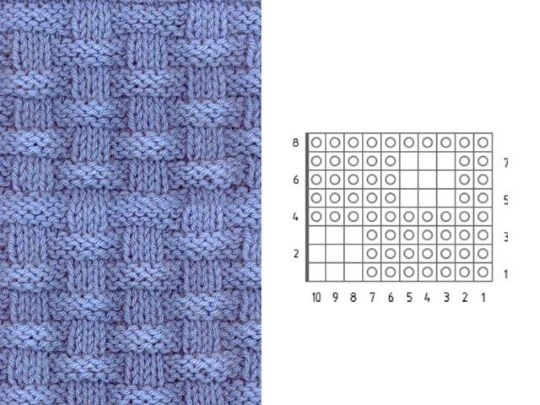
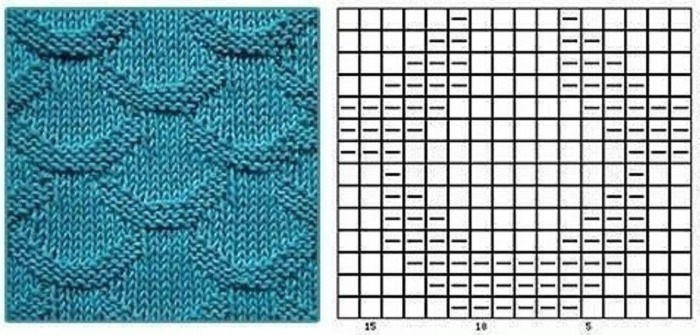
Patterns and diagrams for knitting a snood
A scarf-collar with knitting needles (the patterns and descriptions for it are very diverse) can be knitted in different ways and with almost any patterns. But you need to adhere to a simple rule - the more "complicated" the yarn, the simpler the pattern should be. So, when knitting from fancy yarn, knitting with English elastic, garter stitch, or pearl pattern will be perfect.
For knitting openwork or arans, it is worth choosing a single-color yarn on which the pattern will be clearly visible.When choosing patterns and descriptions for knitting a snood scarf with knitting needles, you need to take into account their complexity. Beginners may find the braids and aran stitches too complex, but they will easily cope with the purl and knit stitch patterns.
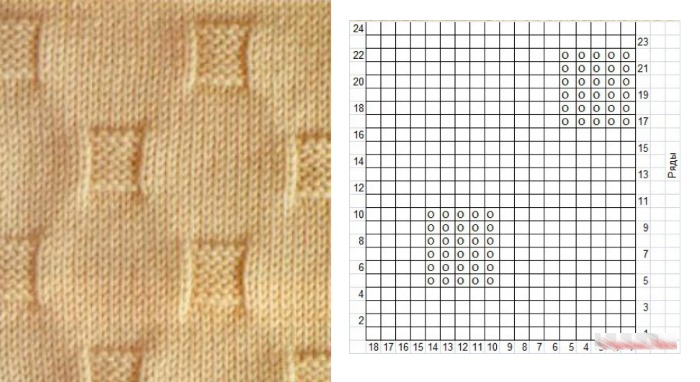
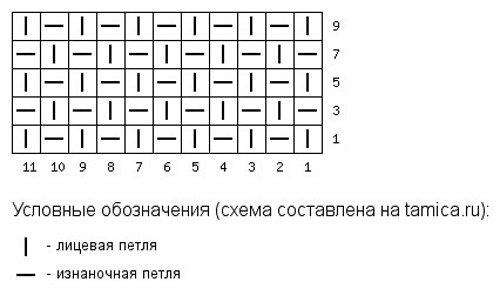
Variations of simple patterns from front and back loops
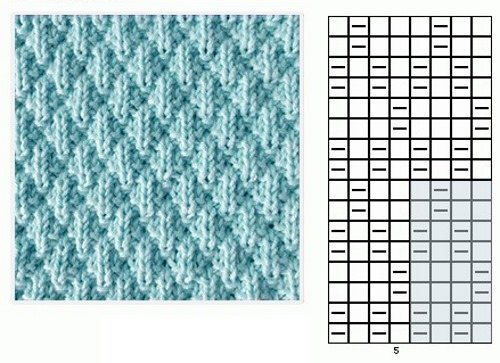


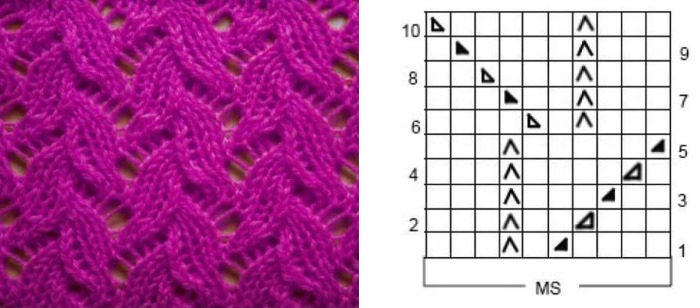
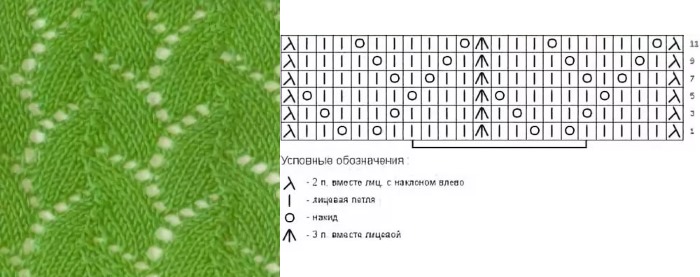
Openwork pattern variations
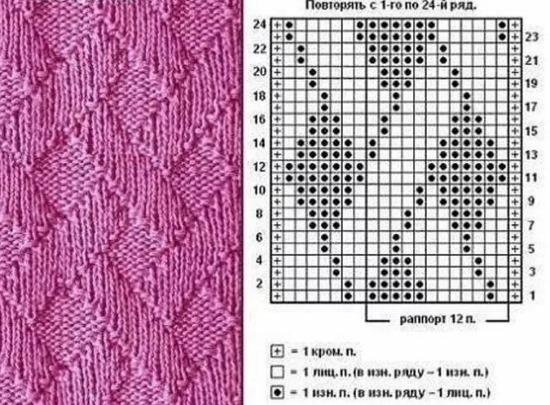
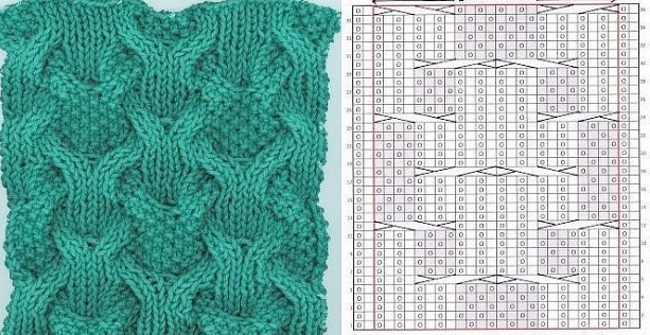
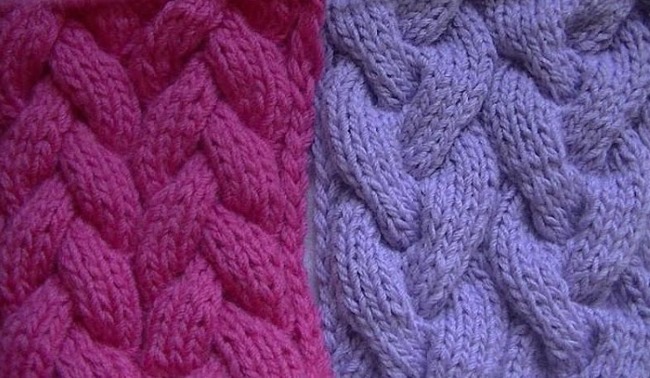
Braid and Aran Pattern Variations
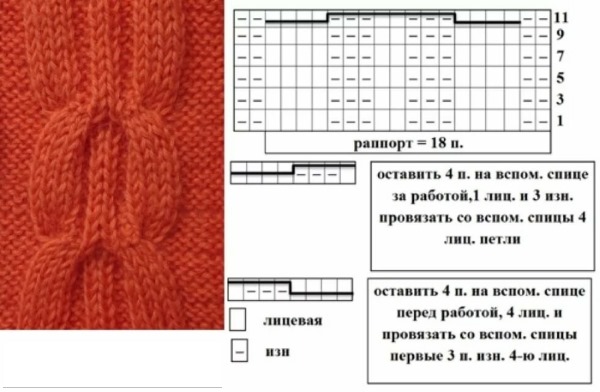
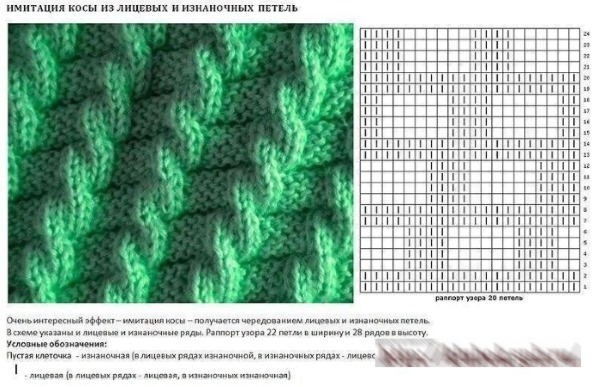
However, braids and arans are difficult to perform, and not all beginners can knit them correctly, but there are imitation patterns that are visually very similar to braids.
General recommendations for knitting
Recommendations:
- To knit a short snood, you can use circular knitting needles to make it seamless. And a long snood is easier to knit like a regular scarf, and then sew it.
- Particular attention should be paid to the density of knitting. It should not be different, otherwise the width of the finished product will be uneven, which can spoil the appearance.
- The main difficulties arise with knitting with the stocking stitch, as the edges of the product curl. Therefore, scarves are usually not knitted with this pattern, but you can try the following techniques:
- To avoid such trouble, you can make stripes of 3-5 loops with a pearl pattern along the edges of the product.
- Another option from folding is to crochet the edges of the finished product. For this, you can choose simple single crochet stitches or the "crayfish step".
The main thing is to correctly calculate the density of crocheting so that the fabric does not tighten, but also does not create unnecessary waves. Usually, one column in each loop is knitted along the width, and two columns in a loop along the long side, or alternate between one column and two columns as needed.
- The finished product can be steamed well, or wetted and stretched on the base. But here you need to consider what yarn the scarf is knitted from and whether such processing is acceptable.
- For winter scarves, you can make a two-layer version by sewing two pieces of stockinette stitch together.
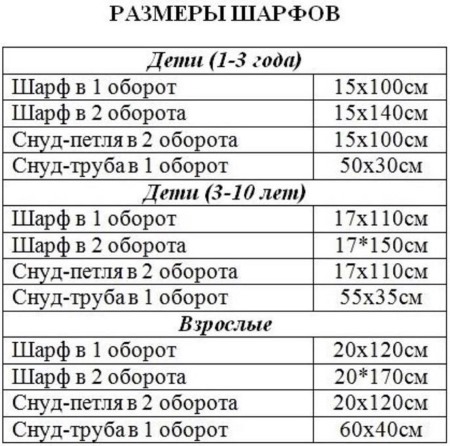
- The most convenient way to calculate the required snood length is using the table.
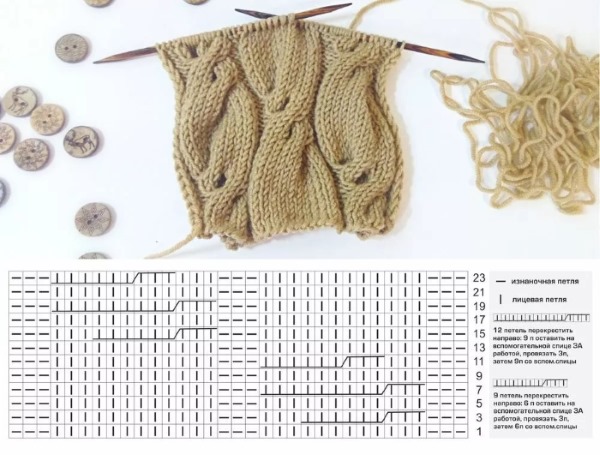
Snood braids for beginners
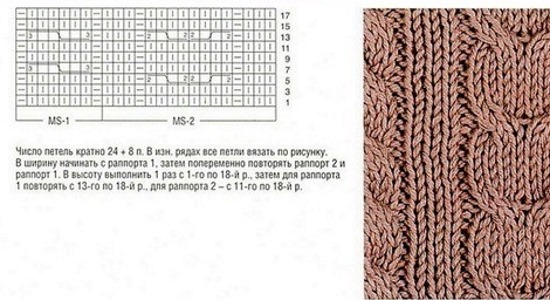
A scarf-collar with knitting needles (diagrams and descriptions can be found online) is very often knitted with various braids, cables or arans. But beginners are afraid to take on such work, since these patterns seem complicated to them. However, a simple braid itself is knitted elementarily. The main thing is to correctly understand how and where to make crossings, and then you can get an excellent result.
To knit such a snood with regular braids, you will need either long knitting needles (at least 35 cm long) or knitting needles with a short line (60 cm of line will be enough). The size of the knitting needles should be selected in accordance with the thickness of the yarn. The recommended needle size is usually indicated on the labels.

But if you want the fabric to be denser, then you need to take knitting needles 0.5 mm smaller than recommended. If you need a looser fabric, you can safely take knitting needles 1 size larger.
You will also need an additional knitting needle. You can buy a special knitting needle with a bend in the store, or you can replace it with a regular hairpin or a large pin. Each craftswoman finds the most convenient way for herself.
It is better to choose mixed yarn for work. Pure wool can be very frizzy, and cheap acrylic often starts to pill after only a short period of wear.
If you need a more voluminous and warm scarf, then you should choose threads with a thickness of 100 g / 100 m. If you need a lighter option - 100 g / 250 m. It is imperative to first knit a sample to check how the thread behaves when twisted.
Basic pattern
This is a simple braid pattern, which is knitted from 12 loops. It alternately makes 4x4 crosses. If desired, you can vary the number of crossed loops, then the braid will be wider or narrower. But you need to consider that the more loops are removed to the auxiliary knitting needle, the more difficult it will be to make the cross.
In this case, the braid pattern is 16 loops, taking into account 4 edge loops, 2 on each side. When knitting a snood, you can skip these loops and then the total number should be a multiple of 12. The diagrams show 2 options for "braiding" the braid. The only difference between them is how the crossings will be located.
Scheme 1
For the braid according to the first scheme, you need 16 loops. The edge first loop of each row is removed without knitting, and the last one is knitted purlwise.
Knitting pattern:
- In the first row, remove the edge stitch, then knit purl stitch, 12 knit stitches, the last two purl stitches again.
- The second row should be knitted according to the resulting pattern - knit stitches over knit stitches and purl stitches over purl stitches. On the back side, all rows, which in this case are even, are knitted according to the same principle.
- The third row is knitted in exactly the same way as the first.
- In the fifth row, knit the first crossing: remove the first loop, knit a purl. Transfer the first 4 loops to an additional knitting needle and leave them in front of the fabric. Then knit 4 loops as faces, and after them, the 4 loops left behind the work are also knitted as faces. Knit the remaining 4 loops as faces and finish the row with two - purl. This is a crossing to the left side.
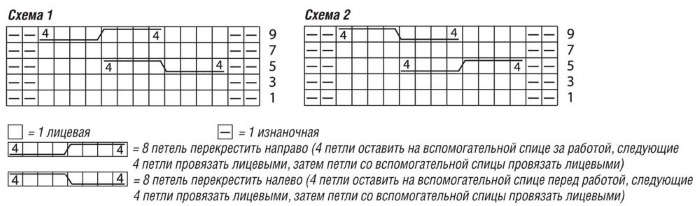
- From the sixth to the eighth row, everything is knitted according to the pattern.
- In the ninth row, the second crossing is done: the first loop is removed again, the second is knitted purlwise. The first 4 loops are knitted as faces, then four loops are transferred to an additional knitting needle and remain behind the fabric.
- Next, knit 4 loops from the main needle, and then from the additional one. The last 2 loops are purl. This is how the crossing to the right side is performed.
- Then the rapport is repeated from the first row. If desired, you can make a larger distance between the crossings, knitting more rows. The main thing is that the crossing is done in the front (odd) row.
Knitting according to Pattern 2 is done in the same way, only first a cross is made to the right side, and then to the left.
Description of work on snood
Job Description:
- Cast on the required number of stitches on the knitting needles. If there are paths of purl stitches between the braids, then you need to cast on a number of stitches that is a multiple of 16.
- The required length of the snood is knitted according to pattern 1 or pattern 2. For a long snood, which will be worn in 2 turns, at least 100 cm in length is needed.
- Sew the beginning and end of the snood using a hook or needle.
Snood knitted with thick or thin yarn
Recently, snood scarves made from thick and bulky yarn, or from very thin threads, have become very popular.To knit with such yarn you need to choose the simplest patterns: garter stitch (all stitches are knitted) or pearl pattern (the pattern alternates between knit and purl stitches).
Pearl pattern
For knitting from thin threads, the front surface is used. Here, the rolled edges play into the hands of the craftswomen and create the necessary volume and airiness.
To work you will need:
- Thick yarn – no more than 100 g/100 m. Often there is yarn that is made in the form of a cord or tape, it is perfect for work. The composition can be any.
- Thin yarn – not less than 50 g/150 m or 100 g/300 m, respectively.
Snoods made from thin wool yarn with the addition of mohair look very stylish.The knitting needles should be selected according to the thickness of the yarn. For thick thread, these will be knitting needles starting from size No. 5, but for thin yarn, you can safely take knitting needles thicker than recommended to add additional volume to the fabric.
Job Description:
- Knit a 10 x 10 cm sample and calculate how many loops correspond to 1 cm. For thick yarn, it usually turns out that 1 cm is equal to 1 loop. For thin yarn, 1 cm can fit up to 5 loops, depending on how thick the yarn and knitting needles are. Based on this, you need to calculate the required number of loops.
- For a simple snood 50 cm wide, you will need to cast on 50 loops with thick yarn, and 150 to 200 loops with thin yarn.
- Knit the required length of the fabric with the chosen pattern. When knitting a pearl pattern, in the first row there is an alternation - one front, one back loop. And in the following rows, the opposite is knitted over each loop: over the front - back, and vice versa.
- At the end, you need to connect the ends of the scarf, closing it into a ring. To do this, you can use a hook, a needle, or, without removing the knitting needles, knit the last and first rows together.
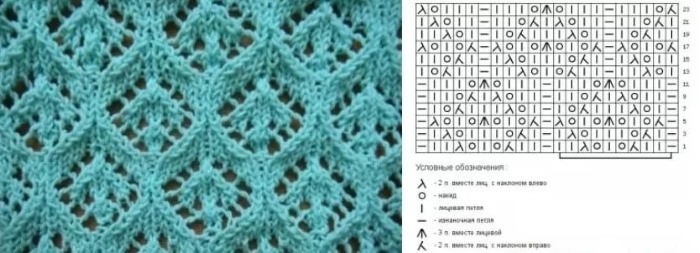
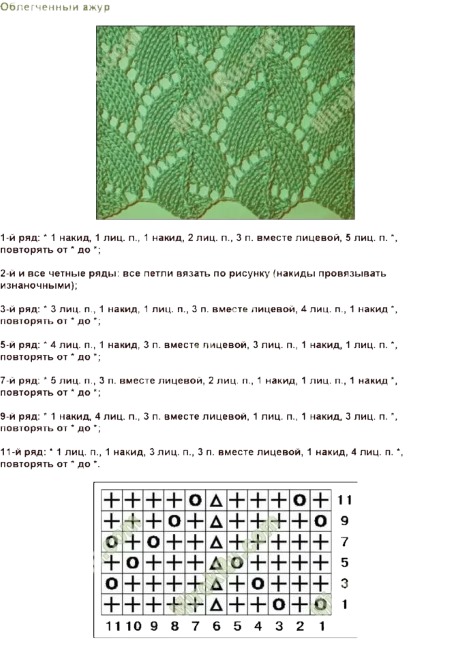
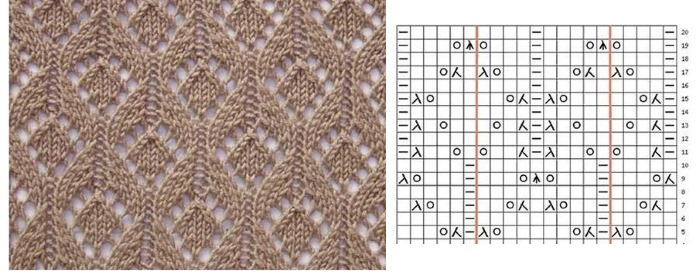
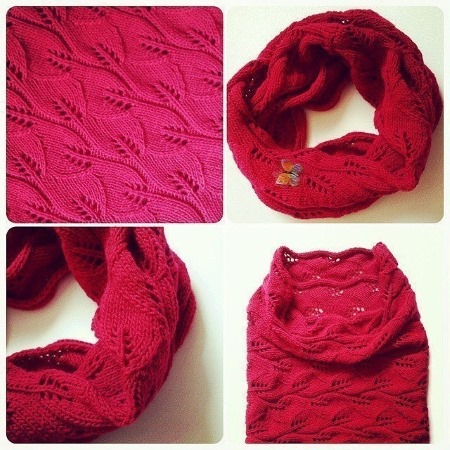
Openwork scarf-collar with knitting needles
Openwork items always look attractive and interesting. Spring looks are often complemented by lace and openwork snoods, and it looks very stylish.
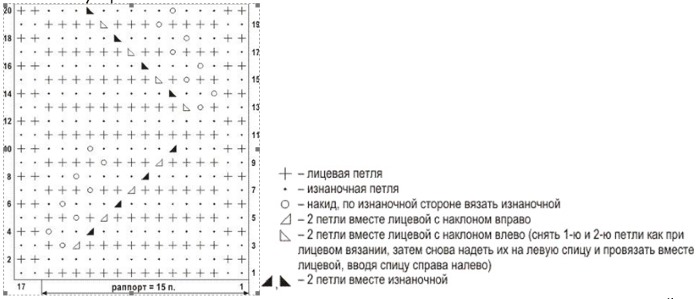
A knitted snood scarf (patterns and descriptions of openwork for such a thing are quite easy to find) can have different patterns. The most common option is leaf motifs.
To work you will need:
- yarn of any composition with a thread thickness of approximately 100 g/200 m;
- Suitable knitting needles for it are No. 3.0 with a cord of 80 cm or more.
Pattern Description:
- The pattern repeat is 15 stitches wide and 20 rows high. When knitting this pattern, you need to pay special attention to the even placement. It is best to use a row counter so as not to accidentally skip a row.
- In the diagram, the front (odd) rows are read from right to left, and the back (even) rows are read the other way around.
Job Description:
- This model is knitted in a circle. It is very important to calculate the required number of loops, and then cast them on the needles. All knitting is closed in a ring, and so continues.
- Knit the required height of the snood, and then carefully close the edge of the knitting with a crochet hook or a needle.
Scarf snood with English elastic band for women
The "English rib" pattern is quite popular. The fabric knitted with this pattern holds its shape perfectly. At the same time, the scarf will be quite embossed and voluminous. For work, you will need any yarn with a thickness of about 100 g / 250 m and suitable knitting needles No. 2.5 - 3.5.
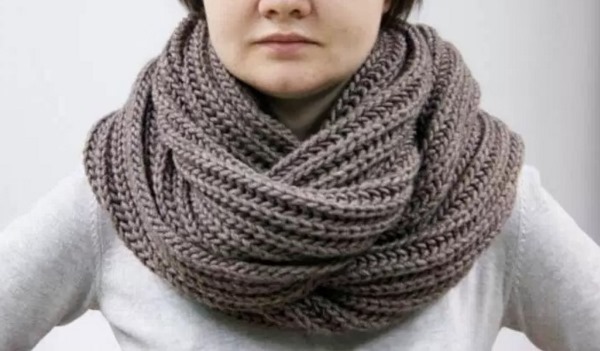
You can use either long paired needles (not shorter than 35 cm) or short-lined needles (not longer than 50 cm). When knitting this pattern, you must knit the first basic row, and then alternate the second and third rows. The pattern is double-sided.
If the pattern is knitted horizontally:
- Cast on the required number of stitches + 2 edge stitches onto the knitting needles and knit the basic row.
- The required length of fabric is knitted.
- The fabric is closed into a ring and sewn.
If the pattern is knitted vertically:
- Cast on as many stitches as needed and close the knitting into a ring.
- The required height of the product is knitted.
- It is better to close the edge of the product with a needle or elastic method. This way the elastic will retain its mobility and will not stretch over time.
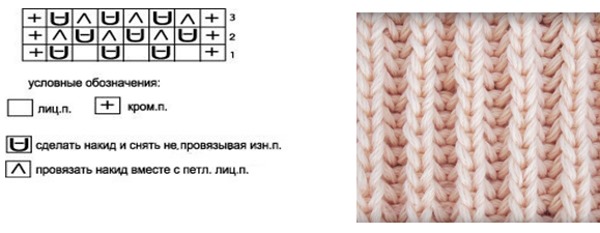
Elastic edge closure without a needle:
- Knit 2 loops, slip one loop without knitting. Knit the resulting 2 loops.
- Knit one stitch again – there will be 2 stitches on the right needle. Transfer them to the left needle and knit together.
- Continue this way until the end of the row. Tighten the last loop and hide the end of the thread.
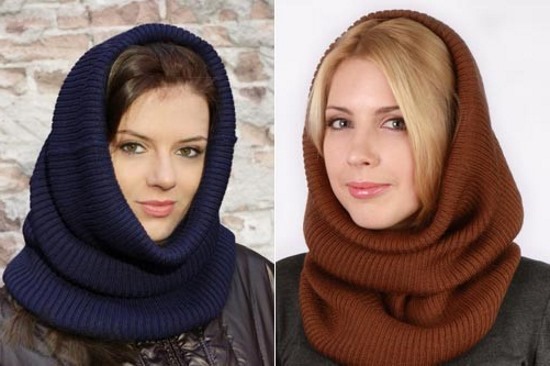
Scarf snood-hood
This universal snood model can be both a scarf and even a hat. In itself, it is a rectangular piece of fabric of the required length, which is closed into a ring. Such a scarf-collar differs from ordinary snoods, perhaps, only in width - most often it starts from 50 cm.
To work you will need:
- Any yarn, thick enough – about 100 g/200 m.
- Suitable for the yarn knitting needles No. 3.0 – 4.0. It is better to take knitting needles on a fishing line, since it is inconvenient to knit such a voluminous and large fabric on long knitting needles.
It is important to take into account that for a snood 50 cm wide and 100 cm long, you will need several skeins of yarn.

Job Description:
- Choose any pattern you like and knit a 10x10 cm sample to calculate the knitting density.
- Based on how many loops fit into 1 cm, cast on the required number of loops.
- Knit the desired length with the chosen pattern. Most often, it is from 100 to 150 cm, so that it is enough for 2 turns with a margin.
- Close the fabric into a ring and sew the ends. This can be done with a needle, crochet hook or knitting needles.
Snood-pipe
Among snoods, this option can be called the most miniature. In itself, such a scarf-collar is a fairly narrow knitted tube (usually seamless), which is put on the neck without turns.
It is very easy to knit. You can even use large stocking needles for this. Rarely is such a snood made with a seam. Usually this happens in cases when the craftswoman wants to make a special pattern of horizontal braids along the upper or lower edge of the product.

If you make this scarf-collar a little wider and longer, it can also be transformed into a hood.
To work you will need:
- Any yarn.
- Suitable knitting needles. You can take knitting needles on a small line (60 cm), or a set of long double-pointed knitting needles.
Job Description:
- It is necessary to choose a suitable pattern. For such snoods, various types of elastic bands or patterns with vertical arans and braids are best suited. Such a pattern slightly tightens the fabric and provides a more secure fit in the neck area.
- Cast on the required number of stitches, close the knitting into a ring and knit according to the chosen pattern.
- Knit the desired height. If you plan to use this snood as a hood, you can make a hollow elastic band along the edge to thread a lace there. Or just close the loops.
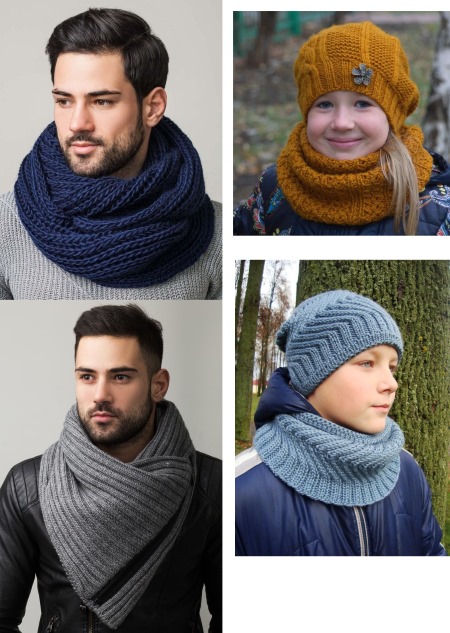
Children's snood for a child with knitting needles
A knitted snood scarf (patterns and descriptions can be found on the Internet) for children is a great alternative to regular scarves. It is easier and more interesting for a child to pull on such an unusual item of clothing instead of getting tangled in a regular scarf. The main thing is to choose the right model and yarn.
Snood for girls
Little fashionistas love to imitate their mothers. That's why snoods in two turns are perfect for them, they not only look stylish, but also retain heat well.
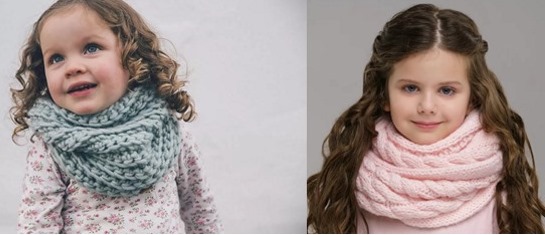
To work you will need:
- High-quality baby yarn. It is better to choose trusted manufacturers with the "baby" mark on the packaging. Such threads undergo strict quality control and are safe even for the smallest children.
- You also need to choose the right knitting needles. Since the fabric is smaller than for an adult snood, you can easily get by with a pair of long knitting needles (about 35 cm).
Job Description:
- It is very important to choose the right pattern. It is important to remember that large and voluminous braid patterns that look good on adult women will look funny and inappropriate on a little girl.
- However, some braid patterns can be made smaller by making the cross with fewer stitches. But this is not possible with all patterns. Therefore, it is important to knit a test sample and see how the pattern will look. This sample will also help you calculate the number of stitches you will need to cast on to start knitting.
- Cast on the required number of stitches and start knitting according to the pattern. For children under 3 years old, a snood in 2 turns should be about 15 cm wide and 80 cm long. And from 3 to 10 years old, the width will be 20 cm and the length up to 120 cm.
- Having knitted the fabric of the required size, you need to close the loops and close it into a ring. You can sew 2 edges with a needle or a crochet hook.
Snood for a boy
Boys, unlike girls, do not like very voluminous things, so a snood-pipe is an ideal option for young gentlemen.
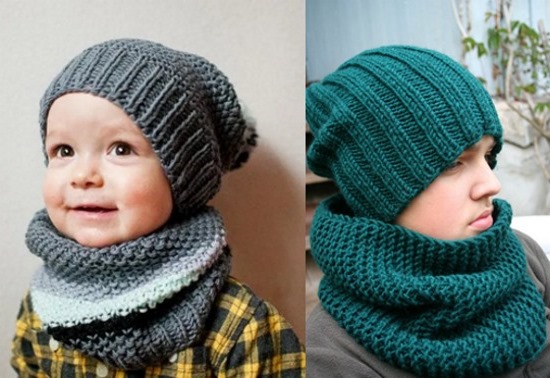
To work you will need:
- High quality children's yarn. It is better to choose brands that contain less than 50% wool so that the product is not prickly.
- The needles should be selected in accordance with the thickness of the yarn. For denser knitting, you can take needles 0.5 - 1.0 size smaller. You can get by with stocking needles of sufficient length.
Job Description:
- Choose a suitable pattern. It is better to give preference to one of the types of elastic, either garter stitch or pearl pattern. For older boys, geometric patterns of alternating front and back loops will look interesting.
- Cast on the required number of stitches. You can calculate it using a sample that needs to be knitted in advance. For children under 3 years old, such a snood-pipe usually has dimensions of 50x30 cm. And for the age from 3 to 10 years - 60x45 cm.
- Knit the snood to the required height and close the loops. If the pattern chosen is elastic, it is better to close the loops with a needle or in another way that will preserve elasticity.
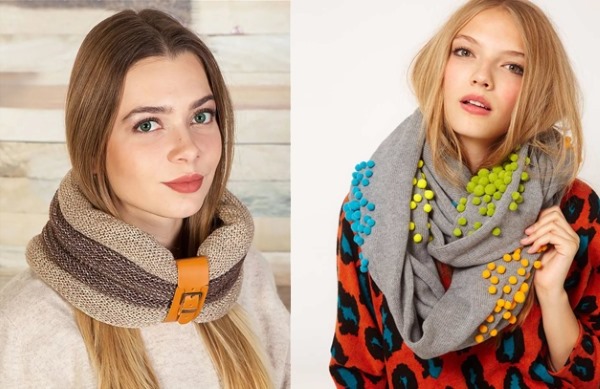
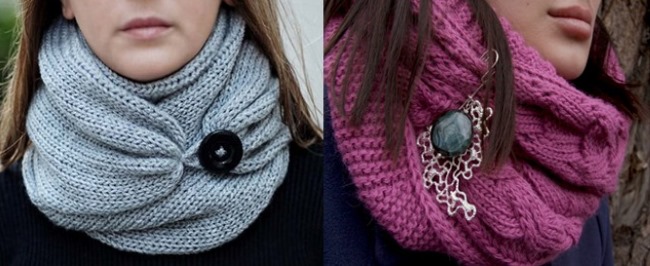
The snood is very versatile. It is an accessory that in skilled hands will allow you to create dozens of looks. There are a huge number of patterns and descriptions for knitted snood scarves, but you can add a special twist to this wardrobe item if you use additional decor in the form of large buttons, leather tags, brooches and fasteners.
Article formatting:Natalie Podolskaya
Video about knitting a snood scarf
Scarf-collar with knitting needles - knitting patterns: