Hand-made wood products do not lose their relevance. A room or garden with wooden crafts looks cozy and original. Often, the material used is leftover boards from repairs or construction, so such products not only decorate the space, but also save the budget.
Is it possible to make money by making wooden crafts with your own hands?
Manufacturing wood products can be a very profitable endeavor if you choose the right niche. However, this type of income has both pros and cons.
| The benefits of working with wood | Cons |
|
|
It is not difficult to create wooden products with your own hands, but in order for them to be in constant demand among buyers, it is necessary to make things modern, therefore, you cannot do without a creative approach and imagination.
Consumers are consistently showing interest in wooden toys. Among the usual sawn toys that have been created for centuries - bears, horses on wheels, cars and cubes, modern parents often buy educational toys. These are various busy boards, puzzles, brain teasers, ride-ons.
An equally interesting direction is the creation of souvenir products. Tourists are happy to buy ethnic handicrafts made by hand as a keepsake. Interior products made of wood have remained at the peak of fashion for many years. Moreover, wood looks great even in the most modern interiors, such as loft and high-tech.
The advantage of wooden things is that they can be made from leftovers from wooden production, for example, furniture. This means that the cost of the material is low.
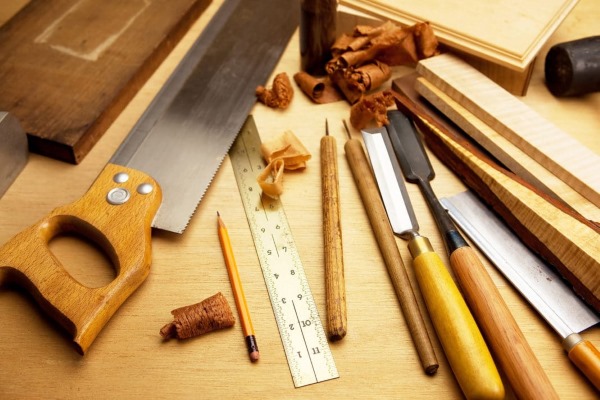
Woodworking tools
Wood is a soft material and relatively easy to process. In order for the work to be enjoyable, safe and performed with the best results, it is necessary to have a standard list of tools in the arsenal.
Tools:
- Axe. Needed for rough preparatory work.
- Hacksaw. This is a hand tool for cutting wood in various directions.
The main attention should be paid to the size of the teeth. Small teeth allow you to make a neat cut, but it will take a long time. Large teeth, on the contrary, cut quickly, but after cutting, you will need to additionally process the edges.
- Plane. Used to level the surface of wood.
- Chisel and chisel. Both tools are needed to make holes, recesses and other recesses in the product. The chisel is used for more precise, "jewelry" work and comes in different configurations, depending on the task at hand.
- Miter box – a device that is designed to make precise and even cuts at different angles.
- Electric jigsaw. Used for cutting boards up to 0.5 cm thick.
- Circular saw. A tool that cuts thick boards.
- Grinding machines. This power tool allows you to quickly and efficiently perform finishing treatment of a wooden surface.
- Drill for drilling holes.
You also need to have a tape measure, rulers, clamps, and a screwdriver.
How to make simple wooden furniture with your own hands
It is not difficult to make wooden products for your home or garden with your own hands, but you need desire, a product diagram and some tools for working with wood.
Stool
It is better to start making wooden furniture with a simple stool.
To work you will need: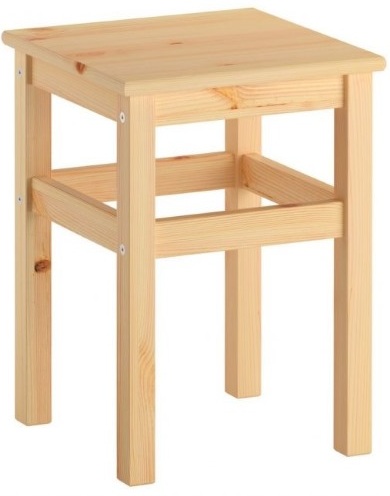
- Bars with a cross-section of 50 mm.
- Sitting boards.
- Self-tapping screws.
- Metal corners.
- Wood glue.
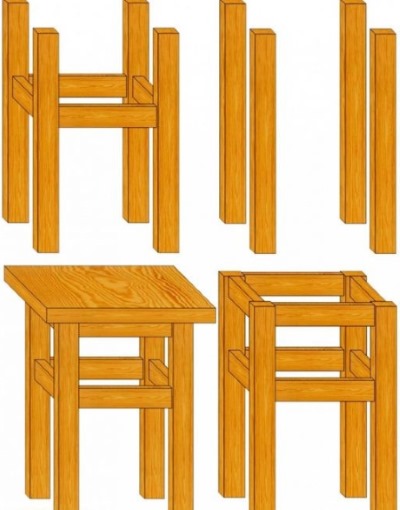
Stages of work:
- You need to cut 4 legs 50 cm long from the timber.
- Next, you need to form a model of the future seat from the boards, measuring 35*43 cm.
- From the timber you need to cut the side rails (placed immediately under the seat) and the crossbars (fasten the legs together for greater stability).
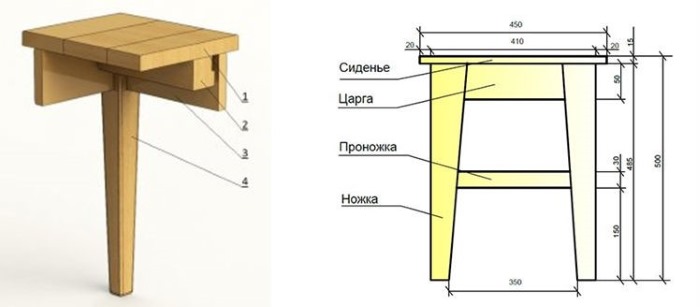
- All blanks need to be sanded with sandpaper. First, you should use sandpaper with medium grain No. 40-60. Finishing should be done with fine grain - 100-150.
- It is impossible to fasten the parts of the stool only with screws, because it will quickly become loose and become unusable. Tenons should be cut out on each end of the sidebar and crossbar, and grooves for tenons should be cut out on the legs.
- The size of the tenon should correspond to 30% of the width of the tsarga, the length – 80% of its width.
- Then you need to cut out the grooves taking into account the calculated dimensions of the tenons. To do this, use a drill with a thin drill bit to make holes along the perimeter of the intended groove. After that, using a chisel, you need to make a recess in the leg. It is important to monitor the dimensions of the groove.
- Next, use a jigsaw and a rasp to cut out the tenons on the tsars and crossbars. When cutting, you need to try the tenon on the groove, adjusting it to the required size if necessary.
- It is recommended to assemble the stool gradually, connecting the 2 legs together using the tsars and the crossbar. Before inserting the tenon, you need to apply a drop of wood glue to the inside of the groove. The product must be assembled carefully, as it takes 24 hours for the glue to dry completely.
- The seat boards also need to be glued together. To do this, glue them on one side and tighten them with a clamp until the glue dries.
- The final work should be carried out after the wood glue has dried.
- The sides and legs must be secured with corners for stability and strength.
- The seat must be secured to the legs with self-tapping screws.
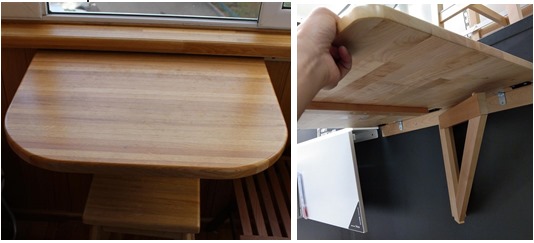
Folding table
Such a table will be appropriate on a balcony or loggia, as well as in the kitchen, if it is small. The main thing when making a folding table is to make a strong and safe fastening.
You also need to consider the conditions in which it will be used. For example, if the balcony is open, then you should take stronger and more durable materials and use special protective coatings for wood.
Stages of work:
- Manufacturing of a tabletop. The tabletop can be of any shape and made of any material.

However, it is recommended to take a board made of hardwood, no more than 3 cm thick. The side that will be attached to the wall should be straight. Rounding on the tabletop is done with an electric jigsaw.
- Preparation of fastening parts.
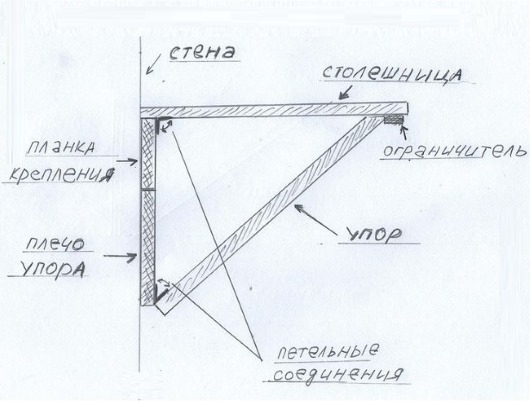
The stability and durability of the structure depend on how accurately the planks are cut and connected together.
- All wooden parts of the table should be sanded with fine-grain sandpaper or a sanding machine.
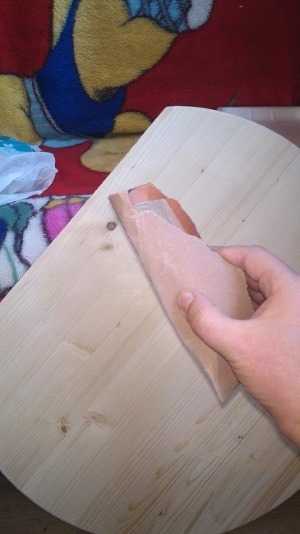
Then, treat it with an antiseptic to prevent the wood from rotting, and cover it with varnish on top.
- Assembling the table.
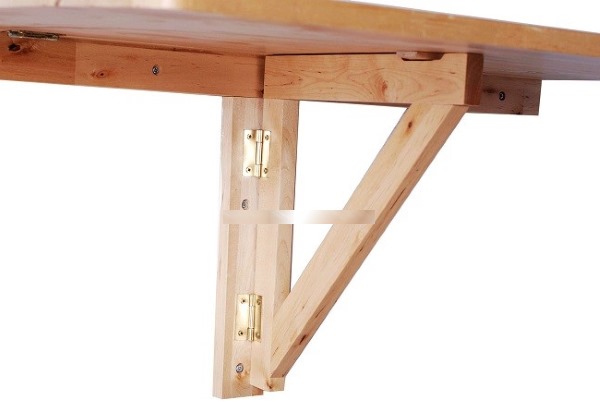
Using screws, attach the vertical and horizontal planks to the wall. Then, attach the hinges to them, and then the fastening leg and tabletop itself.
Wooden home furnishings
Wood is a material that can decorate any interior. Moreover, the more authentic a wood product looks, the more modern it is.
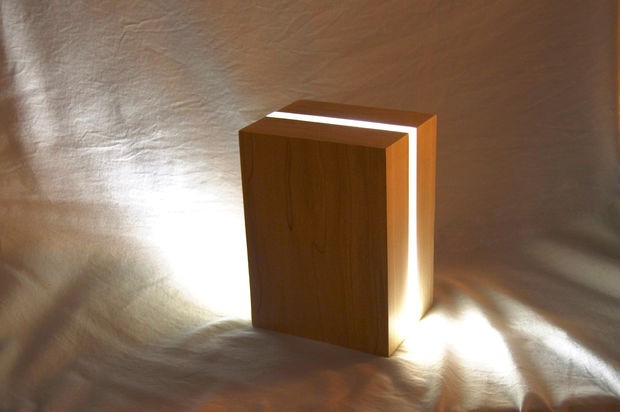
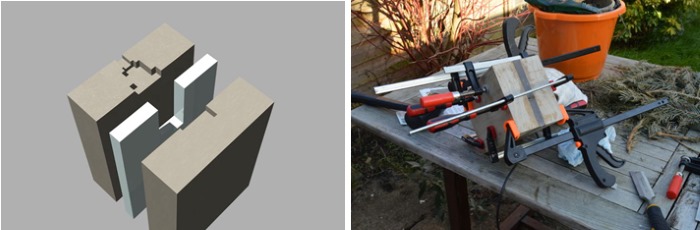
Lamp
You can make wooden items with your own hands from leftover boards, as in the example of this bedside lamp.
Materials:
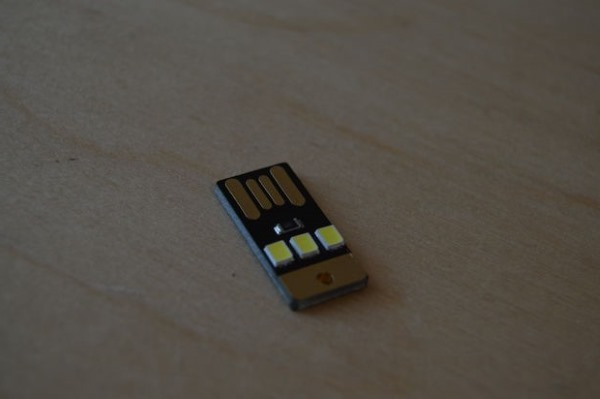
- LED flashlight powered via USB port.
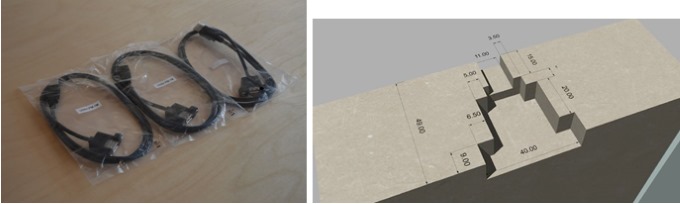
- One-meter extension cable for USB.
- A sheet of plexiglass.
- Wooden board.
- Epoxy glue.
Stages of work:
- Depending on the desired size of the lamp, you need to prepare 2 bars of the same size.

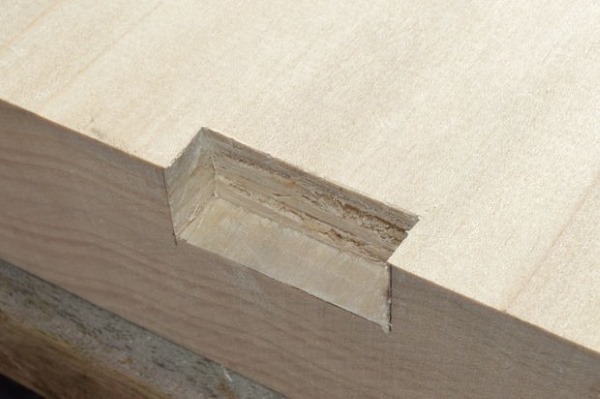
On the first block, you need to make a rectangular recess with dimensions of 16 mm by 40 mm and a depth of 9 mm. To make a groove, you first need to carefully make cuts at an angle with a saw.
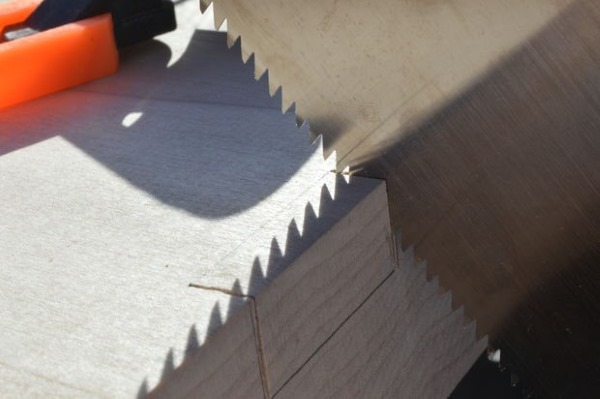
After this, the block should be secured to a flat surface using clamps and a recess should be formed using a chisel and hammer. For this work, it is better to choose a wide chisel with a working surface of 12 mm.
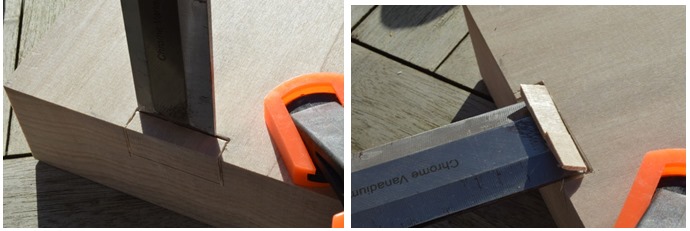
The more evenly the chisel is positioned when gouging out a piece of wood, the easier it will be to make a recess with even sides. It is important to use a chisel to remove parts of the wood in the thinnest possible sheets, otherwise there is a risk of chipping the block.
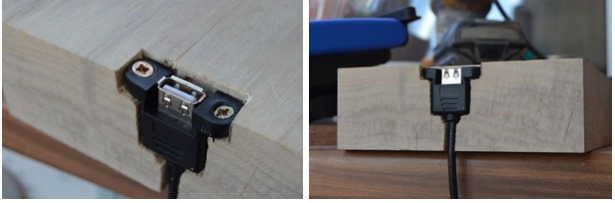
- On the second part of the lamp, you should prepare a recess that will correspond to the dimensions of the USB connector.
The recess is formed in the same way as in the first case, but it will require a little more time and effort. It is recommended to use a 6-millimeter chisel.
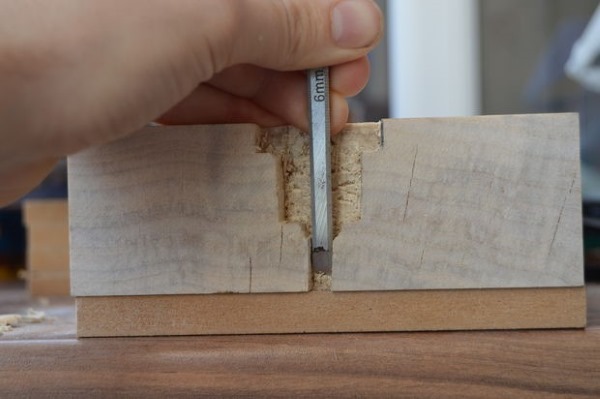
The connector should ultimately fit tightly into the recess, so it is necessary not only to accurately repeat its shape, but also to take into account the existing height difference: at the connector itself and in the cord area. After the recess is ready, the connector should be placed in it and secured with 2 screws.
- The next step is to cut out the plexiglass for the lamp.
The height of the part will correspond to the height of the lamp. In this example, it is 210 mm. Depending on your skill, you can cut the desired shape from the plexiglass using a saw (band or circular) or entrust this work to laser cutting professionals.
- Next, all the parts should be glued together using epoxy resin. And secured with clamps until completely dry.
- For final preparation, it is necessary to process the resulting lamp with sandpaper. First, use a larger grain, and finish sanding with a fine one. It is necessary to remember that the better you sand the plexiglass, the more matte its surface will be, which will ultimately give a soft, muted light when the lamp is turned on.
- The lamp surface should be coated with special means for better preservation of the wood, as well as to give the product a finished look. You can use wax, acrylic paints, stains or varnish.
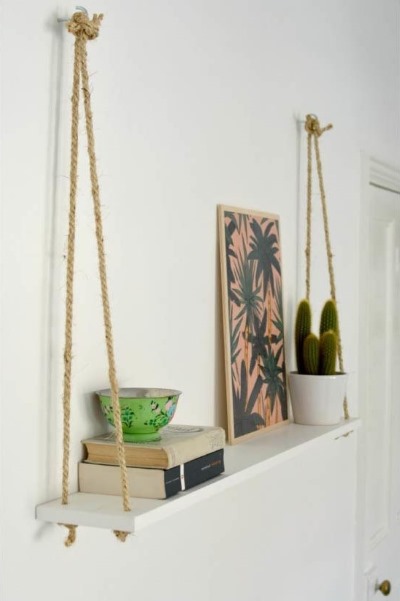
Simple wooden shelf
For flowers or books, you can make a shelf with a rope mount.
To work you will need:
- Board of the desired size. Recommended width from 25 mm.
- 4 meters of rope, 8 mm thick.
- Drill.
- Hooks – 2 pcs.
- Perforator.
Stages of work:
- Mark the places on the board and use a drill to make holes for the rope.

The drill should be slightly thicker than the thickness of the rope.
- The wood needs to be treated to protect it from dust and time, and also for beauty. To do this, the surface needs to be sanded with sandpaper. You can emphasize the natural pattern of the wood using a stain and cover it with varnish or wax on top.
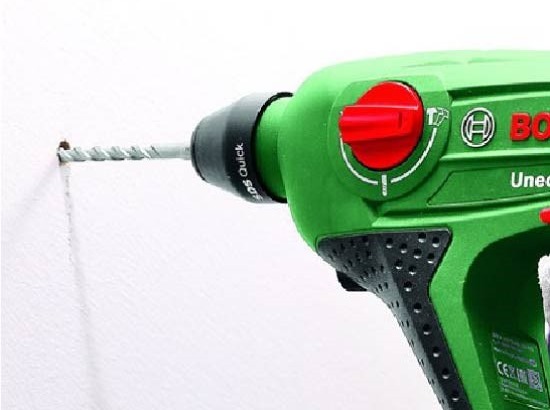
- Using a hammer drill, drill a hole in the wall and secure the hooks.
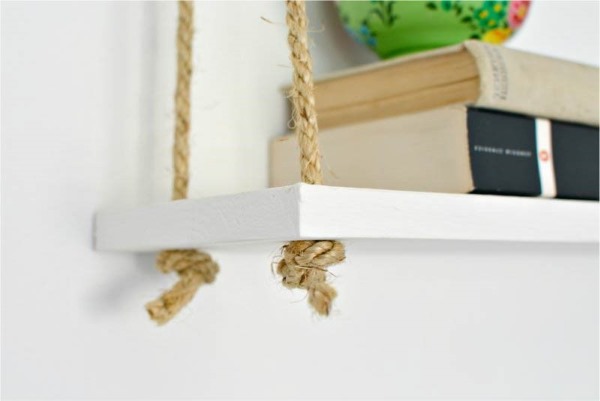
- The rope needs to be cut into 4 equal pieces. Each piece needs to be secured under the board with a knot.
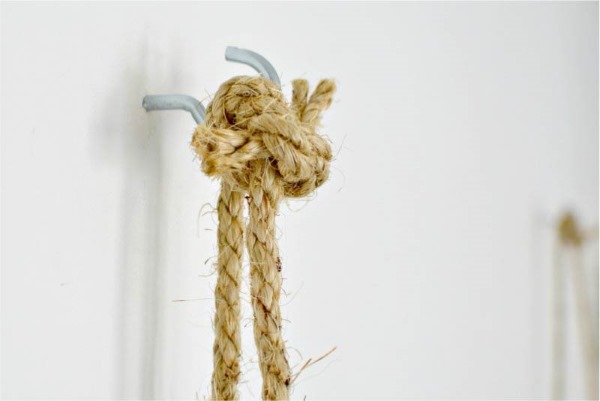
- Using knots, it is necessary to tie the upper parts of the ropes.
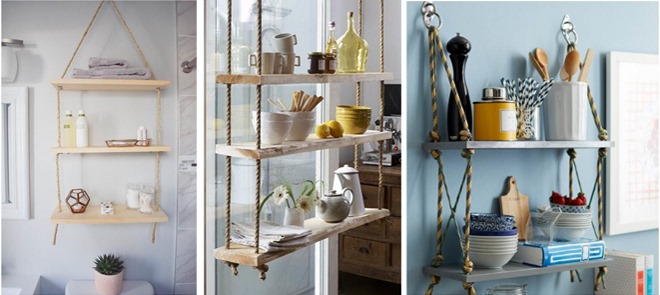
There are many possible variations of such shelves.
Crafts for the garden
Wooden products made with your own hands can not only decorate your garden, but also bring significant benefits.
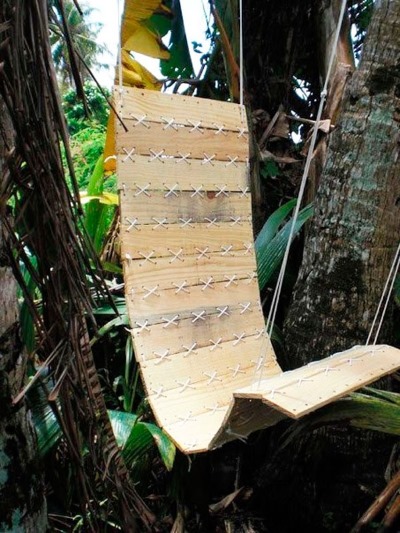
Wooden hammock
To work you will need:
- Pallet or boards.
- Strong rope.
- Tools (chisel, drill, pliers, sandpaper, pencil, tape measure).
Stages of work:
- It is necessary to disassemble the pallet into boards using pliers and a chisel.
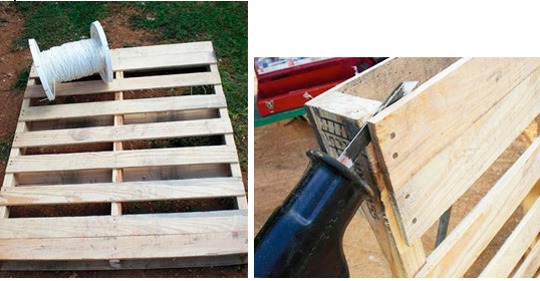
You need 16 boards to make a hammock.
- The boards need to be made as smooth as possible by sanding them or using a sanding machine.
- On each board, it is necessary to mark the places for holes for the rope. The distance from the hole to the edge should be more than 2 cm.
- Using a drill, you need to make holes according to the markings.
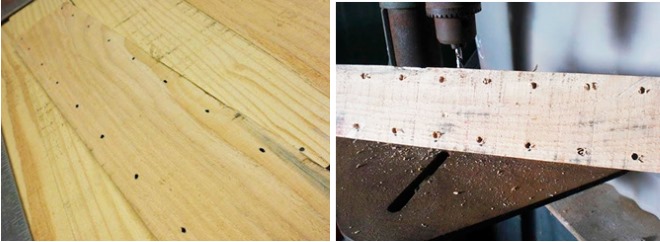
The drill diameter should be thicker than the diameter of the rope.
- All wooden parts must be fastened together with rope.
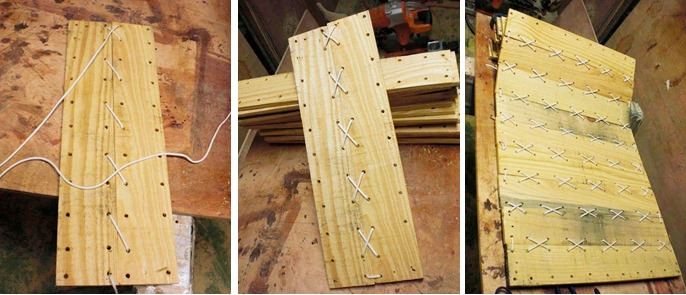
- In the corners of the outer boards, you should drill more holes for the rope on which the hammock will hang.
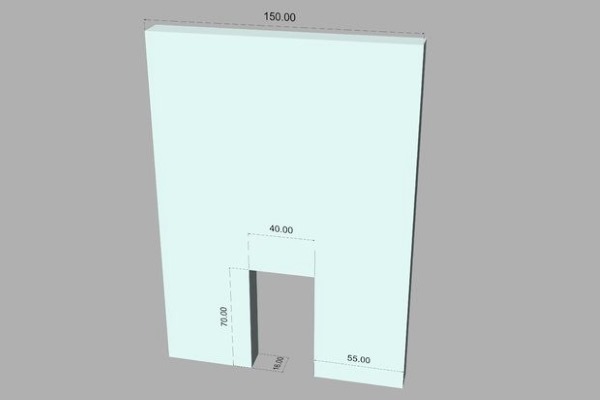
Birdhouse
The more birds on the site, the fewer insect pests. To attract bird families, it is recommended to hang birdhouses.
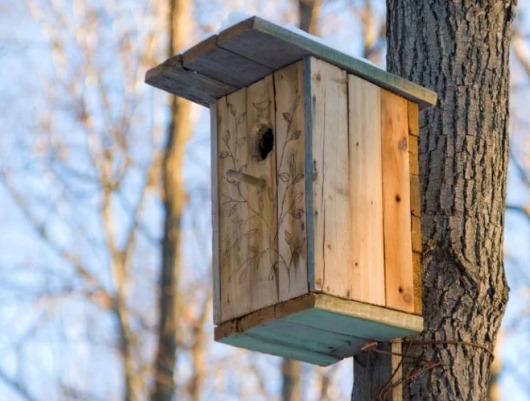
To make a birdhouse, you need to use the following diagram:

To work you will need:
- Boards 2 cm thick.
- Hammer.
- Nails, diameter about 2 mm.
Stages of work:
- The boards need to be cut into pieces according to the dimensions specified in the drawing. It is important to remember that chicks do not have sufficient plumage at the beginning of their lives, so when preparing the pieces and subsequently assembling the birdhouse, no gaps should be allowed. All sides should fit tightly together.
- The construction of the birdhouse should begin with the assembly of the front wall with a round hole and two side walls located at right angles to the front.
- It is enough to hammer in 3-4 nails along each connection line.
- The next step is to insert the bottom between the 3 sides and nail it. Then you need to nail the 4th wall of the birdhouse to the side walls and the bottom.
- To make a canopy, you should first connect 2 parts (a small square and a rectangular one). The canopy should protrude above the birdhouse by a distance of 5 to 10 cm. The longer this protruding part, the less chance cats have of getting to the opening of the birdhouse.
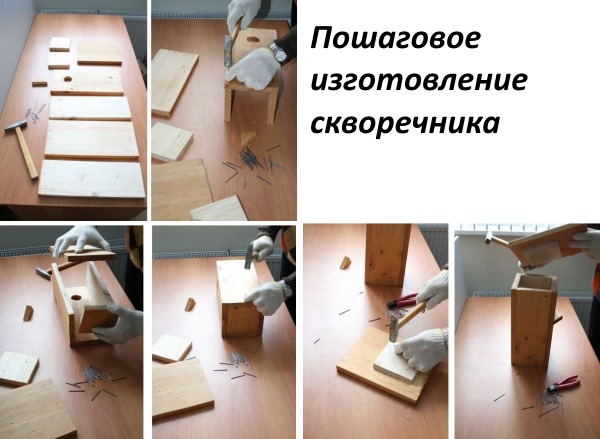
If after nailing 2 parts there are protruding ends of the nails, they must be bent with a hammer.
- The roof should cover the birdhouse tightly. If it does not fit well or not all the way, you can adjust the workpiece with a chisel. Then nail it to the walls.
Wooden Toys for Kids
Wooden products made by hand for children have many advantages. They look modern, are environmentally friendly, and are tactilely pleasant.
African animals
To work you will need:
- thick plywood board scraps,
- jigsaw,
- sandpaper.
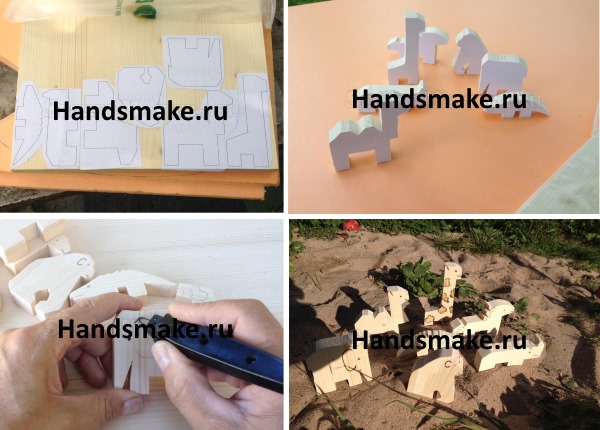
Stages of work:
- It is necessary to make paper parts of future animals and glue them onto plywood.
- Next, you need to cut out the blanks along the contour with a jigsaw.
- Using sandpaper, you need to sand each piece.
- To draw details (eyes, ears), you can use a wood burning device or paint the animal faces with paints.
- To make the toys last a long time, it is recommended to cover them with varnish.
Domino
Dominoes are a popular game among adults and children who can already count.
To work you will need:
- plywood 0.5 cm thick,
- jigsaw,
- sandpaper.
- ruler,
- pencil,
- decorative outline,
- varnish (optional).
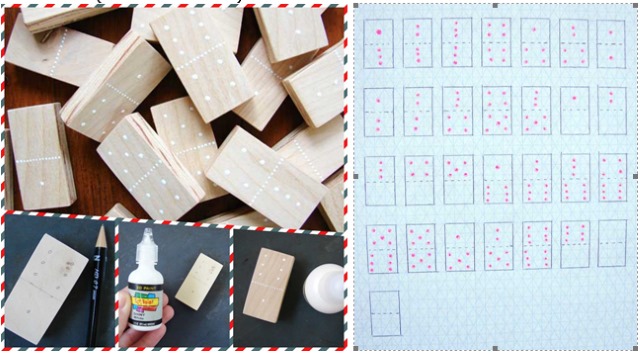
Stages of work:
- From plywood you need to cut out 29 rectangles measuring 4 cm * 2 cm.
- Each piece needs to be sanded well with fine-grain sandpaper so that the wood is smooth.
- Use a pencil to mark the locations of the dots.
- With a decorative outline, draw a line in the middle of the rectangle and make dots. It is recommended that before applying the outline to a part, practice making dots in another place to learn how to squeeze out the same amount of paint. Complete drying of the outline usually occurs after 12 hours.
- Each domino piece should be coated with varnish for wood surfaces.
For little ones, you can make a version that does not require counting skills. To do this, you need to use pictures instead of dots. For such dominoes, you need to print the necessary pictures on a printer and glue them. It is recommended to glue them as follows.
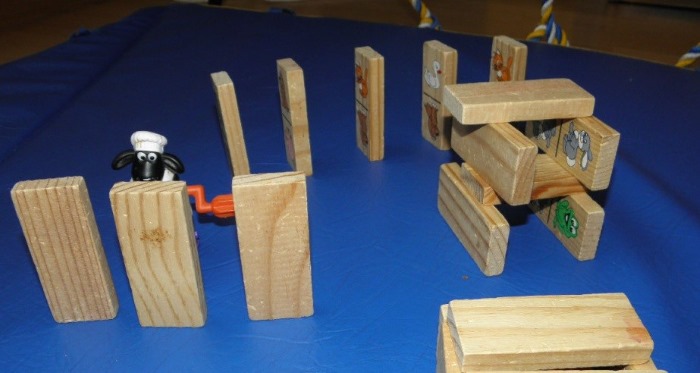
Cover the piece of wood with PVA glue using a brush. When dry, the white glue will become transparent and will act as a primer. Next, place the desired picture on the piece of wood and coat it with glue on top.
The paper will get wet, so you need to move the brush carefully so as not to tear the picture. After drying, it is recommended to coat the entire wooden part with PVA again. The surface will become glossy and smooth, pleasant to the touch.
To make a wooden interior item with your own hands, you don’t have to be a wood craftsman. Having studied the basics of carpentry, you can choose a simple model for beginners, and use a hand tool instead of a professional electric one.
Author: Vorobyova Nadezhda
Article formatting:Natalie Podolskaya
Video about wooden products
DIY wood products:
I made small wooden figures to order. To send the goods, I ordered polypropylene bags (BOPP) on the site pak24. They are intended for both food and non-food products.
The article is useful, but not very accurate information on some aspects.