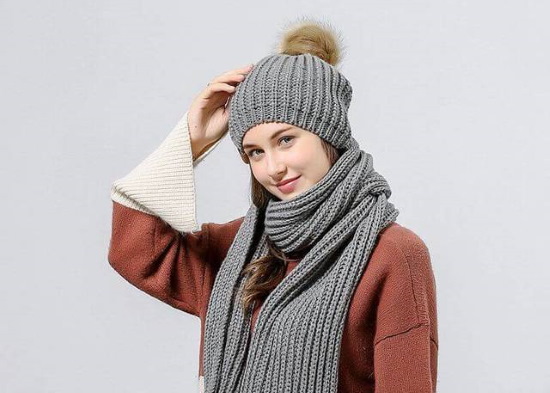
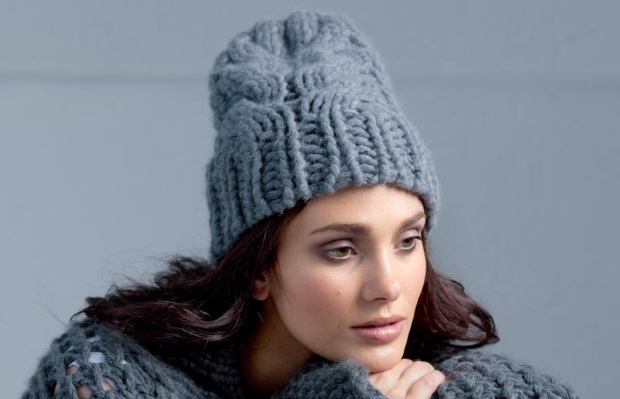
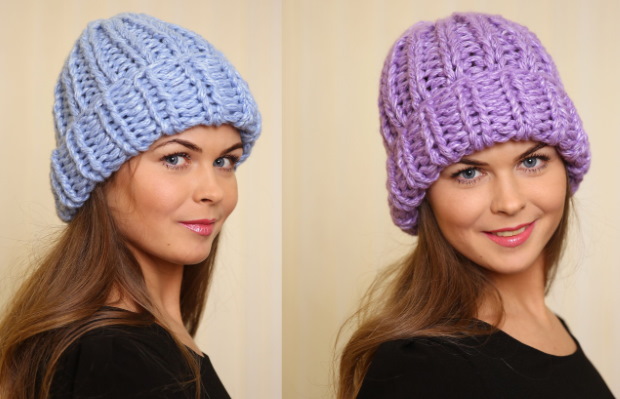
Hats made of thick yarn are a warm and fashionable accessory that will come in handy for women in the cold season. Since it is not always possible to find a hat that fits perfectly and is suitable in style and color, you can try knitting it yourself according to individual measurements.
In this case, you can choose a style and color that directly matches your outerwear. Then it will not only be a warm headdress, but also a stylish addition to your look.
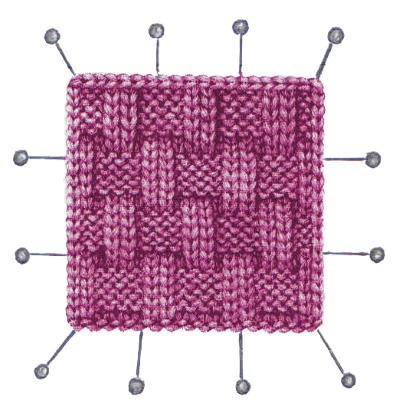
Before you start knitting, you need to knit a sample from thick yarn.: a small square 10x10 cm with the chosen pattern, and wash it. This is done to ensure that the chosen pattern is correct, to check the density of the appropriate knitting and the diameter of the knitting needles, the degree of shrinkage of the yarn after washing, and to calculate the appropriate number of loops for a certain density of the product.
Taking measurements
Before starting work, you need to measure the circumference or volume of your head.For more accurate measurement results, you should seek outside help.
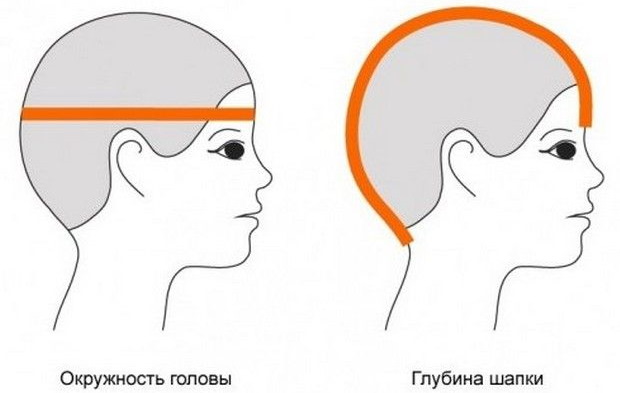
To measure the head, you need to determine the head circumference along the forehead, at the widest point, and measure with a tape measure. If you don't have a tape measure at hand, use a cord or yarn. To determine the correct depth of the hat, measure the length from the earlobe to the crown.
Choosing knitting needles
The most suitable knitting needles for knitting a hat from thick yarn are metal plastic or smooth wooden knitting needles.
Rough needles will catch the yarn and create the effect of a sloppy product. Plastic and wooden needles are lighter in weight, but less durable, and some metal needles can stain light-colored yarn, they are heavier, but will last a long time.
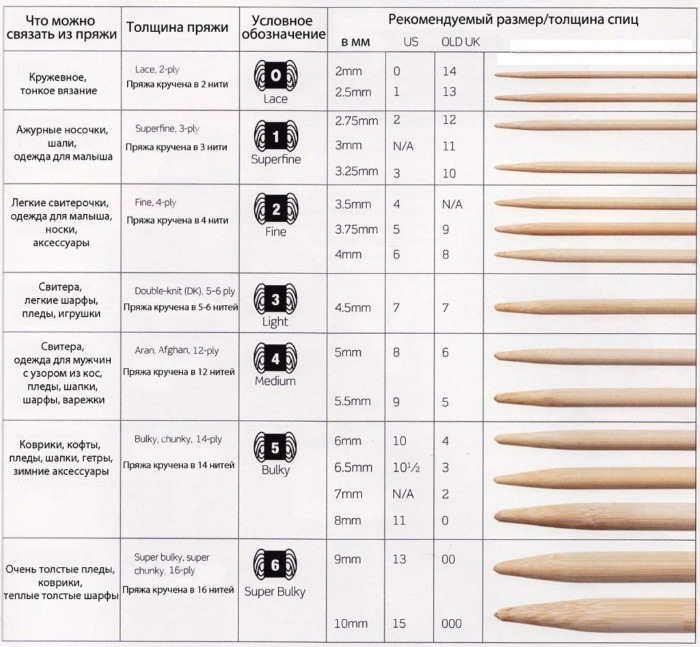
The needles have a number from 1 to 8, which indicates the diameter of the needle in mm. The circumference of the needle should roughly match the thickness of the yarn, then the pattern will be the most clear and textured.
The method for determining the size of the future loop is as follows: a thread is wound on the knitting needle in the form of a spring - one skein, this is 1 loop. After completing the knitting of the product, it should be slightly pulled out and steamed through the protector.
Possible product options for women
Women's hats can be made in various variations. All of them can be with or without a visor, more or less thick, fluffy or dense. There can be a pompom on the top. The hat can also be decorated with tassels, beads and other decorative elements.
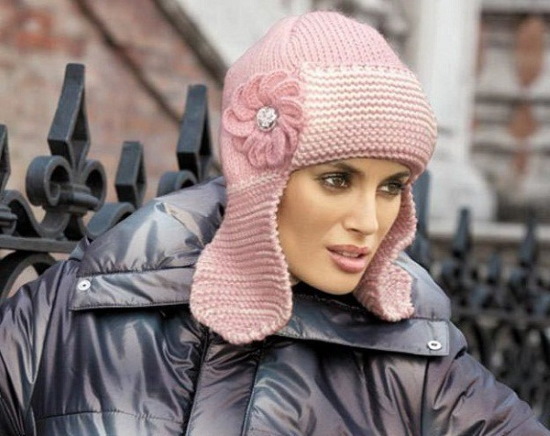
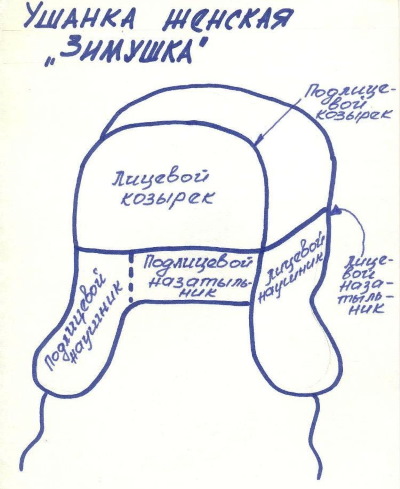
Knitted hat with earflaps from thick yarn
The ushanka hat is the most suitable for protection from the cold and warming the ears in the cold winter.
To knit such a hat, you will need:
- thick yarn;
- 2 knitting needles;
- centimeter;
- scissors.
A hat made of thick yarn is easy to make with knitting needles and is suitable for beginner needlewomen. To make this hat, a garter stitch knitting method is suggested, where all rows are knit.
Knitting pattern and description:
- The required number of loops is cast on one of the knitting needles. It is important that the end of the thread is long enough, about 20 cm, to comfortably hold the thread. It should be located between 2 fingers: index and middle.
The end of the yarn should remain on the outside of the palm. If the thread is not long enough, it will be uncomfortable to hold. This thread can also be used later to sew the elements of the product.
- The knitting needle with the loops is taken into the left hand. The other knitting needle is taken into the second hand.
It is necessary that the thread is located on the index finger of the left hand and is clamped between the index and middle fingers and between the ring and little fingers.
- Knit 1 cast-on loop.
- The knitting needle in the right hand is inserted into the second loop from left to right. The knitting thread is grabbed from the index finger and pulled through the loop. The new loop is transferred from the knitting needle in the left hand to the knitting needle in the right hand.
- The following loops are knitted in a similar manner.
Step by step knitting instructions
The product is knitted quite simply.
Step by step the process looks something like this:
- Measuring head circumference and hat depth.
- Knitting ears.
- Calculation of the front and back of the hat.
- Knitting the main part.
- Knitting the top of the hat.
- Knitting a hat visor.
- Removing protruding threads.
The detailed process of knitting a sample of a hat with earflaps is described with the calculation of the head volume of 55 cm:
- Measuring the circumference of the head and the required depth of the hat.
- Knitting ears. Cast on 8 loops of thick yarn onto 2 knitting needles – 1 row.
To the 2nd row, from 2 sides, one edge loop is added. The number of loops in the second row is 10. In this way, knit up to 22 loops in a row, up to the 8th row, then, in the remaining rows, knitting continues in 22 loops. The length of the ear is adjusted as desired.
- Calculation of the front and back of the hat. For calculations, the width of the knitted ear is measured and multiplied by 2. The resulting number is subtracted from the head volume figure. The remaining amount is divided into 2 halves, taking into account that the front part of the hat is 1 cm larger than the back.
With a head circumference of 55 cm, 39 loops are taken for the front part, and 36 for the back part. The total number of loops is calculated by adding up all the parts of the hat: Ear + ear + back part + front part = main part of the head. 22 + 22 + 39 + 36 = 119.
- Knitting the main part. In order for the seam of the hat to be at the back, the number of loops on the back side is divided by 2. The knitting needles cast on part of the loops of the back part - 18, one eye - 22, the number of loops of the front part - 39, the second eye - 22 loops, the second part of the loops of the back part - 18.
Then knit another 5 rows in the amount of 119 loops for fastening and knit until the hat reaches the appropriate depth.
- Knitting the top of the hat. At the top of the hat there is a strong narrowing. At the beginning, the row decreases by 2 loops. The next row decreases by 8 loops - in the row, at equal intervals and at the end, 2 edge loops are necessarily left. So, 10 rows are knitted until 2 loops remain. By the end, 14 to 17 loops should remain, the remaining loops are pulled together.
- Knitting a hat visor. At the front of the hat, 39 stitches are cast on and 5 rows are knitted. The next 5 rows are decreased by 2 stitches – one on each side.
- Removing protruding threads – the final process. All protruding threads are carefully removed with scissors. This is a quick and easy process that symbolizes the completion of the work.
A hat made of thick yarn of this style, knitted with knitting needles, is suitable for both children and adults. To fix the hat under the chin, additional cords are sewn on. The ears of the hat can be fixed with buttons or additionally sewn buttons.
Large English knit hat
To knit such a hat you will need:
- thick yarn;
- 2 knitting needles;
- centimeter;
- scissors.
The hat is knitted using the "English rib" pattern. The product knitted in this way is soft and elastic. As an option, you can add a pompom to the headdress to make the hat look more original.
Knitting pattern with description:
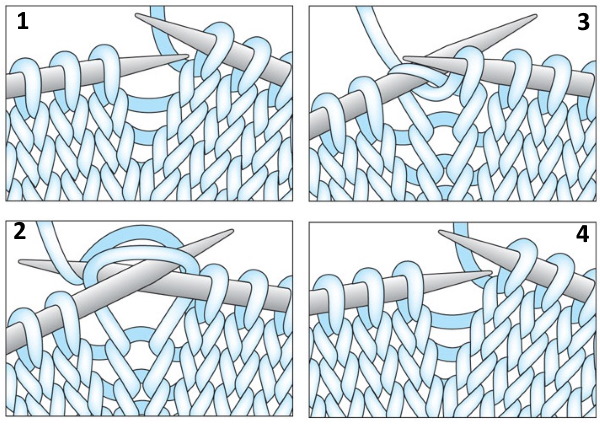
- Row 1. An odd number of stitches is cast on. Then the row is knitted as follows: 1 edge stitch, not knitted and removed. Then, alternately, 1 purl and 1 front stitch are knitted. Everything is knitted like this, until the last stitch. The outer stitch is knitted with a front stitch.
- Row 2. Slip 1 stitch. Then knit 1 stitch, make a yarn over, and slip the stitch without knitting. Next, make 1 purl stitch. Finish the edge stitch.
- Row 3. Yarn over. Without knitting, remove 1 loop. It is important to hold the thread at the back of the product! The loop and yarn over of row 2 are knitted together with a face loop. Next, yarn over and, without knitting, remove 1 loop.
- Row 4. The loop and yarn over from row 3 are knitted together with the front loop, a yarn over is made and 1 loop is removed.
- Next, the 3rd and 4th rows alternate again.
Step-by-step knitting instructions:
- Measuring head circumference and hat depth.
- Knitting the main part of the hat.
- Knitting the top of the hat.
- Removing protruding threads.
A detailed example of knitting a hat with a head circumference of 58 cm looks like this:
- First, you need to measure the circumference of your head and determine the desired depth of the hat.
- Then the main part of the hat is knitted. For 1 row, 39 loops are cast on and another 20 rows are knitted using the "English rib" pattern.
- Knitting the top of the hat. To form the crown of the hat, the number of loops is reduced. To do this, the purl loops are knitted 2 together with a purl stitch, and the front loops are knitted 2 together with a front stitch. 2-3 rows are knitted this way. Then, the remaining loops are pulled together with a knitting thread and secured.
- Removing protruding threads. All excess is removed with scissors to give the product a finished look.
A hat made of thick yarn for women or a child, knitted with English knitting needles, will be pleasant to wear and very beautiful.
Thick Yarn Braided Hat
To knit such a hat you will need:
- thick yarn;
- 2 knitting needles;
- centimeter;
- scissors.
Knitting pattern with description:
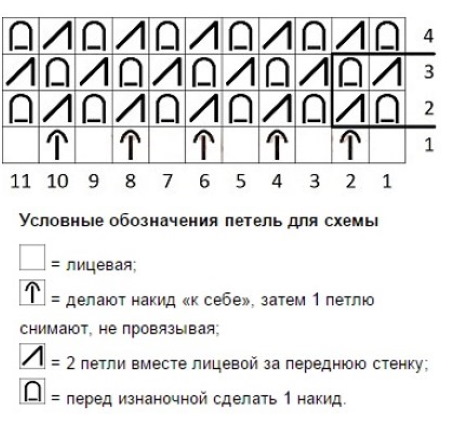
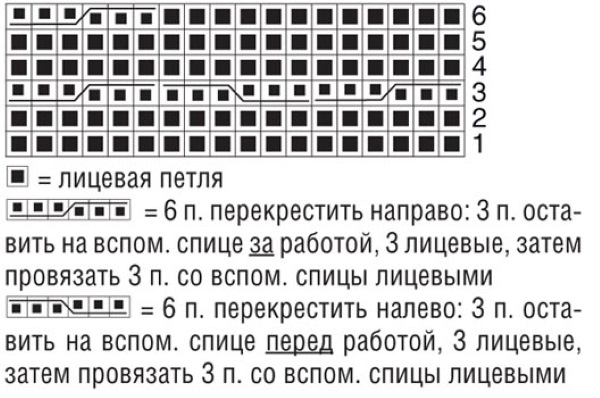
- Row 1. To knit the “braid” pattern, cast on 1 row on the knitting needles in the following quantity: 2 purl loops, 6 front loops, 2 purl loops.
- Row 2. Knit 2 knit stitches, 6 purl stitches and 2 more knit stitches.
- Row 3 is knitted similarly to row 1.
- Row 4 is knitted similarly to row 2.
- Row 5. Knit 2 purl stitches. 3,4,5 stitches are removed back onto a separate knitting needle. Knit 6,7,8 stitches with the front stitch. Next: stitches from a separate knitting needle are also knitted with the front stitch, and the next 2 stitches are knitted with the back stitch.
- By doing the 5th row in this way, you get a figure eight.
When removing loops onto a separate knitting needle from the back of the product, the braid turns to the right. To turn to the left, remove loops onto a separate knitting needle from the front side of the product.
Step-by-step knitting instructions:
- Measuring head circumference and hat depth.
- Knitting elastic.
- Knitting the main part of the hat.
- Knitting the top of the hat.
- Removing protruding threads.
An example of knitting a hat is described with a head circumference of 54 cm:
- Measuring head circumference and hat depth.
- Knitting an elastic band. An elastic band is knitted for the base of the hat. 70 loops are cast on the knitting needle, consisting alternately of 2 purl and 2 front loops, plus edge loops are knitted on 2 sides. The width of the elastic band is knitted at the discretion of the master. In the last row of the elastic band, 6 loops are added and the row should be 78 loops.
- Knitting the main part of the hat. The main part of the hat is knitted with a braid pattern. 78 loops are cast on, the two outer ones are edge loops, and 20 rows are knitted
- Knitting the top of the hat. On row 21, the loops are decreased in the front rows. In the back row, all loops are knitted with purl knitting.
Every 6 loops, 2 loops are knitted together. In the next row, 2 loops are knitted together every 5 loops and so on for six rows. In the 7th row, knit every 2 loops together. The remaining loops are pulled together with knitting thread and secured.
- Removing protruding threads. All excess is removed with scissors to give the product a finished look.
A thick yarn hat knitted with a braid pattern is ready. This hat looks elegant and original, so many young girls may like it. Knitting a braid is not easy, but the result will not make you regret the time spent.
Thick yarn hat with a turn-up
To knit such a hat you will need:
- thick yarn;
- 2 knitting needles;
- centimeter;
- scissors.
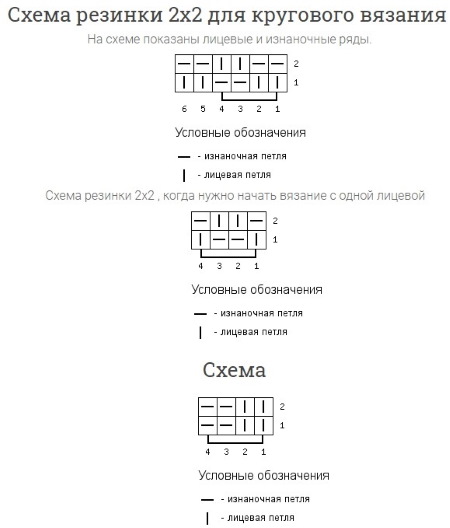
Knitting pattern 2x2 with description:
- To knit a 2x2 elastic band, the loops are cast on in the order of alternating 2 front and 2 back loops.
- For a symmetrical pattern, after sewing, the number of loops must be a multiple of 4.
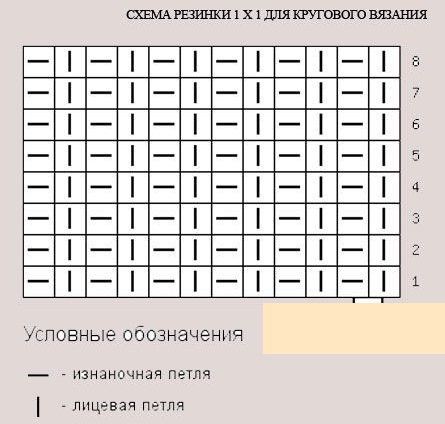
Knitting pattern 1 X 1 with description:
- To knit a 1x1 elastic band, you need to alternately perform 1 purl loop and 1 front loop.
- To obtain a symmetrical pattern, after sewing, the number of loops must be a multiple of two.
Step-by-step knitting instructions:
- Measuring head circumference and hat depth.
- Knitting a lapel.
- Knitting the main part of the hat.
- Knitting the top of the hat.
- Removing protruding threads.
An example of knitting a hat is described with a head circumference of 56 cm:
- Measuring head circumference and hat depth.
- Knitting a turn-up. To knit a rib, cast on 120 stitches, then join them into a circle, and knit the turn-up with a rib, alternating 2 purl stitches and 2 face stitches. The following 24 rows are knitted in this order.
- Knitting the main part of the hat. Next, the hat is knitted with a rib pattern: 1 front and 1 back loop for 44 rows.
- Knitting the top of the hat. On row 45, the crown of the hat is formed. For this, 3 loops - 1 purl, 1 front and 1 more purl, are knitted together with a front loop.
In order for the loops to lie evenly, before knitting them, it is necessary to remove the loops from the knitting needle, turn them over and put them back on the knitting needle and knit. Thus, 4 more rows are knitted. On the 49th row, the 16 remaining loops are pulled together with a knitting thread and secured.
- Removing protruding threads is the final stage. All excess is carefully removed with scissors.
A thick yarn knitted hat with a turn-up is one of the most popular accessories of a winter female image. Such a hat is relevant for both women and men of different ages.
Thick yarn hat with elastic band
To knit such a hat with an elastic band you will need:
- thick yarn;
- 2 knitting needles;
- centimeter;
- scissors.
Knitting pattern:
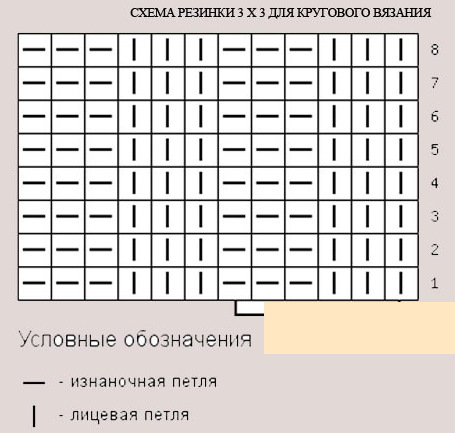
- To knit a 3x3 elastic band, 3 purl and 3 front loops are alternately cast on to the knitting needles.
- To obtain a symmetrical pattern, after sewing the number of loops must be a multiple of six.
Step-by-step knitting instructions:
- Measuring head circumference and hat depth.
- Knitting the main part of the hat.
- Knitting the top of the hat.
- Removing protruding threads.
An example of knitting a hat is described with a head circumference of 56 cm:
- Measuring head circumference and hat depth.
- Knitting the main part of the hat. Cast on 120 stitches, alternating 3 purl stitches and 3 face stitches. Knit 55 rows in this order.
- Knitting the top of the hat. In row 56, the crown of the hat is formed: 3 front loops and 2 back loops are knitted over 2 rows. In row 58, 2 front loops and 2 back loops are knitted. In row 60, 2 front loops and 1 back loop are knitted. The remaining loops are pulled together with knitting thread and secured.
- Removing protruding threads. To give the product a neat finished look, all excess is removed with scissors.
A hat made of thick yarn, knitted with needles in a way called "ribbing", is distinguished by its elasticity and ease of use. In addition, such a headdress can have different patterns.
How to knit a pompom for a hat from yarn
There are two most common ways to make a pompom. For both, the same thing is true: the more yarn is wound, the denser and fluffier the pompom will be.
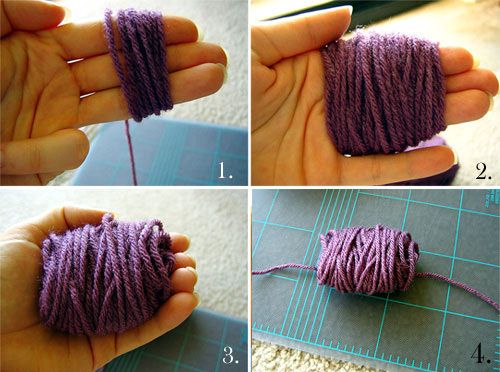
Method 1 – using your fingers:
- The yarn is wound around 4 fingers of the hand.
- Without removing the yarn from your fingers, the resulting bundle is tied in the middle with a thread.
- The tied threads are removed from the hand and the yarn is cut with scissors on both sides.
Method 2 - using cardboard templates.
To make a pompom using templates, you will need:
- thick cardboard;
- pencil and compass;
- the required yarn;
- needle;
- scissors.
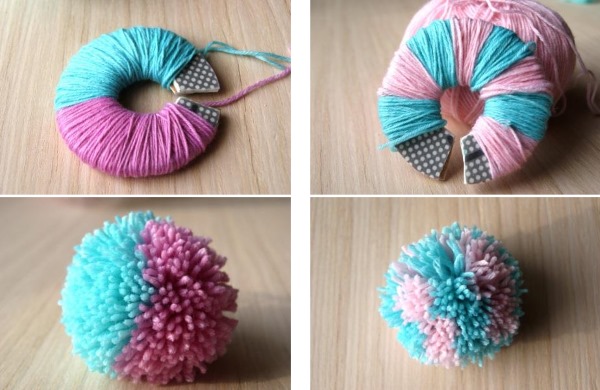
The step-by-step manufacturing process looks something like this:
- Using a compass or a round object of suitable diameter, draw 2 identical circles on the cardboard. Their diameter will be equal to the diameter of the pompom.
- Inside each of the circles, draw 2 more circles - these will be the holes for winding the threads. Cut out a large circle with a hole.
- A piece of thread is placed on one of the circles, around the hole, forming a loop. The second circle is placed on top.
- Take a thread, thread it through a needle and wrap it around both pieces.
- Then, using scissors, the threads are cut along the outer edge of the circle. And in the center, it is tightly tied with the thread from point 3.
- The templates are removed.
Yarn tassels
The length of the tassel depends on the length of the object on which the thread is wound. And the fluffiness depends on the number of windings.
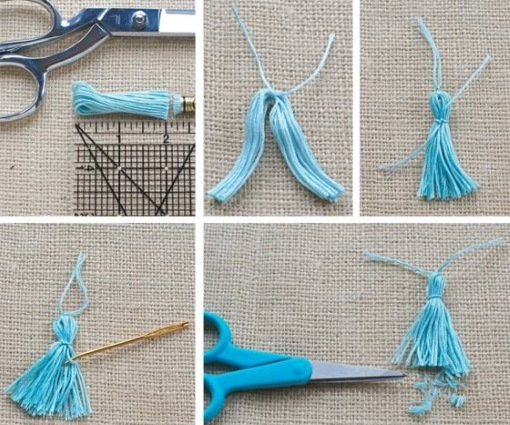
Step by step:
- To form a tassel, you need to wrap the yarn around an object of suitable length (this could be your fingers).
- Then, on one side, the yarn is cut and divided into 2 equal parts.
- The cord on which the tassel will be located is placed on one of the parts of the threads so that its end is in the middle of the length.
- Then everything is covered with the second half of the threads.
- The entire product is tied with a thread in the middle.
- The upper part of the threads goes down.
Today, knitting things with your own hands using knitting needles or a crochet hook is a whole art. To master this craft, you need to spend a lot of time studying various techniques, as well as types of knitting needles and yarn.
But after mastering this skill, unlimited possibilities for creating individual and original things open up. And a knitted hat made of thick yarn will become a warm addition to the autumn or winter look for any woman.
Video about knitting
Knitting a hat from thick yarn for women: