Winnie-the-Pooh is a fairy-tale character who is the main character of A. A. Milne's stories and poetry collections. He was one of the toys of Christopher Robin, the writer's son. He is a rather clumsy bear, his head is stuffed with sawdust, but despite this, he has an excellent memory.
In the 1960s, the Disney studio created several cartoons with this character and his friends. In 1969-1971, the Soyuzmultfilm studio drew 3 episodes about the adventures of the bear cub. There were other, less popular adaptations.
The bear cub is small and very plump, almost round. It has wide open eyes and round paws.
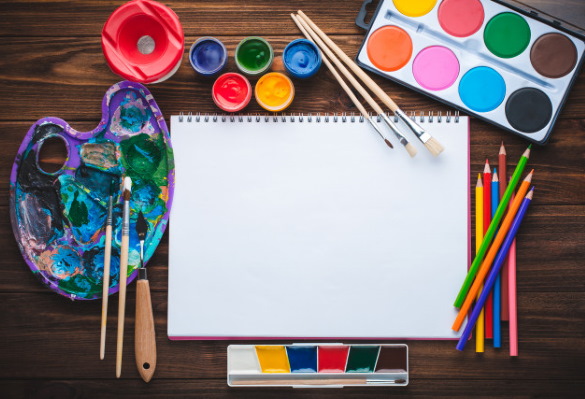
What you need for drawing
Winnie the Pooh in Soviet cartoons differs in appearance from the hero created for the Disney series. To depict the bear, you should prepare a work place in advance and purchase the necessary materials and tools.
The table and chair for drawing should be in a well-lit place, it is desirable to organize uniform daylight in the room. If the room needs additional lighting, you need to buy a lamp with blue light, not yellow.
It is better to buy pencils intended for professional artists.
To make the drawing voluminous and multifaceted, you need both hard and soft pencils:
| Marking | Characteristic |
| N | solid |
| NV | average |
| 2B | soft |
| 9B | the softest |
| 9H | the hardest |
When drawing, the lines must be clear and even, for this the pencils must be well sharpened. For this purpose, you should use a special sharpener.
They are small or designed for stationary use after being attached to a work table. You can sharpen pencils with a stationery knife, but this method is used only by professional artists.
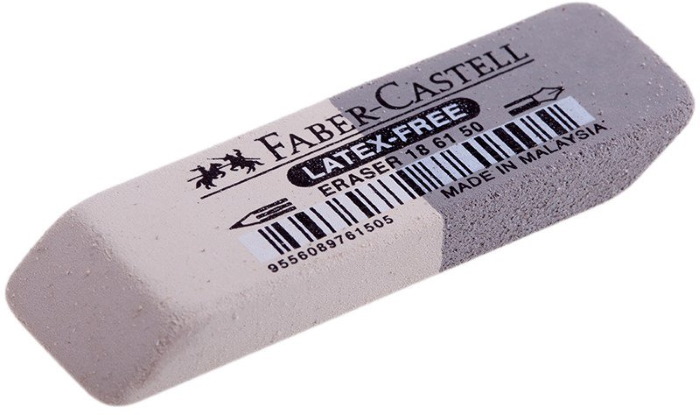
You will need an eraser or a pencil eraser, which even professional artists use. It is important that the eraser is of good quality so that when you remove the pencil, a black dirty spot does not appear on the sketch and the paper is not damaged as a result of erasing.
The eraser should be white, then it will not stain the paper. They come in several types: hard, soft and flexible. To draw straight lines or patterns, you may need rulers: straight or shaped patterned.
Choosing quality drawing paper is important. Beginners are best off using A4 or A3 sheets.
The main characteristics to consider when choosing a sheet of paper are:
| Density | The higher the density of the sheet, the better. Such a sheet will not deform under strong friction and will not wrinkle. |
| Texture | A medium grain paper is preferable. It will be easier to draw small details on such a sheet. |
Master classes
Winnie the Pooh (the bear's drawing can be colored with colored pencils) has brown fur in almost all Soviet animated films. In foreign films, it is sometimes dark yellow.
From a Soviet animated film
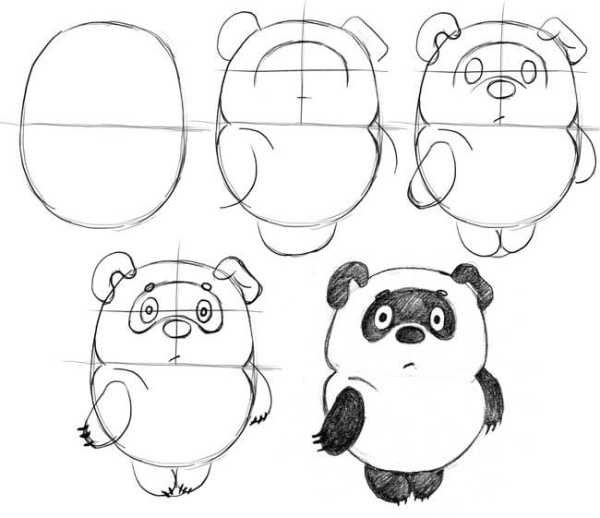
To draw a bear from the Soviet cartoon series, you need to follow the following steps of the process:
- Draw a thick, wide oval and divide it in half with a horizontal line.
- Round off the corners on the sides of the horizontal line, separating the bear's head from its body.
- Mark the front legs on the sides of the body.
- On the head, indicate the location of the ears. 1 ear should be slightly flattened, since according to the plot, Winnie the Pooh sleeps on it.
- Divide the head into 4 parts of approximately equal size using horizontal and vertical lines.
- Mark the border of the muzzle with a line parallel to the forehead.
- Mark the eyes on this line.
- The bear's nose is located below the horizontal line between the eyes.
- Above the horizontal line separating the body from the head, mark Winnie the Pooh's mouth with a short, slightly slanted line.
- The front paw on one side should be at the level of the horizontal strip between the head and the body.
- On the other hand, the paw is slightly below the horizontal line with a slight overlap on the body. In this case, Winnie the Pooh will be positioned slightly to the side.
- On the bear cub's eyes, mark the pupils, and above the eyes, on the line of the muzzle, mark small eyebrows.
- Draw the bear's lower paws below the body.
- Shade the muzzle, ears, nose and paws with a simple pencil.
- Lightly retouch the body with brown color.
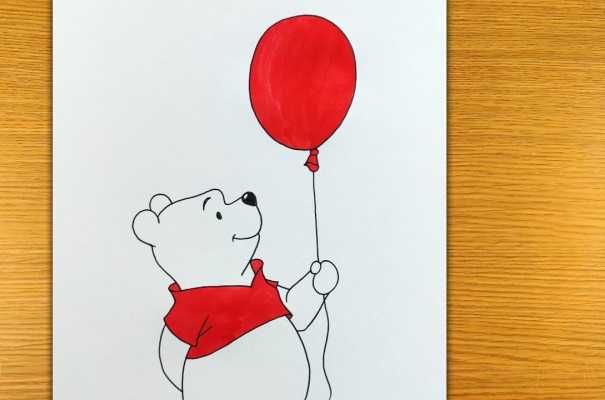
Full length
Winnie the Pooh (the drawing of the bear can be made full-length) is depicted smiling in some pictures.
To draw such a picture, you need to perform the following actions:
- Draw 2 circles: 1 above the other at a distance of 0.5 cm. The top circle should be slightly to the left of the bottom one.
- Connect the circles with a slightly inclined line.
 | 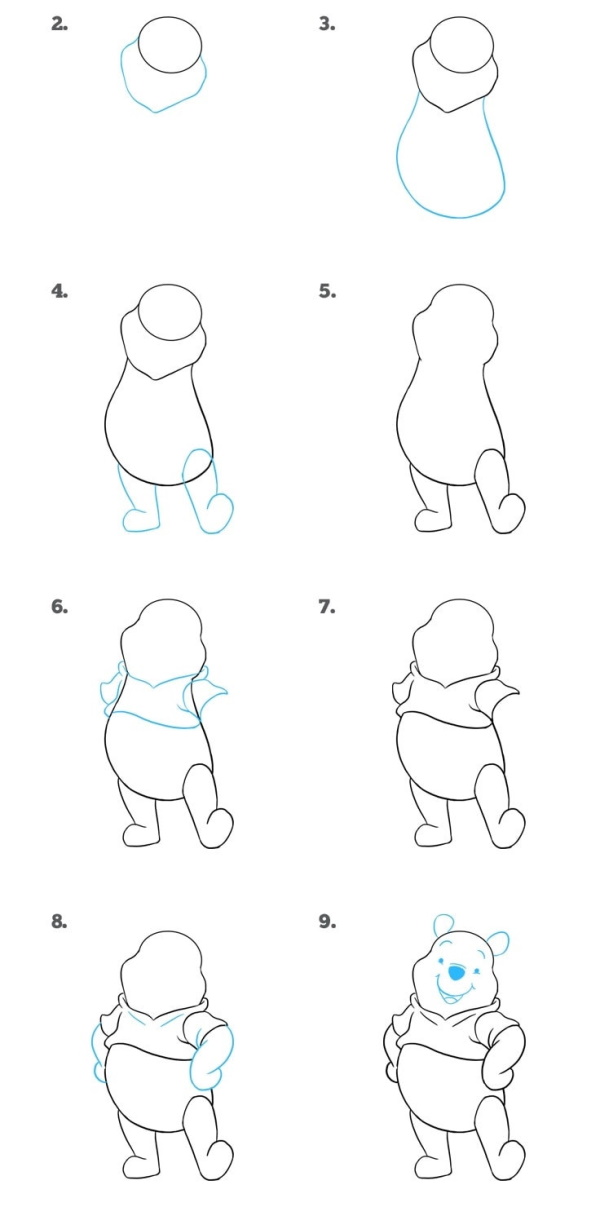 |
- In the upper circle, draw a line at an upward angle to the right. Later, the strip will serve as a guide for the location of Winnie the Pooh's eyes and cheeks.
- Use the top circle to sketch out the head.
- From the top point of the strip drawn in the upper circle, draw a rounded cheek protruding beyond the line of the circle.
- Draw the nose parallel to the cheek line, mark the eyes and the eyebrows above them, tilted like a house.
- Mark a small fold on Winnie the Pooh's chin.
- In the space between the circles, draw a shirt collar.
- Using the large circle that represents the bear's body as a guide, mark the edges of Winnie the Pooh's cropped shirt.
- On the sides, mark the front legs and thick belly.
- Draw the hind legs one by one.
- The finished bear can be colored with colored pencils, the body can be made yellow, the shirt - red.
- Outline the eyes, nose, mouth and ears with a black pencil.
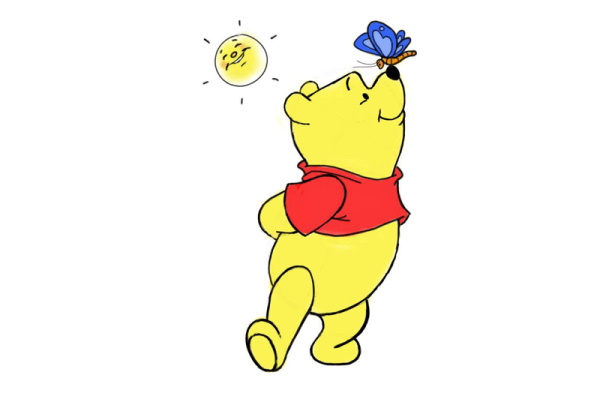
With a butterfly on the nose
Winnie the Pooh can be drawn with additional elements, insects or other animals.
To create an image of a playful teddy bear sideways with a butterfly on its nose, you will need to follow these steps step by step:
- Draw a large oval that will serve as the body.
- Above the oval, draw a smaller circle to further depict the head.
- At the top of the oval representing the body, mark the upper paw.
- Under the oval are the 2 lower paws of the bear cub.
- Turn the top circle into a head, on which mark the ears and nose raised upwards.
- Use a circle to mark the edge of Winnie the Pooh's nose where the butterfly sits.
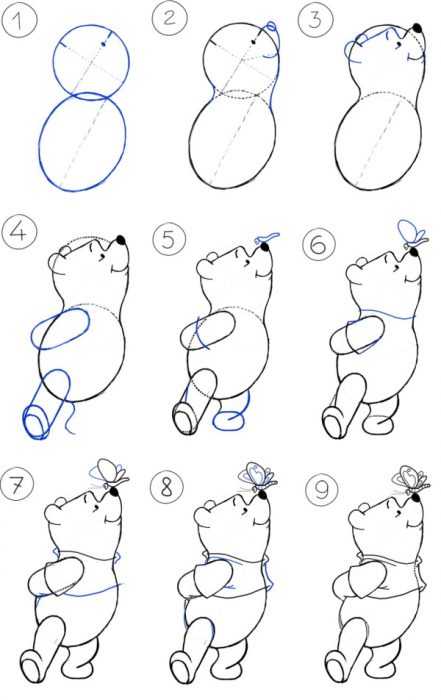
- Draw small details on the head: a smiling mouth, eyes and eyebrows.
- Starting from the neck line to the waist, outline the outline of Winnie the Pooh's shortened shirt.
- Draw all the small details with a black pencil, mark the folds on the shirt.
- Shade the body with a yellow pencil and make the shirt bright red.
- The butterfly's wings can be painted orange or burgundy.
To add volume and reality, you can add shadows and highlights to some areas of Winnie the Pooh's body.
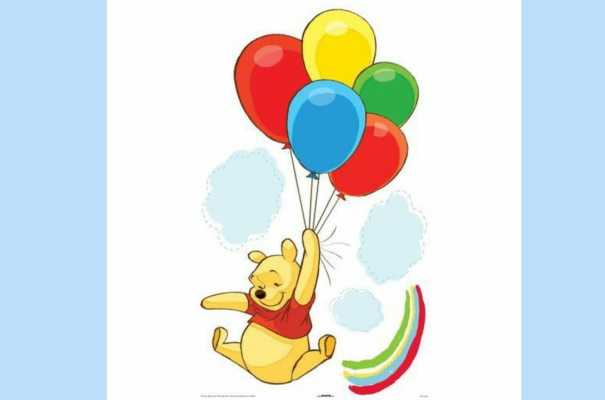
With balloons
Winnie the Pooh, whose drawing can include scenes from any film adaptation, loves balloons, just like his friend Piglet.
For this master class you need to follow the steps step by step:
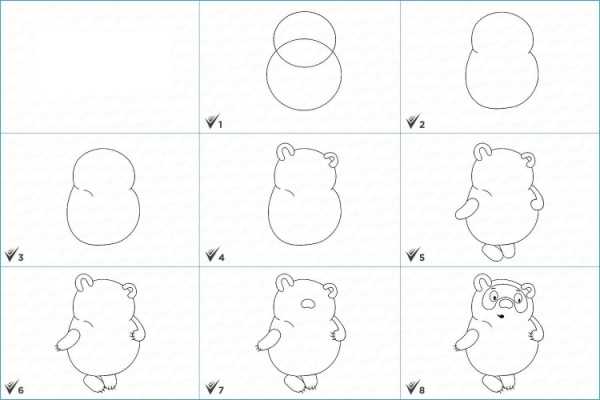
- Draw a circle at the top of the sheet.
- At the bottom of the sheet, with an overlap on the upper circle, mark an oval slightly larger than the circle. The drawn figure may resemble a snowman in shape.
- The top circle is given a square shape using smooth lines.
- The top circle should overlap the bottom circle a little, and the lines will show the dividing line between the bear's head and its body.
- The bear's ears are marked on the sides of the head. On the right side, according to the plot of the cartoon, the ear should be slightly flattened.
- Approximately in the middle of the head, slightly to the left of the center, the nose is marked with a slightly flattened oval.
- Above the nose, repeating its shape, a muzzle is marked, in which eyes will be drawn as circles.
- Below the nose, slightly to the side, there is Winnie the Pooh's smiling mouth.
- The upper paws are marked with arched lines, ending in short claws.
- The lower legs are depicted under the oval representing the body.
- The final version of the image is outlined with a black pencil, and the extra lines drawn with a simple pencil are erased.
- Almost the entire body of the bear is shaded with a light brown pencil.
- The muzzle, paws and ears are painted dark brown.
- The dividing line between the head and the body is shaded in dark color.
- There are small darkenings under the bear's eyes.
- Winnie the Pooh's nose should be made black with a small white highlight on the side.
- The pupils, eyebrows and mouth above the eyes are marked with a dark pencil.
- Place strings into one of his upper paws, on which round multi-colored balls will be held on top.
- Between the balls and the strings, mark the places where the balls are tied with threads with small triangles.
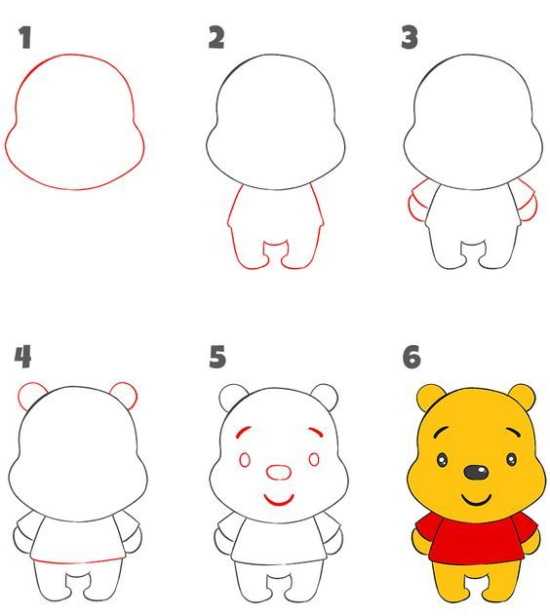
Small
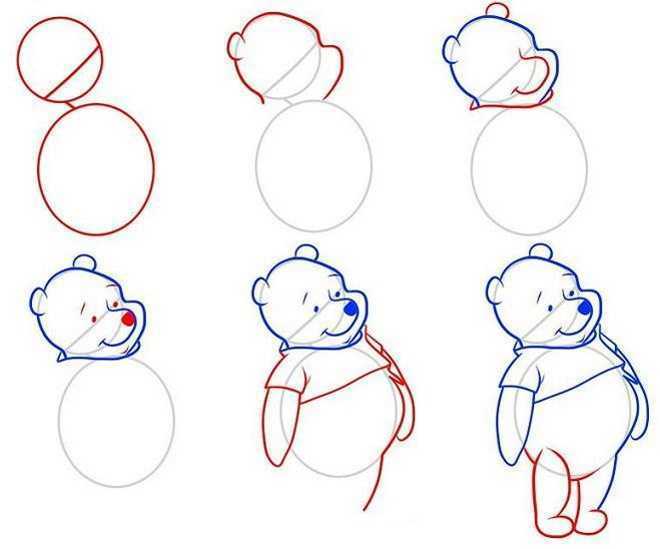
A drawing of Winnie the Pooh as a child is quite easy to make:
- Draw 2 circles of approximately the same size at a small distance from each other.
- In the upper circle, you can add additional lines that will help you correctly mark the features of the fairy-tale character’s face in a sitting position.
- In the upper circle, draw a vertical line in the middle.
- In the upper circle, mark 2 horizontal lines closer to the bottom. Between the 2 horizontal lines, mark the bear's eyes.
- Draw eyebrows above the eyes, which are shaped like small arcs.
- At the very bottom of the upper circle, mark the mouth.
- Give the top circle the shape of a bear's face by widening the bottom and top parts, making the head close to a square in shape.
- At the top of the head, mark small ears and draw a nose.
- Expand the lower circle towards the bottom and connect it to the resulting muzzle at the neck level.
- Add small paws, mark the end line of Winnie the Pooh's shirt.
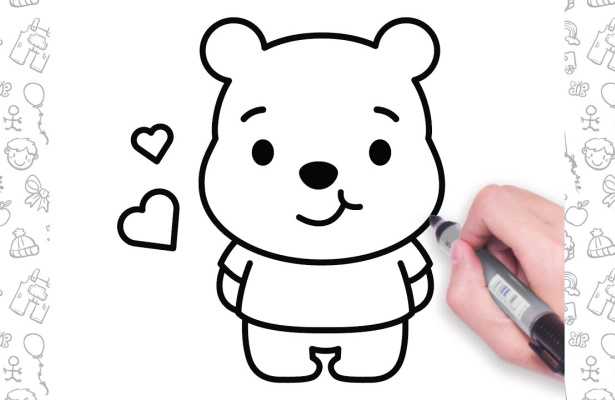
- Erase all auxiliary additional lines.
- Draw the sketch with a black pencil and color the bear yellow. Winnie the Pooh's shirt should be bright red.
Winnie the Pooh's favorite treat is honey, which he is forced to obtain by fighting bees. That is why Winnie the Pooh is often depicted with a pot of honey in his drawings.
Video about drawing
Winnie the Pooh - drawing: