Satin stitch embroidery seems complicated and beyond the capabilities of beginner craftswomen. However, a little practice is enough to master this type of needlework.
Types of satin stitch
Satin stitch is an ancient type of embroidery. Almost every country and region had its own distinctive features in embroidery.
The most common types of satin stitch include:
- Plain satin stitch.
- White satin stitch, can be embroidered with or without overlay.
- Artistic embroidery with colored threads.
- Russian smooth surface.
- Chinese satin stitch with silk threads.
Simple
Satin stitch embroidery for beginners should consist of small details, embroidering which is difficult to make a mistake. Simple embroidery is just such a type of needlework. Basically, these are floral motifs that are obtained from separate parts - petals, the middle of the flower, leaves, stem. These parts usually have a smooth and clear shape.
The embroidery technology is that it is double-sided.
This means that when embroidering a leaf on fabric, the same leaf should be obtained on the reverse side. To do this, before making a stitch, the needle should be inserted into the outline of the drawing and the tip should be pulled out from the opposite side of the drawing. And only after this should you make a stitch, pulling out the thread.
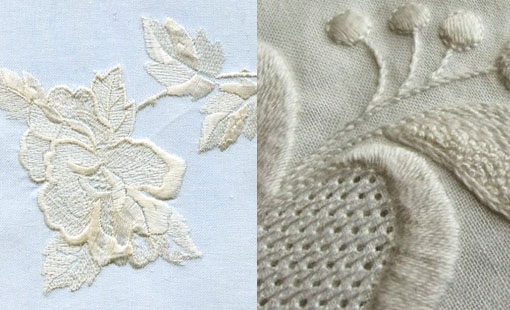
White with decking
White satin stitch is embroidered with white threads on white fabric. Initially, it was created to decorate underwear and bed linen, as it looks very delicate and neat. To make the work seem airy, almost transparent, you should take thin fabrics for the base - cambric, crepe de chine.
You can embroider with floss or silk threads, depending on the desired result.
Embroidery can be with or without overlay. The overlay is needed to give the work volume; to visually highlight individual details, and make others less noticeable. Overlay in modern embroidery can be done in several ways. It depends on how much volume should be given to the design details.
The outlines of the design are stitched with a forward stitch, a back stitch, or a chain stitch. The space inside the outline is sewn with straight stitches.
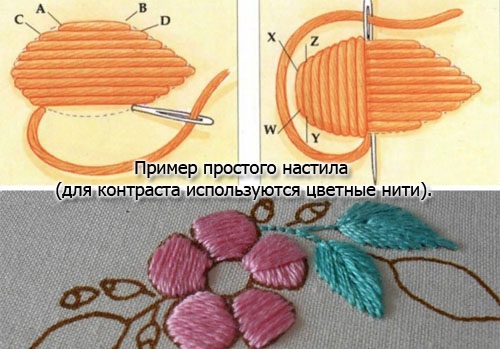
This can also be done with a "tambour" stitch, and if necessary to increase the volume, the tambour stitch can be "laid" in several layers. In this case, each subsequent layer is sewn perpendicular to the previous one. Important: the stitches of the base, or the stitches of the top layer (when the base is multi-layered) should always be perpendicular to the stitches with which the design detail will be embroidered.
You should also make sure that adjacent stitches of the satin stitch are evenly adjacent to each other, without overlapping or gaps between them. The white surface with a covering is mainly represented by floral and plant patterns. Modern embroidery allows you to experiment with both the designs and the stitches used in embroidery.
Artistic color embroidery
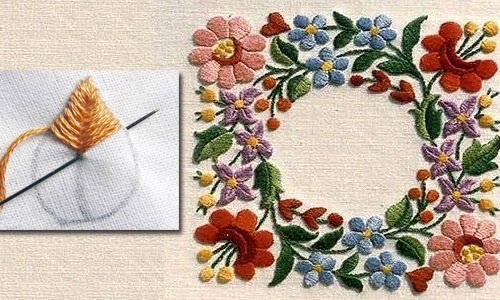
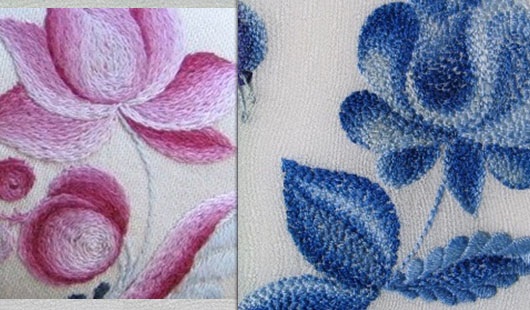
The second name for this type of satin stitch is tonal. This embroidery allows you to convey shadows and light by transitions from dark to light shades of color and back. The possibilities of this satin stitch are limitless. It perfectly conveys veins and color transitions when embroidering plant scenes.
When embroidering animals and birds, the stitches almost replicate hairs and feathers. People can also be embroidered with satin stitch.
Satin stitch embroidery for beginners should have a simple motif. For practice, you can take a flower or even one petal. Choose 3-4 shades of one color. Mark the approximate boundaries of each tone transition on the fabric.
Chinese stitch
Chinese satin stitch is similar in execution to artistic satin stitch. The difference is that it is more contrasting. This means that the transitions between colors on each detail are strongly expressed. You can accurately determine where one color border is, and where the other is. Such contrast is achieved by embroidering each detail, using a larger number of colors than in artistic embroidery.
The video shows paintings embroidered with silk on silk:
Chinese satin stitch is always done with silk threads, and the base is silk or satin. In terms of execution, it can be with or without flooring. The designs mainly depict typical oriental motifs – flora and fauna.
Russian smooth surface
Russian satin stitch is classically done with a running stitch. In this case, the seam is long from the front and short from the back. The space is sewn horizontally or vertically to the weft of the fabric. The main thing that needs to be achieved when embroidering is that there are no gaps in the fabric on the embroidered area.
This can be avoided by staggering the seams.
There are many branches of this ancient embroidery that appeared in different parts of Russia. For example, in the photo above, there is embroidery that is not tied to a strictly vertical or horizontal arrangement of stitches, but otherwise the technology is observed.
Types of seams: single, double
Different stitches are used in embroidery. For double-sided embroidery, when a perfect reverse side is needed, double stitches are used. In other cases, single stitches are used.
The most common seams include:
| "Forward the needle"
| This is the simplest of the existing seams, which is used not only in embroidery, but also in sewing. It is also called overcast. But if overcasting clothing parts does not require special beauty, then when embroidering, you should pay special attention to the proportions of stitches and the spaces between them.
The stitch on the front side should not be more than 5 mm. And the gap between adjacent stitches should not be more than 3 mm. |
| "Back the needle" | When making a seam with a needle, you will always need to make a back stitch. After which the needle is brought out to the front side slightly ahead of the stitch formed. It is necessary to maintain the same length of stitches. |
| "Tambour" or "Loop" | This stitch is widely used in embroidery. It is used to make a flooring, to design the contours of details, to embroider stems in plant themes. |
| "Stemmed" | The stitch is used in the same cases as the "tambour" stitch. But it looks neater and more delicate.
It must be performed according to the scheme:
|
| "Obmechatochny" | This type of stitch is used when processing the base of the embroidery so that the edges of the fabric do not fray or become deformed during the process. |
Tools and materials for satin stitch embroidery
For embroidery you will need:
- Textile.
- A needle with a sharp end.
- Threads.
- Scissors.
- Hoop.
How to choose fabric?
Most commercially available fabrics, even the thickest ones, are suitable for satin stitch embroidery. The fabric you choose will depend on the design and its future use.
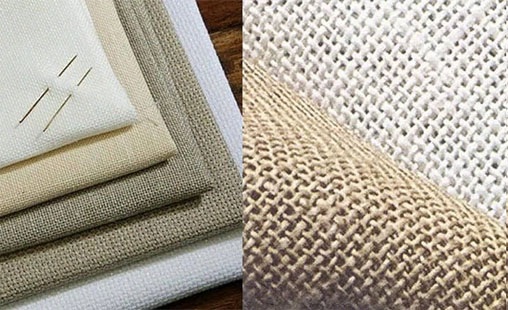
However, to make the work a joy and the result not disappointing, you should follow the rules:
- The fabric should be chosen so that the interlacing of the threads is visible. Otherwise, it will be impossible to count them and you will have to embroider "by eye".
- The fabric should not deform, fade, or discolor. It is necessary to exclude all possible misunderstandings with the finished embroidery in the future. The patch should be washed and ironed to ensure its suitability for work.
Needles
Embroidery needles, which are presented in stores, differ in thickness and size by the tip. They can have a blunt and sharp end. Needles with blunt ends are intended for cross stitching. For satin stitch you need to use needles with a sharp end. When choosing the needle size, you need to understand what threads and what base the embroidery will be sewn on.
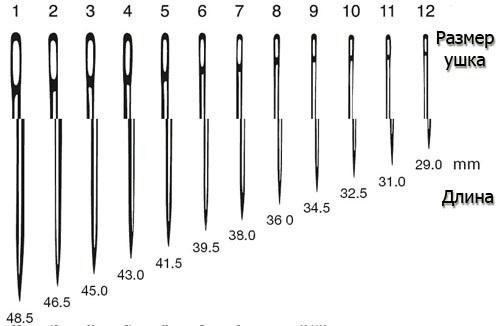
The eye should be wide enough for the thread to pass through, and the needle should be thin enough not to leave holes in the fabric.
Basic rules for choosing a needle:
- No. 1-3 are suitable for transparent and thin fabrics.
- No. 4-8 – for cotton.
- No. 9-12 – for any thick fabrics.
Threads
The thickness of the thread depends on the fabric chosen for embroidery. On thin bases, you should embroider with silk or floss. On thick bases, accordingly, with thicker threads.
Mouline threads are universal in many ways:
- Wide range of colours.
- There are several thin threads in one strand. Accordingly, you can adjust the thickness using 1-2-3 threads from the strand.
When preparing to embroider a design, especially if it is large, it is recommended to stock up on all the necessary volume of threads. Since some manufacturers (usually Russian ones) in different batches of colors of the same number may differ in shade.
Carbon copy
To start the embroidery process, you need to transfer the design of the future embroidery onto the fabric. The easiest and most accessible way is to use carbon paper. You can buy it at any office supply store, at least black paper.
There are also multi-colored carbon paper sets on sale. They are suitable if you use a multi-colored base for embroidery.
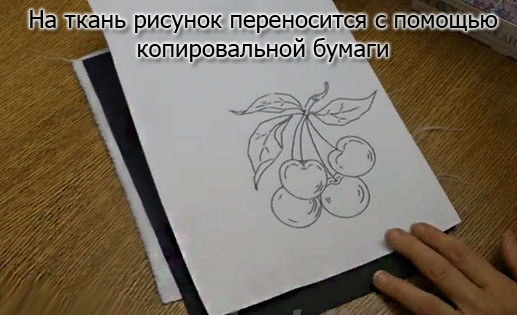
Despite all the convenience of carbon paper, it has its disadvantages:
- It is difficult to draw small details.
- Stains the fabric.
Where to start working?
The beginning of the work consists of preparing the material and tools, as well as mastering the methods of securing the thread to the fabric.
Necessary:
- Choose a design. You can find many designs on the Internet. Or you can take a picture you like from a magazine or book and transfer it to the fabric.
- Select a base fabric, or an interior or clothing item.
- Select a needle and thread depending on the thickness of the base.
- To prevent the fabric from warping while you work, stretch it over a hoop or use a special frame for embroidery.
- Prepare small rounded scissors.
The workplace should be comfortable. It is better to put a pillow or a bolster under your back. Good lighting should also be provided.
Often you can tell an experienced embroiderer from a beginner by the perfect back side, which has no knots. It is better for a beginner embroiderer to immediately train herself to sew without knots. So that it becomes a habit.
Figure 1 shows an example of getting started. On the wrong side, make a stitch, leaving a small tail of thread outside, then sew a second stitch perpendicularly. In the process of tightening the second stitch, the tail of the thread is placed so that it is tightly tightened by the thread.
Figure 2 shows how to secure the thread when embroidering with 2 threads. The thread should be folded in half and inserted into the needle to form a loop. After making a small stitch from the back of the fabric, the needle is threaded into the loop and then tightened.
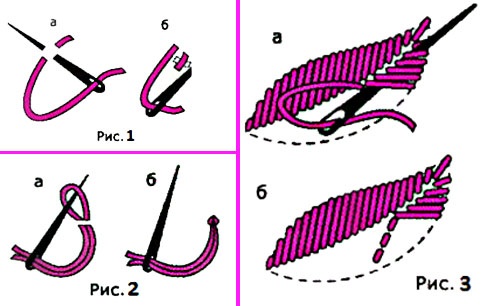
Figure 3 shows how to secure the remaining thread after embroidery. There are 2 options here. If the embroidery of the detail still needs to continue, then the remaining thread is secured with several stitches in the place that will then be covered with embroidery.
The second option is when the embroidery area is finished. Then the thread needs to be threaded from the inside under the finished embroidery.
Technique of transferring a design onto fabric
In addition to using carbon paper, there are other ways to transfer a design onto fabric. During the day, you can use a window. Stick the paper with the design onto the glass with tape. Attach the fabric to the paper on top and carefully trace the outline of the design.
Or a more convenient method, but it will require an engineering approach from the embroiderer:
- You should take two chairs or stools.
- They need to be placed in such a way that the first stool stands on the floor, and the second one lies on it with the seat and legs up.
- Place thick glass on these legs, and place a table lamp underneath. The structure is ready!
To transfer the design, place the sheet with the design on the glass, cover it with a cloth on top and turn on the lamp under the glass. If the design is simple, you can place the paper with the design on the fabric and baste it., and the seam should go along the outline of the drawing. Then it remains to remove the paper and outline the seams with a pencil. After this, the threads are removed from the fabric.
Master class: leaf embroidery
Satin stitch embroidery for beginners usually includes such elements as leaf and flower embroidery, as they are most often found in artistic embroidery motifs. To make a leaf, you will need green threads of 4 shades (from dark to light).
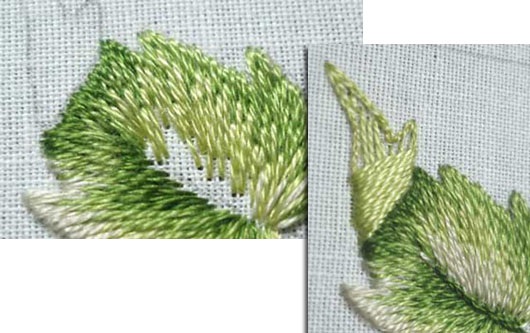
In the DMC floss palette these are No. 469, 471, 472, 613.
- It is necessary to transfer the drawing to the base. Inside the sheet we draw veins. Firstly, they will indicate the direction of the stitches, and secondly, in the places of the veins it will be necessary to correctly place shadow and light accents.
- The design consists of two parts: the main sheet and its folded part. The work begins with the embroidery of the main sheet. The outline is made with a running stitch. Next, you need to fill the light part of the sheet with the lightest floss (613). The stitches should be of different lengths so that the transition to the next color is smoother.
- Continue filling out sheet numbers 471 and 472.
- Next, add stitches from the darkest color floss (469). When making stitches, remember the direction of the leaf veins.
- It is necessary to sew up the entire space of the main sheet. At the same time, the middle of the sheet should be clearly visible in the finished work; for this, there is no need to make a transition of colors in the middle. All stitches begin and end along one line. If everything is done correctly, the vein lines will be smooth, barely noticeable, thus giving a natural look to the image of the leaf.
- The folded part of the leaf should be embroidered with a simple satin stitch with a base. To do this, you need to make an outline with a chain stitch and fill the space between the outline with simple stitches. It is important to remember that the base stitches should be perpendicular to the main stitches. After the base is made, you should sew up the part of the leaf with a regular stitch.
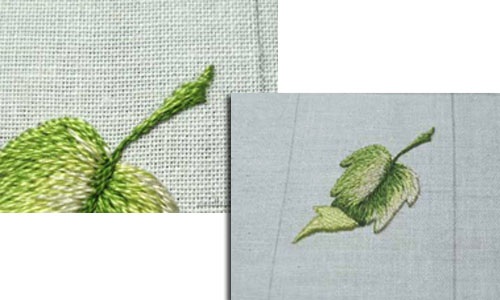
The work is completed by embroidering the leaf stem using the back stitch.
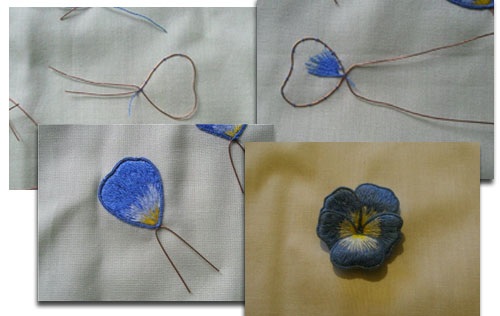
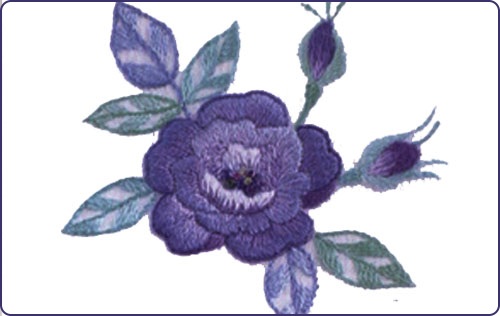
Rosebud diagram
To make a rose, you need to at least master the art of satin stitch a little. Otherwise, there is nothing complicated if you correctly follow the sequence of embroidering the parts of the flower. The order of the work is indicated by numbers on the diagram. The lines and arrows on the petals should be transferred to the fabric along with the outline of the rose.
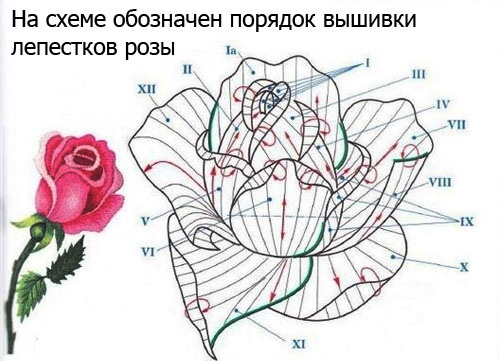
The arrows indicate the direction of the stitches, and the lines are the boundaries of the color transitions.
Volumetric embroidery: wild flowers
Sometimes 2D (flat) embroidery is not enough to convey the desired effects. Then 3D embroidery comes to the rescue - volumetric. In order to make truly exclusive things, the craftswoman must master many types of needlework. For simple embroidery plots with volumetric satin stitch - wildflowers, insects - it is enough to have basic skills and know the basic stitches.
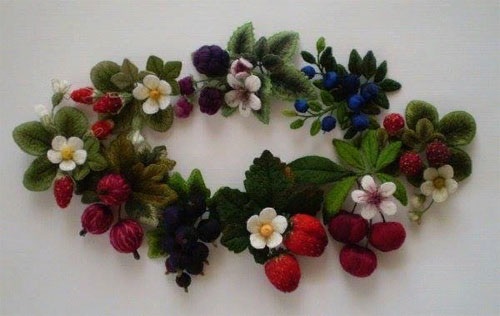
It may seem that the flowers in the photo are very difficult to make. This is not true.
To work, you need to select threads, prepare thin wire and a needle with scissors:
- A base should be made from wire, repeating the flower petal, and sewn to the fabric with threads of the main embroidery color of this detail.
- Next, the space inside the wire form is embroidered with satin stitch.
- It is necessary to hide the wire. To do this, it is sewn with a loop stitch. The petal is ready. It only remains to cut it along the contour.
A flower is assembled from embroidered petals.
Letters on clothes
There are no clear rules for monogram embroidery. The type of monogram and the stitches used to create it depend on the creativity of the needlewoman. Letters can be simple and created purely for practical purposes, to designate their owner. For example, letters created with a tambour stitch.
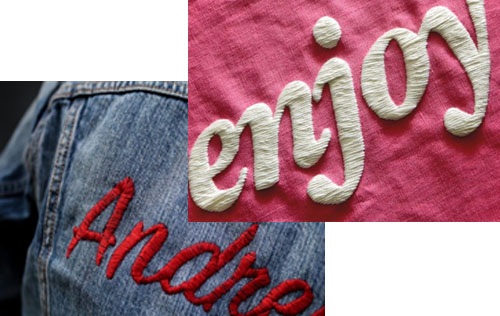
Or, for example, embroidery with a simple stitch using thick threads.
Birds
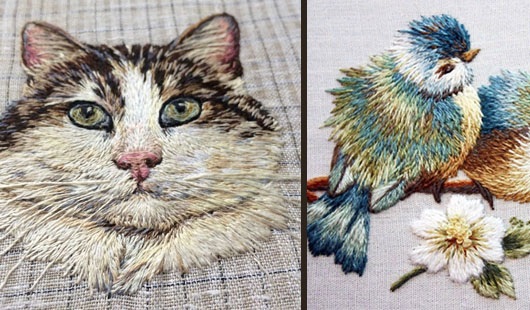
The theme of birds is one of the favorites of satin stitch embroiderers. Firstly, there are many types of birds, so you won’t get bored embroidering a lot of them. And secondly, satin stitch perfectly conveys the beauty of birds, emphasizing the plumage with the direction of the stitches. Moreover, any type of satin stitch will do for birds.
Tips for Beginners
Satin stitch embroidery is not an easy type of needlework. To master it, you will need perseverance, experiments with colors, fabric bases and a lot of time. You should start getting acquainted with satin stitch with simple techniques and designs. Otherwise, there is a risk of quickly losing interest in embroidery after unsuccessful attempts.
Simple designs in one color or with a minimal set of colors can also be very beautiful.
Satin stitch embroidery can become a significant discovery in another type of needlework for all experienced and novice craftswomen!
Author: Vorobyova Nadezhda
Article formatting: E. Chaikina
Useful video about satin stitch embroidery
Video of a master class on embroidering a picture:
My older sister did satin stitch embroidery - she was great at it! She basically sewed everything for herself. I remember making a white blouse and embroidering it with roses, I still remember how much I wanted to wear it... but unfortunately (and fortunately for my sister) it didn't fit me in size 🙂
Excellent! Very accessible and interesting.
Found an interesting article beautiful satin stitch embroidery. Lots of beautiful photos and a master class.
Found an interesting article embroidery satin stitch patterns flowers. Lots of beautiful photos and master class.
Maybe we choose needles according to the fabric? The thicker the fabric, the thicker the needle and, consequently, the longer the eye? Because this confused me:
№1-3 are suitable for transparent and thin fabrics. №4-8 – for cotton. №9-12 – for any thick fabrics.
Satin stitch embroidery gives a flight for creativity. Now handmade jewelry is very fashionable. Jewelry with satin stitch embroidery in beautiful fittings is just fire. I found excellent ready-made kits for beginners.
Satin stitch embroidery somehow became a discovery for me. Well, I was already tired of flowers, so I started looking for ideas, patterns for embroidery.
And I found a lot of interesting things, there are original designs for embroidery, just super.