For kids creating a drawing of a bee can become a feasible task if you help the young artist organize the work process in accordance with the main recommendations of fine art teachers. After mastering the basic rules, it will be easier for the child not only to copy the simplest pictures, but also to come up with their own improvements to the original images.
What do you need to draw with a pencil?
A drawing of a bee for children should be created using basic tools:
- set of pencils of different hardness (Different leads are needed for drawing the outline (hard pencils), shading and filling the inner space of the main figures (soft pencils), as well as depicting secondary objects in the drawings (medium-hard pencils marked HB);
- sheets of thick paper or cardboard (thin paper may tear when coloring a drawing or removing mistakenly drawn lines with an eraser);
- eraser (it is recommended to provide the child with an eraser made of high-quality rubber that is not capable of damaging the integrity of the paper or cardboard sheet used);
- stencils (relevant if the drawing of a bee is created by a child aged 5-8 years, who has no previous independent experience of creating multi-component images by hand);
- original images (if the child prefers to copy pictures rather than create them on their own);
- colored pencils, markers or paintsThe child can choose the method of coloring the resulting picture independently.
- You should not tell him what colors he should use, as this approach may provoke a rejection in the young artist towards creativity in general.
How can a child draw a bee step by step?
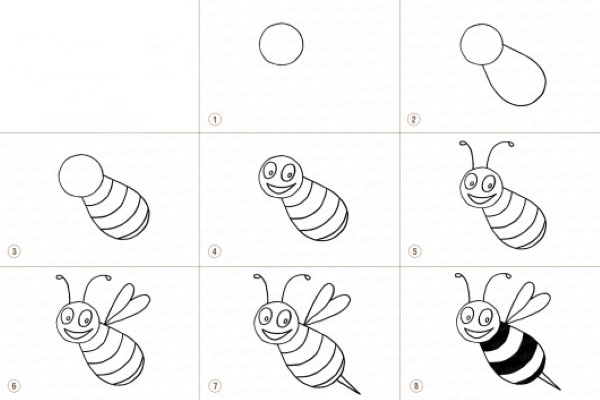
It is more convenient to create a drawing of a bee for children in stages, starting with the image of the insect's head. Detailed drawing is best done at the final stage.
Head with a proboscis
The head of the insect should be drawn like this:
- Draw an oval with pointed edges, placing it vertically.
- Draw a small semicircle inside the bottom edge of the figure.
- Finish drawing a semicircle, connecting its extreme points into one, outside the outline of the image (trunk).
- Stepping back 1-2 cm from the lower border of the oval, draw another rounded oval inside the figure, approximately half the size of the first (the insect’s eye).
Torso
After drawing the main parts of the bee's head, you need to move on to creating the outline of the body:
- From the right border of the previously drawn bee's head, draw a semicircle, placing its extreme points on the edge of the oval.
- From this semicircle, draw another semicircle to the right, maximally stretched to the right and slightly pointed at its peak. The distance between the upper and lower edges of the bee's body should be at least 7 cm.
Stripes
To make the drawing more realistic, it is necessary to fill the inside of the insect's body with smoothly curved stripes.
The distance between the arcs should be at least 2-3 cm (the exact length is determined by the scale of the image and the format of the sheet of paper used).
Antennae
It is recommended to draw the antennae of the bee with curved lines, placing their extreme points below the original ones. The curves should be drawn approximately from the middle of the left border of the head. The length of the antennae should not exceed 7 cm (when depicting a bee with full filling of the working space). The lines should have a clear outline, sharp angles at the bends and a characteristic appearance for the antennae of an insect.
Wings
It is recommended to draw the bee's wings using pointed ovals with an uneven outline. These figures should be drawn from the semicircle closest to the head of the drawn insect. Inside the wings, to make the drawing more realistic, you need to draw a "skeleton" (a vertical line with thin straight lines extending from it to the right and left).
Sting
The sting is rarely drawn by children, since, due to their age, they do not pay attention to the details of the insect's image, examining it independently. Parents or a teacher should draw the child's attention to this integral part of the bee's body, suggesting that it be drawn with a thin line (at least schematically), drawing it from the left side border of the insect's head.
The final touches
At the final stage of creating the image of a bee, it is necessary to draw the insect's legs, consisting of 2 parts, so that the 2 front ones are shorter than the back ones. You can detail the image by drawing the relief of the insect's body, as well as by applying shadows, shading, or by coloring the resulting picture.
Bee Drawing Ideas for Pencil Sketching. Description for Beginners
A drawing of a bee for children is created in several ways, depending on the style chosen by the young artist for his work.
Maya the Bee
Maya the Bee, a famous children's cartoon character, is almost always chosen by children when given the task of drawing an insect.
It can be depicted like this:
| Drawing variant | The way it is created |
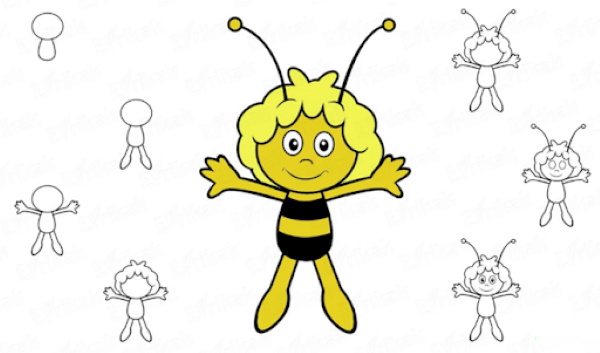 | 1. Draw a small circle in the middle of the sheet of paper you are using. 2. From the lower edge of the circle, draw an elongated semicircle, curved downwards (the body). 3. From the lower border of the semicircle, draw 2 ovals of the same size (the bee’s legs). 4. From the side edges of the body, in the area where the body transitions to the head, draw 2 parallel lines in each direction, connecting their extreme points with a curved line (the hands of a cartoon character). 5. Draw a bee hairstyle around the top border of the head using a smoothly curved line. 6. From the head, draw 2 thin lines upwards, at the end of which draw small circles (antennae). 7. Draw the outline of Maya's facial features, depicting the eyes (2 identical ovals), a semicircle between them with an upward curve (nose) and a mouth (a semicircle under the nose, curved downwards). 8. The bee’s body must be filled with smoothly curved downward lines, located at a distance of 2-3 cm from each other. 9. Add detail to the image by drawing the pupils and also drawing the fingers of the cartoon character. 10. Colour the picture using yellow and black colours. |
Bee Chibi
It is recommended to create a drawing of a Chibi bee like this:
| Drawing variant | The way it is created |
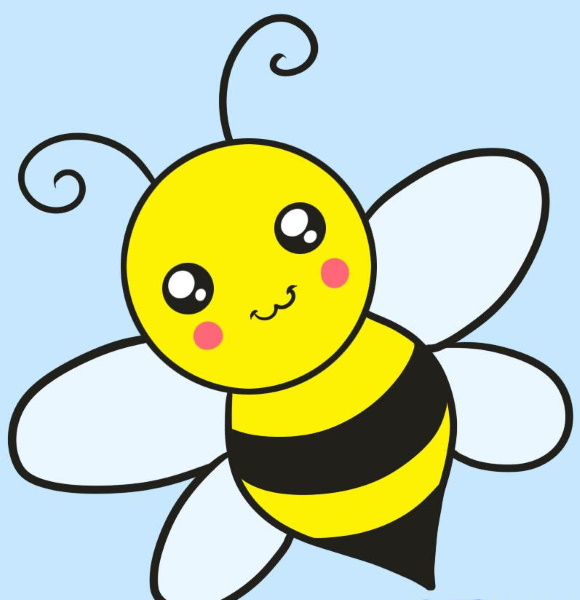 | 1. Draw an even circle in the middle of the sheet of paper you are using. 2. Inside the circle, draw 2 small circles of the same size (eyes). The eyes should be drawn so that the bee's face is positioned slightly diagonally. 3. Draw pupils and highlights inside the eyes (2 more circles in each eye, different in size, and located close to each other. The space between the inner circles should be painted black). 4. Stepping back 2-3 cm from the eye contour, draw another small circle, symbolizing the contour of the cartoon character’s cheeks. 5. Between the cheeks, draw 2 semicircles, curved downwards, located close to each other. 6. From the upper border of the drawn head, draw 2 curved lines, the ends of which are directed in opposite directions and twisted into spirals. 7. From the lower edge of the head, draw a semicircle, pointed downwards (torso). 8. The inner part of the body should be filled with smoothly curved lines, the distance between which should be at least 3-4 cm. 9. From the side borders of the body, draw semicircles to the right and left. The upper ovals, identical in size, should be 1.5 times larger than the identical lower figures (insect wings). 10. Add detail to the image and, if desired, color it. |
Bee on a flower
It will be more interesting for children to create a drawing of a bee sitting on a flower like this:
| Drawing variant | The way it is created |
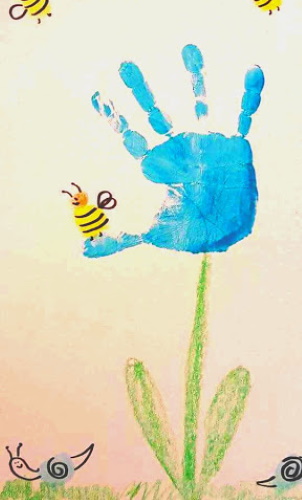 | 1. Evenly distribute brightly colored paint over the inside of the child’s palm. 2. Press your palm firmly in the center of the sheet of paper you are using, thus creating an imprint (the outline of a flower bud). 3. From the lower border of the flower, draw 2 parallels downwards, painting the space between them green. 4. From the lower points of the stem, draw 2 elongated semicircles, curved upwards (leaves). 5. On one of the “petals” (finger) draw a small triangle (the body of the bee). 6. Paint the inner part of the triangle yellow. Draw stripes with a simple pencil over the plain background. 7. From the right border of the body, draw a diagonal line, the length of which should not be more than half the edge of the main triangle. 8. Draw semicircles (wings) on both sides of the diagonal. 9. Draw a small circle (the insect’s head) at the top corner of the triangle. 10. Draw the bee's eyes and mouth inside the head (dots and a semicircle). 11. From the upper border of the head, draw slightly curved lines upward (the insect’s antennae). If it is not possible to use paints to draw secondary objects (flowers), they can be depicted schematically, at the discretion of the young artist. |
Bee with honey
The easiest way to draw a bee with honey in its hands is like this:
| Drawing variant | The way it is created |
 | 1. In the central part of the sheet of paper, draw a rounded oval (the body of the insect). 2. The right side of the oval should be approximately twice as wide as the left. 3. At the top border of the image on the right, draw 2 circles inside so that the one located to the right is behind the left one (the bee’s eyes). 4. Draw 1 small circle (pupils) inside the main circles. 5. Between the eyes, close to them, draw a small oval (nose). 6. Stepping back 2-3 cm from the nose, draw 2 semicircles coming out from the same points, but having different degrees of downward curvature (the insect’s mouth). 7. To the left of the bee's face area, draw 5 slightly curved lines, placing them at a distance of 1-2 cm from each other. 8. From the left border of the main figure, draw a small triangle. 9. Draw 3 semicircles of different sizes on top of the oval so that their end points are located on the border of the main figure. 10. Finish drawing the insect’s limbs, depicting them in any form (either by drawing the arms and legs well or by drawing them schematically with straight lines). 11. Draw a semicircle curved upwards close to one of the hands (the handle of the bucket of honey). 12. From the extreme points of the semicircle, draw a rectangle downwards so that its upper edge is approximately twice as wide as the lower edge (bucket). 13. Using wavy lines running along the border of the drawn bucket, depict the outline of the splashing honey. 14. Add detail to the drawing and, if desired, color it. |
Honey insects on honeycombs
To emphasize the importance of bees in honey production, the child can be asked to draw honey-producing insects directly on the honeycombs. To make the task easier for the young artist, you can show him what honeycombs look like in reality, and also talk about their purpose during the discussion.
| Drawing variant | The way it is created |
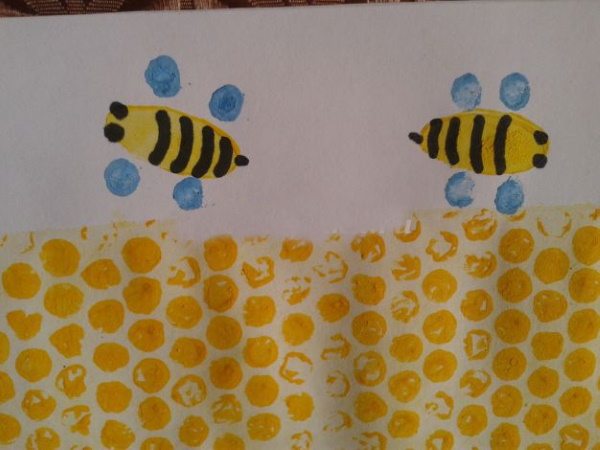 | 1. Visually divide the working surface into 2 halves. 2. At the bottom of the drawing, draw many small circles, placing them close to each other (honeycomb). 3. If you have colored pencils, it is recommended to color the inner areas of the small circles yellow. 4. In the upper half of the working plane, draw 2 ovals, pointed at the edges (the bodies of the insects). 5. To the right or left inside the figures (if the artist chooses the right side on one oval, the same image should be on the left on the second) draw 2 small circles of the same size. 6. On the opposite side, draw a small straight line, outside the outline of the main image. 7. Fill the inner part of the bees’ bodies (from 2 circles to the opposite border) with slightly curved lines. 8. Draw 2 small circles (insect wings) at the top and bottom of the oval borders. 9. If desired, the overall composition can be improved by drawing a few more bees above the honeycombs. |
Beehive with bees
A beehive with bees can be drawn in detail in a realistic style, or schematically, bringing the appearance of the final image closer to a cartoon style.
The easiest way to create a picture is:
| Drawing variant | The way it is created |
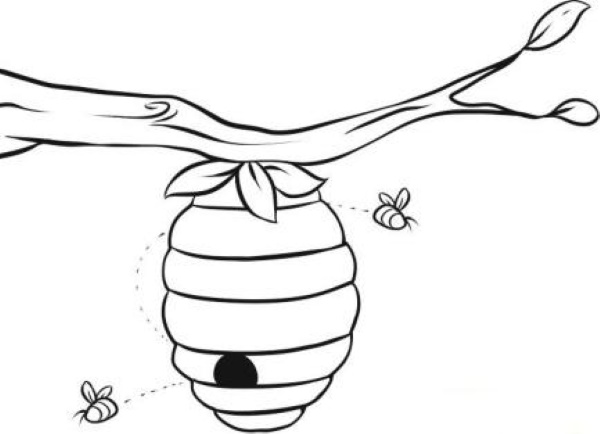 | 1. From the right border of the working plane, draw 2 slightly curved horizontal lines that exactly repeat each other’s curves. 2. The extreme points of the lines should be connected by a vertical curve, imitating the branches of the main tree branch. 3. Draw small ovals (leaves) close to the pointed parts of the drawn branch. 4. Fill the space between the lines with curves, placing them randomly. 5. From the middle of the lower border of the branch, draw 3 pointed ovals from one point, the ends of which should be directed in different directions. 6. Draw 7 semicircles below, the extreme points of which should be located on the contour of the previous line (beehive). The semicircles should be drawn in different sizes so that the upper and lower figures are the smallest, and the largest are located in the middle. The distance between the semicircles should be no less than 4-5 cm. 7. Between the 3rd and 4th semicircle, draw a small semicircle curved upwards from below. Shade or color the distance inside the outline. 8. To the right and left of the drawn hive, schematically depict bees (small ovals, the inner area of which is filled with slightly curved lines, with elongated semicircles drawn from the upper border of the main figure (wings). |
Bee on a rock
You can paint a stone to look like a bee like this:
| Drawing variant | The way it is created |
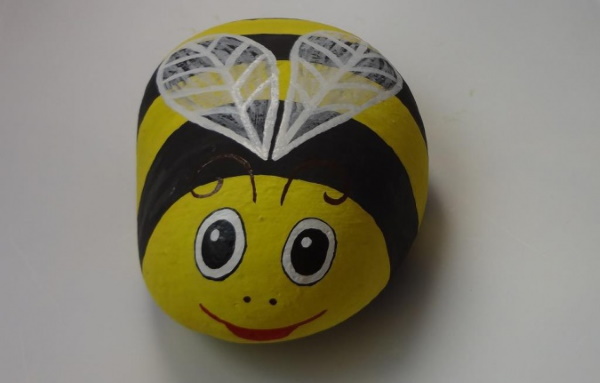 | 1. Visually divide the surface of the stone being used into 3-4 stripes, the width of which should be at least 2-4 cm, depending on the size of the stone. 2. Paint the stripes on the surface of the stone, alternating black and yellow colors. 3. Let the paint dry. 4. Next, on the front strip, which should be yellow, draw 2 ovals, approximately the same size (the bee's eyes). Inside each oval, draw another one (the pupils). Paint the pupils black, leaving a small white dot (the highlight). 5. Place 2 black dots (nostrils) under the eyes, approximately between them. 6. At the bottom of the front surface, draw 2 semicircles curved downwards, the extreme points of which coincide (mouth). Color the space between the semicircles red. 7. Above the bee’s eyes, in the middle, draw 2 curved lines, the ends of which should be twisted into a spiral (antennae). 8. On the upper edge of the stone, draw 2 ovals with white paint, one side of which should be pointed (wings). The pointed corners of the ovals should be located at one point. 9. Add detail to the image by drawing a vertical line with smooth horizontal branches inside the ovals (the “skeleton” of the insect’s wings). |
Realistic image of an insect
The most difficult task for a child will be to draw a realistic bee. During the first attempts, it is recommended to provide the young artist with an original image, focusing on which he will be able to cope with the task.
| Drawing variant | The way it is created |
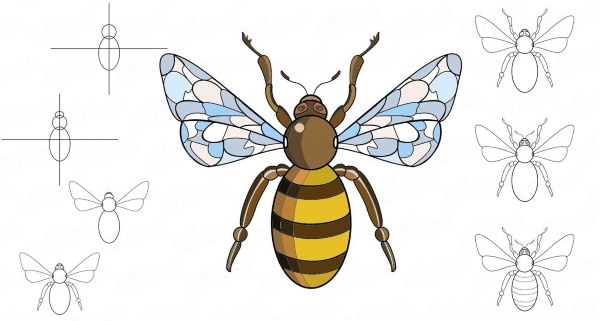 | 1. In the middle of the working plane, draw 2 perpendicular lines that intersect exactly in the middle. 2. Step back 2-3 cm from the point of intersection of the lines and draw a small circle (one of the parts of the insect’s body). 3. Draw an oval at the bottom of the circle so that its bottom point is located approximately in the middle of the bottom part of the vertical (the second part of the insect’s body). 4. Draw a small semicircle (the bee’s head) on top, close to the circle. 5. Remove secondary lines using an eraser. 6. Draw a triangle to the right and left of the circle (insect wings). 7. The inner area of the wings must be divided into 2 halves using a horizontal line. 8. From the area where the two parts of the body connect, draw 2 slightly curved lines to the right and left, directed downwards. The extreme points of the lines should be connected, thus forming an angle (the hind legs of the insect). 9. Using curves connected to each other, you should also draw the front legs of the bee. 10. From the upper border of the semicircle, draw 2 curves with a thin pencil (antennae). 11. Fill the lower part of the body with stripes, the width of which should be no more than 2-3 cm, depending on the scale of the final image. 12. Color the resulting picture using black and yellow colors. |
For children, the task of creating a drawing with an image of a bee will not only be a way to reveal their creative abilities, but also an opportunity to prevent nervous system overstrain. By depicting an insect in the chosen style, the child learns attentiveness, accuracy and perseverance. You can make the task easier for the young artist by providing him with the original image, an optimized workflow algorithm or templates (if the child is under 5-6 years old).
Video about drawing a bee
How to draw a bee for kids: