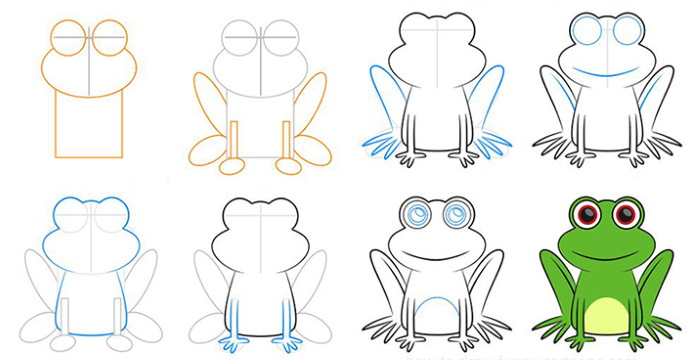
A simple drawing of a frog is not a difficult task for children. The main thing is to learn image construction and the competent use of imagination and color scheme.
How to draw a frog with a pencil step by step for children
You can train your child's imagination by asking leading questions:
- where the amphibian lives;
- how it moves;
- what is the difference between a frog and a toad;
- what color;
- about anatomical features.
This will help in the future when constructing an image and forming a plot. Such a drawing process becomes educational and developmental for a child.
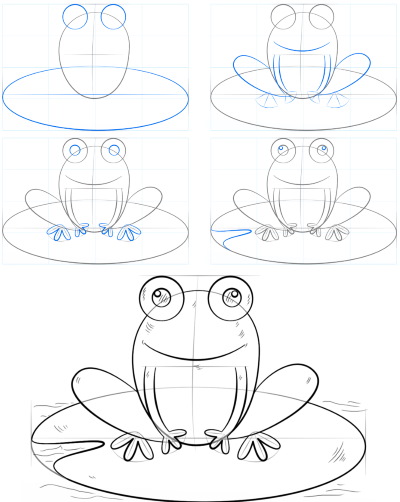
Construction
Next, having established that the child knows what standard geometric figures look like, they begin to draw a pencil drawing:
- Preparation of materials.

To draw you will need a pencil of any hardness, an eraser, a sheet of paper or A4 format, as well as a ruler or a notebook in a grid, provided that the child has a poorly developed “eye”.
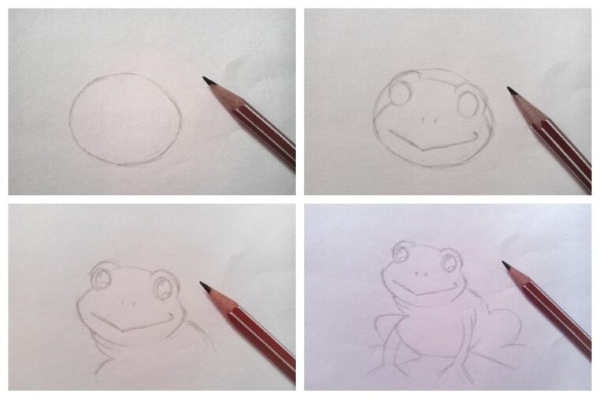
- Identification of body part areas. They are depicted as geometric figures and subsequently modified to the necessary forms. First, in the upper left half of the sheet, an oval is depicted - this will make the frog's head. A little higher than the center of the oval, a cross is drawn slightly slanted to the left so that in the area of the muzzle, the line divides the side of the figure in half.
Then, in the center of the sheet, draw a circle, the size of which is 1.5 times larger than the oval, without touching the head area. Then proceed to determine the area of the front and back paws of the left side.
To do this, 1 chicken egg is depicted under the circle with the narrowed part to the left and down so that the sides of the figures touch. The ratio of the sides is 1:5. The second egg is drawn behind the circle slightly overlapping, and its size is 1.5 times larger than the first. The narrowed part "looks" up.
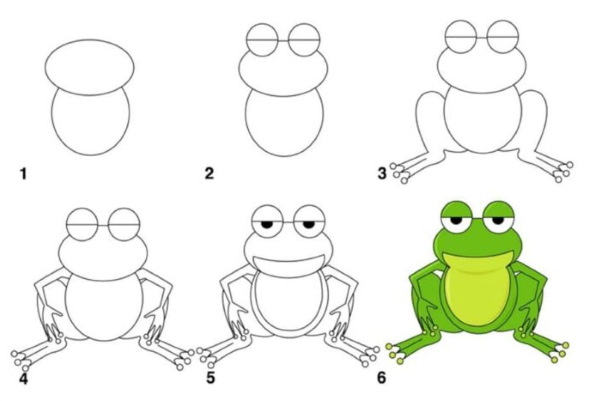
- Drawing the actual shapes of the frog. They start with the head. The main characteristic feature is bulging eyes. To get them, in the area of the cross they draw a semicircle and the same one above at an angle of 45 degrees, touching the side of the oval.
Slightly to the left of the figure, draw a smooth line so that it forms the area of the nose, and slightly below it - a second one to depict the mouth. From each semicircle for the eyes, draw 2 soft horizontal lines to indicate the area of the back and spine.
- Drawing the visible part of the eye. Draw a circle under the semicircle to create an eye with an eyelid. Inside it is a leaf located horizontally, and in it is an oval for a highlight.
- Neck and abdomen. The frog has a voluminous, arched neck. To get it, you should draw an arched line between the chin and the body. The frog's belly sags, so it is depicted as a downward-curved arc.
- Sketches of paws. The front ones are bent backwards, the back ones are bent forwards, and all have long phalanges of the fingers. Depending on the species, there can be from 3 to 5 of them. At the end of each one there are membranes. To make the back legs bent, the egg depicted is divided in a ratio of 1 to 3.
The bend of the front legs is slightly more than 90 degrees. To get the visible part of the right hind leg, in the area of the back from the opposite leg make a small arc, the extended side of which will go parallel to the spine, and the second of the same size, but so that the line goes along the back.
- Working out all parts of the body. At this stage, muscle lines are added and the drawing is fully detailed.
For children and other students learning to draw animals, the construction technique is necessary to maintain proportions. After completing the specified algorithm of actions for drawing a frog, delete all auxiliary lines.
Coloring
High-quality elaboration of shadows will help the child to correctly select the color scheme for the image in the future.
| The process of coloring a frog using pencil technique | |
| Action | Description |
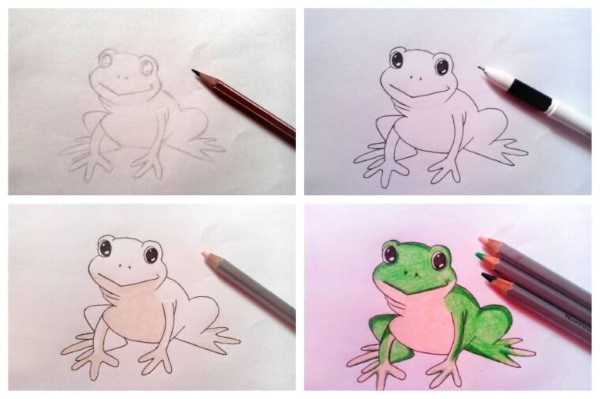
| Selection of materials | To color, you will need a black liner or pen, 2B, 4B and 8B pencils and an eraser. |
| Highlighting the darkest areas | The visible part of the eye and the entire lower area of the frog (except the belly) are outlined with a black liner or pen. The leaf depicted in this organ is painted over without touching the oval for the highlight. The nostril, the bends of the legs, the mouth and the muscle in the area of the outer corner of the eye are highlighted. |
| Shadow under the frog | Since the light falls on it from left to right, not the entire plane under the amphibian will be painted black. It will be slightly protruding from the chest and concave inward from the front and back legs. With such a fall of light, a shadow is not drawn under the head.
It protrudes slightly from the back. All edges of the shadow should be soft, for this purpose cross-hatching is used. For additional softness, the painted part can be shaded with a pencil of 8B hardness and shaded with a piece of paper, a cotton swab or other material. |
| Working with pencils | First, use the softest pencil – 8B. It marks the darkest parts of the frog:
Next, detail with a 4B pencil:
The entire amphibian is shaded with a 2B pencil. At all stages, it is necessary to control the pressure. If you press too hard, the image becomes flat and unrealistic. |

This type of coloring is suitable for older children. A younger child can be taught to draw colorful fairy-tale amphibians.
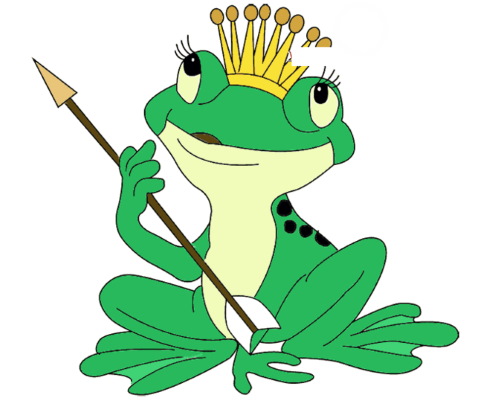
The Frog Princess with a Crown
Drawing a frog for kids becomes an interesting activity when they start drawing cartoon characters.
In this case, you will not need pencil shading, but an understanding of the rules for constructing amphibian forms and the placement of light and shadow. According to the plot of the fairy tale, the frog princess is waiting for the prince. She can be drawn turned away from the viewer (but not with her back to him) in the foliage by the river.
How to do it:
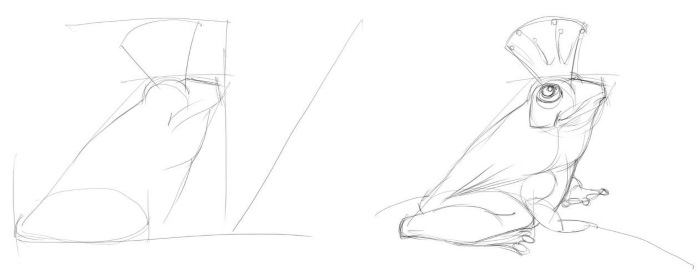
- Construction. In the center of the sheet and closer to its right corner, draw 2 touching circles. The ratio of sizes is 2 to 3, where 2 is the head, 3 is the body. From the point of contact, in a chain, one small oval is perpendicular down, the second - at an angle of 45 degrees and the third - parallel to the plane. In place of the ovals will be the left front paw.
To form the back, under the large circle, draw one oval in a chain, proportionate to the entire front paw, and in the direction of it, the second. On the left, the circle of the head is slightly beveled with 2 lines to form the muzzle. On it, draw a smiling mouth (after all, the fairy-tale character is friendly), a ball for the eye, an eyelid and a muscle from it.
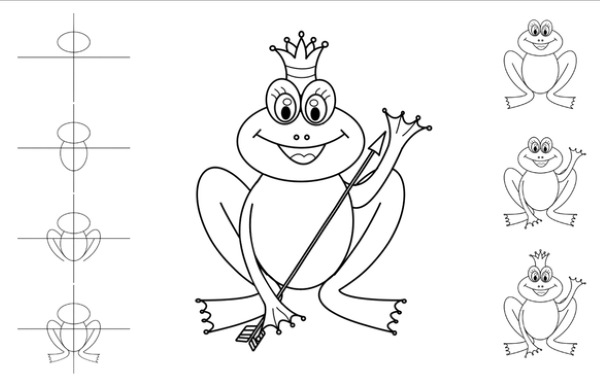
On the right, make a bevel so that the body is convex compared to the head, and the back of the head is flat. In the same way, bevel the body on the right, and draw an arc to the beveled area, equal to half the oval for the left paw. This will be the right one. Above the eyes, draw a crown, touching them and having curved pointed parts along the perimeter.
- Working out small details. Inside the eye, draw a pupil with a glare. To the right and left of it, mark the muscle area - below it, draw a duplicate soft line, but a darker line.
The next stage is working on the paws. The chain of small ovals is combined, and in place of the third one, a wrist with long phalanges of the fingers and round membranes is drawn. On the large oval touching the bottom of the body, a line is drawn so that this part of the body resembles a rounded letter "G".
Draw the paw itself in place of the second oval. It should be twice as big as the front one. Do not do anything with the right paw. Afterwards, erase all the outline lines.
- Skin color markings. There will be no spots on the belly, but there will be plenty on the back and paws. There will be several small spots on the head in the occipital region, about the same size on the back paw, and smaller ones on the front paw. There will be both small and large spots on the back, with the number increasing towards the bottom of the body.
- Drawing the background. Since the frog is small, the grass next to it will be half the size. Its edges are curved in the direction of the wind, and under the amphibian it is completely flattened. The grass in the distance is lighter and less detailed.
All the upper planes of the plants are light green and have soft highlights from the humidity. The lower and closer the grass is, the darker and more contrasting it is. A shadow is formed under the frog, and accordingly, the grass under it is the darkest. The river can be painted blue.
- Coloring the princess. To make it voluminous, all the convex parts should be lighter than the rest. For the mouth, belly, eye, upper eyelid and highlights on the paws, yellow is mixed with a small amount of light green and applied to the highlighted areas.
Later, this color will be needed to depict highlights on the muzzle and back. Then, the spots are painted black, and the remaining parts are painted green. For highlights along the muscle near the eyes, around the muzzle and on the back, the previously made color mixture is used.
In the area of the folds, the darkest parts of the amphibian, the lower eyelid and the mouth, very thin black lines are applied according to the shape. To show that the frog lives in a humid environment, you can imitate small drops of water with a thin brush or a white gel pen.
- Crown. It will be golden with jewels. It is round in shape, so the part facing the light will be yellow, the shadow and distant sides will be orange, and in the area of the darkest side, it will be red with a purple tint.
The crown can be decorated with precious stones of any color along the perimeter. Then, from the side where the light falls, they will be white. And in the shadow area, they will be a rich, selected color.
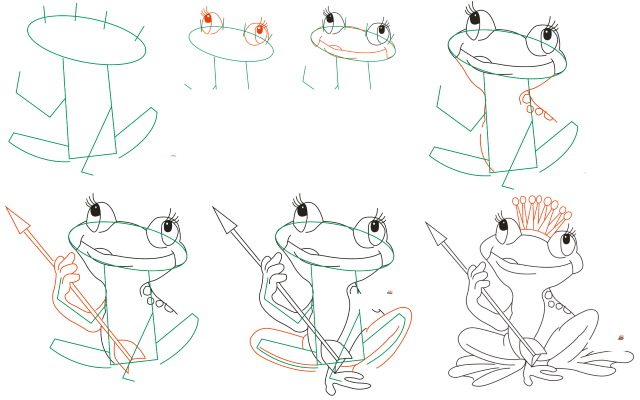
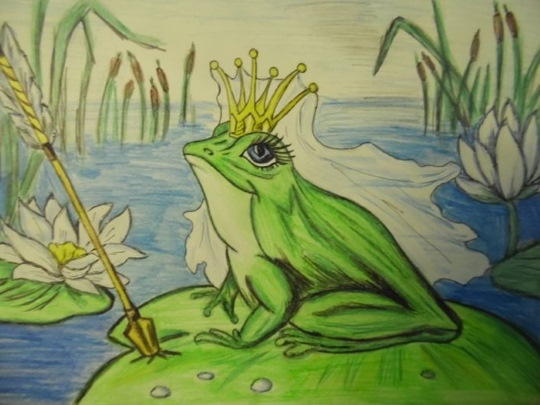
On the stone with an arrow
Instead of the described background, you can use a large stone with foliage.
Then the algorithm of actions will be as follows:
- Correctly depict the stone and the background. The boulder can be of any shape, but it must have a flat surface, as the frog will sit on it, waiting for the prince. Even the sharp edges should be slightly rounded. It is depicted almost on the entire lower half, as the frog will be drawn on the upper half.
If the stone has a porous structure, small circles or ovals should be drawn around the entire perimeter, except for the top part. They will be larger in the middle, smaller on the sides.
Since the frog is wet, the stone underneath it will also be wet. Accordingly, its upper part will glare in the sun and be white. The boulder itself will be gray, and darker in the pores and shadows of the grass. And the grass underneath it will be the darkest, next to it – saturated green, in the distance – light.
- Draw a frog princess on a stone. For construction, you can use the already described 1st or 2nd variant of the animal. Ideally, if the frog on the rock looks to the left, since its muzzle will not become darker than its back and will not add gloom to the drawing.

It is desirable that the surface area of the boulder be either proportionate to the animal, or slightly larger. Then the main focus of the painting will be on the frog, not the stone. A short shadow is drawn under the amphibian.
- Add a crown and arrow. The crown can be of various shapes, at the discretion of the child. The arrow is depicted either in the mouth of the amphibian (it is desirable to preserve its smile), or in the paw, or on the stone itself.
Regardless of its location, it, like all objects, casts a shadow on objects. The arrow and crown are made in the same color - gold, and from them you can draw light yellow lines that imitate the glow.
A drawing of a frog for children may suggest that it is positioned with its muzzle facing the viewer.
Then the construction of the drawing will be like this:
- Depict the stone and the background.
- Divide the top part in half again.
- In the upper divided half, draw an oval in a horizontal direction, in its place will be the head.
- Below it, draw a circle that touches it, one and a half times larger (it “goes” onto the stone) – so the frog will be located not on the edge of the stone, but on its plane.
- The hind legs of the amphibian are long and strong, so in their place, 2 horizontal ovals are drawn, and in the area of the front legs, 2 vertical ones, smaller in size and closer to the center of the body.
- Detail the muzzle with a contented smile, round eyes with eyelashes and an arrow in the mouth.
- In place of the small ovals, draw thin, splayed paws;
- In the area of large ovals - powerful, bent at the knees and with large feet.
- Place a crown on the head.
- Connect the head, paws and body with smooth lines.
- Remove geometric shapes.
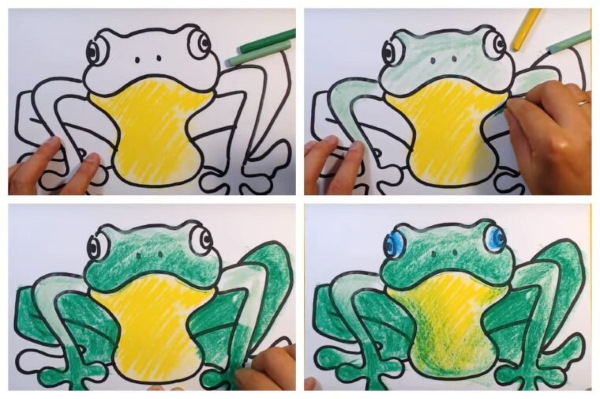
- Paint the belly yellow.
- Make the rest of the body green with black spots.
- The lights and shadows correspond to those depicted in the background.
- Make the crown and arrow gold, and draw a glow from them.
The drawing of the frog princess is ready.
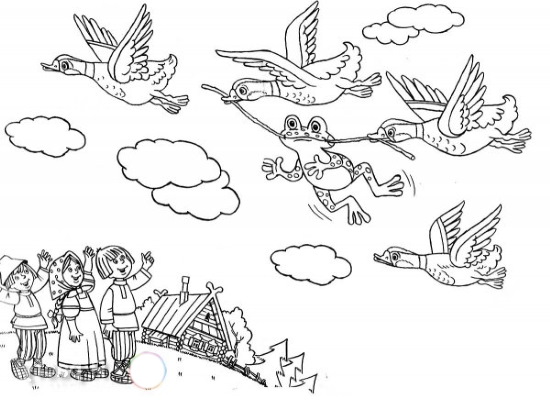
The Traveling Frog
This is the second famous fairy tale character. As Garshin wrote in the fairy tale of the same name, the main character heard from ducks about warm lands where it is beautiful and there are many mosquitoes, and wished to get there. Then, showing ingenuity, she asked these birds to help her get there.
A drawing of a frog for children will become a fun, interesting composition, because according to the plot of the fairy tale, it holds a rod with its mouth, which is carried in the beaks of ducks.
Before drawing you need to:
- Prepare the materials. This is an A4 sheet, a ruler, a mechanical or sharpened pencil with a hardness of HB, an eraser, a black pen, a brush and paints.
- Divide the sheet into 4 equal parts. This will be needed to determine the location of the main character and the birds.
Image of ducks
They will be in the upper right and lower left squares. The far duck will be 20% smaller than the near one. For the heads and bodies, use an HB pencil to draw a chain of 1 small and 1 three times larger flat oval at an angle of approximately 30 degrees. Add right-angled triangles with the flat side down to the small ovals. These will be the beaks.
On the left side of each small oval, draw circles so that they fit into these geometric figures. From the circles along the oval, draw 2 lines to the body, parallel to each other. This will be the neck.
Draw fans without a sharp end at the bottom of the large ovals. This will be the tail. Divide the sides of the oval in half to determine the width of the wings. Add a square to each upper part of this figure, and a triangle to each of them.
Only their sharp corners will "look" to the left, thereby emphasizing that the wings are bent. That is, the right triangle will be depicted inside the square. In the second half of the large oval, draw paws with splayed membranes in the direction of the body.
Next, the ducks are detailed. On the beaks, closer to the head, add a horizontal comma for the nostrils. From the acute angle to the right side of each triangle, draw lines to separate the mouth area.
In a circle, somewhat closer to the beak, depict eyes with pupils directed not at the viewer, but forward, and glare. Pupils and nostrils are drawn with a black pen. On the neck, closer to the body, add 2 wavy lines with a pencil, parallel to each other. The same - in the chest area and in the triangle of the spread wing.
The entire lower area of the wings will also be wavy with long feathers. All parts of the body are connected with smooth lines, and additional ones are drawn on the wings in the upper part.
Frog with a twig, background, coloring
Main stages:
- Draw a frog with a twig. The lower right square is intended for this. Between the ducks' beaks, draw a rod, bent slightly to the right under the weight of the frog, since the ducks are moving to the left.
In the middle of the twig, mark a point from which draw a large oval tilted to the left. The upper part is slightly beveled on both sides, since there will be a muzzle in that place, and the lower part is strongly beveled. From the latter, slightly overlapping on the sides, depict 2 identical ovals.
- Detail it. Inside the oval for the body, draw 2 lines, concave in such a way that the head and body are formed. From the neck area, draw paws bent at the elbows, holding onto a twig.
In place of the 2 ovals, draw the extended hind legs with spread fingers with skin stretched between them and with membranes. On the sides of the head, draw 2 semicircular eyes. All over the body, except for the belly, draw spots on the skin. Then delete the outline lines.
- Add background. The nearby clouds will be larger than the distant ones, and their location is not important.
- Color the entire drawing. They start with the background. The sky is painted blue. Since clouds in nature are not solid, light gray, bluish and pinkish spots are added to them. As soon as the background is dry, the ducks are painted.
Their paws and beaks are bright orange, for the rest of the body you only need brown. Light shade is used for the inner part of the wings and body, dark - for the head, neck (leave the line white), outer part of the wings, tail and the area of long feathers.

Paint the rod with any shade of brown. Wait again for the drawing to dry and move on to the frog. Paint the belly and head in the mouth area yellow, the rest of the parts green, the spots black. The drawing is ready.
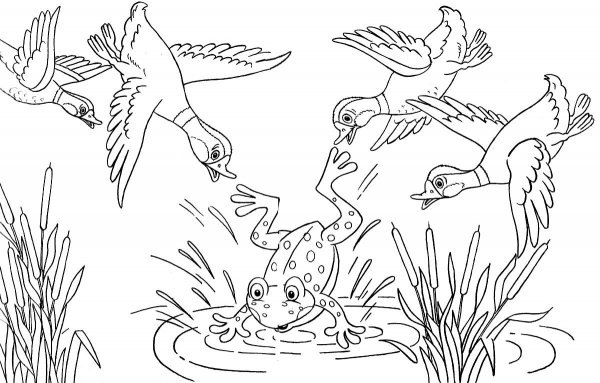
Beautiful frog in a swamp on a water lily
According to the plot of the same fairy tale by Garshin, the main character, because of bragging, let go of the twig and never reached the warm lands, but ended up in another swamp. To depict it, you will need watercolor paints. With their help, the muddy surface of the quagmire is better emphasized.
Actions:
- Draw a swamp with a water lily in the center. First, divide the sheet with a line, slightly convex upwards, so that the lower part is 2 times larger. Next, draw a large oval, touching with an arc in the center - in its place there will be a water lily.
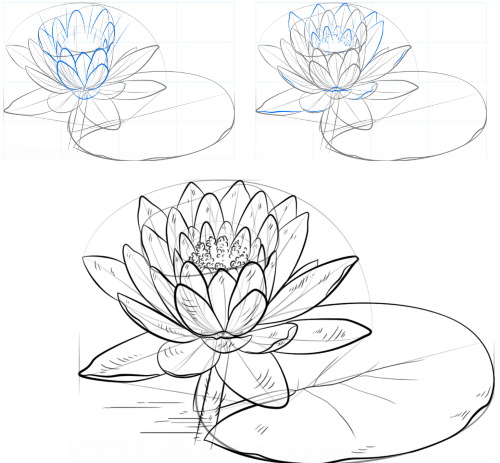
From the left side of the oval and up to the middle of it, draw many thin leaves, connected at the bottom, so that the shape of the flower turns out round. The lower petals are strongly spread out.
From the inside, draw short thin lines with balls at the end. These will be the stamens. On the oval itself, on the left edge, draw a triangle in the shape of a thin piece of pie. Add low-growing, stunted plants behind the swamp.
- Draw a frog according to the point "construction", only depicting not the muzzle to the left, but to the right. The second part of the water lily leaf is intended for it.
- Detail everything. First, remove the outline lines. Then add shadows from the frog and flower. The background does not require detailing. On the oval, draw lines characteristic of the leaf. Slightly in front of it, add part of the reflection from the flower and frog.
- Color it. They start with the background. To give the swamp immobility, the paint is applied in large horizontal strokes. The color is dark green, mixed with brown in places. The reflection is darker than the flower and the amphibian itself. You can highlight the duckweed in spots.
The trees in the background are painted green, not forgetting about the shadows. The sky is blue. Then the main objects are painted. The leaf color is green with dark lines and shadows from objects. The water lily is white with gray shadows and yellow stamens. The frog is green with a yellow belly and black spots on the body. The main character in the swamp is ready.
Funny frog with open mouth
This type of drawing will be the easiest for a child, since it does not require the formation of a composition.
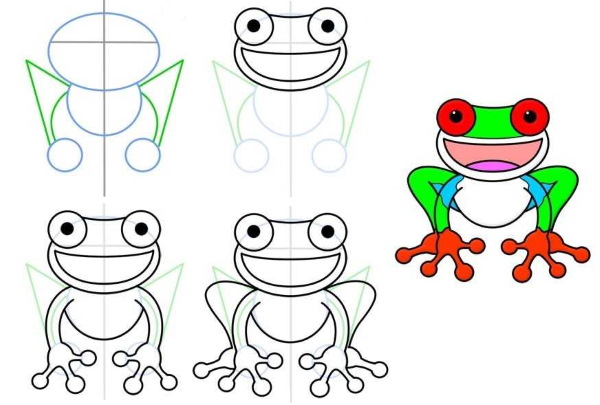
Stages of illustration:
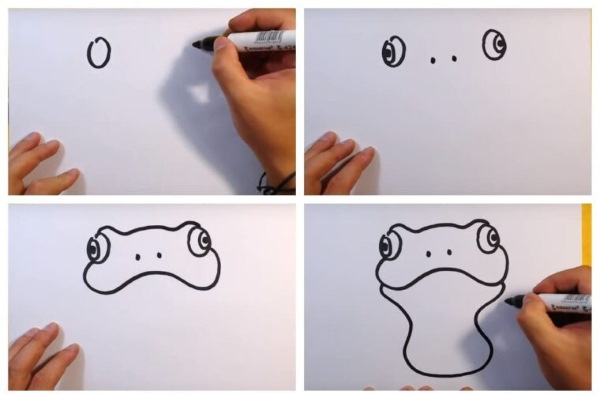
- Draw 2 large semicircles and an arc between them, forming the top of Mickey Mouse's head - these will be the eyes.
- From the edges of the planned eyes, draw 2 lines down, almost completing the oval.
- In the empty space, draw 2 front paws and connect them with the lower part of the oval.
- To the left and right of the body, add 2 large half-hearts, which will later serve as the thighs of the sitting frog.
- Add a massive paw to the bottom of each one.
- In the area of the semicircles, draw balls, and inside them, closer to the bottom, draw another one - this will make eyes, the pupils of which should be painted black.
- In the upper half of the body, add a wide smiling mouth with a tongue.
You can add hats, dresses, etc. to such a frog, which will make the picture even more fun for children. Any drawing of this amphibian will be easy if you follow the steps given.
Video about drawing a frog
Frog drawing for kids: