3D volumetric drawings are considered the most difficult to perform - achromatic shades with a pencil create shadows and a visual effect of presence. Such masterpieces require detailed drawing of small accents, good abstract and developed thinking.
For beginner artists, it is possible to perform all the successive line drawings and shading step by step. Realistic drawings should have clear boundaries, contours and a smooth transition of shades where necessary. For classes, you will need a simple slate pencil or pen, a marker for drawing contours, white or squared paper.
How to get 3D effect of drawing
To create a simple drawing, you need to choose the right picture. This can be an image with labyrinth lines, an animal or an insect, as well as abstract interpretations.
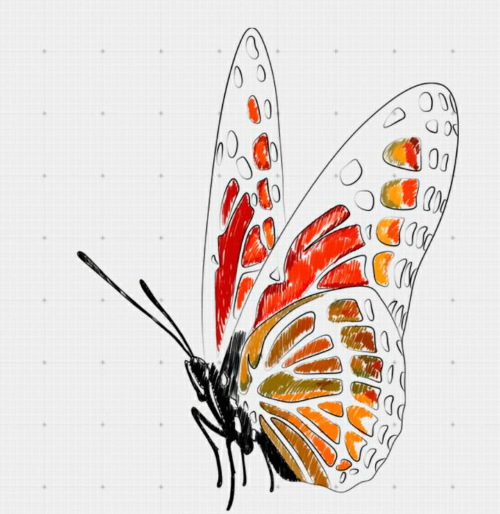


Below, an example will be used to examine the step-by-step drawing of the butterfly's contours:
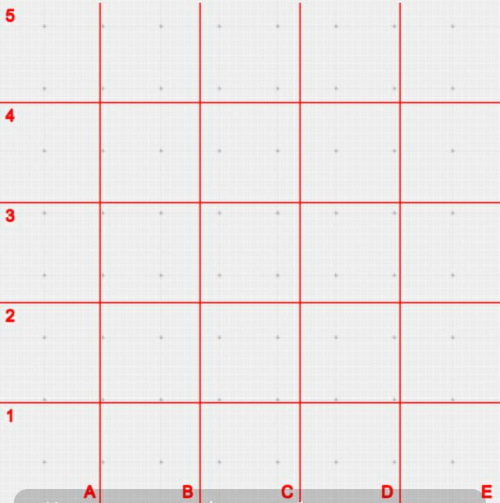
- First, you need to prepare the paper - a large drawing square has proportions of 1:10.
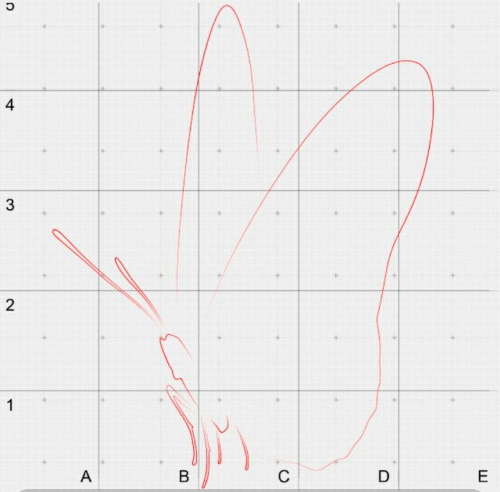
- It is necessary to outline the boundaries of the drawing, which will correspond to the actual dimensions in a reduced projection.
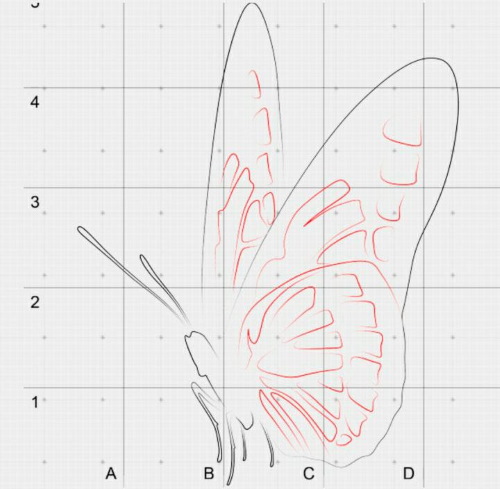
- Once the outlines are applied, the accents should be detailed. As a rule, this is drawing details within the contours.
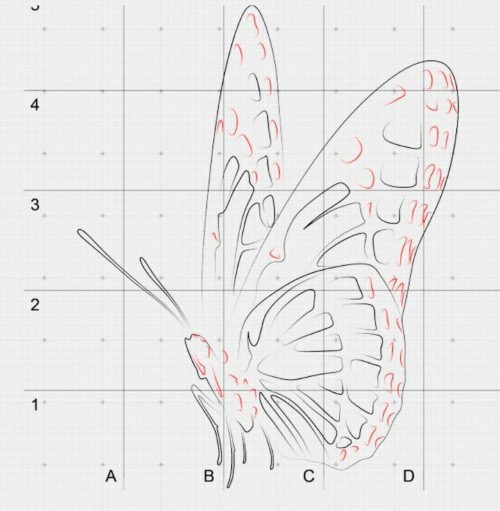
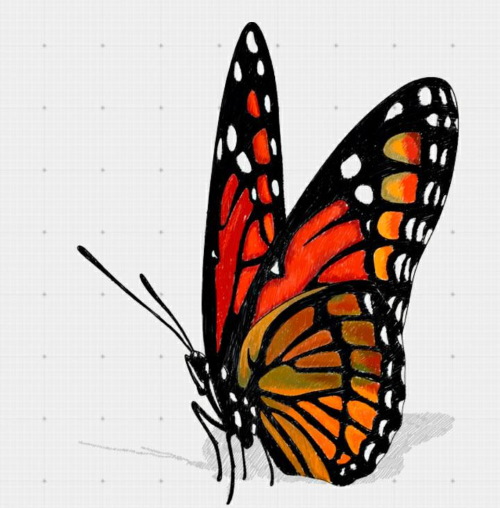
- The main guide lines need to be removed or masked. This can be done by shading or painting with color.
- The image is completely aligned, color inaccuracies are eliminated.
- Next, it is important to correctly apply the shadow of the drawing so that it becomes three-dimensional. For this, you will need a light-colored slate pencil.
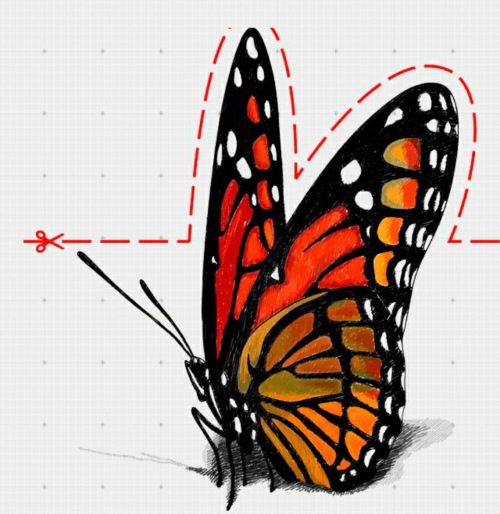
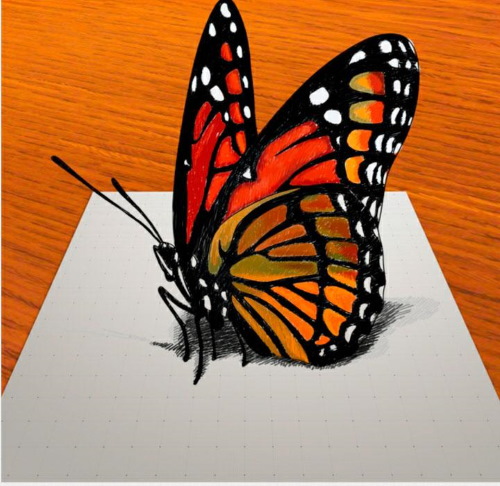
The shadow should fall from the guide lines of the drawing. Visually, the light comes from the observer who peers into it. Accordingly, the shadows recede into the background - it is always smaller in size than the cells. Next, at the level of ⅔ of the drawing, you need to cut out the upper part of the butterfly. In the finished version, it looks like a living one, sitting on a piece of paper.
Drawing 3D with a pencil step by step for beginners is easier to do by cells, creating a blank.
In such moments, it is worth thinking in advance where and how the shadow will fall, from which side the depth effect will be stronger. In the presented version, the hatching technique is used.
First, the outline of the future drawing is created, after which the areas that are deeper need to be darkened:
- The bottom layer, the deepest one, is done using the technique of full color overlap.
- Layers 2 and 3 should be shaded in the direction of horizontal and vertical lines.
- The unlit sides of layers 2-4 are darkened to match the main lower tier.
The basic rule of shading is that multi-tone shadow edges always remain 2 tones darker than the darkest area.
Rules for drawing 3D drawings
When creating volumetric effects, it is necessary to follow a number of rules that will subsequently help to maintain the proportions and dimensions of the depth of the future illustration of the composition.
The rules are as follows:
- Drawings made in a 2-dimensional plane with volume elements are called projections on planes. When moving away and approaching, its dimensions always change.
- Projection is impossible without perspective. This is necessary to depict a drawing at an angle, which will always be smaller further on. The plane plays the role of reducing illusory vision.
- There should be a viewing point in the center of the sheet of paper, from which you need to push off. It does not matter which side the drawing is located to the plane, its edges or sides will always be in the center of light balance.
- The corners of spaces are always distorted. Only the perspective of narrowing or widening is reflected on the plane.
In reality, there is only a three-dimensional dimension. To project it on paper (2-dimensional space), you need to display 4-5 planes. For example, 2 side walls, floor, ceiling and the center of the drawing, if it is in the perspective of space (depth).
How to convey light and shadow correctly
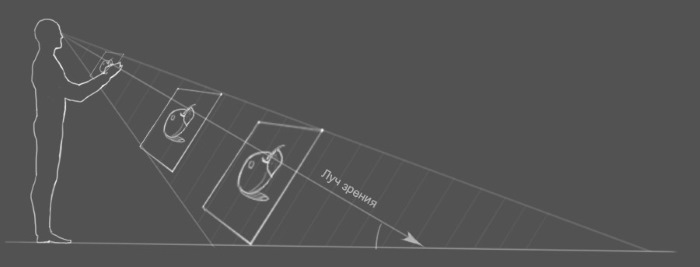
Before creating a drawing, you need to make a sketch that will look distorted on paper in a 3D effect.
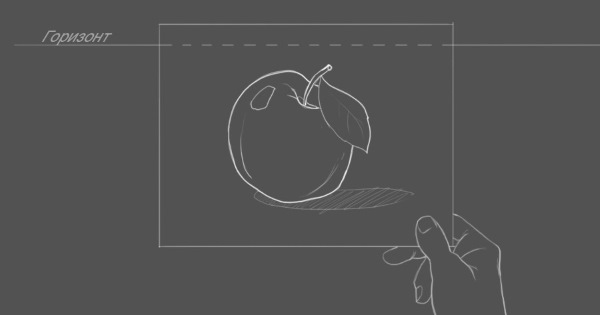
Here it is worth considering the view from above. When composing the composition, the side edges are narrowed, and the angle of view will be 120 degrees. An anamorphic drawing in the correct interpretation can only be seen from 1 correct point. The same thing happens when the viewer sees an image on the asphalt.
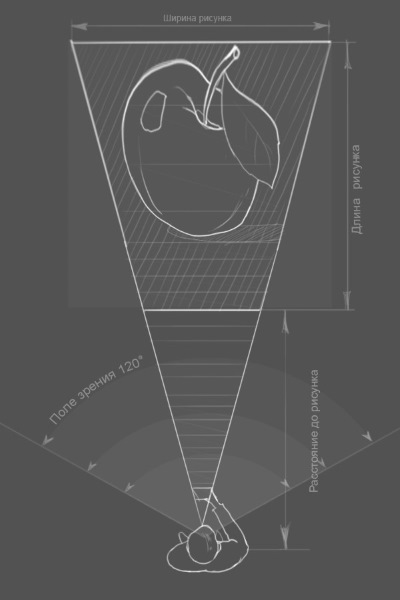
Highlights and shadows are related in perspective. The wider the viewing angle, the narrower the field of view will be. Depending on how far away the observer is, the length of the image will change as he or she approaches. Therefore, anamorphic drawings should always be viewed from a certain point.
Pencil drawings in 3D technology need to be animated not only with shadows, but also with highlights. It is important for beginning artists to know that if you apply the beam projection step by step, you can see how the beam of light hits the object.
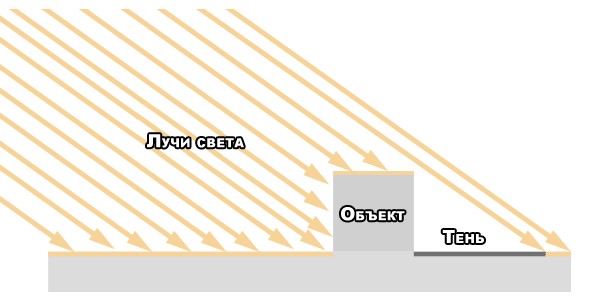
The sheet shows only the image of the imitation of the impact of light on various surfaces through which the beam does not approach. Consequently, a shadow plug appears.
It is also important to consider the degree of transparency of those edges along which the beam approaches tangentially:
- The density of the object - the higher it is, the less the penumbra will fall in perspective.
- Shine and color - the brighter it is, the higher the probability of reflecting light rays.
- The amount of scattering component - if the light falls in cloudy weather, the level of contrast and perspective will be lower. The denser the beam and the brighter the light, the clearer the edge of the drawing appears.

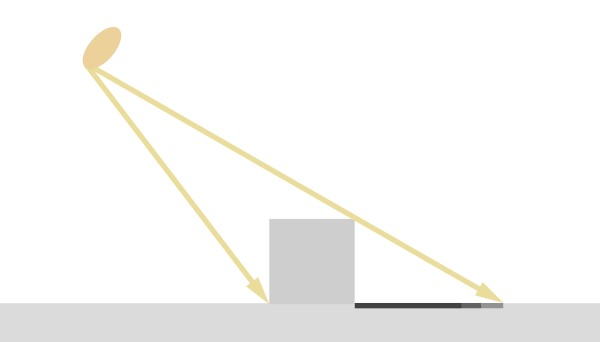
This is what an area that is not illuminated looks like. From the point of view, a part of the field is visible to the viewer. If you change the point of observation, the shadow will lengthen, moving away from the object along a tangent of a smaller radius and angle of inclination.
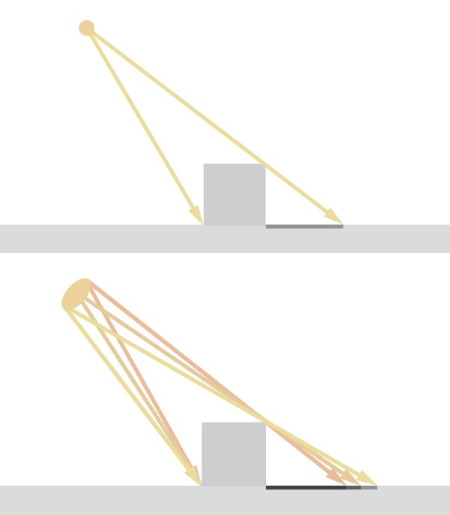
Such moments occur when the laws of physics are not observed. Depending on the location of the object of observation, the angle of the shadow and penumbra can change. The latter appears if the observer changes the point of observation.
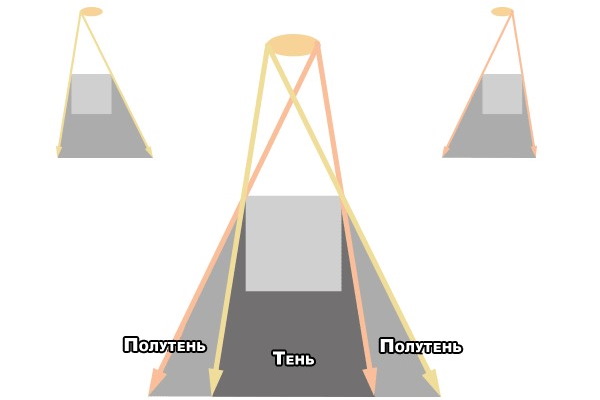
It is also necessary to take into account that there may be several points of light from which rays fall on an object. For example, light from 3 different lamps falls on an object in a room - a sconce on the wall, lamps on the ceiling. Accordingly, there will also be several scattering points.
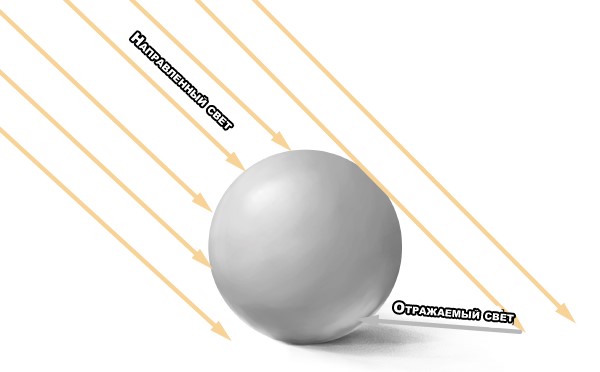
Directional light will always fall on a point from which reflected light will appear. Drawings often show objects located in shadow.
If the beam does not hit those points, then what is visible must be invisible, however:
- There is a concept of “scattered” light in the shadow area – it is not reflected completely, but falls out of the points of light absorption.
- Specular light will emerge at the point from which it falls, provided that the observer is looking directly at the source.
- Diffuse reflection is possible under circumstances where the object is distorted or has a microstructured surface.
Shape and color also influence the formation of shadows.
Some objects can absorb some of the light and let the rest pass through. This applies to fabrics and thin objects. Such a shadow will be formed from a beam passing through an object.
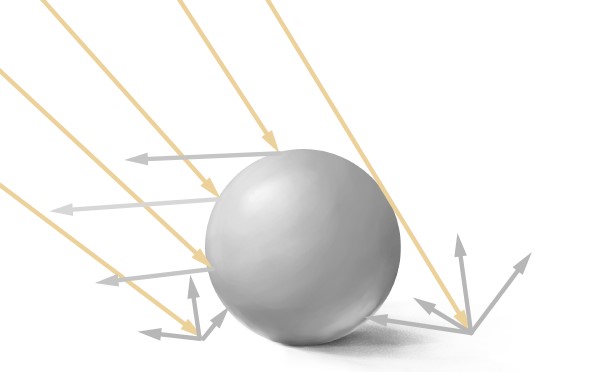
The point that the mirror beam hits is not independent. There are many small surfaces on the ball that reflect light rays, but only one of them in a specific position will catch the eye of the observer.
Master classes for beginners
A 3D pencil drawing step by step for beginners should be created on marked paper to correctly display the projection.
Below are some typical images that are suitable for training and learning as examples.
Heart
The drawing can be done with a projection onto a distant or near perspective.
First, you need to create a structure and mark the boundaries of the drawing:
- On paper you need to draw an image in the shape of a heart and highlight the outline.
- Next, you need to mark the boundaries of the plane - it is distorted at the point of the center of visibility, where the drawing is located.
- Step by step, you need to paint over those areas that are tightly adjacent to the plane at the intersection points.
- Along the tangent, you need to create shadow lines that fall from left to right. This will create the effect of lighting and shadow formation at the point where the rays are blocked.
- Lastly, you need to mark the boundaries of the heart where the light completely hits it.
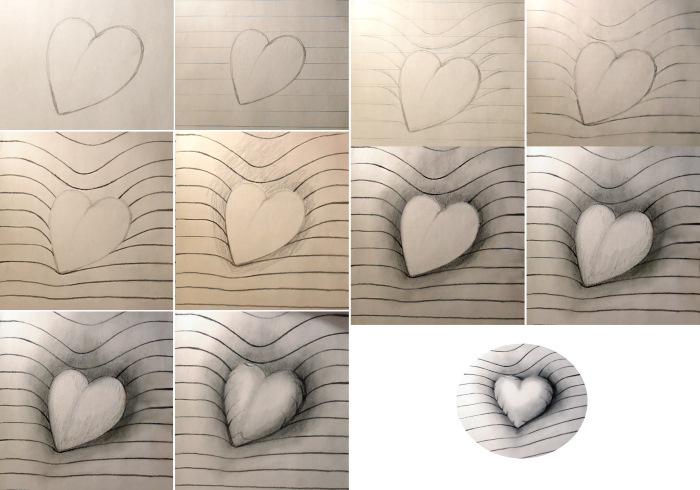
To make the drawing “live”, it is recommended to shade the pencil with your finger, moving from the illuminated part of the drawing to the dark one, creating an intense diffusion of light.
Hole
To depict a three-dimensional hole, you need to draw a circle in the center of the sheet.
To give the figure volume, it is important to focus the observer's gaze at the point where the thickness of the drawing will be visible:
- Highlight the circle in black to define the boundaries.
- To give the drawing three-dimensional properties, you need to "flatten" the circle in the part that is farther from the observer. Then mark the far axis with a bold pencil highlight.
- For interpretation, you can add straight lines that will be distorted where they enter the hole.
- Next, you need to add shadows, but only where the light penetration is less.
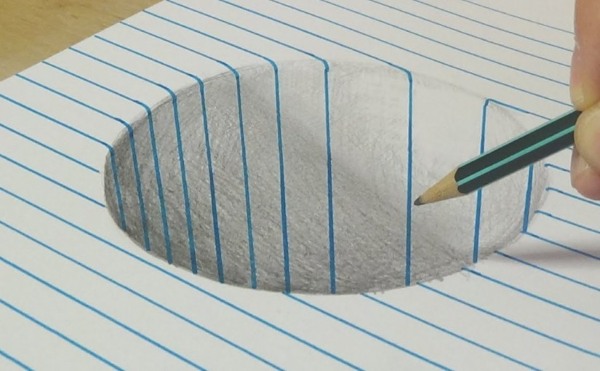
The shadow should be applied from the inside towards the outside, smoothly blending the traces of the lines.
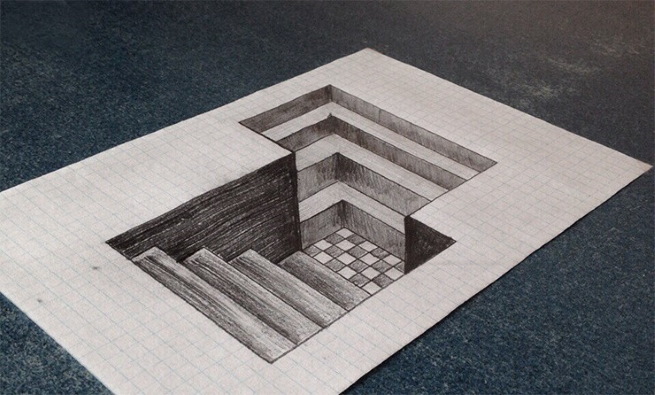
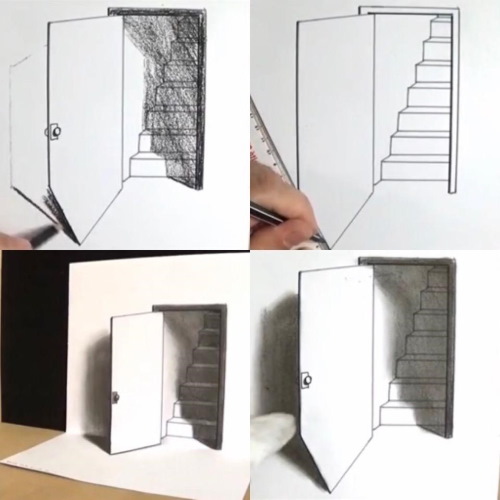
Ladder
The most complex drawing is considered to be 4-dimensional, where you can see all 4 cardinal directions. Despite the distortion of space, the drawing will only affect the visible 3 cardinal directions depicted on paper.
To create it you need:
- Draw a diagram of a horizontal staircase, add parallel to the floor edges that go into a perspective narrowing towards the observation point.
- Next, you need to add lines between the main edges to connect them vertically. This is how you get a step depicted in half a turn.

To make the drawing more systematic, it is worth adding abstraction. – it will allow you to display the angle of the staircase that will be visible in 3D visualization.
To do this you need:
- Mark the area where the pattern cannot be observed. This could be doorways or plantings.
- For effect, you can add a door to the overall picture to create the illusion of an unfinished action.
- An important stage will be the application of shadow highlights. They should be located in the perspective of the far corner - the light falls from right to left, illuminating the surface with direct rays. The shadow side, which remains visible to the observer, is darkened.
Here it is important to take into account the penumbras, which are formed as a result of the scattering of light due to it hitting other objects (outside the frame).
Funnel
The distorted circle allows us to simulate the movement of space – perspective is inappropriate here, since in reality such objects are difficult to display and represent from the point of view of physics.
First, you need to draw a circle of the same shape as in the case of the hole. On the side farthest from the observer, the part is distorted, and the sides are expanded. In this case, the circle has edges and parts of the world. If you take a sheet of squared paper and fold it into a cone, the lines will distort the round space despite the fact that they are parallel.

The angle of distortion should show how much the space on the horizontal surface is curved in relation to the vertical. Additionally, the drawing should have shadows - where several lines are directed to one point.
Other drawings
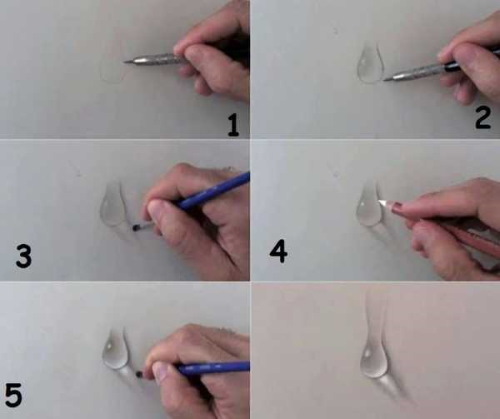
The most beautiful is the drawing of a drop. The composition has almost no edges and centers, which complicates the artist's work. The observation point is a virtual visual area that remains untouched. The outline of the future drop is formed around it, and somewhere in the middle - glare of sunlight. It is interesting that water always reflects light and partially absorbs it.
Therefore, there may be several shadow spots in the drawing:
- The borders are always highlighted with a dark shade to indicate the shape of the drop.
- The bright highlights are reflected light, and the transition shadows are the absorbed ray, which forms the thickness of the reflected surface inside the drop.
The same principle can be used to draw a spherical ball made of glass, water or metal. Smooth surfaces have the ability to scatter a beam of light in several directions depending on the shape, so this nuance must be taken into account when constructing a projection.
How to draw a 3D portrait
A 3D pencil drawing step by step for beginners can be drawn in the portrait technique. This is the most extensive and easy area of study, in which such artists as Michelangelo, Leonardo da Vinci, Rembrandt created masterpieces.
Facial proportions
To correctly and beautifully convey facial expressions, emotions, shadows, you need to create a sketch and draw parallels according to it, corresponding to the levels of the eyes, eyebrows, nose and lips.
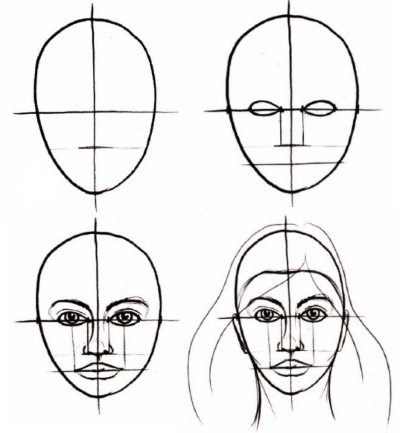
Next, you need to start from a symmetrical cross-shaped curve, although in reality there is any with perfectly even features. Asymmetry should look neat, expressed in details.
You also need to draw a parallel for the eyes, arrange the verticals so that they are equidistant from the middle (nose). Then you can start drawing details, contours and applying shadows.
Basic principles of construction and layout
The eyebrow line must be positioned in such a way as to maintain the proportions on paper relative to the model.
 If a person has facial features of different sizes, it is advisable to highlight them not with a pencil, but with a shadow.
The center of the eye should be projected onto the edge of the corner of the lips.
If you draw a diagonal tangent from the nostril to the outer corner of the eye, you will get a straight line.
Now you can start sketching:
- Place the approximate center of the pupil. It should be dark, serve as a parallel for drawing the ears.
- Strands of hair should be drawn like da Vinci, using a few defining lines.
- Once all the details are defined, you can remove the guide lines to begin drawing the details.
Shading with a pencil should be done in stages to highlight the darkest and lightest parts of the face oval.
Detailed drawing of the face
To identify the lightest areas of the face, you need to provide which of them tan the fastest in the sun:
- forehead and temporal lobe;
- nasal rib;
- cheekbones.
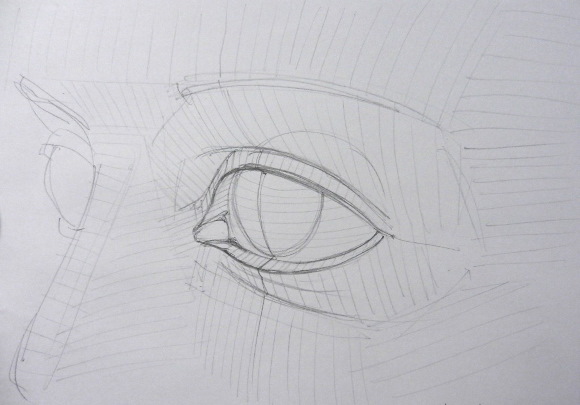
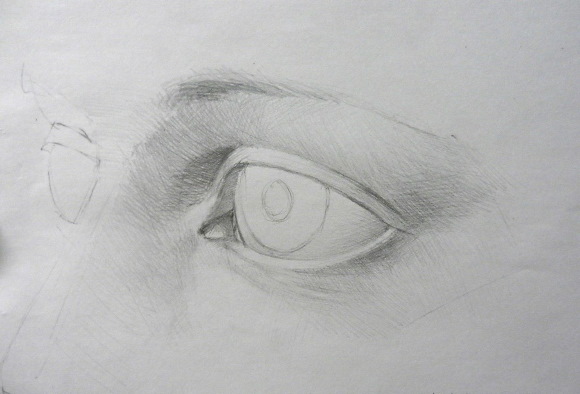
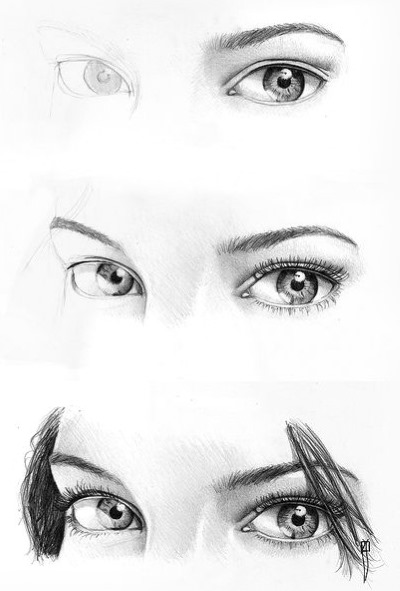
These parts should be lightened with a white pencil, or avoid retouching in these areas completely. The eyes are spherical in shape, but they are located in a hollow of the skull. They are covered from above by the upper eyelid, which has a thickness comparable to the thickness of the pencil lead.
If the face is depicted in profile, then the iris needs to be detailed. In order for a novice artist to “see” all the curves, it is necessary to draw visual lines of curves, and from them project parallels to the base of the eyes and nose.
Along the lines, you can determine which of them will be removed from the observer, and what needs to be highlighted. Detailing the pupil will require knowledge of tricks. It is important to understand that this is a mirror surface that not only reflects light, but also absorbs it.
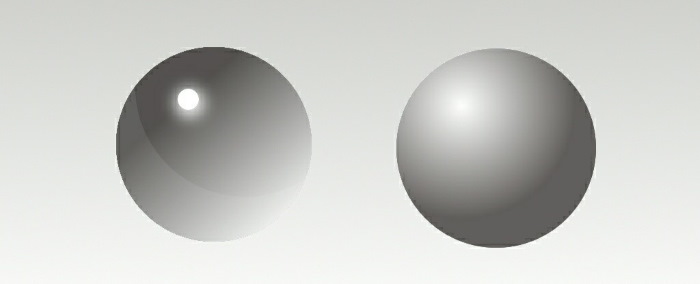
Below is a table to help you understand how to draw certain spherical objects:
| Sphere type | Color image | |
| Mirror, transparent | On the light side, the area should be dark with a reflective glare. On the shadow side, it is lightened. | The glossy surface reflects bright and clear highlights, and reflexes are virtually invisible. |
| Matte, opaque | Light is distributed according to the law of chiaroscuro: glare, diffusion and darkening. | The shadow, penumbra and reflex will be on the darkening side. |
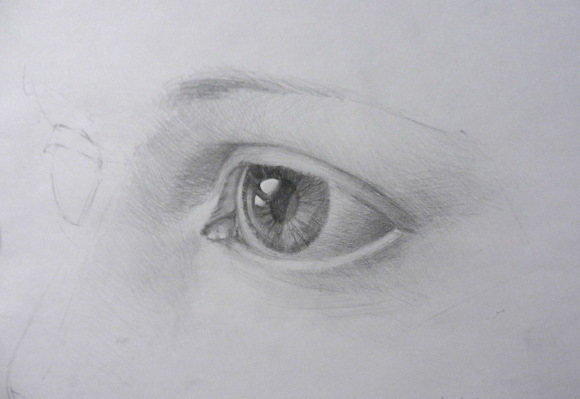
The reflex is depicted as a line of transition from shadow to penumbra, indicating the boundaries of the area where light transmittance decreases.
It is necessary to open the light sensitivity step by step from the outer corner of the eye. The 3D drawing must be finished. The same applies to drawing the lips and nose - you need to remove all the lines and shade individual parts with a pencil. For beginners, such a course in portrait graphics may seem capacious and complex, but this is only the basis for a future masterpiece.
Video about 3D drawings
Simple 3D pencil drawing step by step: