The hedgehog is known to children as the hero of many fairy tales and cartoons, so the image of the forest animal is often used in children's creativity. A hedgehog made of felt according to special patterns can be used as educational toy, crafts for the exhibition, decorative elements.
Necessary materials and tools
A felt hedgehog, the pattern of which is given below in several variations, can be made with the following materials and tools:
| Material/tool | Features of use |
| A sheet of brown (or black) felt | Necessary to create the hedgehog's needles, eyes and nose. |
| A sheet of beige (or milky) felt | Necessary to create the hedgehog's face and paws. |
| Felt scraps of different colors | They are used to decorate the craft – “place” the following details on the hedgehog’s needles:
|
| Hedgehog template for sewing | This is the basis of the product, without a template it is impossible to create a hedgehog. You can choose any template you like, and then transfer it to felt in detail. |
| Scissors | It is better to use two types of scissors: medium size is suitable for small parts, large size scissors are suitable for larger ones. They must be strong and well sharpened. |
| Marker or pencil | It is best to use a simple pencil for marking the details. Its advantage over a marker is that the marking traces will not be too noticeable. It is good if the pencil is soft or hard-soft - it will be easier to mark, and the trace will be brighter than from a hard pencil. A marker of dark shades will do: gray, brown, black, etc. - its trace should be clearly visible on the felt. |
| Strong needle | The needle should not be too short and thin. To check how convenient it is for working with felt, you need to try it on a felt sheet folded in half. |
| Threads | Threads are needed to sew the parts together. You can use any threads: sewing, embroidery or knitting. It is best if the thread is thick – in this case the parts will hold well. |
| Hot glue gun | Hot glue is most convenient to use when working with felt, as it fixes the material very well and dries quickly. However, if you don’t have it, you can use super glue. |
| Stuffing material | For stuffing you can use:
|
| Additional elements | These can be decorative elements (buttons, "live" eyes") to decorate the craft. You may also need a ribbon if you need to make a loop. When making a developing hedgehog toy, you will need small clothespins, buttons, and Velcro. |
Transferring the pattern to felt, cutting out the pieces
The felt hedgehog, the pattern of which is presented below in various versions, must be made carefully.
To do this, you need to correctly transfer the pattern onto the felt and cut out the pieces.
To avoid making mistakes and repeating actions several times, it is important to adhere to the following rules:
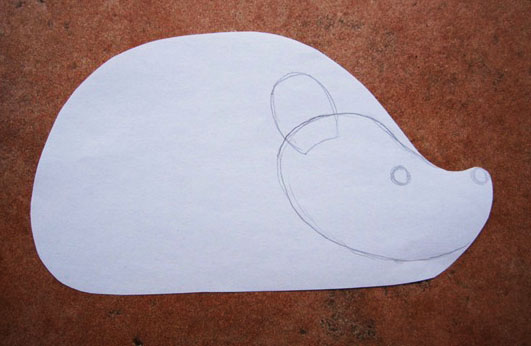
- First, you should print out the selected template in two copies. This is necessary so that the superimposed parts can be transferred to the felt intact. For example, the animal's muzzle must be sewn on top of the "needles", and for greater durability of the product, the needle part of the body must be whole. The parts should not be combined like a puzzle, but superimposed on each other. To do this, you should cut out the parts so that each of them retains its integrity.
- Next, you need to cut out the paper pieces so that each of them is whole, using both copies of the template. List of necessary pieces:
- hedgehog face;
- needle-like part of the body;
- eye(s);
- nose;
- mouth;
- paws (if needed according to the template);
- various forest delicacies.
- Now each paper detail should be transferred using a simple pencil (marker) onto felt of the corresponding color.
- The final stage of cutting is cutting out the felt pieces with sharp scissors along the contour of the transferred pattern.
Felt Hedgehog for Beginners
Even beginners can make a beginner hedgehog.
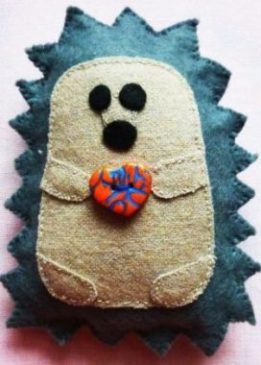
 The procedure for making a simple hedgehog is as follows:
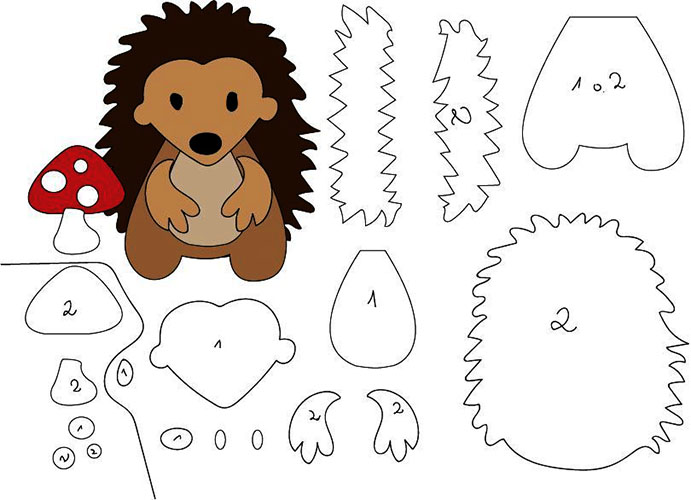
- First, you need to cut out the hedgehog parts from felt:
- abdomen – 1 piece;
- body – 2 parts;
- nose – 1 piece;
- eyes – 2 parts;
- hand – 2 parts;
- leg – 2 parts.
- Next, you need to sew the paws to the belly. The seam goes along the front part of the product, so it needs to be done neatly. Between the front paws of the animal, you can sew a bright button in the shape of a heart or an apple.
- Then the nose and eyes are glued on.
- The finished belly with all the attached elements must be sewn to one of the body parts.
- Next, you need to attach the second part of the body to the first one, and then connect them together with a loop stitch through the edge, leaving a few cm to the end.
- The resulting hole should be used to fill the toy with padding polyester or other material. After that, you need to finish the seam, tie a knot and hide it inside the body with glue.
This hedgehog can be used as a toy, as well as a Christmas tree decoration, don’t forget to sew on a loop.
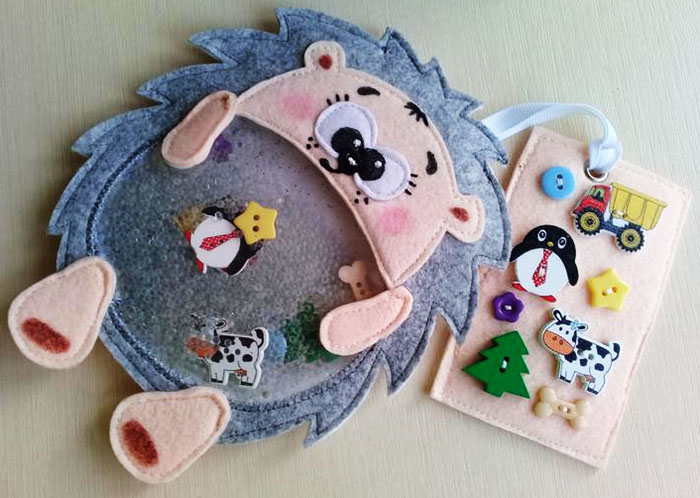
For a developmental book
The felt hedgehog, the pattern for which is presented below for the educational book, can help children develop and master the following skills:
- fine motor skills of hands;
- counting within 5-8;
- intelligence;
- color perception.
To do this, children are asked to attach the following parts to the hedgehog's spines:
- mushrooms;
- flowers;
- leaves;
- apples;
- pears.
The set goal determines the content of the product.
To develop fine motor skills of the hands, teachers recommend organizing educational games for children using:
- buttons;
- Velcro;
- clothespins;
- buttons;
- magnets;
- cords.
All these fastening elements can be combined in one game. If the role of the hedgehog in the developmental book is chosen to teach counting and color perception, you can limit yourself to one type of fastening of the parts, making sure that all the elements are of different colors.
Master class on making a hedgehog for a developing felt book:
- First, you need to cut out the parts using a template. The size of the hedgehog should match the size of the page of the developmental book. You can also leave some space for a pocket in which the child can put the parts attached to the back of the animal. The following parts are needed:
- nose – 1 pc.;
- eye – 1 pc.;
- body – 1 pc.;
- needles – 1 pc.;
- forest treats - the required amount, 2 pieces for each element.
It is important to take into account that the size of apples, mushrooms and other forest delicacies depends on the size of the hedgehog and the planned quantity of these elements.
- After this, you need to mark the location of the fastening elements of the parts on the needles and sew/glue them (buttons, parts of buttons, magnets).
- Next, you need to sew the details of the hedgehog's body to the sheet of felt, which will be the page of the developmental book, using a neat decorative stitch.
- The next stage is to design the animal’s face – you need to embroider the eyebrow, ear cavity, mouth, and also sew or glue on the nose, eyes, and tongue.
- Now you can move on to decorating the forest treats. First, you need to lay out the details of each treat in pairs and sew the second fastening element (the second parts of the buttons, Velcro) to one detail from each pair. If some elements will be attached with buttons, then you need to make a slit-loop on these treats according to the size of the button head. If some elements will be attached with cords, then you need to make 2 holes on these treats to bring out the cord.
- At the end of the manufacturing process, it is necessary to sew each pair of forest delicacy parts together with a neat decorative stitch.
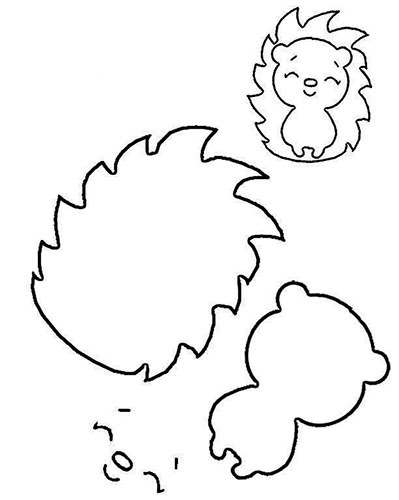
You can also decorate one of the pages of the developing felt book with a hedgehog. A template of any hedgehog that stands on its hind legs will do for the pattern – for example, the one below.
Only the parts "body" and "belly" will not be useful - instead of them, oilcloth material will be used. The point of the game is for the child to find the given buttons by fingering the hedgehog's belly.
Step-by-step description of the process of making a hedgehog-shaped search toy:
- First you need to cut out the parts:
- needles – 2 pcs.;
- head – 1 pc.;
- muzzle – 1 pc.;
- ear – 2 pcs.;
- paw – 4 pcs.;
- foot – 4 pcs.;
- heel – 2 pcs.;
- eyes – 2 pcs.;
- nose – 1 pc.
- Next, take one piece of the needle-like part of the body, mark the location of the abdomen on it, which is then cut out.
- In place of the belly, a decorative stitch "window-pocket" is sewn on - a square-shaped PVC material in 2 layers, which must be carefully stitched or glued on 3 sides. A thick file or a plastic corner folder can be used instead.
- The next stage is to "assemble" the animal's hind and front paws. You need to sew the parts of the front paws together in pairs, and then the feet, to which the heels are first sewn.
- You need to sew the ears and muzzle onto the hedgehog's head, and also embroider eyelashes, eyebrows and ear cavities on it.
- After this, you need to design the front part of the hedgehog - the part with the “window”: you need to sew the head and paws into place.
- Now you need to put the filler (polyethylene granulate) into the "window-pocket", instead of which you can also use beads. Together with the filler, larger buttons of various interesting shapes are placed into the "window-pocket".
- Next, you need to stitch or glue the last side of the oilcloth square so that its filling does not crumble inside the hedgehog.
- Then you can cut off the extra corners of the PVC material that stick out from behind the hedgehog's body and sew the front part of the needles with the back loop stitch through the edge or a regular decorative stitch. First, you need to sew the back part to the book page with several stitches.
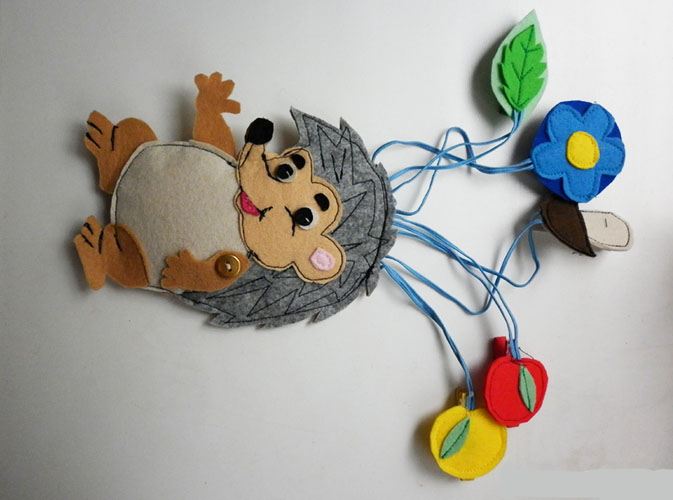
For mobile
The felt hedgehog, the pattern for which is presented below for the mobile, should be bright and interesting. Its main purpose is to attract the attention of the baby.
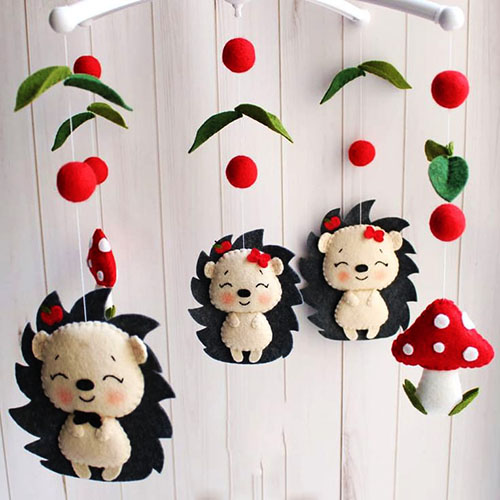
Therefore, felt sheets can be chosen in any color - the main thing is that the shades of the product parts are in harmony with each other.
The order of actions when making a felt hedgehog for a mobile:
- First, you need to cut out the parts: needles (1 piece), body (2 pieces), front paws (2 pieces). In this case, one of the body parts should have legs, the second one – without them.
- After this, on the front part of the body (the one with the legs), you need to embroider the facial elements:
- eyes;
- nose;
- mouth;
- brows.
- Next, you should sew both parts of the body together, immediately attaching the front paws to the one with the legs. When sewing the parts of the body, you need to sew the front paws at the same time. You need to start the sewing process from the lower part of the body.
- Leaving a hole in the crown area, you should stuff the future hedgehog with padding polyester, after which you need to carefully finish the seam.
- Using a pink pencil or marker, draw rosy cheeks on the animal.
- The hedgehog's body is glued to the needles with its back part, and it is important not to forget to attach a loop.
- The animal's needles can be decorated with bows or colorful forest treats made of felt.
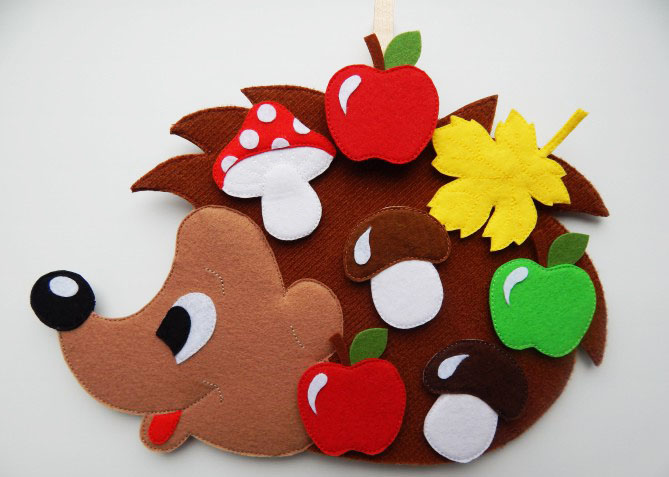
Hedgehog with multi-colored needles
A hedgehog with multi-colored needles will decorate a craft made from natural materials for an autumn-themed exhibition.
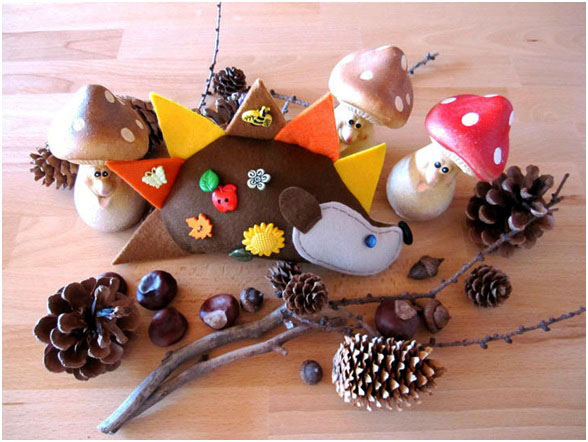
It can also be placed as a decorative element in a thematic corner of a class or group.
To make a hedgehog, you need to perform the following steps in the following order:
- First of all, you need to cut out the hedgehog parts from felt:
- body – 2 parts;
- muzzle – 2 parts;
- ears – 2 parts;
- eye – 2 parts;
- nose – 2 parts;
You will also need 6-8 isosceles triangles for the needles (the number depends on the size of the needles themselves and the hedgehog’s body).
Felt triangles should be of different colors.
- A muzzle, facial elements and various decorative details should be sewn onto each body part.
- Next, you need to fold the body parts face to face, and place the triangles between them with the sharp part facing down, alternating colors.
- Now you can stitch the product along the back contour, leaving the belly unstitched for easy turning and stuffing.
- Now you should turn the hedgehog inside out, fill it with padding polyester and, putting both parts of the belly together, carefully sew it with a blind or loop stitch.
Velcro hedgehog
Felt Hedgehog with Velcro is a small Velcro puzzle game used for the development of preschool children.
From the pattern below, you will need the following parts to make the toy:
- needles – 2 pcs.;
- body with legs – 2 pcs.;
- abdomen – 1 pc.;
- front paws – 4 pcs.;
- head – 2 pcs.
It is best to choose soft felt so that the product can be easily stuffed with synthetic padding.
Master class on making a hedgehog with Velcro:
- First, you need to cut out the pieces and fold them in pairs for sewing, so as not to mix anything up or forget anything.
- Then you need to take one part of the body with legs and sew the belly to it.
- On the head you need to design the face - embroider the eyes and nose.
- Next, you need to mark the location of the Velcro on each piece and sew them on:
- It is best to sew the soft part of the Velcro onto one of the needle parts from the very bottom to the place where the top edge of the hedgehog's head will be located;
- a small rectangle of the hard part of the Velcro is sewn onto the back part of the body with legs (the one without the abdomen);
- on the second part of the body (where the abdomen is sewn on), small rectangles of the soft part of the Velcro are sewn on in the places where the arms are attached;
- a small rectangle of the rigid part of the Velcro is sewn onto the back part of the head;
- Small rectangles of the hard part of the Velcro are also sewn onto the back parts of the left and right front paws.
- After this, it is necessary to sew together the paired parts of the needles, leaving a small opening for stuffing. After filling the needles with padding polyester, the opening is carefully sewn up.
- Step 5 is repeated for the head, body and arm pairs.
- When all the parts are sewn and stuffed with synthetic padding, the toy can be assembled - attach the body parts to each other using Velcro.
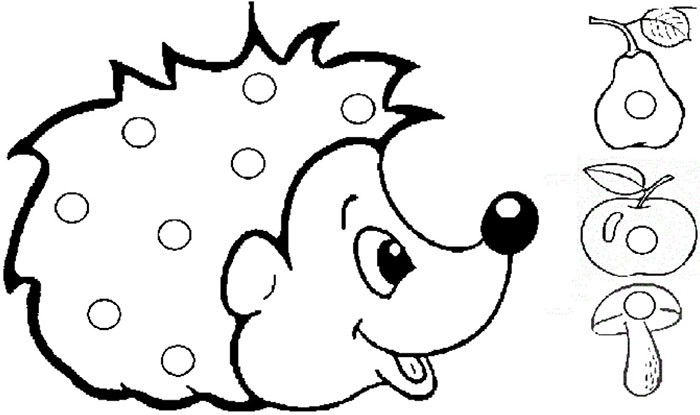
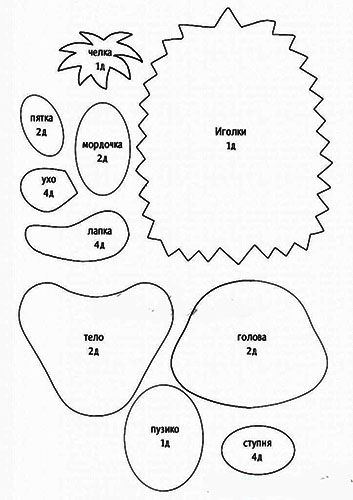
Hedgehog with clothespins
Hedgehog on clothespins is an educational game made of hard Korean felt without filler. With the help of this toy, you can master counting within 5, as well as basic colors - for this, the parts attached with clothespins need to be made multi-colored.

On the back of the forest treats are attached clothespins, with the help of which the objects can be fixed on the needles of the animal. All forest treats are attached to the hedgehog with the help of a ribbon sewn between the parts of the hedgehog.
The procedure for making a hedgehog with clothespins is as follows:
- According to the picture, you need to cut out the details:
- body (the whole hedgehog figure without a face, arms and legs) – 1 pc.;
- needles – 1 pc.;
- face – 1 pc.;
- belly – 1 pc.;
- front paws – 2 pcs.;
- hind legs – 2 pcs.;
- inner part of the ear – 1 pc.;
- eyes – 2 pcs.;
- nose – 1 pc.;
- eyebrows – 2 pcs.;
- tongue – 1 pc.
- You can draw apples, mushrooms and other forest delicacies yourself. When cutting out, each item should be made in duplicate and then sewn in pairs for greater strength.
- When all the forest treats are ready, you can glue the clothespins to their backs using hot glue, not forgetting to secure a ribbon or thread between the clothespin and the part.
- Next, you can start processing and sewing each detail. On the needle part, the needles themselves are embroidered with black threads. Then this detail is sewn to the body with a decorative stitch. At the same time, you should not forget that in the upper part you need to sew between the layers of ribbon with forest delicacies.
- The next detail is the belly. First, you need to sew the right arm on a button to its right part - this is necessary so that it can move. Then you can sew the belly to the body, not forgetting to sew the left front paw and both back paws between the layers in certain places.
- The final stage involves working on the animal's face. You need to embroider a long nose on it, then glue its round tip. After that, you should embroider the mouth, sew on the eyes, eyebrows and ears, and then stitch the face to the hedgehog's body over the needles and belly.
The patterns presented in the article will help you make a felt hedgehog that can serve as both an educational toy and a decorative element. You can choose the one you like from several options, and then follow the step-by-step description and your own ideas.
Author: anna-master (Anastasia K.)
Video about making a hedgehog from felt
Master class on making a double-sided educational hedgehog: