Among the various methods for children to safely learn about the world, development boards give adults a wide scope for their imagination. Examples of these can be factory-made versions or analogs presented in the photo on the Internet, made with their own hands taking into account the age and gender of the children.
What is a busy board
Literally translated from English, "busy board" means "a board to occupy". This device is a small surface on which various small objects are collected, which were previously not allowed to children.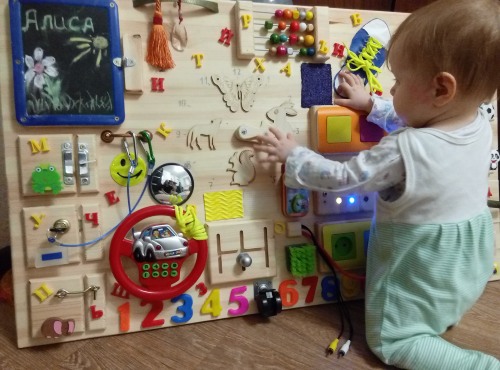
The idea of introducing children to understanding the essence of things through tactile sensations belongs to the Italian teacher Maria Montessori.
She suggested placing household items on the stand and allowing children to explore the principle of operation of once forbidden things. This allows achieving 2 goals at once: distracting the child from useless activities and stimulating his intelligence and logic using the game method.
DIY development boards for children photos demonstrate that it is quite possible to make them at home from scrap materials.
At the same time, it is possible to take into account the interest of a boy or girl in certain household items at different stages of development. There is freedom to choose a design that appeals to the preferences of a particular child. As he or she grows and the dynamics of interests, it is quite possible to change the exposition of the stand.
And the efficiency of a home-made busy board for the all-round development of a child will significantly exceed the time and material costs.
Benefits of a development board for a child
The appeal of learning about the world through ordinary things according to the Montessori method is the flexibility of approaches based on the age and needs of the child. In optimal conditions, he gains knowledge in the process of satisfying his natural curiosity. In addition, the busy board eliminates injuries, breakage of things and provides the opportunity to independently explore the world around him.
Along with safe introduction to everyday objects, busy board allows you to naturally develop such essential skills as:
- fine motor skills as a result of the complete freedom of receiving tactile sensations from the movement of chains, zippers, latches, etc. After all, even the most simple board allows you to feel different objects with your not yet quite skillful hands and fingers;
- coordination of movements by “working” with different laces, latches, door chains, etc.;
- development of spatial-figurative thinking, since the novelty of sensations stimulates brain activity;
- concentration of attention, development of perseverance, patience when maintaining attention on individual objects while repeatedly performing various movements;
- development of the logic of changing certain features of objects when performing various actions. Even the simplest devices (locks, latches, etc.) allow you to independently understand the principles of their operation;
- knowledge of the surrounding world in color, digital, and letter aspects, as well as the ability to independently move parts placed on a sensory stand;
- the positive influence of the impressions received on the child’s intellectual development;
It is important to note that this exciting activity of learning the essence of ordinary things keeps the child's attention for a long time.
 In addition, this happens without pressure from adults, accompanied by boring explanations about the purpose of this or that object. This is a kind of self-training in the rules for using basic things, expanding the understanding of the surrounding world.
What types of development boards are there?
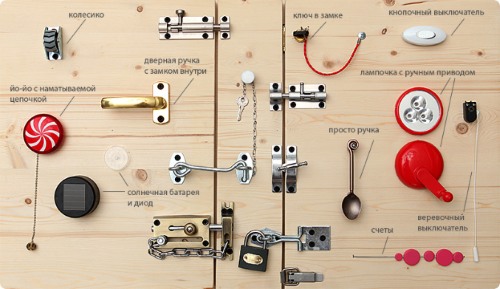
To make a DIY development board for children, the so-called play panel, you can use any solid base. As shown in the photo, objects that move, close, open, spin, and glow are attached to it.
Busyboard allows you to collect even forbidden objects in one place, the functionality of which the child can study without risk to his health. Here, arbitrary additions are allowed in the form of stickers, pictures, etc.
Depending on the base material, there are 2 types of busy board:
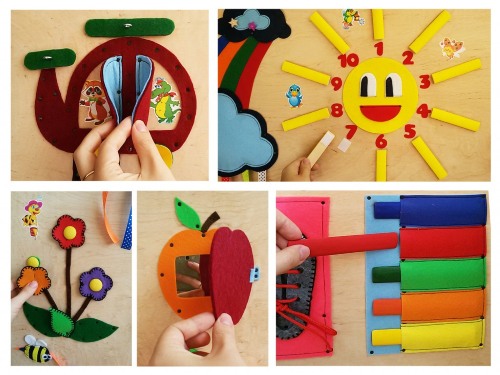
- Fabric (soft) busy board is a kind of rug or pillow formed from a frame covered with thick textile, felt. Various elements made of fabric, environmentally friendly plastic, rubber are attached with Velcro. Colored patches of fabric of different textures are also glued or sewn here. This "assortment" allows babies to develop sensory abilities, learn and remember shapes/colors, compare sizes. This type of busy board is relevant for six-month-old children.
- Hard The busy board is made of wood, plywood, thick cardboard (size from 50x50 cm and more). Taking into account the age of the child, the stand can be filled with more "adult" items. These can be latches, bolts, toggle switches, working door locks, clock dials, flashlights, telephone dials, etc. Such an "educational toy" will be interesting for children from 8 months to 1.5 years. And with replaceable, multi-level filling, it will not lose relevance even for a 5-year-old child.
Development boards for children of both types can have different shapes and sizes. In most cases, standard rectangles are made. And as you can see from the photo, the stands made with their own hands, thanks to the imagination of parents, take the form of houses, trains, cubes, hexagons, circles, etc.
When determining the dimensions, it is necessary to take into account the need to create conditions of comfort, accessibility of the child to things throughout the entire area of the playing field. No less important is the safety of these play sensory stands.
For this purpose, when preparing to create them, one should pay attention to the features of all components, namely:
- the base material is selected based on the child's age. For babies under 1 year old, soft fabrics are used, while for older children, preference is given to wooden structures without sharp corners;
- the filling with objects must exclude the risk of injury, the presence of threads, and take into account age requirements;
- strength of materials of all parts, ecological reliability of their paint, reliability of fastening.
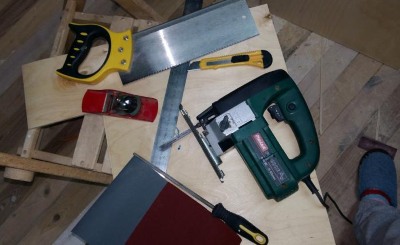
Tools and materials for a homemade busyboard
Before you start making your own busy board, you need to ensure that you have the necessary tools, materials for the base, and parts for filling it.
Tools for work:
- hammer;
 drill;
- screwdriver;
- screwdriver;
- scissors;
- stapler;
- gun (for glue).
Base materials:
- board, plywood, chipboard, plastic (thickness not less than 1 cm);
- electric saw/drill, jigsaw;
- nails, screws, self-tapping screws;
- wood glue;
- felt-tip pens, pens, pencils;
- clear varnish, paint (environmentally friendly).
Sewing accessories:
- thick fabric, oilcloth, foil of different colors and textures (separate pieces);
- laces, ribbons, ropes (so that they can be used to tie bows and knots);
- buttons, large beads, wooden abacus for counting them with your fingers;
- spools of thread;
- "tractor" type zippers, which can complement the design with, for example, crocodile teeth, etc.
Furniture and construction fittings:
- locks (padlocks, mail locks);
- objects that can be opened/closed, latched, pushed (bolts, bolts, catches, latches, bolts);
- hooks, door chains with fastenings and other devices that can be caught on something;
- wheels, gears, balls demonstrating movement;
- massage, construction rollers.
Plywood blanks:
Along with using plywood to make the base of a busy board, you can also find a place for it when decorating the stand itself. Various figures, road sign designations, etc. can be made from it. In this case, it is necessary to eliminate the roughness of the material along the edges of the products.
Bells, lights, switches:
- buttons, switches, rotary toggle switches (it is desirable that they produce a pleasant melody when pressed);
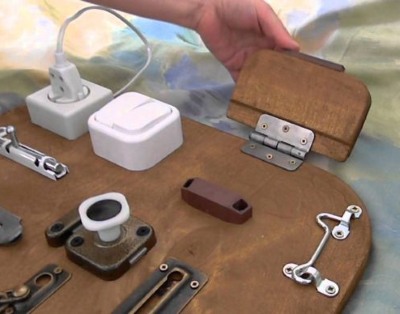
- electrical plugs and sockets not connected;
- luminous elements (bulbs, flashlights);
- round dial/button keyboard from a telephone;
- doorbell (battery operated);
- clock dials;
- panels with buttons from used electrical appliances;
- bells of different sizes.
What toys and objects can be included in a busy board
Developing boards for children when making with their own hands photo can be filled with other improvised objects, toys. They can be equipped with spare parts of furniture, equipment and other little things that are waiting for their time on the mezzanine. It is enough to organically combine them with other elements that have a target purpose for different age categories.
These may include:
- sorters – toys that have a base with holes and a set of insert parts of different sizes, colors, shapes. The familiar pyramids and nesting dolls have been enriched with different shapes: circles, squares, cubes, balls, crosses, triangles, etc. Thanks to this diversity, you can find a suitable option for use in a development board for children of different ages;
- TV remotes, placed on the stand allow you to distract the child's attention from the originals and understand the essence of their action in the process of their main use;
- wooden abacus, metal/plastic rings, beads strung on a piece of an old curtain rod/strong rope. In the process of moving these objects from side to side, the baby will learn to count in a playful way;
- calculators complement the idea of different options for arithmetic solutions. In this case, as in the previous one, it is important to teach the child to understand the purpose of these objects;
- bright pictures with letters, numbers, animals, fruits will become not only a wonderful addition, but also a functional decoration of the stand.
This list can be supplemented with other elements. After all, it, as well as the design of the busy board, depends on the age interests, needs of the child; the riot of imagination of the creators of the stand.
Making a development board with your own hands
Regardless of the choice of a hard or soft base for a busy board, the beginning of work involves the following general processes:
- Making a sketch based on the selected shape and size of the structure.
- Selection of materials and details for decoration
- Approximate arrangement of elements on the sketch with their contours outlined
Fabric board step by step instructions
Instructions:
- Making a frame for the chosen shape when making a sketch of the product: a rug, a ball, a house, a cube, a pillow, a house with birds and much more. Here you can use an old pillow or a suitable form of board, plywood, environmentally friendly plastic. In the latter cases, the workpiece is filled with padding polyester and covered with thick fabric (cotton, denim, harmless synthetics).
- Preparing the parts. These can be various rattles/bells in pockets, bows, ribbons, colorful appliques, colored buttons of different sizes and shapes, soft zippers, loops, hooks. Fabric bags filled with peas, buckwheat, flour, sand, etc. are also suitable.
- Fixing the developing toy parts in accordance with the busy board plot. This is done with a needle, strong threads, glue, Velcro and the caring hands of adults.
Wooden board step by step instructions
Instructions:
- Preparing the base: sanding and finishing the hard surface with sandpaper.
- Transferring a sketch onto the processed base with the location of the parts indicated.
- Decorating before attaching elements: painting the entire area of the board with gouache. After drying, the appropriate drawings are applied (stories from fairy tales, plants, animals, the sea, etc.). These can also be images of cartoon characters, animals, letters, numbers, and other decor.
- Drilling holes for attaching pre-selected objects - toys, planks, blocks, sticks. When placing the board vertically, it is necessary to attach special metal corners to its back side.
- Cleaning up sawdust, sanding treated areas.
- Covering the dried surface with clear varnish.
- Attaching previously selected elements to the dry surface of the manufactured shield using screws, self-tapping screws, construction glue. The sharp ends of the fasteners on the opposite side must be processed with a file, sandpaper. Individual elements can be glued to the base (flashlights, dials, etc.).
The structures of the stands for girls and boys are made from the same materials.
Their difference lies in the selection of details for their filling. For children under 3 years old, you can make universal development boards that will suit any gender. But decorating a busy board for older children requires taking into account the emerging interests and needs of boys and girls.
Features of a busy board for boys
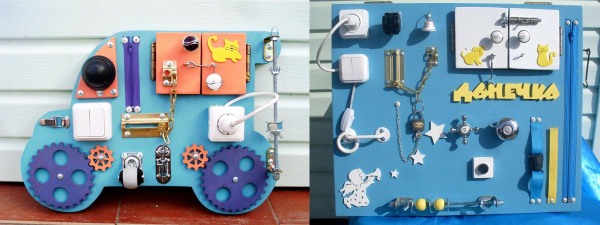
One of the nuances of busy boards for boys is a set of elements in the form of nuts, screws, wheels, dials, car steering wheels. Children are especially captivated by models with buttons that make different sounds. A busy board in the form of a car, ship, locomotive, rocket, etc. will do here.
You can choose images of your kids' favorite astronauts, soldiers, superheroes from cartoons and feature films that are in tune with their interests. A cooler color palette (silver, blue) is suitable for the design.
Features of a busy board for girls
A homemade busy board for girls can be richly decorated with images of their favorite animals, cartoon characters (fairies, sorceresses, elves). Multi-colored clothing elements (zippers, buttons, laces, ribbons, etc.) will also be appropriate here. When decorating, it is advisable to use their favorite stickers and colorful details.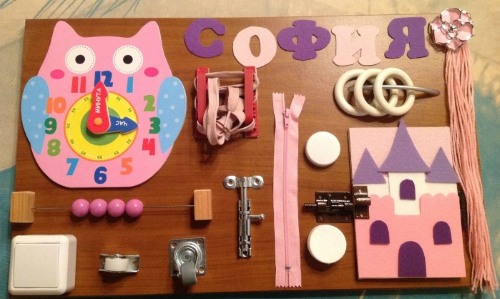
The design gives preference to light, warm, rich tones.
These can be pink, cream, gold, orange, red colors and their shades. At the same time, fans of gender freedom have the right to use various colors of its base and decor for the busy board.
Ideas for decoration
Along with the designated forms and their contents, you can also use other ideas born not only by manufacturers, but also by numerous parents. The smallest explorers of the world will be captivated by busy boards in the form of a sun, glued/drawn trees and flowers.
It can also be a dollhouse with multi-colored windows/secret doors, behind which a family of animals (mother, father, children, etc.) is located. One of the entertaining options for a child under 3 years old will be a board equipped with magnets with images of letters, numbers, different figures of people, birds, animals. It can be placed on the floor, on the wall, or on a table.
Older children respond more actively to themed busy boards.
Ordinary colored plastic caps in the form of a traffic light, drawn symbols for street crossings, etc. will help to comprehend the rules of safe road traffic. For them, you can turn an ordinary board into a pirate ship, a mysterious starry sky or water depths with unseen inhabitants.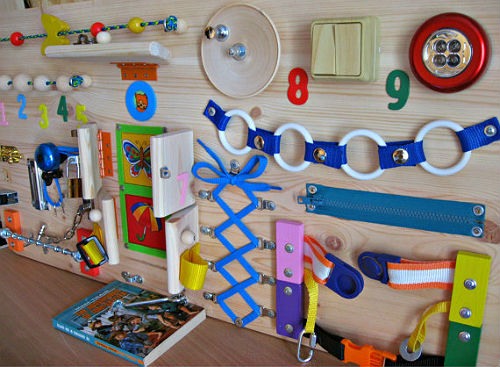
It can also become a spaceship with a "control panel" in the form of various toggle switches placed on the panel. Boys and girls react touchingly to the opening of niches/boxes with family photos placed there.
Photo ideas for making various development boards for children of different ages with your own hands, presented online, can also suggest other original solutions. To implement them, you only need the desire of adults to show imagination and spend a little time.
Making a busy board yourself is also an opportunity to unite the efforts of the whole family. After all, here the efforts of the father are applied in doing carpentry work, the creativity of the mother who knows the needs of the baby, brothers and sisters in choosing toys. The result of joint creation will be the direction of children's energy in a constructive direction.
Video on how to make development boards for children with your own hands, photos
Find out how to assemble a busy board with your own hands in the video:
Making a development board for a child:
Help me with some advice! I want to order this board for my daughter (3 years old). What do you think, is it worth ordering or is it expensive?