Drawing by cells – a good way to have a good time. You don’t need to have any special skills to do this. It’s enough to choose a sample and, observing the geometry, start creating a small, medium or large drawing. An ordinary school notebook of a standard width of 0.5 cm, lined in a box, can be used as a canvas.
Tips and Rules
Drawing on squares can give you your first artistic experience. This activity helps develop creative thinking and coordination, and has a beneficial effect on the nervous system.
The items you will need for this are a sheet of regular school notebook and a pencil. You can color the cells with colored pencils, felt-tip pens or fountain pens.
Drawings on cells medium, large or small are divided into simple and complex. The first may take 10-15 minutes to create. More complex drawings require more time and effort.
If you decide to use felt-tip pens, you should keep in mind that these tools are divided into 2 varieties, each of which has its own advantages and disadvantages:
| Type of markers | Advantages | Flaws |
| Water | No unpleasant odor |
|
| Alcoholic | Long lasting | They smell bad |
In addition to pencils and markers, you will need an eraser. On plain paper you can depict anything, from small emoticons and symbols to entire pictures with many objects.
There are no strict rules for drawing by cells, but for convenience it is recommended to start from the top of the sheet and gradually move to the bottom. Cells located in one horizontal line are best filled from left to right. You need to draw as you read a book or write a text: from left to right, top to bottom.
However, not everyone likes this method of filling in cells. Perhaps, the artist, becoming more experienced, will develop a more convenient method. The most important thing is - having gained experience, do not use ready-made samples, but come up with your own drawings and your own styles of patterns.
If you are using a ready-made sample, you should count the number of cells horizontally and vertically in advance and draw the corresponding rectangle or square in your notebook.
For convenience, you can mark each horizontal and vertical row with numbers or letters. This will make filling easier. Filling will be similar to playing "Battleship" or chess. Finding the cells that need to be colored will be much easier.
If you use a sheet of paper that does not have cells, you should draw them yourself. The main thing is to measure everything correctly so that the cells are the same size.
The process of drawing on a sheet of paper by cells can be divided into 3 stages:
- Draw an outline of the selected image.
- Applying tracing paper to the drawing and creating a pixel version of the outline.
- Filling with the desired colors.
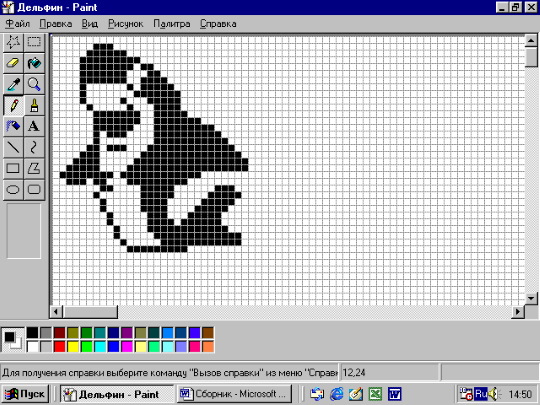
Today, a simpler method of creating drawings by cells is also relevant, which is based on the use of computer programs.
Popular ones include:
- Paint;
- Corel;
- Photoshop.
While working, you can enlarge the image, which will make it easier to fill the pixel cells. The drawing is colored using the fill method.
Medium size drawings by cells in a notebook for beginners
It is best to start medium-sized grid drawings with images of emoticons or symbols.
The simplest images can be obtained on a sheet of paper 10 cells wide and long. Having acquired the first skills, you can move on to more complex images.
Black and white
Black and white drawings are a separate direction in this art form.
They are easy to draw, because in this case you don’t have to waste time choosing the right colors. A simple pencil or a black gel pen is used for this. You can start with the image of the Yin and Yang symbol. It will not take up a large area.
The stages of its drawing are as follows:
- Take a square sheet of paper with a width of 17 standard cells (8.5 cm2).
- In the second row from the top, count 6 cells from the left and paint the next 5 cells. The remaining 6 cells on the right should remain unpainted.
- In the next horizontal row, paint the 5th and 6th cells, as well as the 12th and 13th.
- Go to the row below and color the 4th cell, as well as the 13th and 14th.
- In the next 2 horizontal rows, paint the 3rd, 7th, 8th, 13th, 14th, 15th cells.
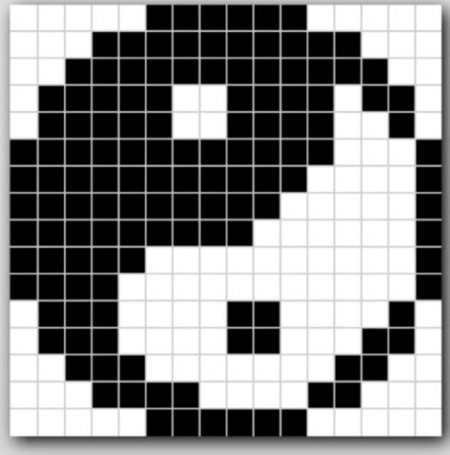
- In the next row, paint the 2nd, 13th, 14th, 15th and 16th cells.
- Next row - 2nd and 12th to 16th.
- Next – 2nd and from 11th to 16th.
- Then - 2nd and from 9th to 16th.
- Next – 2nd, 8th, 9th, 12th to 16th.
- Then – 3, 7-9 and 12-15.
- Next – 3-4, 7-15.
- Then – 4 and 8-14.
- Next – 5,6, 9-13.
- Paint from the 7th to the 11th cells.
- The bottom, 17th horizontal row remains unpainted.
It is also easy to draw braids using squares.
To do this you will need a pencil and the following reproduction:
- Use a pencil to draw 3 vertical lines, each 2 cells long.
- After skipping a horizontal row of 1 cell, draw 3 more lines under these lines. Their length should also be equal to 2 cells.
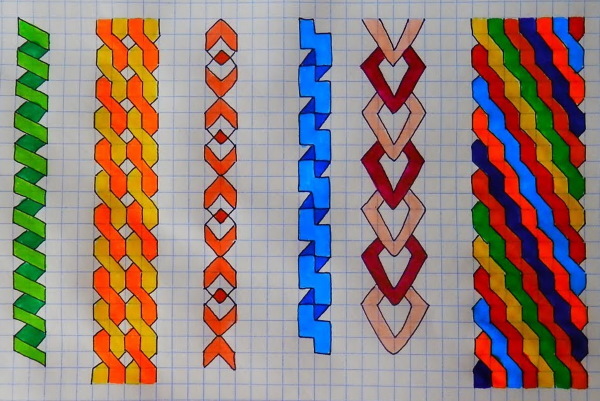
- These 2 steps can be repeated many times, depending on how long you want your future braid to be.
- Draw slanted lines in the remaining horizontal rows. From the right upper line, draw a slanted line to the middle one, located slightly below. From the middle upper line, draw a slanted line to the left one, located slightly below. Then, from the upper left line, draw a small line so that it falls on the slanted line you just drew. Similarly, draw a small line on the other side of the braid.
- Step 4: Repeat until all lines are connected.
With a pencil
The image of a cup can be created using one pencil.
To do this you should:
- Start with the outline. In the upper right corner, at the intersection of 2 lines, put a dot. You should leave 4 horizontal rows on top. This is where the steam coming out of the cup will be.
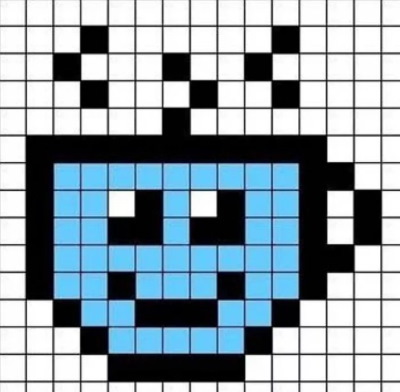
- From the set point, draw a contour along the lines: 6 down, 1 to the left, 1 down, 1 to the left, 1 down, 1 to the left, 1 down, 5 to the left, 1 up, 1 to the left, 1 up, 1 to the left, 1 up, 1 to the left, 1 up, 1 to the left, 1 up, 1 to the left, 1 up, 1 to the right, 1 up, 1 to the right, 1 up, 11 to the right.
- Color the resulting cup.
- Paint over a few cells above the cup. This will be steam.
- If desired, you can draw patterns on the cells in the cup itself.
Multicolored
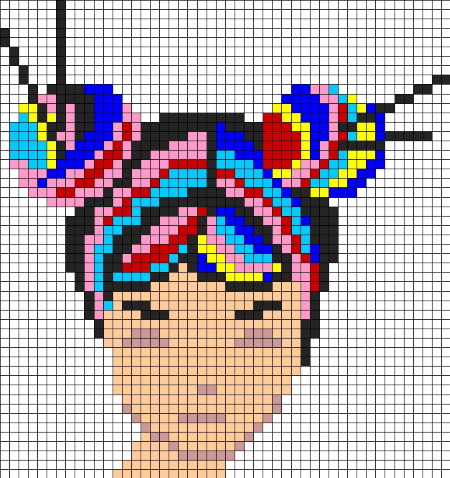
Drawings on cells medium and in color are a more complex process than creating black and white images. The main difficulty lies in using more writing instruments and in choosing the right colors. However, the principle remains the same.
This could be the Apple symbol - a multi-colored apple. Having found its pixel sample and prepared the necessary colors, you can depict exactly the same on your sheet of paper.
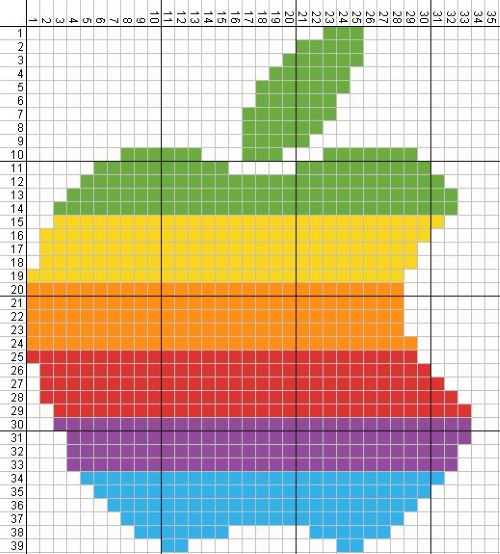
This will require 6 colors and the following steps:
- Looking at the sample, create the outline of the apple. Separately create the outline of the upper leaf.
- Color the fruit using different colors. The top of the apple is green.
- Paint the next few horizontal stripes (the exact number depends on the chosen size) yellow.
- Make orange stripes, then red ones, and purple ones underneath them.
- Draw the bottom of the apple blue.
To draw a multi-colored boot, you will need 3 writing instruments of different colors:
- pink;
- white;
- black.
The sheet should have dimensions of 27x16 cells: 27 vertical rows and 16 horizontal ones.
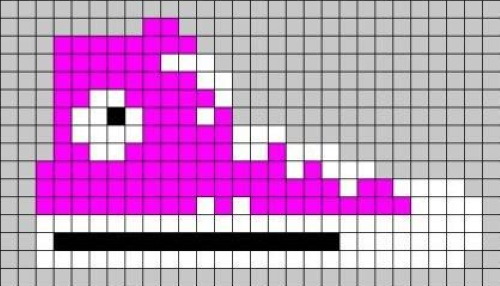
The stages of drawing are as follows:
- Trace the outline. You can start with a point in the upper left corner. It is placed at the intersection of 2 notebook lines. From there, draw the outline straight along the lines: 5 to the right, 1 to the left, 2 to the right, 1 down, 1 to the right, 1 down, 1 to the right, 1 down, 1 to the right, 3 down, 3 to the right, 1 down, 3 to the right, 1 down, 2 to the right, 1 down, 5 to the right, 1 down, 1 to the right, 3 down, 1 to the left, 1 down, 24 to the left, 6 up, 1 to the right, 7 up.
- Proceed to coloring. Most of the boot is colored pink and white. The top 2 horizontal rows should be pink.
- In the 3rd horizontal row from the top, 6 cells on the left are painted pink. The remaining 3 cells in this row are white.
- In the next row there are 8 pink and 2 white.
- In the next corner the colors alternate: 2 - pink, 2 - white, 5 - pink, 1 - white.
- The order of the colors in the next row is 1 pink, 2 white, 1 black, 1 white, 3 pink, 1 white, 1 pink.
- Having gone down another row, you need to paint 1 cell pink, the next 4 cells white, the next 5 pink, and the remaining 3 white.
- The next row is colored as follows: 2 pink, 2 white, 6 pink, 2 white, 1 pink, 3 white.
- Next row: 17 pink, 1 white, 2 pink, 4 white.
- Next row: 9 pink, 1 white, 1 pink, 1 white, 9 pink, 4 white.
- The next row is all white.
- Penultimate row: 1 white, 16 black, 8 white.
- The remaining bottom cells remain white.
For girls
Images of light and beautiful elements will appeal to girls.
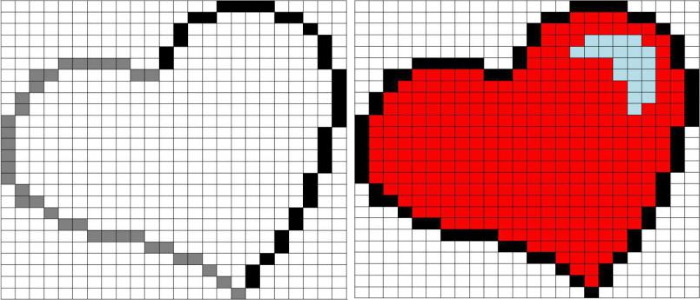
For example, to depict a heart you will need:
- Take a red felt-tip pen, pencil or fountain pen.
- Take a sheet of paper 11 cells long and 10 cells wide.
- Leave the top and bottom horizontal rows completely unpainted.
- In the 2nd horizontal row from the top, paint 3-4 and 8-9 cells.
- Next – 2-5 and 7-10.
- In the next 2 rows, 9 cells are painted over – from 2nd to 10th.
- Next row - from 3rd to 9th.
- Next – 4-8.
- Then – 5-7.
- In the penultimate row, only the 6th cell is painted.
For boys
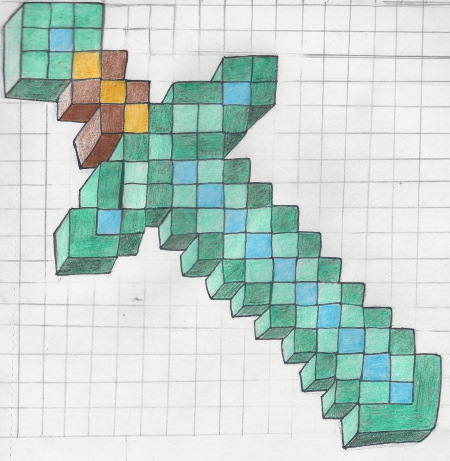
Boys will enjoy drawing cars, animals, characters from various films and video games. Today, superheroes from the Marvel universe are popular, as well as Minecraft characters. It is noteworthy that 1 color is usually used to create such drawings, so 1 pen or pencil is enough.
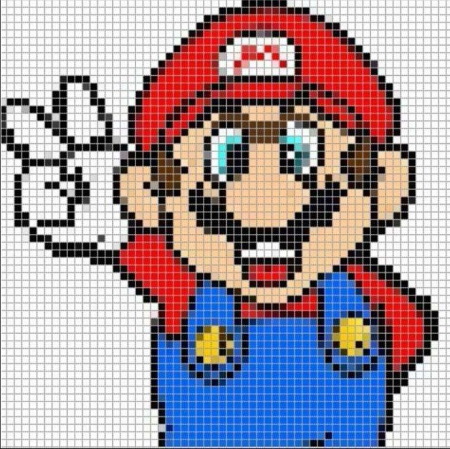
You can draw an average image of the video game hero Mario using the cells. Having appeared in the 80s of the last century, it consisted of a small number of pixels. For the image, you need to prepare a place in a notebook of 14x17 cells. There should be 14 horizontal rows and 17 vertical rows.
You will need 6 pencils or markers:
- red;
- black;
- yellow;
- blue;
- brown;
- beige.
You will also need a pencil to create the outline. The drawing process begins with creating the outline. On the right side of the paper "canvas", stepping back 2 cells from the bottom, you need to put a dot.
Then, along the notebook lines, make a border with a pencil: 5 up, 1 left, 1 down, 1 left, 1 down, 2 left, 1 up, 1 right, 1 up, 1 right, 2 up, 1 right, 5 up, 3 left, 1 down, 1 left, 1 up, 5 left, 1 down, 1 left, 2 down, 1 left.
After 3 down, 2 right, 1 down, 6 left, 2 down, 1 right, 1 down, 1 right, 1 up, 3 right, 1 down, 1 right, 1 down, 2 left, 1 down, 1 left, 2 down, 2 right, 1 up, 7 right, 1 up, 5 right.
Having created a colorless silhouette of the famous Italian mustachioed plumber, you can move on to coloring it:
- hands and head should be beige;
- shoes and hair - brown;
- mustache and eyes - black;
- overalls - blue;
- 2 fasteners on the jumpsuit - yellow;
- sleeves and cap - red.
Animals
It is convenient to draw representatives of fauna together with children. Many people think that the world of nature is difficult to draw, but this is a mistaken opinion. It is enough to find simple examples of favorite animals. Both boys and girls will enjoy drawing them. Famous cartoon characters are a good start.
You also don't have to put in a lot of effort when drawing:
- panda;
- pony;
- hedgehog;
- dolphin;
- puppy;
- kitten.
When drawing, it is necessary to strictly observe proportions and carefully redraw from the selected sample, for example:
| Drawing | Stages of creation |
| Hedgehog | 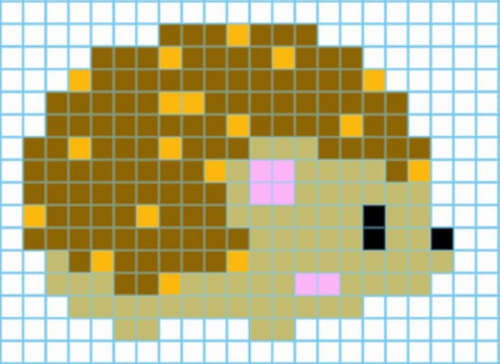
|
| Elephant | 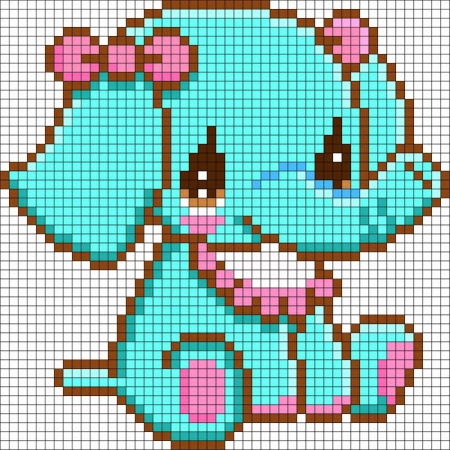
|
Complex drawings
The complexity of the drawing depends on the area it occupies on the canvas, or more precisely on the number of cells that need to be painted.
Complex drawings take longer to create, but they are more realistic. If, when viewed closely, such an image will seem “square” and “pixelated”, then when it is moved away from the eyes, realism will begin to appear.
The principle of creating such drawings remains the same. They will require the same tools - pencils, a pen, markers, and as a canvas - a sheet of school notebook, lined in vertical and horizontal lines.
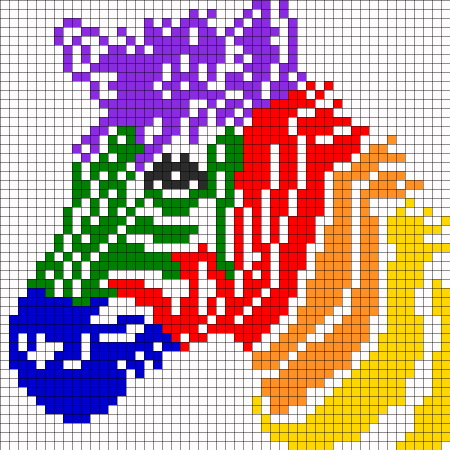 |  |
The main difficulty in creating large-scale drawings is that it requires the artist to be attentive. There must be no room for errors in calculations. Otherwise, you will have to start all over again.
3D Drawings for Beginners
The pinnacle of a grid artist's skill is the ability to create three-dimensional drawings on a flat canvas. Such images are distinguished by their realism.
It is not easy to achieve the desired result in them. Various effects are used to "step over" from one environment to another. The simplest method is considered to be the one based on the use of the play of light and shadow.
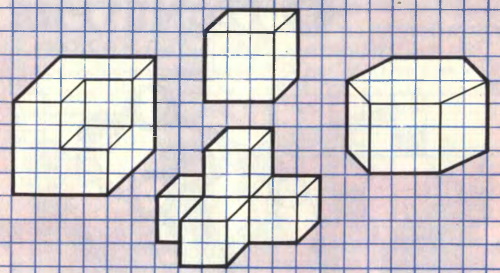 |  |
When creating 3D grid drawings, it is also worth remembering the difference in line drawing. In this case, cells play the role of pixels, which set a certain resolution.
By drawing small, medium or large pictures on the squares, everyone can improve their artistic skills, gradually moving from simple to complex. This process also promotes the development of creative thinking, spelling vigilance, coordination, artistic taste and has a beneficial effect on the nervous system.
Video about creating drawings by cells
Drawings by cells medium: