If you want to please a loved one with a gift made with your own hands, then you need to find out how to make a box out of paper. It can be used as packaging for a purchased or homemade surprise. This way, you can not only save money, but also pay special attention, care and warmth to the person it is intended for.
How to make a paper box with your own hands without glue
Making a box without glue will be more difficult than using it because you will have to carefully and precisely make the folds so that it has a shape, does not fall apart and is stable. This model is best made from a soft material.
Pull-out box
To wrap a gift, you need to calculate the size. The most important thing is to use an even square.
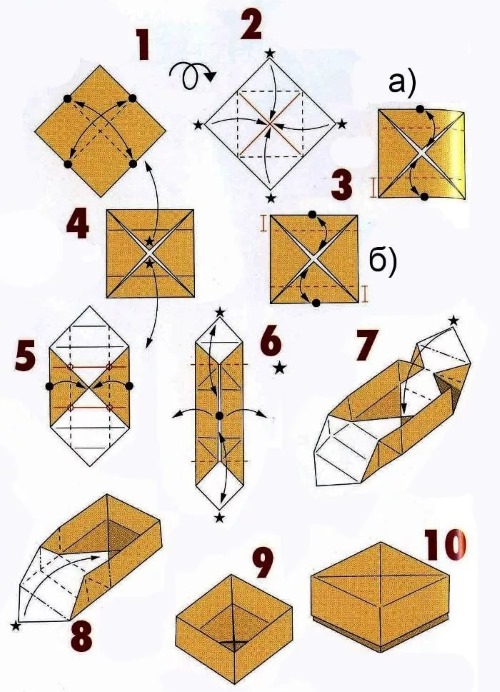
Step-by-step instructions (more detailed than in the photo):
- Fold the square in half and unfold it.
- Place the square in the shape of a rhombus.
- Bend all corners one by one towards the center and straighten.
- Turn over to the other side.
- Do the same.
- The result is a closed square.
- The triangles from the center need to be bent to the edges. The top and bottom sides, do not touch the sides.
- Return to the starting position.
- Open the triangles (upper and lower) completely, that is, move the lower one down (straighten it out), and the upper one up.
- Direct the sides one by one towards the center.
- Pull the upper and lower triangles towards the center. Return.
- Move the right and left sides apart.
- There should be 2 triangles left at the bottom, to which the next 2 are directed.
- The retractable part is ready.
To make the lid, you will need the following parts and step-by-step actions:
| Details | Course of action |
| 2 rectangles |
|
This option definitely needs to be decorated. It is better to add a thread or a loop to the retractable structure to pull it out of the base. You can glue a voluminous bead, which will serve as a handle (like a door).
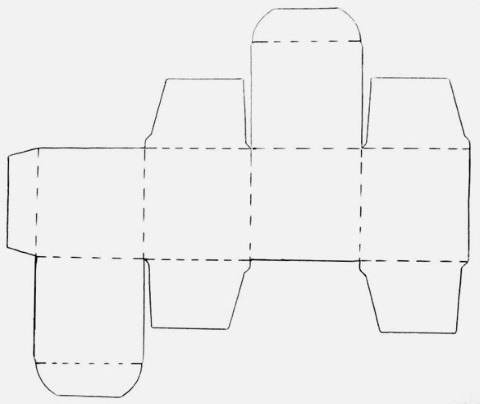
With a non-removable lid
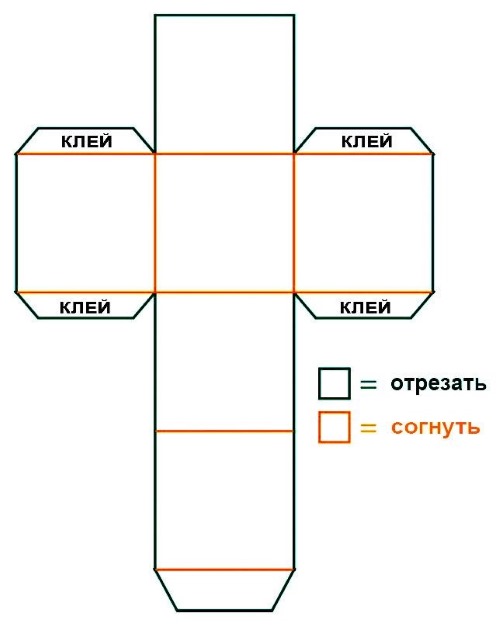
How to make a paper box with a non-removable lid is described in the instructions below. To make it, simply print or draw and cut out the following layout.
Proceed according to the scheme:
- Prepare a drawing on paper.
- Carefully cut along the outline.
- The layout is ready.
- Fold along the orange lines.
- Apply glue to the blocks labeled "glue" and stick them together.
- Note that one similar part remains free - this is the lid.
- The gift wrapping is ready.
It is inconvenient to open it with just your fingers, so it is better to glue a thread or chain to the top. Do not forget about decoration, you can make a model directly from colored paper or with a picture.
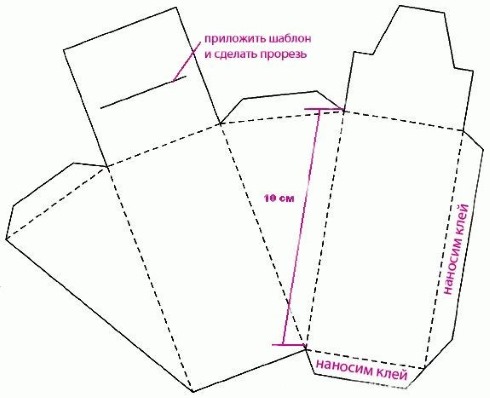
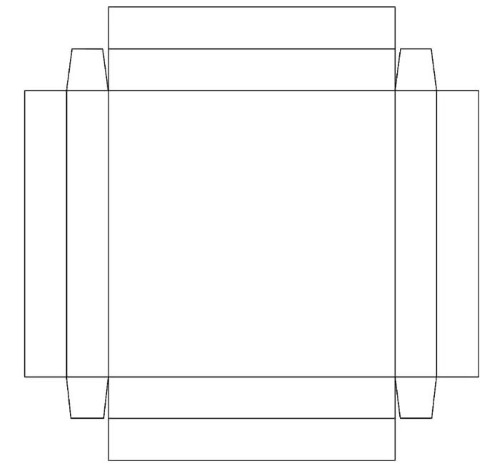
Quick option
How to make a paper box quickly is given step by step below. First of all, you need to prepare a printed form, which is assembled by fixing the parts to each other. This option should be done on cardboard, since paper does not hold its shape well.
Manufacturing process:
- Print or draw a figure as shown in the picture on thick paper or cardboard.
- Cut along the outline.
- Pay attention to the part with 2 parallel thick (black) lines. They should be holes. It is better to cut them with a stationery knife. The lines from the scissors can be too deep and uneven, then the structure will not be reliable.
- The lines along the edges (thin stripes) should also be cut. They will be inserted into each other.
- Fold the sides along the dotted line in the center.
- Insert parts with fasteners or inserts into each other.
- Assemble the box.
This is the simplest option, because there is practically no need for diagrams here, it is enough to bend and insert parts experimentally. In addition, a ready-made layout is used, and not a lot of actions to form it.
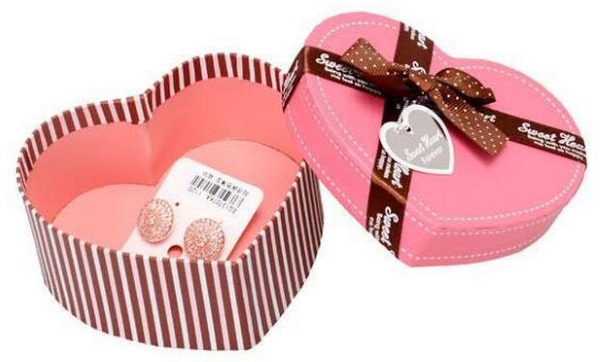
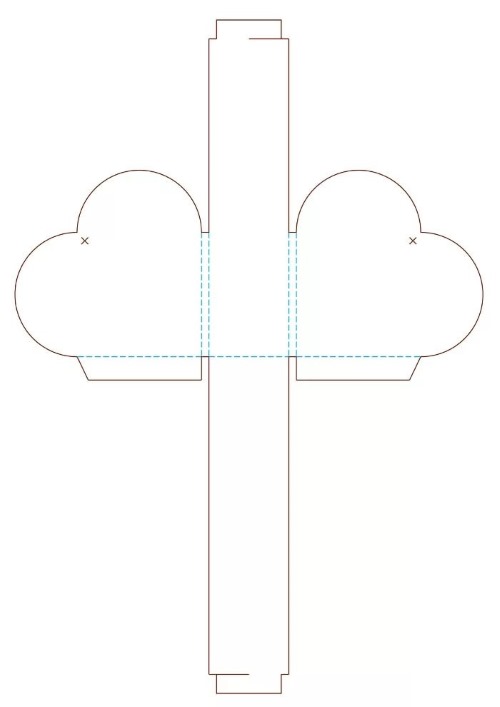
Heart shaped box
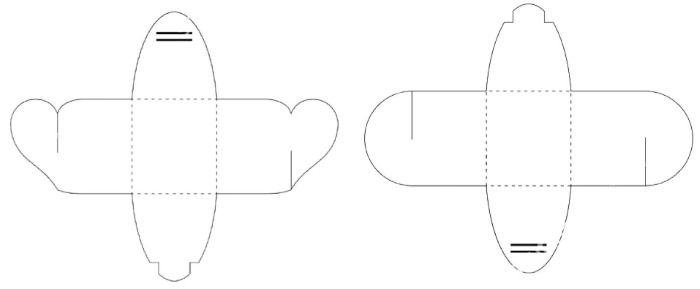
You can give such a box to your other half on a significant holiday for lovers. There are several options for making it, but it is more logical to try with the simplest ones. For the first one, you will need a ready-made drawing.
Formation of paper product:
- Cut out the layout.
- Fold along the dotted lines.
- Secure the edges of the strip with a friend.
- The box is ready.
But there is one problem - joining the large strip and the bases - hearts. You can use glue, office tape (multicolored), a needle and colored thread (suitable only for sewing thick materials), or you can add a layer of a line with spikes that would hold the structure, as will be done in the second option.
The next model is an openwork heart with a tight fastener, how to make it:
- Draw an openwork or simple (at your discretion) heart and cut it out.
- Prepare a rectangular strip, the width of which is the height of the future box. Form "spikes" on one side. This strip should be enough for the whole heart. Cut out.
- Bend the "spikes" into one straight line, as shown in the picture.
- Glue them to the base (heart). If it is of a regular shape, then you can not retreat from the edge, and if it is figured, then it is better to leave a small distance.
- The box is ready.
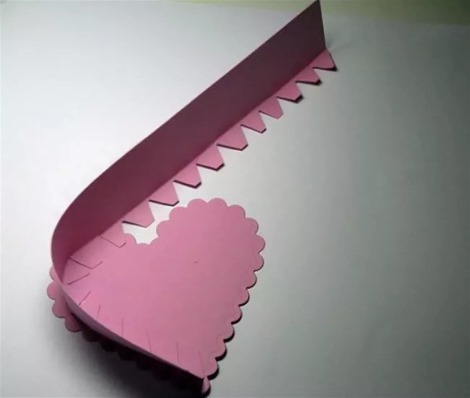
You can also make a heart-shaped lid for it. Just take a base slightly larger than the previous one, and a strip of smaller width, literally 2-3 times. If you plan to put something edible in there, then just cover it with cling film, and tie a beautiful ribbon or tape on the sides.
Origami box without lid
Making according to layouts is not the main trend in the practice of packaging design; you can make them by folding. Many needlewomen know how to make a box out of paper using the origami technique, but this is one of the simple options.
Assembly stages:
- Prepare a square of any size, depending on the desired result.
- Fold it in half to create a central horizontal line. Return to its original position.
- Attach the top and bottom sides to the center line you just created.
- You will get a rectangle.
- Bring its sides to the center. Unfold it so that the same rectangle remains.
- You will get lines in the center of individual squares. You need to bring the sides to them again and spread them back.
- You will get a rectangle with 2 large squares, each of which consists of 4 small ones.
- The corners of the rectangle or the outer small squares need to be folded towards the central horizontal line, leaving a little free space or not completely covering the small squares (the outer 4).
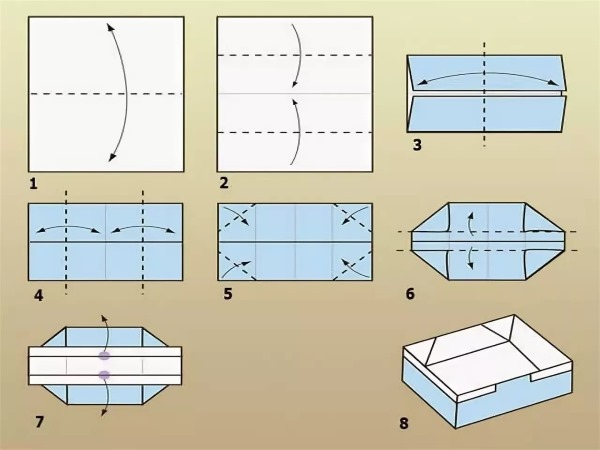
- Next, you need to bend 2 strips from the center into triangles, as shown in the picture.
- Now you need to unfold the box by pulling on the points indicated in the photo under number 7.
- The gift wrapping is ready.
This option is suitable for a set of gifts or sweets, such as candies or marshmallows. The sides can be decorated with braid.
How to make a cardboard box
In order to make a strong structure that can withstand a heavy gift, you need to use cardboard, and it is better to fasten it with glue, paper clips, clamps or other invented methods for a specific design.
Square
It is best to make a box of this shape using a ready-made model so as not to make a mistake in the size.
Stages:
- Cut out the part.
- Fold along the dotted lines.
- Collect.
- Glue along the attachment lines and in places that are not tight to each other.
- The box is ready.
The result is usually decorated with glitter or painted.
Round
With this form you need to be especially careful, it is not only difficult to make (how to assemble), but also to make parts, so it is better to use a compass when drawing a circle. The easiest option is to use a strip with teeth that will be attached to the circles.
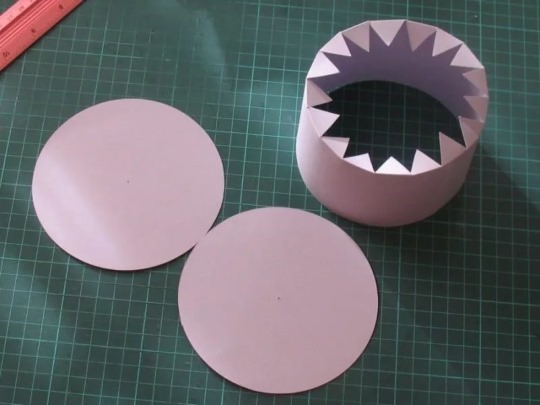
Manufacturing stages:
- Prepare a strip, the width of which is the height of the future package, and decorate it with teeth. It should correspond to the length of the circumference. Cut it out.
- Draw and cut out 2 identical circles for the base.
- One will be inside and one will be outside for greater stability.
- Glue the edges of the strip at this stage or start gluing the teeth to the base.
- Once one base is glued, place the second one on top, gluing them together.
- The foundation is ready.
- You can make a lid in exactly the same way, but with a smaller strip width, but a slightly larger base diameter.
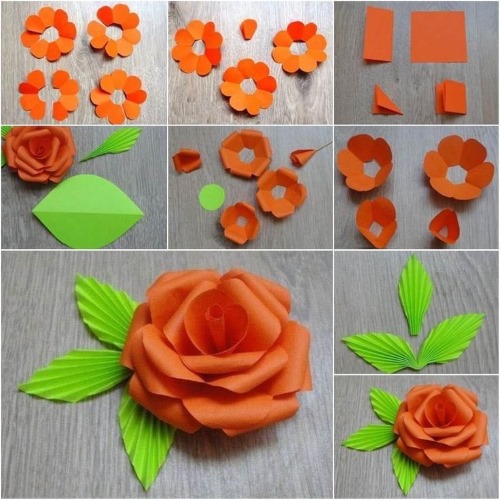
Usually, it is in this version that flowers, bows and other decorations are placed on the lids.
Triangular
How to make a triangle-shaped paper box may be of interest to those who want to give a cake or a piece of it in it. Such a gift may include several components.
Stages:
- Draw or print a template.
- Cut along the outline.
- Cut the strip at the marked place for fastening.
- Fold along the dotted lines.
- Apply glue to the marked area.
- Glue the corresponding fragments.
- Collect.
This type of packaging is suitable for both an individual gift consisting of several parts, and for a group of guests, where each will receive one “piece” of the common cake-gift.
Case
It's quite a complex design to put together yourself, so a mock-up would be ideal.
Progress:
- Prepare a template.
- Cut a line where the fastener will be inserted.
- Bend along the dotted lines.
- Glue the corresponding elements that will match each other.
- The finished case.
It is worth thinking about the design in advance, since it is quite difficult to apply anything to the finished model. It is better to glue the base, and then form the case.
Men's style
For men, there should be a special option - brutal. Separately, you need to make a box and decorations for it - a bow tie or a tie. It is advisable to make the packaging in the form of a colored or white suit. But do not overdo it with shades.
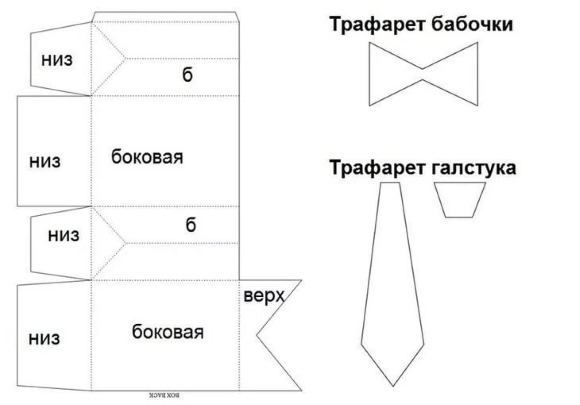
Progress of work:
- Prepare a layout.
- Cut out the details.
- Fold as the dotted lines in the picture.
- Separately make a tie or bow tie from colored paper.
- Glue the box and decoration together.
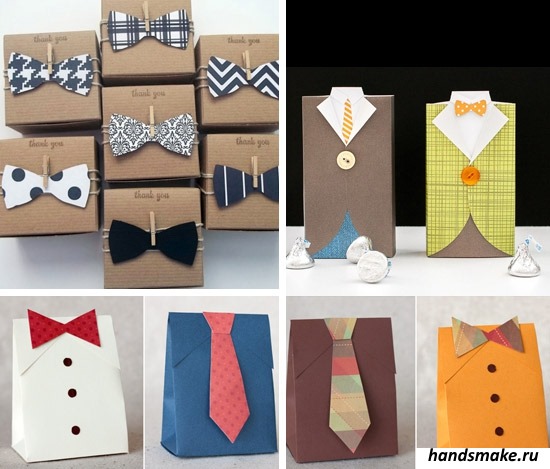
This option does not require any additional decorations.
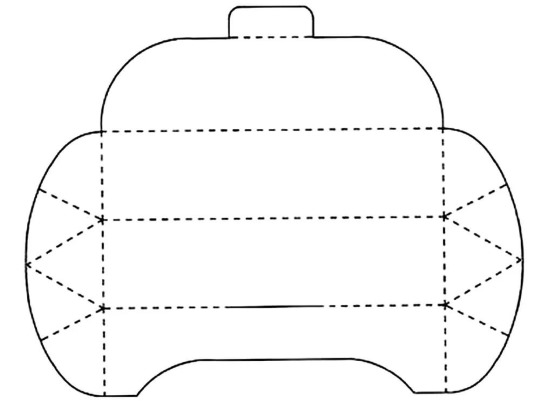
Women's style
Sometimes it is difficult to surprise a girl with something, but DIY gift wrapping and surprise is the best solution. Diamond wrapping will help hide a ring or other jewelry there, but you need to be prepared for the fact that this is exactly what the girl will intuitively expect when she sees the box.
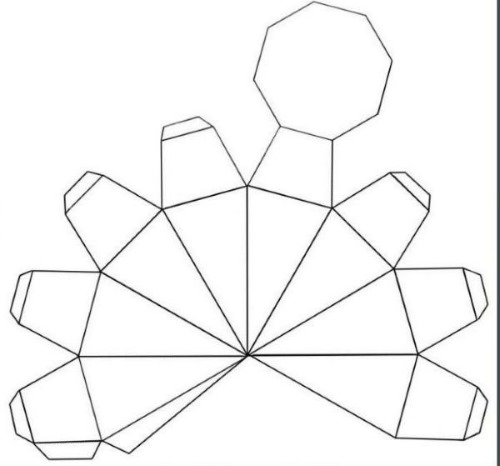
Instructions for packaging:
- Cut out the finished shape from cardboard. Use colored ones.
- Fold the workpiece along the lines.
- Glue the parts together (adjacent).
- You also need to leave one section unglued for opening.
- Ready.
There is no need to decorate the finished product, but you can add a thread or chain on which the diamond will hang.
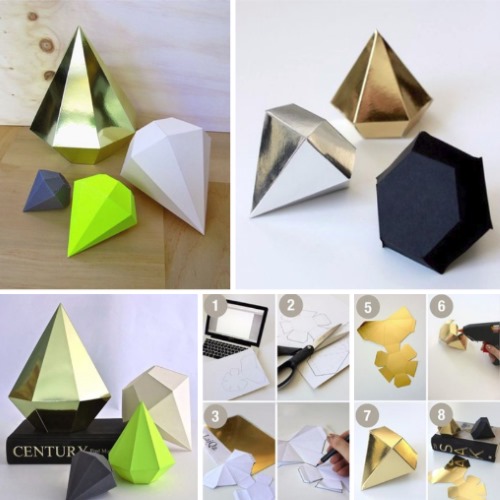
For children
Parents who want to make a gift with their own hands may wonder how to make a paper box for their child. Children love everything bright and colorful, so in this version it is better to use as many decorations as possible. The ideal option is a basket or candy.
For the basket:
- Make a cross out of 5 squares.
- Using a hole punch, make holes around the edges.
- Tie them together with ribbon or thread.
- Add a handle made of any material of your choice.
You can put a small surprise in the basket - a car, a toy, a sweet. A box in the shape of a candy is a package for sweets.
Progress:
- Make a template.
- Cut out the diamonds.
- Fold the workpiece along the dotted lines.
- Tie the edges with ribbons.
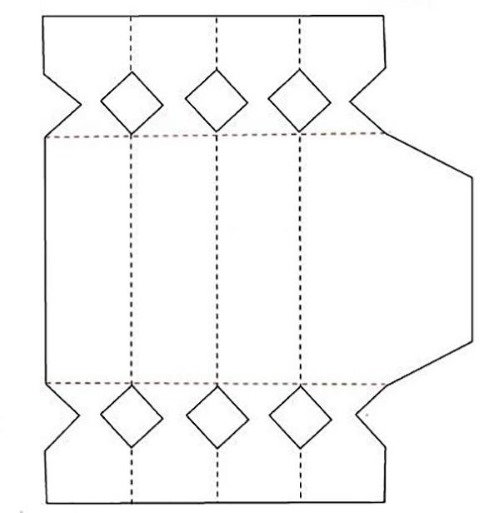
Sweets and candies must be packed in this package.
Box with photos
The perfect gift for your significant other is a box with photos of you together.
You can do it like this:
- Fold the box according to one of the shapes that were suggested earlier.
- Glue the A4 sheets together. The width should be slightly larger than the photograph.
- Fold them like an accordion, one strip of which is the height of the photograph + small indents.
- Glue the photos.
- Glue the A4 edges (bottom and top) to the bottom and lid (respectively).
- Fold the accordion and close the package.
- The gift is ready.
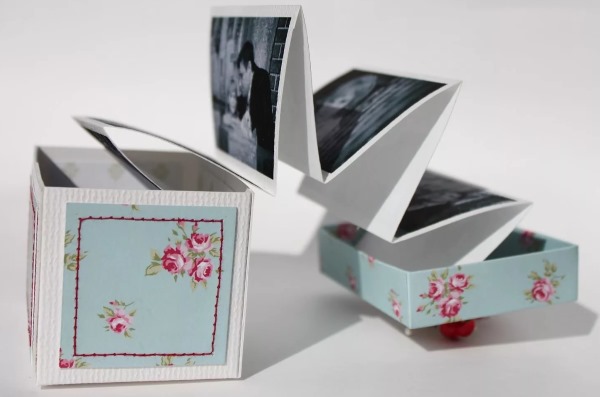
The advantage of this box is that it is already a full-fledged gift, completely made by yourself.
Origami Closing Box
Even a child can make this version with the help of parents. You will only need colored paper or a regular sheet of paper.
Stages:
- Fold the square to form a horizontal and vertical line.
- Bring the edges to the center to form a diamond.
- Fold the bottom side to the back.
- Pull the lower right corner in the opposite direction. Fold along the dotted line.
- Smooth out the figure.
- Turn over.
- Fold in the same way.
- Bend downwards.
- Turn over.
- Repeat.
- Bend and unfold as shown in the picture.
- Draw the sides towards the center along the dotted lines.
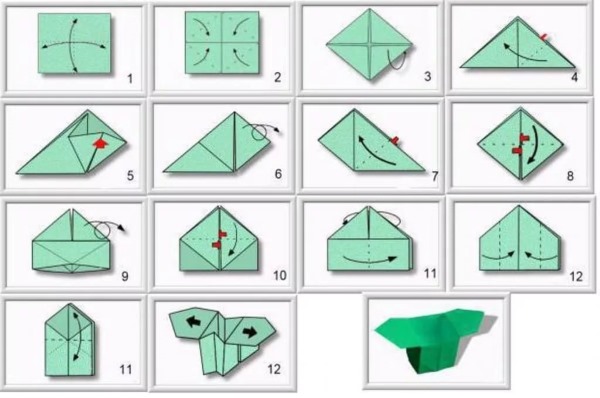
- Bring the upper triangles down.
- Spread them apart, holding onto the corners.
- Ready.
You can glue some parts together if necessary, but using thicker paper helps the box hold its shape.
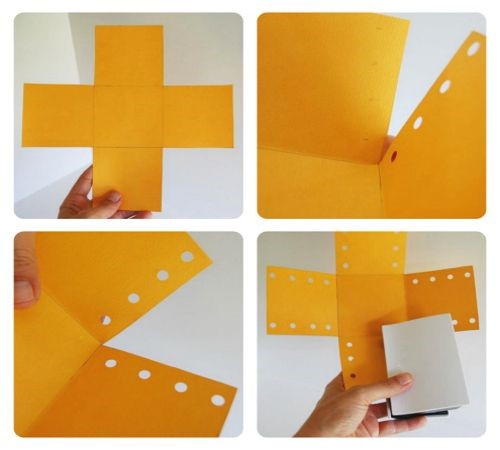
Folding box with a surprise
This option is a good solution as a full-fledged gift for those who want to know how to make a beautiful box with their own hands for a gift. You will need: multi-colored sheets of paper or cardboard, ribbons, decorations, glue, scissors.
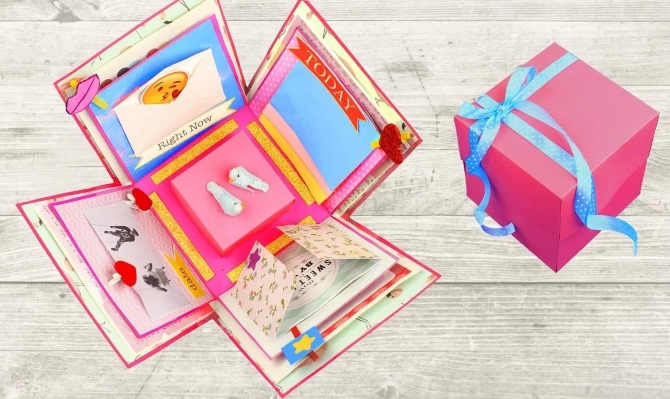
Preparation stages:
- Cut out a cross-shaped design consisting of 5 squares - this is the box itself.
- You can make several, then it will be multi-layered, but the layers need to be reduced in size.
- For the lid, use the layout shown below. Simply cut it out and glue the adjoining parts together.
- Now the box can be assembled, but before that you need to add decorations to the walls: photographs, notes, drawings or small gifts.
- There should be a surprise in the center. It can be secured with a ribbon (holes are made at the bottom) or tape (colored stationery).
- The packaging is assembled and closed with a lid.
- Next, add decoration using glitter and any other decor.
In such a surprise you can hide a ring and propose to your beloved girl.
Decorations for the box
In addition to the finished layouts themselves, it is worth thinking about the appearance of the packaging.
It can be decorated with:
- stickers;
- satin ribbons and iron chains;
- glitter;
- colored office tape;
- drawings and inscriptions;
- voluminous flowers, bows and toys;
- self-made parts (hearts).
All the suggested options will help you understand how to make a beautiful paper box yourself. Decorating the finished product is a whole fantasy experiment. You can use anything you like, even wrapping paper or bags.
Article formatting:Natalie Podolskaya
Video about making a paper box
Video on how to make a paper box using origami technique: