It is recommended that drawings intended for copying be copied onto a sheet of paper in stages, drawing objects in the foreground one by one, and then in the background.
Regardless of the artist's level of professionalism, understanding what stationery will be needed for the work process, as well as adhering to what algorithm, is best for copying pictures on various topics, he will be able to cope with the task in no more than 2-3 hours.
What you need to prepare for drawing
Drawings for copying (it is recommended that each artist organize the work in stages, regardless of whether he or she has fine art skills), for their creation require the presence of:
the original image, which should be chosen not only taking into account the preferences of a particular person, but also based on whether he has sufficient skills to recreate the image with high quality;
a set of pencils of varying hardness (soft pencils are used for coloring or creating shadows, hard pencils are used for drawing the outline and fine lines within it, and medium-hard pencils are needed to create secondary components of the key object);
sheets of paper or thick cardboard;
a high-quality eraser that does not leave streaks or holes after use;
sharpener;
ruler.
Methods of copying
Modern fine art has more than 5 ways of copying images.
Among the most frequently used of these are:
copying by cells;
recreating the original on a clean sheet of paper step by step;
Drawings for copying in stages can be created in different ways
copying with markings (when first the main outline and the contours of small details are outlined, and only then the image itself is drawn);
creating a drawing by dots.
Stages of drawing construction from simple to complex
The stages of drawing construction vary depending on the method of copying the image. Despite the existing differences, all algorithms are organized according to a single principle - "from simple to complex".
If the drawing is multi-component, it must be copied like this:
Draw the outline of an object, schematically indicating the location of its constituent parts.
Draw the component parts of the image (for example, ears if you are copying a drawing of an animal, etc.).
Add detail to the drawing (for example, depict facial features typical of the person being drawn – freckles, scars, and so on).
Color the drawing or, if it is created in black and white, add shadows.
Easy and beautiful pencil drawings for copying in stages
Drawings for copying (images of any complexity are recreated in stages) can be devoted to different topics.
Animals
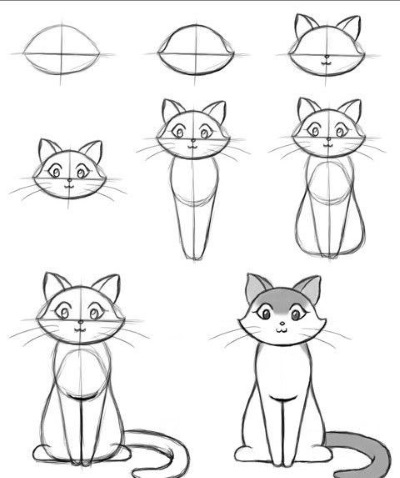
You can draw animals like this:
Image variant
The method of its copying
Draw 2 perpendicular lines in the upper part of the working plane.
Taking the intersection point as the center, draw an oval (the outline of the cat's head).
Draw the top border of the figure, making it slightly curved at the base.
On the upper edge of the oval, draw a pair of identical triangles, one of the edges of which should be double.
Step back 0.5 cm down from the middle of the main figure and draw a short horizontal line (the cat’s mouth).
In the upper plane on the right and above, draw a pair of eyes using ovals and semicircles.
From the side edges, draw several straight lines directed diagonally (whiskers).
Draw the cat's body at the bottom of the oval using straight and slightly curved lines.
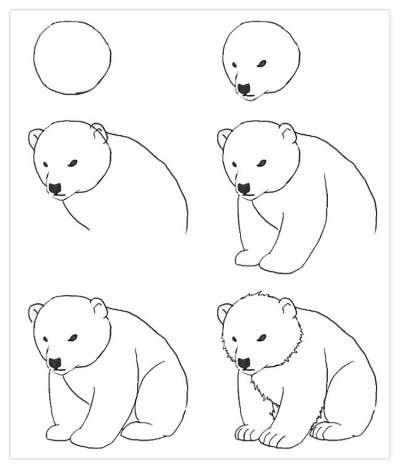
Draw a circle.
Inside the circle, outline the eyes of the bear, located half-sideways (2 black dots), the nose (black heart) and the muzzle (a semicircle drawn from the area of the eye, located on the side farthest from the viewer).
Draw a couple of semicircles (ears) on top of the circle.
From the right and lower border of the main figure, draw several semicircles, thus completing the body and limbs of the animal.
Add detail to the image by drawing the relief of the fur and, if desired, color the drawing.
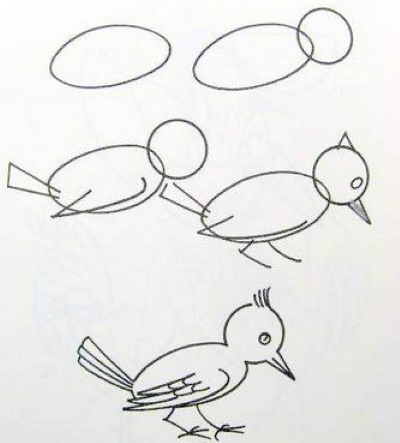
Birds
The simplest ways to create images of birds are:
Image variant
The method of its copying
Draw an oval in the center of the working plane.
To the right of it, draw a small circle so that the left border of the circle intersects with the right edge of the oval. Erase the secondary lines, making the transition between the head and the body of the bird smooth.
From the back border of the oval, draw an elongated rectangle directed towards the upper right corner (the bird’s tail).
In the middle of the bird's body, draw a semicircle, one side of which should be pointed (wing).
Draw thin lines with strong curves at the bottom of the body in approximately the same areas (the bird’s legs).
Draw a small triangle (the outline of the future crest) above the top edge of the circle.
Closer to the right border, inside the circle, draw a small circle (the bird’s eye).
From the right border of the circle draw a triangle directed towards the lower right corner (beak).
Add detail to the image by drawing the bird's plumage and the section of its beak.
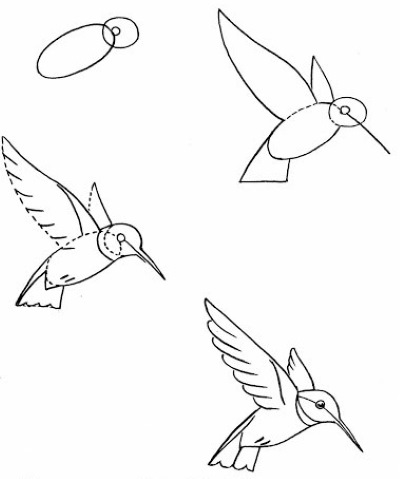
Draw an oval in the middle of the sheet of paper you are using.
To the right of the oval, draw a small circle whose borders intersect with the borders of the oval.
Inside the circle, near the edge of the main figure, draw a small circle (the bird's eye).
Visually lengthening the line of the body and drawing it through the bird's head, draw the beak using a double curved line.
Finish drawing the tail using a rectangle drawn from the left side of the oval.
Use triangles to depict wings.
Add detail to the image by drawing the bird's plumage and the appearance of its head (eyes, feather relief, etc.).
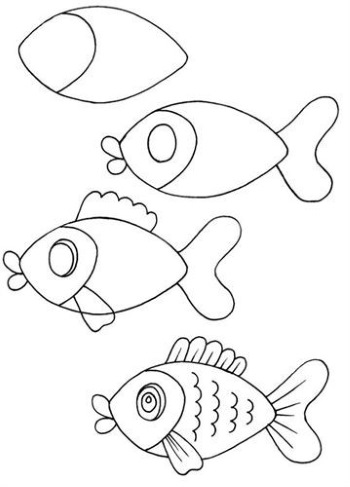
Sea creatures
Drawings for copying by stages with the image of sea creatures can be drawn like this:
Image variant
The method of its copying
Draw an oval, pointed at the sides (the body of the fish).
Inside the oval, on the left, draw a semicircle curved to the right. The maximum bending point should be located 1-2 cm to the left of the center of the main figure.
Between the left border of the oval and the semicircle, draw a small oval (the eye of the fish).
From the left edge of the fish's body outline, draw a pair of small semicircles (the fish's mouth) from one point.
Finish drawing the fin and comb using straight and smoothly curved lines.
Add detail to the image by drawing scales, curves of the fin and tail, and pupils inside the eyes of the sea creature.
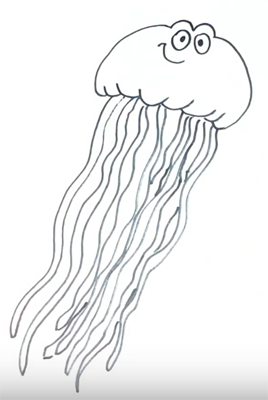
At the top of the page you are using, draw a semicircle curved upwards.
Adjust the semicircle line by making it additionally curved upwards in 2 places located close to each other.
Connect the bottom points of the semicircle with a wavy line.
Inside the resulting figure, draw 2 small circles with dots inside (eyes) and a downward curved line (mouth).
From the connecting line, draw curves downwards, grouping them into 2.
Connect the curves at the bottom points with a short semicircle or a small triangle without a base.
Flowers
The easiest ways to draw flowers are:
Image variant
The method of its copying
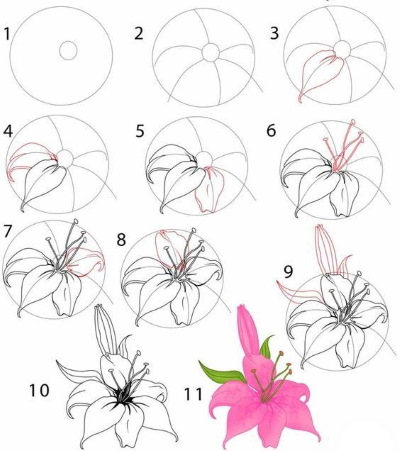
Draw an even circle, filling the middle part of the working plane.
Draw another small circle inside the circle.
From the inner figure, draw smoothly curved lines to the edges of the main circle.
Taking the curves as the center, draw the lily petals with slightly curved ends.
From the middle of the bud, draw 4-5 straight lines with small circles at the ends (stamens).
Add detail to the image and, if desired, add the stem, leaves and color the resulting picture.
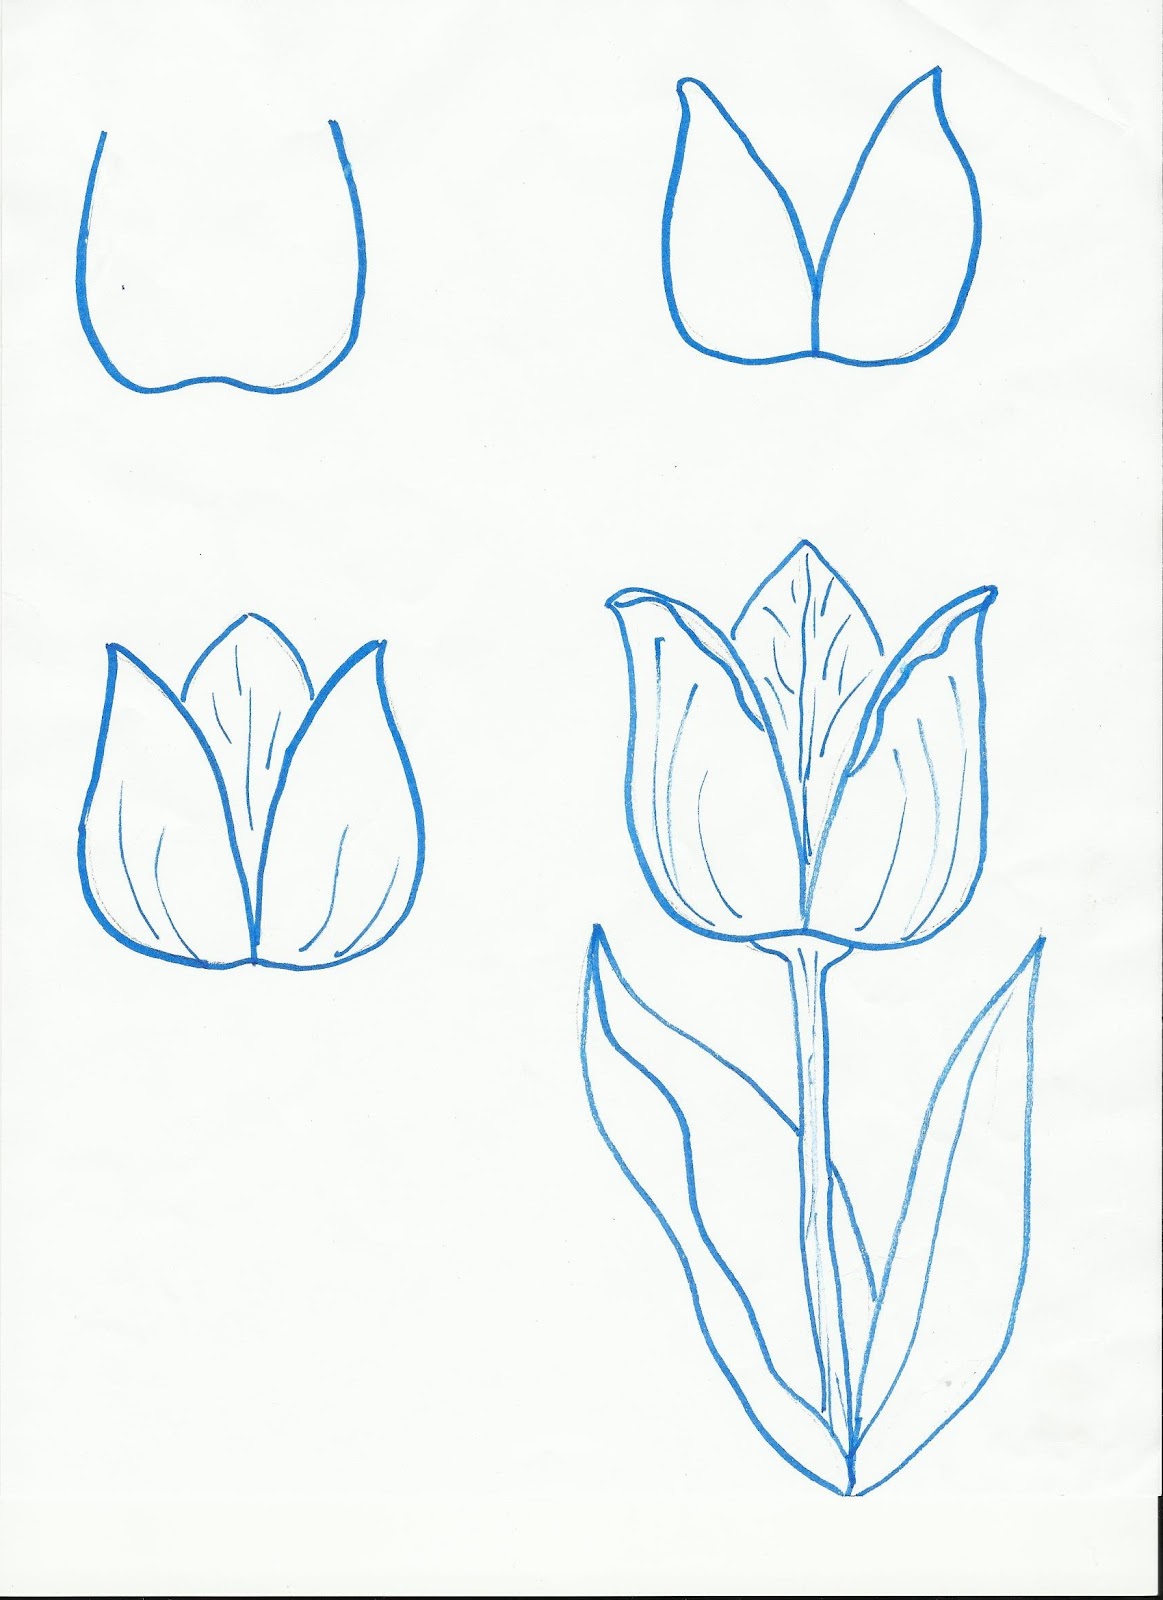
Draw a semicircle, strongly curved downwards so that its lower part represents the rounded edge of a rectangle.
Adjust the outline by bending it upwards along the center of the bottom border.
From the middle of the lower edge, draw 2 smoothly curved curves to the ends of the semicircle (petals).
Between the main petals, draw another one using a triangle.
Finish drawing the stem and leaves of the tulip.
Nature
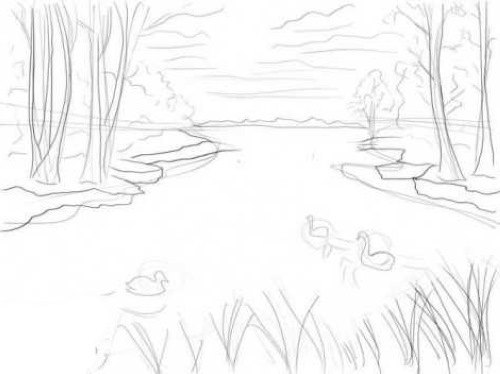
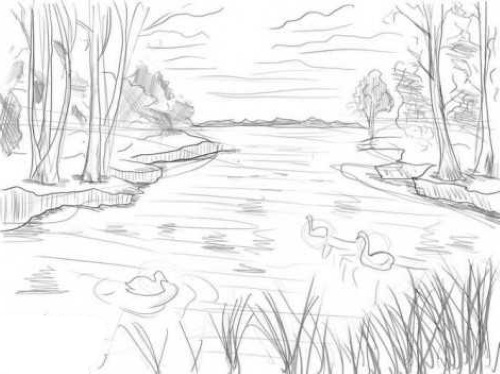
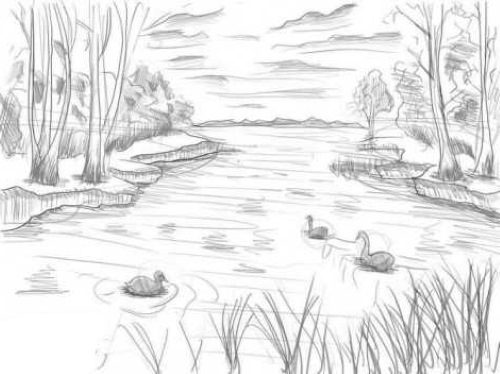
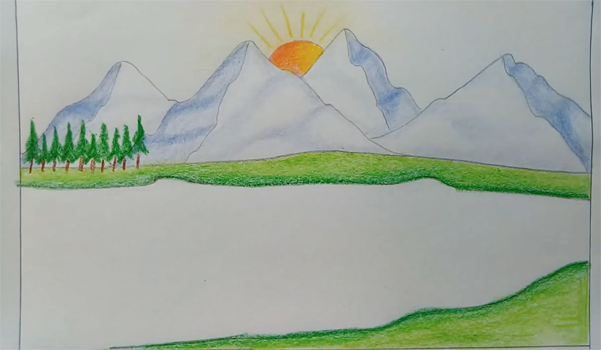
Drawings intended for copying, which schematically depict a landscape, are extremely important to copy according to the recommended stages.
This necessity is connected with the fact that multi-component images require selection of the size and detail of the drawn objects, depending on the distance of their location from the viewer's eyes.
Image variant
The method of its copying
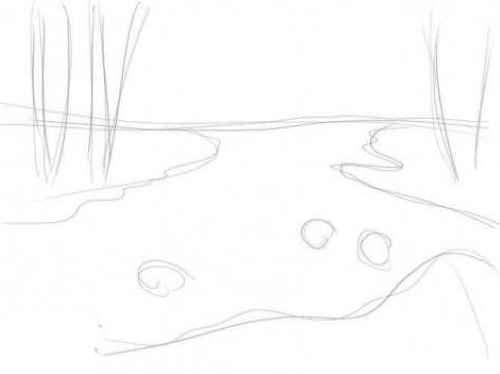
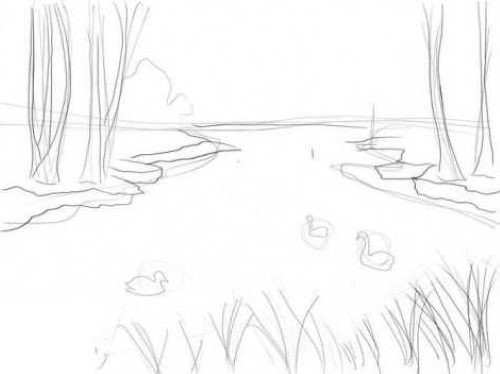
Draw a horizon line, dividing the working plane so that its upper part is half the size of the lower one.
At the bottom, using smoothly curved lines, draw the outline of the river banks.
On both banks, draw straight lines, drawing them from one point (outlines of trees).
Draw a curve in the foreground to depict the terrain.
Add detail to the image by drawing large stones lying in the middle of the pond (ovals located randomly in the central part of the working plane).
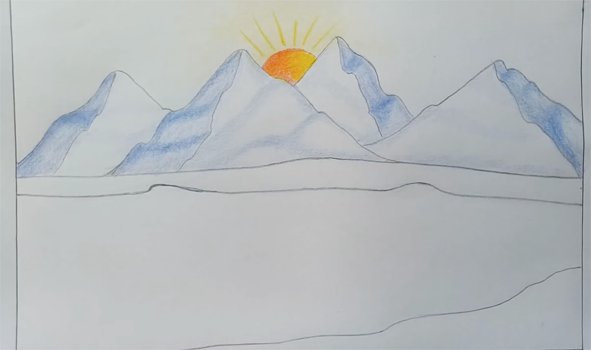
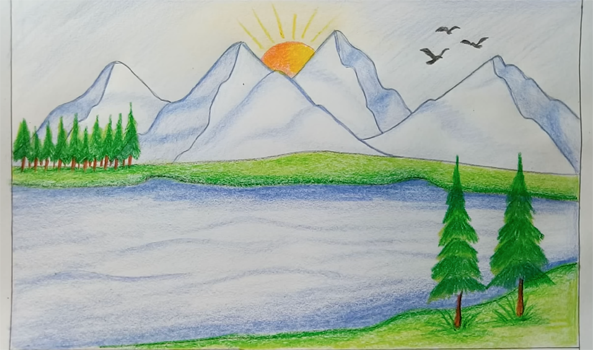
Mark the horizon line by dividing the sheet of paper you are using so that its upper part is 3 times smaller than the lower part.
Step back 2-3 cm from the horizon line and draw a slightly curved line along the entire length of the sheet (the outlines of mountains located in the distance).
Use shading to depict the relief of the mountains.
In the foreground, draw several trees using smooth curves, grouped in 2s.
Food
Food images are most often used by girls as decoration for their personal diaries or notebooks.
In this case, food products are drawn as cartoon characters with eyes, mouth and characteristic features of a living creature.
Image variant
The method of its copying
In the center of the working plane, draw a large isosceles triangle, placing its main angle down.
Step back 2 cm from the upper border of the figure and draw a line that exactly follows the shape of the outline.
In the middle of the lower part of the triangle, draw 2 identical black dots (eyes) and a downward curved semicircle between them (mouth).
Fill the space inside the figure with small hearts, placing them randomly.
Draw an even circle.
Divide the inner part of the circle into 2 parts using a curve passing through the middle of the drawn figure.
Fill the top half with small dots that will need to be colored later.
On the right in the upper half, draw 3 small circles (berries) close to each other with 3 triangles located in the gaps between the berries (leaves).
In the lower half, draw 2 equal circles (eyes) and a semicircle with a downward bend, the extreme points of which are connected by a slightly curved line (mouth).
Detail and color the image.
Eyes
There are two main ways to draw eyes:
Image variant
The method of its copying
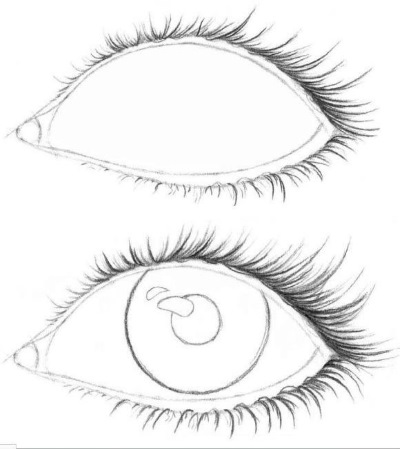
Draw an oval, placing it horizontally and sharpening its sides.
Draw a small semicircle on the left inside the figure.
Draw the outline of the eye again, stepping back 0.5 cm from the main line.
Along the entire length of both eyelids, draw slightly curved lines, making them thicker at the base and thinner at the ends (eyelashes).
Inside the oval, draw a circle with another small circle inside.
Add detail to the image and make it more realistic using shadows and shading.
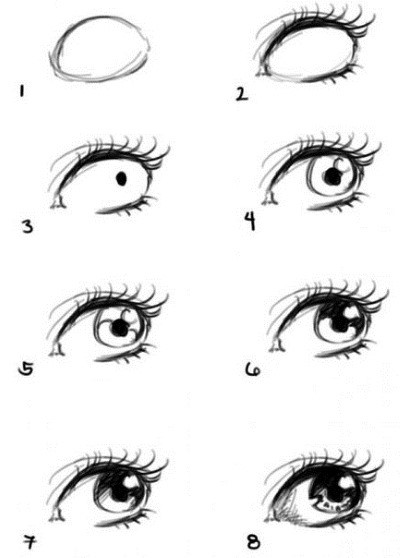
Draw a rounded oval.
Draw the outline of the figure, making it more expressive.
Draw a small semicircle on the left inside the oval.
Draw eyelashes along the entire length of both eyelids.
Mark the area where the pupil will be located with a black dot.
Draw a small circle around the pupil, placing it close to the right border of the main oval.
Add detail to the image, making the inner part of the eye more realistic using shadows and shading.
Anime
Anime style drawings are easiest to copy like this:
Image variant
The method of its copying
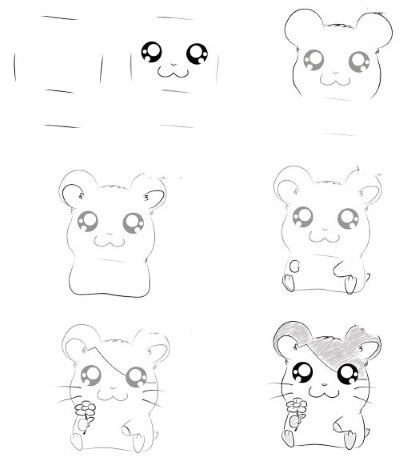
Schematically outline the boundaries of the head of the animal you plan to draw.
Draw an outline.
Draw 2 identical large circles (eyes) inside the outline. Color their inner part, leaving a small circle inside white.
Between the eyes, draw a small horizontal line (the nose) and a smoothly curved line below it (the animal’s muzzle).
Finish drawing the hamster's body using smoothly curved lines.
Color the drawing or add shading.
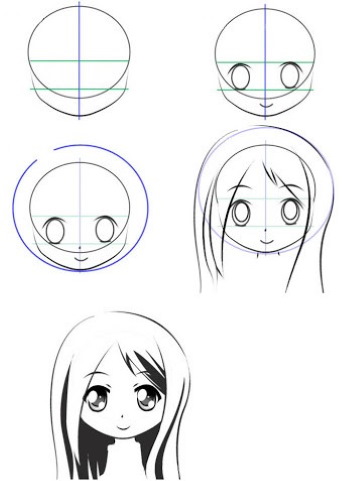
Draw a circle, the inner part of which is then divided into 4 equal parts using perpendicular lines.
Draw a semicircle on the bottom edge of the circle, connecting its extreme points with a straight line.
Between the horizontal and the connecting line, draw 2 identical ovals (eyes).
Draw a small semicircle curved downwards (mouth) under the connecting line.
Finish drawing the hairstyle using semicircles and wavy lines.
Erase secondary lines and then refine the image.
Cool and funny drawings
The simplest drawings that can be used to decorate a notebook or sketchbook are:
Image variant
The method of its copying
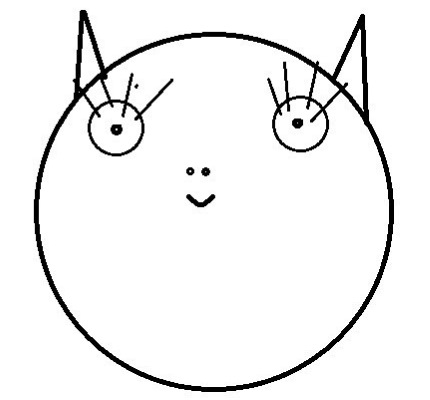
Draw a circle.
From the upper edge of the circle, draw 2 equal triangles.
Inside the main figure, draw 2 small circles with dots inside.
From the upper boundary of the circle outline, draw vertical lines, placing them at the same distance from each other.
Between the drawn circles, place 2 dots (nose) and draw the cat’s mouth (semicircle with a downward bend).
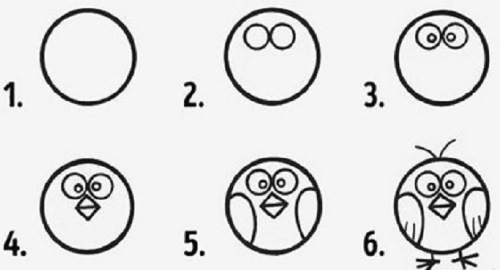
Draw a circle.
Inside the main figure, in the upper part, draw 2 small circles, placing them close to each other (eyes).
Draw the pupils inside the eyes.
Draw a rhombus between the eyes, below them, then dividing it in half (beak).
Draw semicircles inside the circle on the sides, curved towards the center.
Refine the image.
Images in 3D technology
The easiest way to draw an image in 3D technique:
Take a sheet of paper with lines drawn in a grid, or draw lines on it yourself.
In the middle of the working plane, write any word consisting of a minimum number of letters, for example, “love”.
Draw horizontal lines on the work surface, the first of which should be located above the level of the letters.
When drawing horizontal lines that pass through the inscription, make them curve upwards where they intersect with the letters.
The advantage of copying in stages is that even a child or an adult with no experience in fine art can create such drawings. This creative process allows you to get rid of negative thoughts, stabilizes the state of the mental system, and also helps to reveal the artist's creative potential.