Scarves are warm wardrobe items that create a stylish look. Most models are within the power of beginner knitters who want to knit a warm item for a child. To knit a scarf for a girl, first choose a model. Below are the most popular types of scarves for children with knitting needles.
Selection of materials and tools
To ensure that the product does not take too long to complete and that knitting is convenient, pay attention to the size of the knitting needles. The quality of the product will be affected by the composition of the yarn, so it is also carefully selected.
Yarn
A scarf for a girl, which will be knitted with knitting needles, should be made of carefully selected yarn.
The coat should be:
- warm;
- not prickly;
- natural in composition.
If all points are met, the scarf will be comfortable to wear. Cashmere and merino are considered ideal materials for knitting children. Products of this yarn retain their shape, warmth, and do not cause allergic reactions in children. If this option seems expensive, you can choose a cheaper one - high-quality semi-wool. The composition should be equal parts merino and acrylic.
Spokes
The size of the knitting needles depends on the yarn chosen. If the yarn is medium-sized, as recommended above, then the needles can be №2.5-3. If you plan to knit scarves from thick yarn, then the needles should be larger in size to withstand the volume. The best for this case is №5.
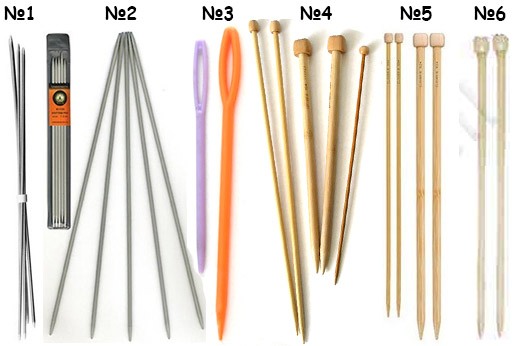
For the thinnest scarves, simple double-pointed needles are enough. For wider models, circular needles are used. If you knit according to the instructions but change the thickness of the yarn, then you should focus on the size of the needles.
Simple Scarf Patterns
Simple but fashionable models of children's scarves can be made using the usual garter stitch method (all loops are only front or back). To add some variety to simple knitting, add yarn of a different color.
Children's models of scarves are distinguished by some details that add naivety: the shade of yarn, tapered ends of the scarf, the addition of pompoms. A similar model from medium wool can be knitted in a few hours.
A tapered scarf starts with a set of 3 rows, gradually adding 2 in every second row. This algorithm is followed until the scarf acquires the desired width. An additional color is added at any time, but they try not to make the stripes of the additional color too wide.
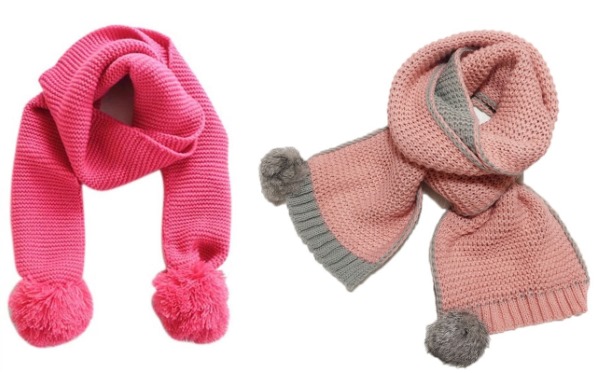
The minimum length of this model is 1.2 m, but if desired, the scarf can be lengthened. The end of the scarf is narrowed in the same way as it was widened: every 2nd row, 2 side loops are knitted into one, reaching 3 and closed. The product looks finished if the narrowed ends are decorated with decorative elements (pompons or tassels).
Scarf for girls with double-sided elastic band
A scarf for a girl with knitting needles and a double-sided elastic band is simple for beginners. The uniform pattern will look original. The instruction below is designed for a length of 1 m, but if desired, it can be extended. The number of loops should be a multiple of 4 + 3 more loops and + 2 side loops. In this case, there are 53 of them.
The order of execution (L – front, I – back):
- Row 1: 3 I, 1 L, 3 I (then repeat with L).
- Row 2: 1 I, 1 K, 3 I, 1 K, 1 I (then repeat 1 K, 3 I).
The following rows are repeated 2 times and alternated until the desired length is reached. The result is an even, beautiful pattern. In order not to lose the spring effect, the woolen product is not exposed to high temperatures.
Knitted snood scarf for girls
Snood scarves are especially popular. Their peculiarity is that they are looped around the neck and put on over the head. This model looks voluminous, and is more comfortable to wear than simple scarves, due to the fact that it does not unravel.
If this model is made from high-quality material, then you get unique and original products that are suitable for men, women and children. A snood for girls will look especially impressive if you add another element of the pattern to the basic knitting, for example, a braid that will interestingly frame the shoulders.

Subsequently, such a product can be used as a cape, especially if natural materials are used.The thicker the yarn, the larger the knitting needle size needed (from 5 and up). The base of the scarf, which will become the turn-down neck, is knitted alternating garter and stocking stitches. You can continue this algorithm to the end, or sew the fabric with a "braid" knit.
Before starting work, measure the width of the snood, which will later become the height of the neck. For a neck height of 40 cm, the calculation of loops will be as follows: 70 loops, of which 18 will go to knitting "braid". The neck is knitted with alternating garter and stocking rows (4:2). The order of loops is observed: 1 side loop, 50 garter and stocking, 18 "braid", 1 side.
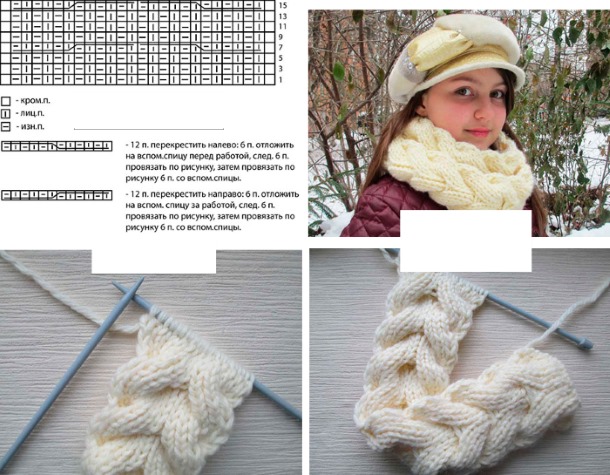
The “braid” element is performed according to a separate scheme:
- Every 8 rows, change 12 loops: remove 6 side loops onto an additional knitting needle, and knit 6 loops from the center.
- Then knit the deferred loops, alternating on both sides, as if “braiding a braid”.
- Continue knitting until the required length is reached. Both parts are sewn together with a neat seam.
Scarf-collar
The principle of wearing a snood scarf and a snood scarf is identical. The only difference is that the snood can reach the greatest length and therefore wrap around the neck several times. The collar is supposed to be short in length and therefore looks like a collar from the side.

This model is especially popular with mothers, because scarves of frisky children, if they do not untie, then they slide to the side. With a scarf-collar, this will not happen, and the child's neck will always be covered, keeping warm.
A scarf for a girl with knitting needles with "braid" inserts based on a simple garter stitch is an original option. If desired, you can use only the "braid" element as a pattern, but the garter base will be warmer and denser. For such a model, medium-thick yarn will be enough, and knitting needles of size 3 will do.
A total of 58 loops are cast on for work, of which the braid takes up 12, the order of knitting the loops is as follows:
- 1 side loop, 5 front garter stitches, 12 braids (repeat three times), 5 front garter stitches, 1 side. Thus, in the fabric, 3 braids are separated by 5 garter stitches.
- The braid pattern element is made according to the same principle as described in the previous method, but this time 8 loops are changed from right to left and every 8 rows.
The average length of a child's collar is 60-65 cm, but it can be extended if desired. When the scarf has reached the required length, finish the last row and sew both sides.
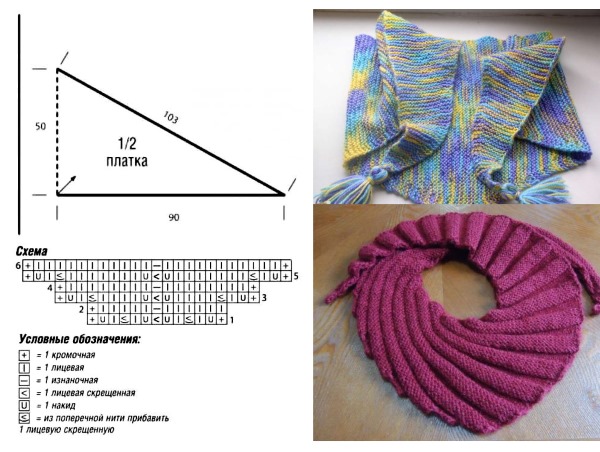
Scarf-kerchief
A scarf for a girl is easy to knit, no matter what model you choose. A scarf-kerchief looks good on both adults and children. This is a triangular fabric, one corner of which protrudes significantly. It is worn as a simple scarf, throwing the ends of the scarf and the largest corner on the chest, or as a headband, which replaces a headdress in the fall or spring.
To make a simple scarf, take 100 g of merino wool with a thickness of 150 m. For such a thickness, you will need knitting needles No. 4. Knitting is done with face loops to create an even pattern of the fabric.
Start knitting from the corner, casting on 7 loops, and follow the following algorithm (L - front, H - yarn over):
- Row 1 – front: 1 K, 1 H, 2 K, 1 H, 1 K (this loop will be the central one, it should be marked), 1 H, 2 K, 1 H, 1 K.
- Row 2 – purl: 1 K, 1 H, 4 K, 1 K (central), 4 K, 1 H, 1 K.
This order is continued by adding 4 loops in the front row on both sides from the center and from the sides. From the back side, 2 loops are added from the sides. It is recommended not to lose sight of the central loop, since it is from it that the pattern is formed. If you get lost, the pattern is disrupted and this becomes immediately visible on the canvas.
To make a standard kerchief, 52-54 rows are enough, after which they are closed. If desired, the product can be decorated with tassels.
Scarf with gathering
To create such an original scarf, take yarn 350 m per 100 g, knitting needles No. 2 and 5.
Procedure:
- Cast on 22 stitches and 2 side stitches on size 2 knitting needles. Perform garter stitch through the front wall.
- On the 5th row, change the knitting needle to #5. The first loop is the front knit, then 2 loops are knitted into each loop (front knit, back knit), the last one is the front knit. At this stage, the number of loops should increase to 42.
- Continue knitting, making purl stitches at the back and knit stitches at the front.
- On the 13th row, change the knitting needle to No. 2 and reduce the loops to the initial number, for this: the first is a front loop, every 2 loops are knitted into 1 front loop at the back, the last is a front loop.
- Up to the 18th row, do the classic garter stitch.
- The pattern is repeated until the end of the scarf, following the example from rows 5 to 18. When the scarf reaches the desired length, the row is finished.
Loop scarf
Loop scarf - the model is ideal for children due to its practicality. It fits tightly around the neck, warms, and the opening will not allow the scarf to untie. To make a loop scarf, you only need medium-thick yarn, knitting needles No. 4 and a knitting pin.
Procedure:
- The loops are cast on based on the required width, but an even number, multiple of 4, is maintained. Knit with a 2*2 elastic band (alternating 2 front, 2 back), removing the first loop, the last one is always a back loop. So knit a length of 10 cm or a little more.
- For the loop, divide the knitting in half: one part remains on the knitting needle, the other is removed to a pin. The part on the knitting needle is knitted with a 2*2 elastic band at a distance slightly less than the width of the scarf. Remove the fragment to a pin.
- The fragment from the pin is transferred to the knitting needle and knitted to the level of the first fragment. In this case, the opposite end of the skein is used, then trimmed.
- Connect both fragments on one knitting needle and continue knitting, gaining the desired length.
- The last row is closed and the thread is hidden. If desired, the scarf is decorated with pompoms or tassels.
Bow-shaped scarf collar
This model resembles a loop scarf in execution, but the method is somewhat more complicated. For the product, take 350 m of yarn, knitting needles No. 3 and straight, a knitting pin. The length of the future scarf is calculated based on the girl's neck circumference +5 cm or slightly more for the circumference over the clothes. The scarf is easier to make with garter stitch, where the loops are hooked to the front wall, the yarn overs - to the back.
The order of execution. (L – front, H – yarn over, I – back):
1. Cast on 4 stitches on knitting needles No. 3.
1st row: remove side stitch, 1 H, 2 L, 1 H, 1 I.
2nd row: remove side stitch, 1 knit stitch, 2 knit stitches, 1 knit stitch, 1 purl stitch.
2. In each odd row, begin adding 1 loop before each edge loop (purl loops are not added). This increases the width to the required size.
3. Once the desired width is achieved, knit in garter stitch for a length of about 10 cm.
4. For elasticity, the loops are transferred to knitting needles No. 2 and pins. The first fragment is transferred to the knitting needle, the rest - to the pin.
5. The part on the needle #2 is knitted with a garter stitch for 5 cm and put on a pin. The second fragment is knitted according to the same algorithm, but with the other end of the skein. When the height of both parts is equal, the thread is cut. Carefully throw both parts onto the needle #3 and knit further together to the length required for the scarf.
6. Then make the 2nd loop in the same way. And after connecting the 2 parts, knit a 10 cm long piece of fabric, then narrowing occurs: combine the 2nd and 3rd loops into one from the edges. The row is finished when there are 4 loops left.
Scarf with checkerboard pattern
This pattern allows you to wear the scarf from any side - it has no reverse side. The process of creating this scarf is quite simple. For the product, take 350 m (100 g) yarn, size 3 knitting needles, and a crochet hook.
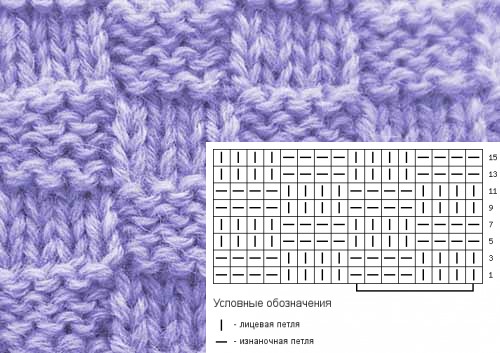
Procedure:
1. For a medium-width scarf, cast on 30 loops and 4 side loops. If desired, the number of main loops can be increased.
The side stitches retain the algorithm: the first and second to last stitches are removed, the 2nd stitch is front facing, the last stitch is back facing in front.
2. They start making a pattern.
Odd rows are made with 6 front loops and 6 back loops. Even rows change the sequence.
3. From row 7, change the order of the rows and knit 6 rows. This change occurs every 7 rows until the end of the scarf length.
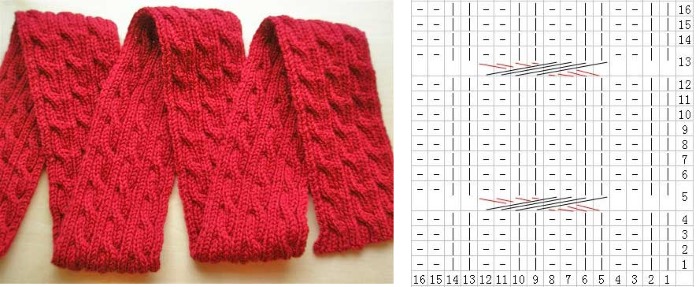
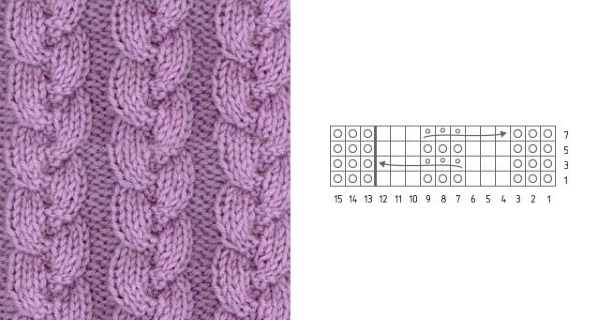
Scarf with voluminous braids
A scarf for a girl with knitting needles of this model is within the power of beginner knitters who want to create a fashionable accessory. For the product you will need a skein of wool of 350 m per 100 g, knitting needles No. 3 and knitting pins.
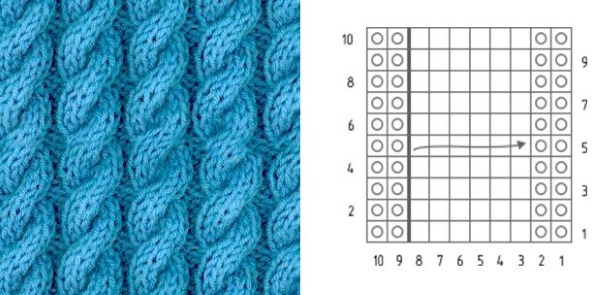
The order of execution (L – front, I – back):
1. A total of 39 stitches are cast on.
Row 1: slip the first one, 12 K back, 13 loops in a row alternate 1 I, 1 K, 12 K back, last one – I.
Row 2 and all even: first slip, 12 I, 13 alternate I and L alternately, 13 I.
2. From the 3rd row, make a pattern: remove the first one, 4 L, throw 4 onto a pin, 4 L. Return the loops from the pin to the knitting needle and make L. From the next 13 loops, make a braid, as with the previous loops: 4 L, throw 4, 5 L together with the side, throw back from the pin and knit L.
3. Row 7: slip 5 loops, 4 L, return loops from pin and also knit, 4 L, 13 in a row alternate 1 I and 1 L, slip 4 loops onto pin, knit the next 4 L, return from pin and knit L, the last one is I.
4. The pattern is repeated every 8 rows until the end of the scarf. The last row is closed and the tail of the thread is removed.
Scarf-hood
The original model of a scarf in the form of a hood will be obtained from 3 skeins of yarn of 100 m (100 g). Take large knitting needles, size 5, a crochet hook and a sewing needle.
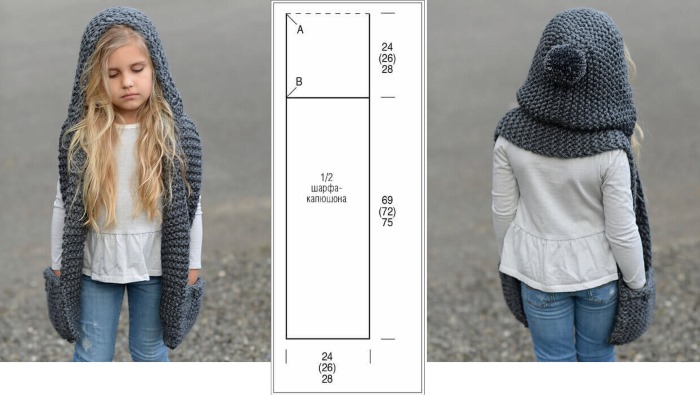
The order of execution (L – front, I – back):
- Cast on 80 loops +1, which will connect the product in a circle.
- Row 1: alternate L and I loops, knitting from the front. Row 2: change the alternation places. Repeat the algorithm up to and including the 6th row.
- Until the 22nd row, knit only L loops.
- Row 23: 37 loops L in front, close the next 6 loops. To do this, knit the 38th and 39th loops, remove the 38th through the 39th. Then knit the 40th and remove the 39th through it. And so on up to the 43rd loop. Knit the remaining 37 loops L.
- Row 24: knit to closed loops and knit the last one before them I from the front. Then knitting turns.
- Row 25: remove first, all others – And from the front.
- Row 26: Knit together the 2nd and 3rd loops from both ends.
- All subsequent rows are knitted until the desired length is reached, following the algorithm: the first one is removed, L is in front, I is in the back, the last one is purl. When the desired length is reached, both halves of the hood are sewn together.
- Create a flap. In the 23rd row, find the first closed loop and from it, in a circle, pick up L loops (keep an odd number). Knit another 12 rows, as in point 2. When the flap is ready, sew together the 12th and 1st rows.
With pompoms
The original pompom detail will look good on any model, examples of which are given above. For decoration, it is enough to sew them along the edges.
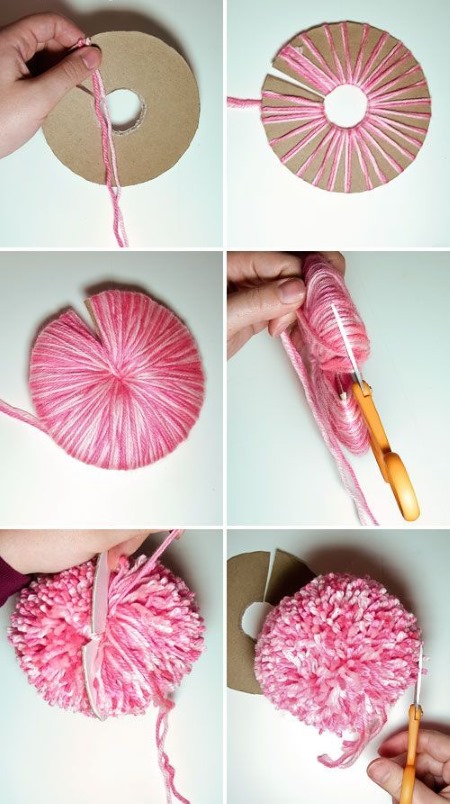
There is an algorithm for making pom-poms:
- For a pompom with a diameter of 5 cm, prepare 2 circles of cardboard. The outer diameter is 3 cm, the inner diameter is 1 cm. In each blank, make a slit from the edge to the center. If the pompoms need to be larger or smaller, then the blanks themselves change in diameter.
- The blanks are put together, a separate thread is laid in the center. The yarn is wound until the internal diameter becomes 2 times smaller.
- The winding is cut along the outer edge, simultaneously pulling the thread laid in advance. The blanks are removed, and the pompom itself is trimmed to even edges.
This is how the required number of pom-poms are made.
Cat scarf
To make it, take 2 skeins of yarn of different colors, 500 m (100 g), knitting needles of size 2, a crochet hook and a sewing needle with a large eye.
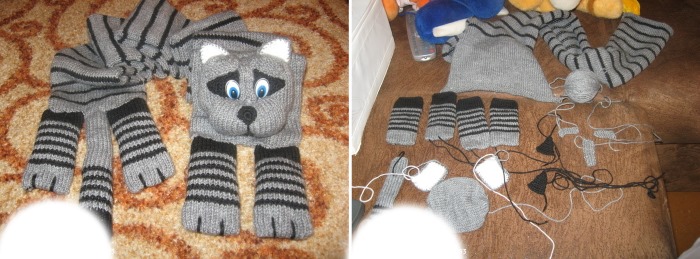
Procedure:
| No. | Product element | The order of execution (L – front, I – back) |
| 1 | Scarf fabric |
|
| 2 | Paws |
|
| 3 | Tail |
|
| 4 | Head |
|
| 5 | Muzzle |
|
| 6 | Ear |
|
All the parts are sewn together, and the head is stuffed with padding polyester. Toy fittings are used as the nose and eyes. You can knit a scarf for a girl with knitting needles in very simple or complex ways. Any chosen model can become an original detail in the image of a young fashionista.
Article formatting:Natalie Podolskaya
Video about knitting a scarf for a girl
Scarf for a girl with knitting needles - knitting video:
Hello. I urgently want to knit a scarf for my granddaughter. Questions: what thickness of yarn and what thickness of knitting needles? I have never knitted scarves, mostly socks and mittens, and then we were going to the skating rink and...no scarf.
Please reply as soon as possible.
Sincerely, Petrovich A.V.