Learning how to sew felt birds is not difficult. It is enough to find out what materials and tools you may need, look at ready-made patterns, read several step-by-step master classes on sewing birds of different shapes and colors.
What you need to make felt birds
List of necessary tools and materials:
| Material | Peculiarities |
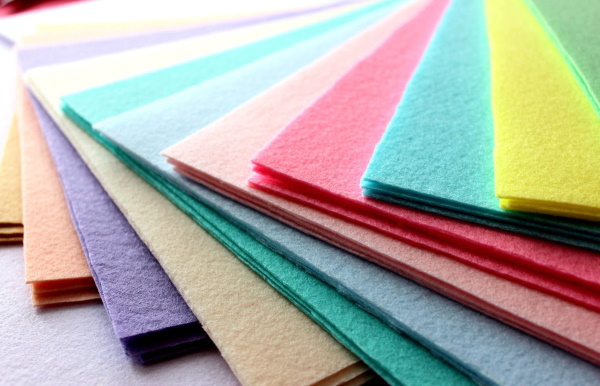
| Felt | For sewing decorative figures, it is advisable to use soft fabric, as it is more convenient to work with. |
| Mouline threads | It is advisable to purchase a set that contains at least 24 colors so that you can easily match the shade of thread to the color of the fabric. |
| Sewing needles | To work with felt you need thin needles. Large needles will leave unsightly holes in the fabric. |
| Stuffing material | Synthetic padding, cotton wool, and fabric scraps will do. |
| Thick paper and a simple pencil | Required for constructing patterns. |
| Water soluble marker | Needed for transferring patterns onto fabric. |
| Scissors | It is better to use special scissors for fabric. They will be sharper and easier to use than ordinary stationery tools. |
| Compass | May be needed when constructing patterns. |
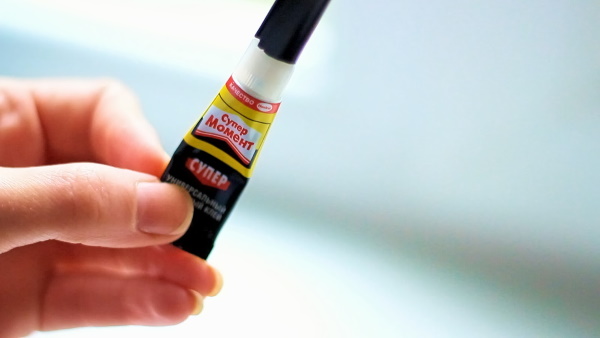
| Moment glue | Needed for attaching decor. |
To decorate finished products, you can use everything you have at hand. Beads, seed beads, rhinestones and sequins will do. You can also use scraps of lace and satin ribbons, colored laces, and scraps of felt fabric.
Many needlewomen sew beautiful buttons onto felt crafts, glue on colored feathers or pieces of other fabrics.
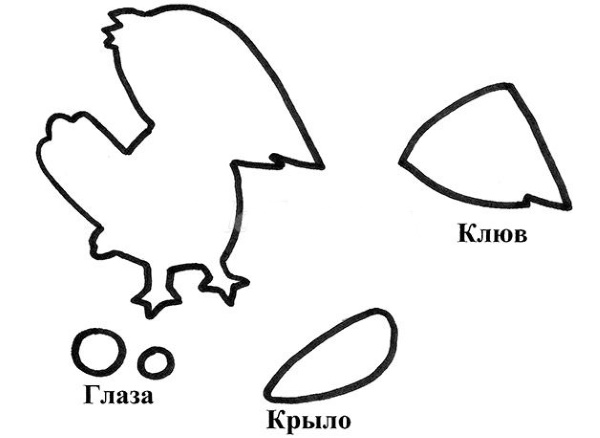
Master class on sewing an owl from felt
A felt bird (the pattern is drawn by hand) can be three-dimensional or flat. This master class provides instructions for sewing a felt owl with partial filling. The bird's body will be flat, and the wings and paws will be stuffed with synthetic padding.
Patterns of details, templates
What details need to be drawn and in what quantity:
- body with pointed ears – 2 pcs.;
- eyes - 2 large circles and 2 small ones;
- wings – 4 pcs.;
- beak – 1 pc.;
- paws – 4 pcs.;
- clothing items – 2 pcs.
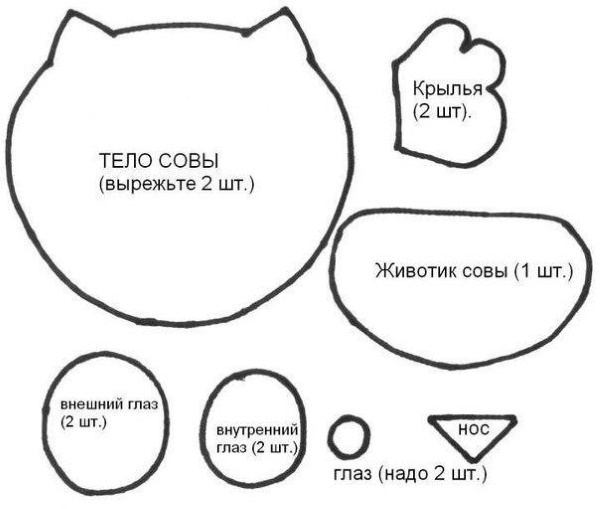
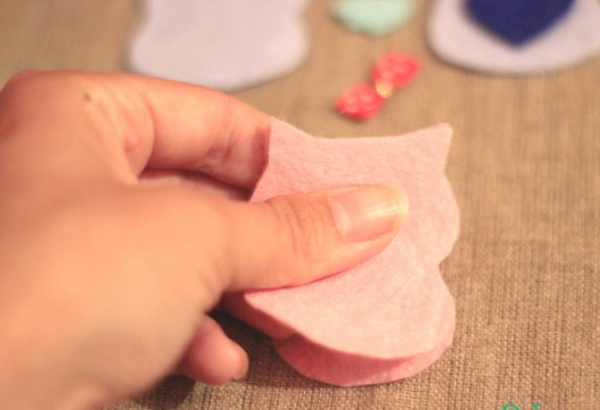
Cut out all the elements with scissors and trace them on the fabric. The body pattern can be transferred to any color fabric. Transfer the 2 large circles to white felt, as this will be the basis for the eyes. Trace the smaller circles on black fabric. These are the pupils.
The wings can be cut out of felt a shade darker than the owl's body. Orange or brown fabric is suitable for the paws and beak. The clothing elements should be identical. You can choose a patterned fabric or embroider it with contrasting threads yourself.
Connecting elements
How to sew an owl:
- Sew 1 piece imitating clothing to the front and back of the body, at the bottom.
- Using an overcast stitch, sew the edges of the paws and wings, leaving openings for stuffing.
- Fill the parts with padding polyester. For convenience, you can use a pencil.

- Sew up the holes.
- Sew the wings and paws so that the seam remains on the inside of 1 of the body pieces.
- Cover the blank 2 with the body pattern, sew the pieces along the edges, piercing through the places where the paws and wings are attached.
- Glue black pupils to the white felt circles using Moment glue.
- Sew on the owl's eyes.
- Glue the beak.
For sewing, you need to use threads that are approximately the same color as the fabric from which the piece is cut.
Decor
To decorate you will need wavy ribbon, black thread and a small rectangular piece of black felt.
Algorithm of actions:
- Wrap the tape around the owl, covering the top edge of the garment. Carefully sew with threads of a similar color.
- Tie a rectangle of black felt in half with black thread.
- Tie a strong knot. Trim off any hanging ends.
- The result is a bow that needs to be glued under the owl's beak, as if it were a butterfly.
Using white thread, embroider a highlight on the beak in the form of 1 vertical stitch.
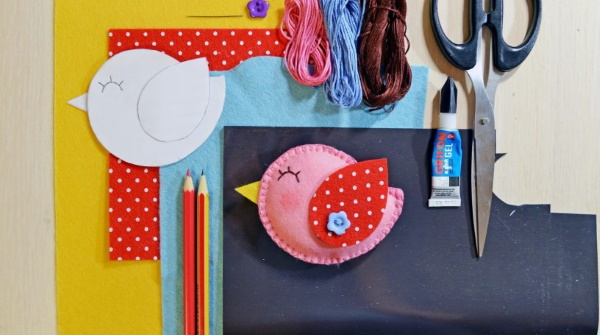
Spring Birds-Felt Magnets
A felt bird (the pattern of another bird is made by analogy) with a magnet inside can become a small souvenir that can be given to friends as an addition to the main gift. If you make 2 identical birds, you will get a themed gift for Valentine's Day or a wedding anniversary.
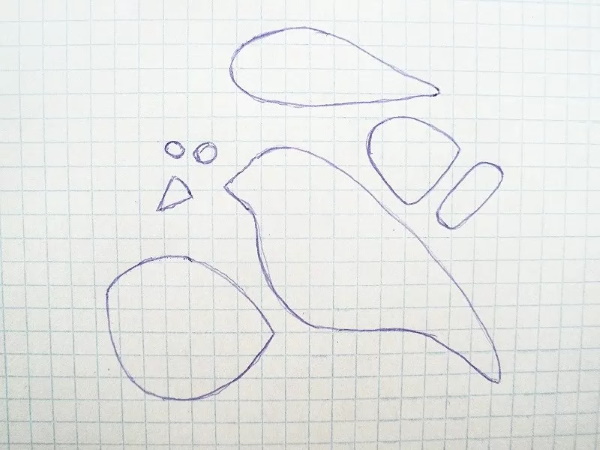
Pattern of the details
To sew 1 bird, you need to cut out 3 teardrop-shaped parts: body - 2 pcs., and 1 wing.
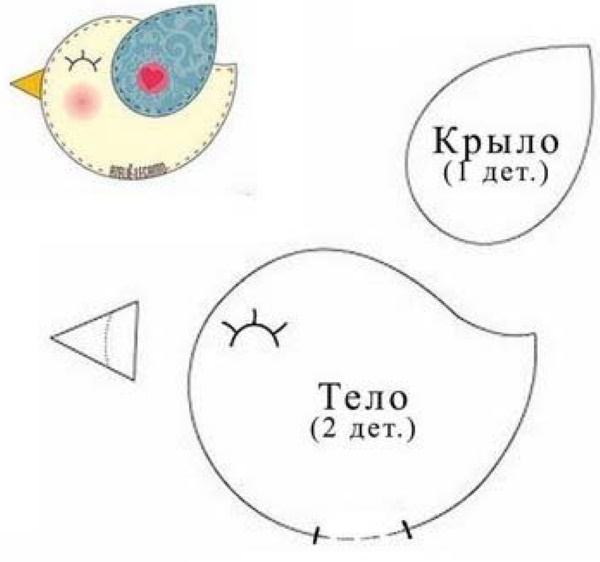
Cut out 1 triangle from a piece of orange felt. This will be the beak.
The body should be larger than the wing. It is advisable to transfer the body pattern to a plain fabric, and the wings can be cut out of patterned felt.
Connecting elements
How to sew a bird:
- Turn the body patterns horizontally. The wide part is the bird's head, and the narrow part is the tail.
- Glue a small magnet to the center of 1 piece using Moment glue.
- Glue the beak to the head so that the sharp tip protrudes outward.
- Sew the 2 body parts together using overcast stitches, leaving an opening for stuffing.
- Fill the bird with synthetic padding.
- Sew up the hole.
- Sew the wing with 2 large stitches from the front side of the product (from the opposite side where the magnet is attached).
Lightly knead the craft so that the stuffing is distributed evenly.
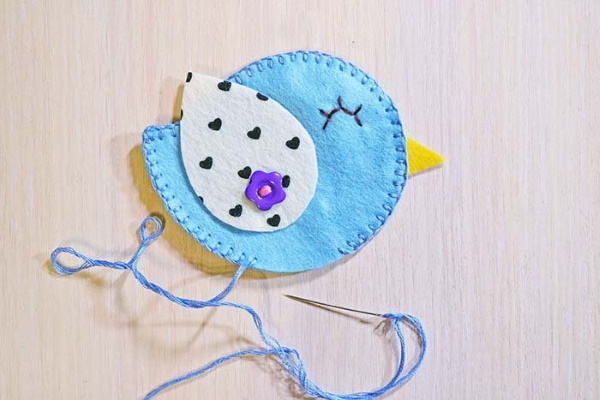
Decor
For decoration you will need 1 beautiful button, black threads and a pink marker.
Procedure:
- Using black thread, embroider the bird's eye in the form of an arc.
- Embroider long eyelashes using large stitches.
- Use a pink marker to draw a round blush on the bird.
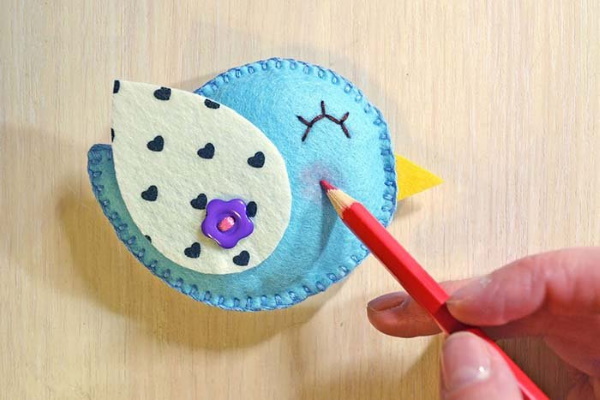
Sew a button to the wing where it attaches to the body to hide the stitching.
Bullfinches
Bullfinches are birds with a special coloring.
Therefore, for sewing you will need felt of certain colors:
- red;
- orange;
- black;
- light gray;
- dark gray.
For decoration you will need white and black felt, as well as brown floss threads.
Pattern of the details
What parts need to be cut out:
- bird silhouette (head, body, tail, beak) – 2 pcs.;
- breast – 1 pc.;
- head – 1 pc.;
- beak – 1 pc.;
- wing – 1 pc.
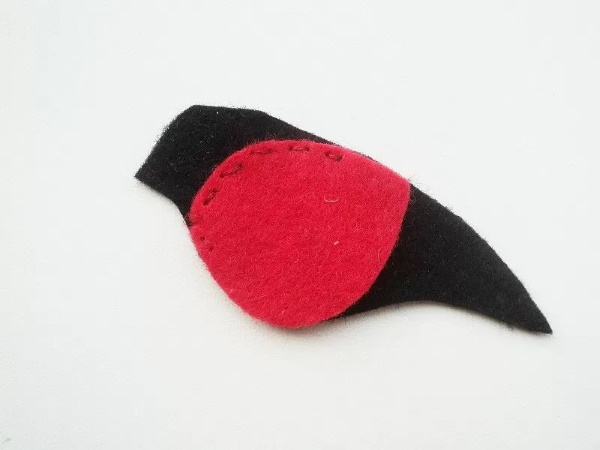
2 parts of the bird silhouette need to be transferred to light-grey felt. Cut out the wing from dark-grey material, and the head from black. Transfer the breast pattern to red felt. Cut out the triangle-shaped beak from orange fabric.
Connecting elements
How to sew all the parts:
- Glue the orange beak to one of the parts of the bird silhouette.
- Sew the red breast to this same piece.
- Then sew on the black head and dark grey wing.
- Connect both parts of the bird silhouette, sew them together with an overcast stitch, leaving an opening for stuffing.
- Loosely stuff the bird with padding polyester.
Sew up the hole.
Decor
Procedure:
- Cut a small circle out of white felt.
- Cut a smaller circle out of black felt.
- Using Moment glue, glue the black circle over the white one.
- Glue the eye to the bird's head.
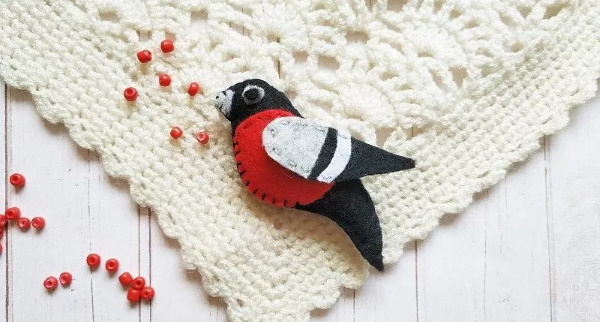
Using brown thread, sew a line on the beak dividing it into 2 parts.
Parrot
The parrot pattern can be simple, where all the details are large and schematic, or, on the contrary, complex, with a large number of elements. The brighter the bird, the more details of different colors will need to be cut out of felt. This master class presents a medium-level version of the craft.
For work you will need fabric of 7 colors:
- light green;
- brown;
- orange;
- white;
- yellow;
- pink;
- blue.
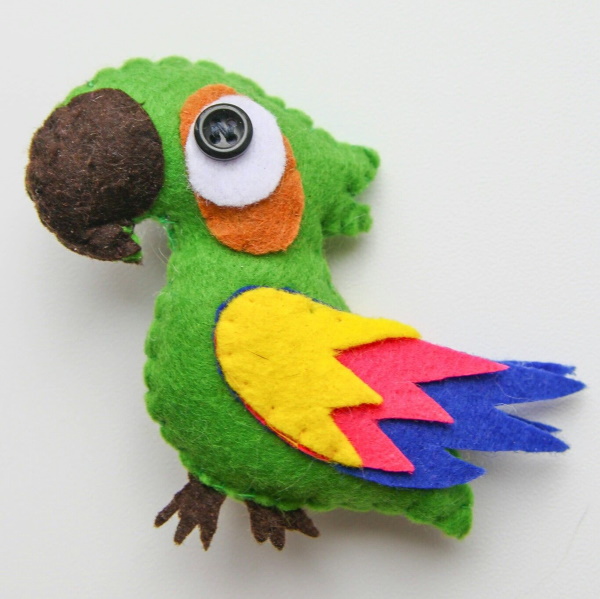
For decoration you will need 1 small black button.
Pattern of the details
What parts need to be cut out:
- full silhouette of a bird (head, beak, body, tail) – 2 pcs.;
- beak – 1 pc.;
- paw – 2 pcs.;
- wing – 3 pcs.;
- eyes - 1 oval and 1 circle.
The body should be cut out of green felt. Transfer the beak and paw patterns to brown fabric. Cut out 1 oval for the eyes from orange felt and 1 circle from white felt. Transfer the wing patterns to pink, yellow and blue felt, 1 piece for each piece.
Connecting elements
How to sew a parrot:
- Using an overlock stitch, connect the bird silhouette patterns, leaving an opening for stuffing.
- Sew the paws to the lower part of the body.
- Fill the part with synthetic padding and sew up the hole.
- Sew on the beak.
- Place the wing patterns on top of each other in a "ladder" in the following order: blue, pink, yellow. The sharp ends of the fabric, imitating feathers, should stick out from under the previous layer of felt. As a result, you should get 1 whole three-color wing.
Sew the wing with a blind stitch along the top edge.
Decor
How to decorate a parrot:
- Glue a white felt circle on top of the orange oval, closer to the top.
- Glue this piece in place of the parrot's eye.
- Sew a button in the center of the white circle. It will imitate an eye.
The button needs to be sewn on with black thread.
Crow
A felt bird (the pattern is transferred to dark fabric using chalk or soap) in black should be decorated with beads or sequins.
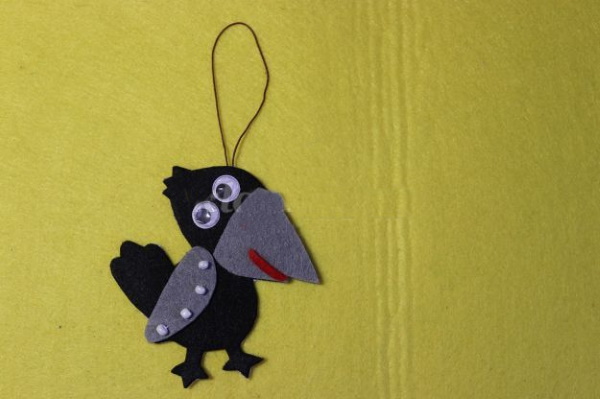
You can also stitch some elements with white threads so that they do not visually merge into a single whole.
Pattern of the details
What parts need to be cut out:
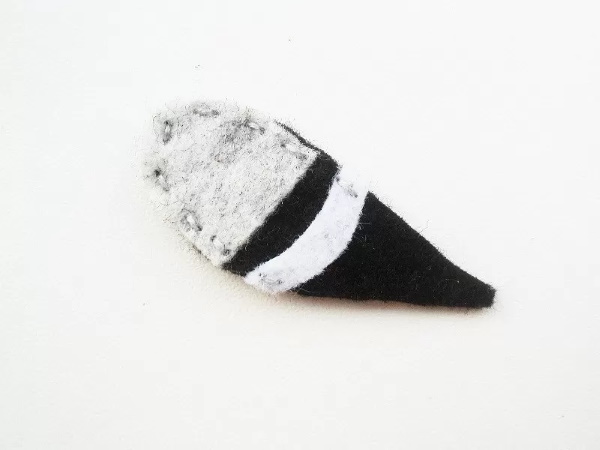
- full silhouette of a bird (beak, head, body, tail) – 2 pcs.;
- wing – 1 pc.;
- paws – 2 pcs.;
- beak – 1 pc.;
- eyes – 2 ovals.
The beak should be cut out of gray felt, and the eyes should be cut out of white. All other details should be black. For decoration, you can use scraps of black lace, as well as black beads with an iridescent coating.
Connecting elements
How to sew a crow:
- Sew the paws to the bottom of one of the bird silhouette patterns.
- Join the 2 body patterns together with an overcast stitch, leaving openings for stuffing.
- Fill the blank with synthetic padding.
- Sew up the hole.
- Sew on the beak.
- Sew on the wing.
Use glue to attach the white eye pieces just above the beak.
Decor
How to decorate a bird:
- Cut out several pattern fragments from black lace.
- Use a lighter to carefully singe the edges of the lace so that it does not unravel.
- Sew on lace with black threads to imitate feathers on the tail, and also sew several patterns to the base of the wing.
- Sew the tail and wing along the contour with black iridescent beads.
- Sew 2 beads into the center of the white eyes. These will be the bird's pupils.
- Embroider 2 nostrils on the beak with black thread.
To imitate pupils, you can use large beads without a sheen.
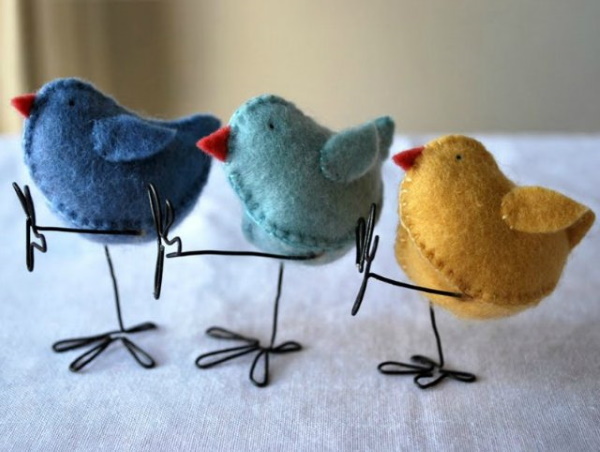
A bird with long, flexible legs
You can sew a decorative toy from felt, with bendable legs.
For work you will need felt of 5 colors:
- brown;
- white;
- black;
- yellow;
- beige.
You will also need wire, a glue gun and a long knitting needle with a round stopper on the end.
Pattern of the details
What parts need to be cut out:
- body – 2 pcs.;
- wings – 2 large parts and 2 smaller ones;
- eyes - 2 large circles and 2 smaller circles;
- stripes imitating feathers – 4 pcs.;
- beak – 1 pc.;
- crest in the form of a feather – 2 pcs.;
- paws – 4 pcs.
The body should be drawn round. To get an even shape, you can use a compass. Transfer the pattern to brown felt. Cut out 2 large wing parts from brown fabric, and the smaller ones from beige. Cut out 2 large circles for the eyes from white felt, and cut out 2 pupils from black felt.
To imitate feathers from beige felt, you need to cut out 4 strips, trim the lower edges of each of them in the form of a wavy line. Cut out the patterns of the crest, beak and paws from yellow felt. The paws should be long, with 4 widely spaced fingers.
Connecting elements
How to sew a bird:
- Connect the paw pieces in pairs using an overlock stitch, leaving an opening at the top for stuffing.
- Using a long knitting needle with a stopper on the end, push the filler through and stuff the toes tightly.
- Measure out a piece of wire equal to the length of both paws with a 2-3 cm allowance. Cut it with wire cutters.
- Bend the wire in half into an arc. The ends should be parallel to each other.
- Coat both ends of the wire with hot glue. Squeeze out a ball and let cool. This is necessary so that the wire does not pierce the fabric. Let the glue dry.
- Take 1 body piece. Sew both paws to the back walls from below.
- Insert the ends of the wire inside the paws.
- Sew the arc that remains in the middle to the brown felt using threads of the same color.
- Sew up the holes on the paws.
- Place the beige wing patterns in the center of the larger brown ones. Sew them on.
- Sew the wings to the back of the body, from the inside.
- Connect the body parts with an overlock stitch, leaving an opening at the top for stuffing.
- Loosely fill the bird's body with synthetic padding.
Sew the tuft onto the back of the body. Sew the body parts to the end.
Decor
How to beautifully decorate the front side of a bird:
- Glue black pupils on top of the white circles.
- Sew the eyes onto the bird.
- Beige stripes imitating feathers need to be sewn to the body, overlapping them in a “ladder” pattern, starting from the bottom.
- Carefully trim off any excess ribbon with scissors.
- Sew the beak onto the bird.
- Embroider a highlight on the beak with white threads and the nostrils with black threads.
- Inside the pupils, embroider 1 small highlight with white thread.
Thanks to the flexible legs, the bird can be placed on a shelf in a funny position, for example, leg over leg, in the lotus position, or squatting. You can sew a bird of any shape and color from felt. Patterns for one-sided toys can be modified. To do this, you will need to cut out additional decorative details (wing, eyes, beak) and sew them to the opposite side of the product.
Video on how to make a felt bird
Felt bird, instructions for making: