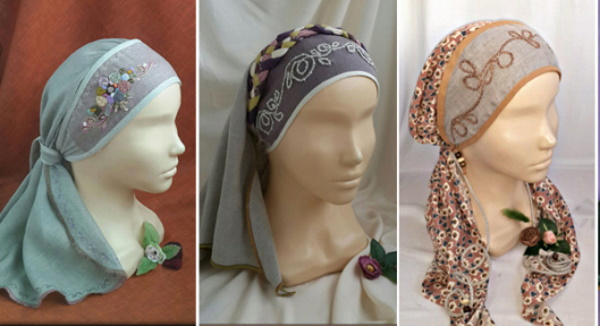
A povoynik is a kind of hat under which you can hide your locks of hair.. A scarf is put on top of the headdress. In this case, the product can be used as a Panama hat or bandana. You can sew an accessory using a pattern, knit different models with a crochet hook and knitting needles using the instructions described in detail below.
What is a povoinik?
The headpiece in Russian clothing was given special significance because it was a beautiful accessory and was characterized by semantic content.
The povoynik was considered a garment that was only allowed to be worn by girls after the wedding, in order to completely hide the curls. If a woman had long braids, they had to be put under the headdress.
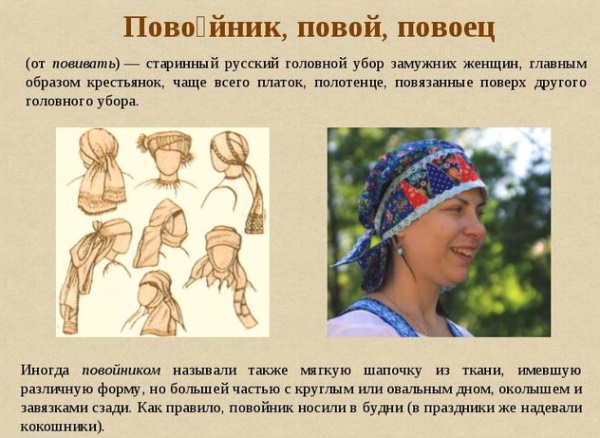
There was a belief that if the strands were to come out, the devil could take the woman to the attic or bring misfortune to the family. In traditional women's clothing, the povoinik was an internal part of the headdress, on top of which was a scarf or a soroka. At the same time, such items were allowed to be worn together or separately. Additionally, such an accessory in each province was characterized by a special style expressing the social status of the girl.
If a woman was bareheaded after her wedding, it was considered a disgrace. If a woman's headdress or scarf was torn off during a quarrel, it was permissible to sue the culprit. This was explained by the fact that people used to be sure that locks of hair were endowed with power. If they were styled and hidden correctly, the family would be successful and strong. Women's head accessories, in comparison with men's hats, had a symbolic and social meaning.
There are many different head accessories. However, the povoinik was considered to be the most widespread.
The headpiece has several different options, but the main one stands out:
| Accessory | Purpose |
| Kichka | The head had to be covered with a kichka, which was a soft canvas cap with a hard forehead protector. Birch bark or wood was used to create the latter. The kichka could have lateral protrusions or a flat shape. |
| Case | A cover had to be worn over the kichka to hide the occipital area with curls. Red calico, silk or velvet material was used to decorate the cover. |
| Headband | It was a kind of accessory, worn on the frontal area of the product. Its parameters matched the other parts. |
However, this form is not the only one. Over time, many different variations of this headdress have emerged.
How to sew?
The pattern of the povoynik (novice craftsmen can sew the headdress) is simple to make and can be created in 2 hours.
In this case, it is necessary to prepare in advance:
- sewing machine;
- thread material;
- scissors;
- fabric material for the outer part;
- fabric material as a lining.
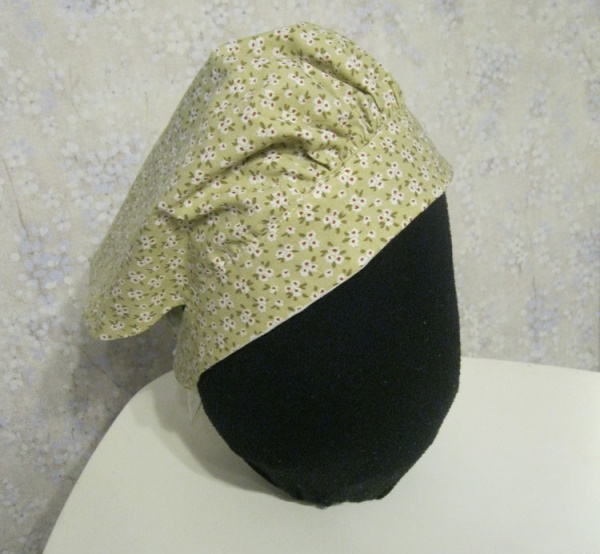
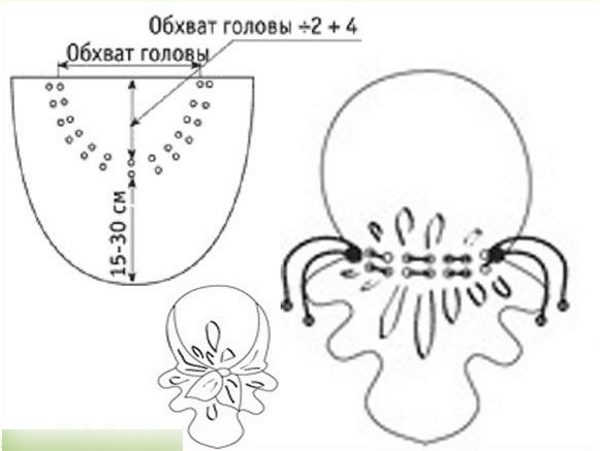
Additionally, you need to prepare a pattern for the accessory, which consists of several parts:
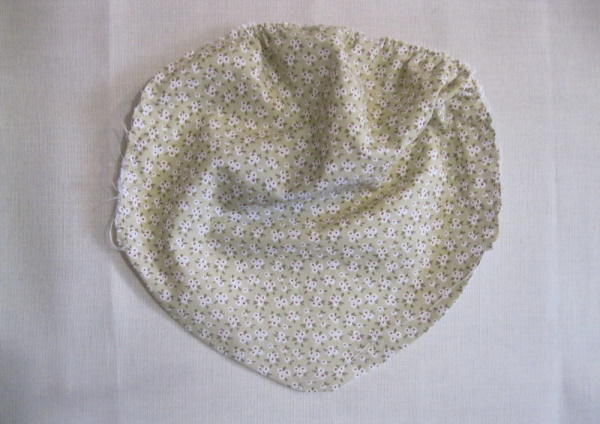
- The main part of the povoinik is considered to be the base, which has a round shape;
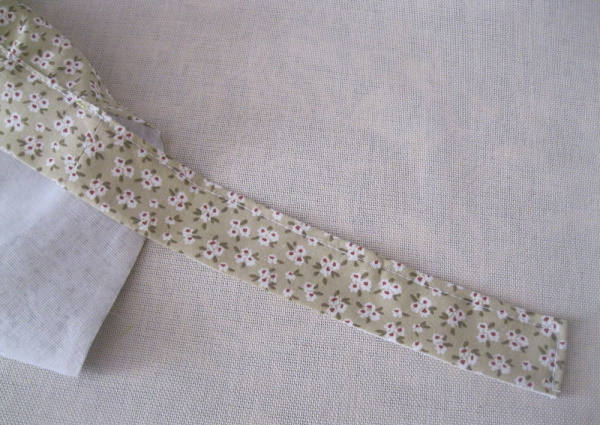
- a headband is required to decorate the front part of the product;
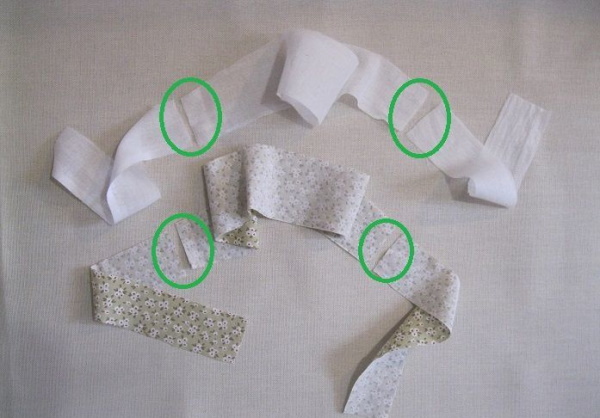
- 2 ties are required to connect to the base and forehead.
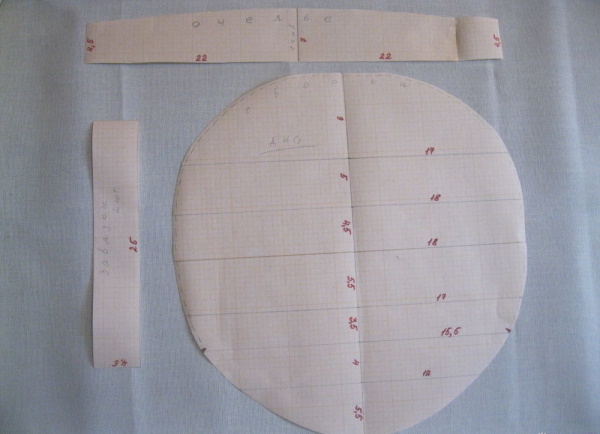
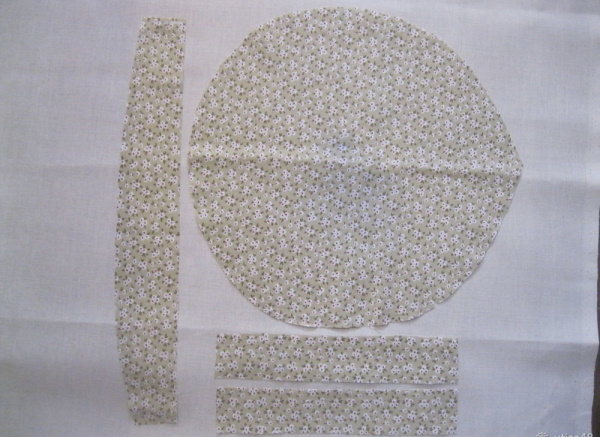
The listed parts must be cut out of the main natural fabric material, as well as the lining. The fabric material can be chosen at your own discretion. The povoynik, the pattern (it is permissible to sew the product from any type of fabric material) of which allows not to create allowances for seams, can be made of chintz and velveteen. The latter material is suitable as a lining, the first - for decorating the outer part of the accessory.
How to create a warrior:
- Each detail shown on the pattern of the product is cut out from the lining and main fabric. Seam allowances may be omitted.
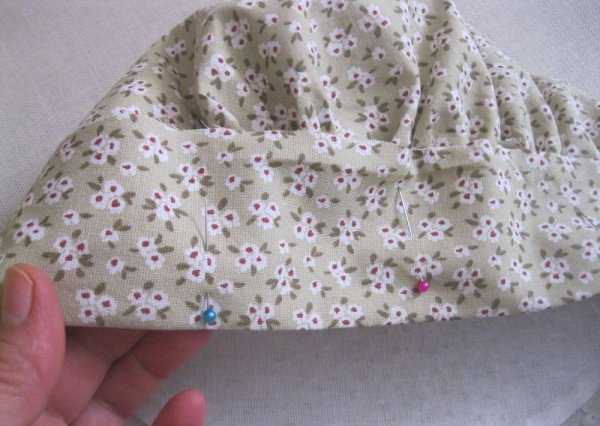
- Connect the cut out parts together with the right sides. The pattern should show the edging of the lower edge of the accessory, so when folding the parts, the marks should match. Between the marks along the edging at a distance of 5 mm from the edge, baste a seam.
- Turn the fabric over to the outside, ironing the edges well.
- Using a double stitch parallel to the edging, stitch the front area. Double stitch parallel to and at a distance of 5 mm from the edging. The stitch is required to slightly gather the edging of the accessory. Before sewing, fix the elements of the product with pins.
- Perform the gathering, placing it evenly along the edging. Often in the front area the gathering is denser, closer to the temporal zone along the edging the gathering is sparse. The front edging should have a size that corresponds to the circumference of the head.
- To prepare the headband with ties, process the inner and outer parts separately. Sew the ties to the headband on each side.
- Once the back and front sides are stitched together, iron them well.
- Connect the 2 parts together and secure with pins. Sew a headband with two ties along the edging along one side.
- Turn the product parts outwards with the right sides together and iron them. Perform this manipulation before further sewing the headdress.
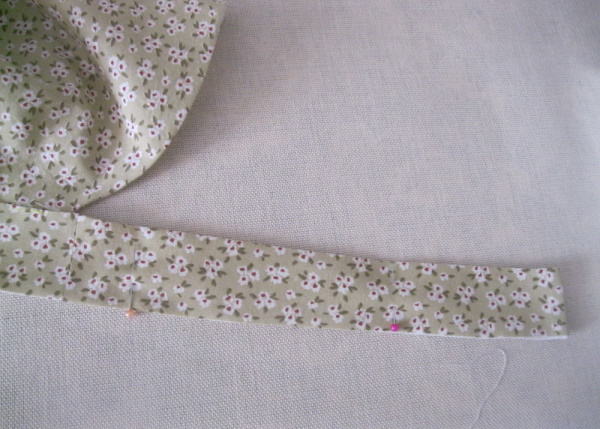
- Measure the center of the headband accurately and mark it. Sew the pieces to the center of the base. To do this, fold them from the wrong side of the base, stitching from the center to the edging of the tie. First, stitch on one side, then on the other. Turn the headband inside out and place it face down.
- Baste and stitch the second end of the headband. When the edge of the product is stitched, iron the ties. Fold the edges of the main fabric so that they catch the inside, and stitch on the sewing machine.
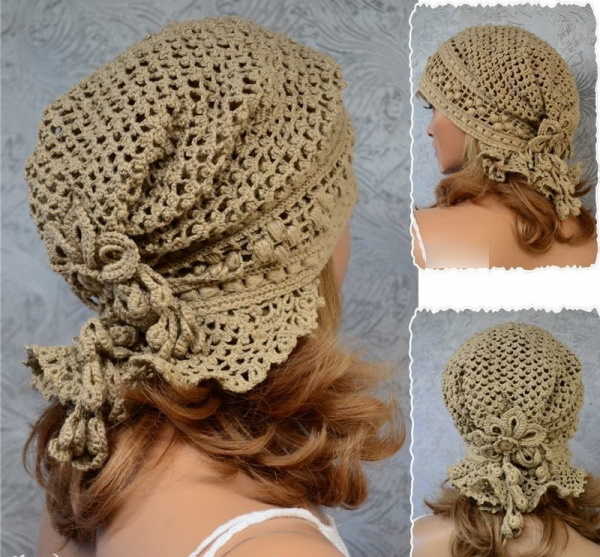
Knitted headdress
A povoynik, the pattern of which (it is permissible to sew the accessory with a crochet hook) requires initially knitting the forehead, after tying, the main part and performing the assembly, can be created from linen threads. For knitting, it is necessary to use tool No. 2.
Description of the creation of the headband:
- Cast on a row of 21 air elements. Additionally create 3 lifting air elements for the new row.
- 1 row consists of 20 double crochets.
- In the 2nd row, knit 3 lifting chain stitches. Repeat the sequence: skip 2 holes, in the 3rd make 2 double crochets, two chain stitches and two double crochets in the same hole. In the last column of the previous row, knit a double crochet.
- In the 3rd row, make 3 air parts for lifting. Repeat: 2 air holes, 4 double crochets and one top in the column of the previous row. Knit two air elements and a double crochet in the outermost hole.
- Repeat the first 3 rows until the desired length is reached.
- In the last row, make all the columns with a yarn over.
The process of creating ties:
- Continue the frontal strip on one side. The initial row consists of 5 air elements. In the hole of the previous row make a single crochet. Repeat similar manipulations to the end.
- In row 1, make 6 air elements. Repeat the sequence from start to finish: knit a single crochet into the arch, make 3 holes, fixing them with a connecting column in the hole from which they were knitted, and insert the tool behind two walls, make 5 elements.
- In the 2nd row, knit 7 elements. Repeat: knit a single crochet into the arch, create 3 parts, fastening them with a connecting column in the opening from which the knitting began, picking up two walls, and also make 5 elements. After the extreme picot, knit 2 elements and a column with 3 yarns into the extreme opening of the previous row.
- Repeat the first 2 rows until the desired length of the tie. If you want to make a bow, the length of the knitting should be longer.
- After making the first tie, cut off the thread material.
Design of the main part:
- Tie the long edge of the finished strip with single crochet stitches.
- In the 1st row, knit 5 elements, skip 3 elements, in the 4th, knit a single crochet.
- Perform the same manipulations for further knitting as for tying.
- To make the product pleated, divide the number of holes by 4 and hang 3 markers. In these areas, you need to add cells through a row three times. Then knit 6 rows.
- Divide the loops into 3, move the markers. The decrease occurs along the edges and in the places where the markers are. In the end, up to 10 cm should remain.
- Row 4: knit without decreasing. Continue adding arches in the middle and along the edging to the desired length of the shoulder.
- Make the second tie in the same way as the first.
- Without cutting the thread material, make a mesh on one side of the product without a picot, moving towards the ties.
- Along the border of the connected tie, move with a grid without a picot of 5 elements and a single crochet into the arch. In areas where there are corners, connect 2 nearby arches with single crochets. To do this, knit 5 elements, a single crochet into the arch, and again a single crochet into a new arch. Create 5 parts.
- For the binding, make 1 row of 5 elements and a single crochet into the arch.
- The 2nd row should consist of 6 air elements and a single crochet into the arch.
- The new row should have 7 holes with a single crochet in the arch.
- To tie the edge of the headband, there should be single crochets in the 1st row. In the 2nd row, make a single crochet, then in the new hole, knit a half-column with a crochet, a double crochet, and a half-column with a crochet.
Assembling the part:
- For assembly, knit a “caterpillar” cord, the length of which is 50 cm. To do this, knit 3 elements.
- Place the tool into the first air part and pull the working loop through.
- Knit a single crochet and turn the fabric clockwise.
- Insert the tool with the working loop under two threads.
- Draw out the hole by knitting a second single crochet.
- Turn the canvas clockwise again.
- Insert the tool under two threads on the edge of the knitted piece, repeating the above manipulations.
- Knit the cord to the required length.
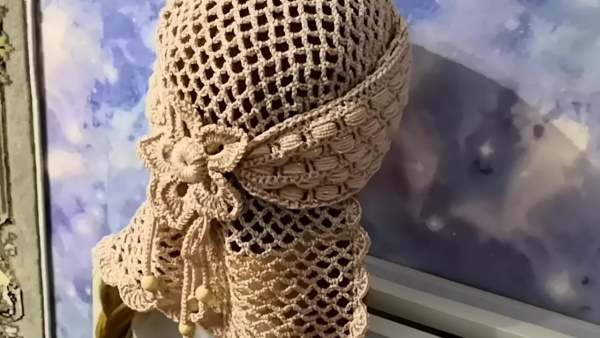
When the cord is ready, it must first be threaded through the outermost hole on the headband, then through each arch along the edging of the main part to its narrow zone, then through the arches of the narrow place and along the second edging to the headband. Then you need to bring out the second edge of the cord, tightening and fixing it on the head.
The tie can be done from the top or from the bottom, controlling the size of the product yourself. Tabs will be formed on top, under which all the strands can be placed. After that, you need to make a knot on top to firmly fix the headband on your head.
Knitted product with knitting needles
Povoynik, a pattern (the product can be sewn from wool yarn using knitting needles) and a diagram of which is made with circular knitting needles 80 cm long, can be knitted with a front surface. The main knitting is done in 2 threads, the visor can be made in one.
Step by step process:
- Cast on 40 stitches. Make the visor with stockinette stitch and shortened rows. The tail should be 50 cm long.
- For 1 row, knit 37 elements, turning the fabric.
- In the 2nd row, remove 1 edge element and without knitting, pull the yarn well back to form a double loop. Make 33 front holes and turn the fabric.
- Row 3 is similar to row 2. Additionally knit 29 holes.
- Continue knitting with shortened rows, without finishing 4 holes until row 8.
- Row 7 consists of 13 elements.
- In the 8th row, make 9 holes, knitting to the end of the row with double loops.
- From the thread tail, knit 41 elements, close the circle and knit together the first and last loop. There should be 80 elements on the tools. Using circular movements, knit a "double rice" pattern 25 cm long.
- Make 9 holes according to the pattern and 3 together purlwise three times. Create the remaining parts according to the pattern.
- Knit the next 5 rows according to the pattern.
- Pull yarn through remaining pieces. Use needle to pull yarn from back and tighten to gather back of headpiece.
- Knit the ribbon with a 1x1 elastic band. Make a 90 cm piece from 21 elements.
- To keep the ends of the ties in shape, make the edge pieces face-on. Fix the ribbon above the visor.
Tips and tricks for making
The pattern and sewing of a headdress require precision and attention.
Therefore, it is recommended to use several tips for making a povoinik:
- If the povoinik is intended as a gift to friends or relatives, it is acceptable to embroider the person's initials using beautiful and thick threads. This will make the headdress unique.
- Before sewing the product, you should wash the fabric material. Thanks to this, the fabric will not shrink.
- The povoynik is a universal headdress that can be worn in sunny hot weather to protect against sunstroke. In the summer season, black fabric will heat up more, therefore, in order to protect against sun rays, it is recommended to choose light fabric.
- When sewing a children's headdress, it is necessary to use a small amount of fabric, so for sewing you can use various fabric remnants that are available. To give the product a childish look, you can use appropriate decorative ornaments.
- It is advisable to wash the headdress with colored items, choosing the mode that corresponds to the type of fabric. Thanks to this, the product will remain beautiful for a long period of time. The headdress must be clean, otherwise dandruff may appear and the hair will quickly become greasy.
- To prevent the headdress from falling off while you are wearing it, it is additionally recommended to buy an elastic band 1.5 cm wide. When cutting, you will need to leave a small area so that you can sew in the elastic band later.
- To easily measure your headwear, it is recommended to wrap the tape above your eyebrows by 2.5 cm, slightly above your ears and on the back of your head in the area that protrudes more. To avoid mistakes, it is advisable to measure your head several times. To get a more accurate result, have someone else measure your head circumference.
A povoynik is a traditional headdress that has several varieties. To sew the product, you must make a pattern so that the model looks original and beautiful. The headdress can also be crocheted or knitted using different types of yarn. In any version, the povoynik is easy to make with your own hands, so both experienced and novice craftsmen can handle sewing.
Video about the pattern of the povoinik
Sewing and pattern of the headdress: