You can create from everything that is at hand. Crafts from ordinary toilet paper rolls with your own hands are an excellent confirmation of this. The products are easy to make, do not involve expenses for consumables, and turn out very original.
Tools and materials for work
In order to know what tools and materials are needed for DIY crafts from toilet paper rolls, you need to decide on the idea of the creation. There can be as many of them as a person’s imagination allows.
The most commonly used are:
- scissors, paper knife;
- glue, tape;
- paints, pencils, crayons, markers;
- fabric, threads, lace, felt, cotton wool;
- wire;
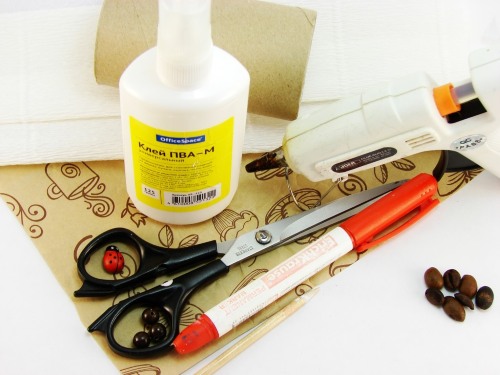
- buttons;
- colored paper, napkins;
- glitter, pebbles, bags, stickers and similar decorations.
Toilet Roll Pencil Case. Step-by-Step Instructions
To make a pencil case, you need to devote some time to the process, think through the design and try.
For the pencil case you will need:
- Three toilet paper rolls.
- Fabric or felt, the length of which will be twice the length of the bushings + 2-3 cm, and the width will be a couple of centimeters more than its diameter.
- A zipper of length equal to the diameter of the sleeve.
- Scissors and a stationery knife.
- Threads to match the fabric color or any other.
- Cardboard for cutting out bottoms.
- Materials for decoration: buttons, beads, stickers.

Step by step instructions:
- Trace the bottom of the tube onto cardboard and fabric, cut out 2 circles from each material.
- Cut one of the rolls so that its part attached to the second one corresponds to the length of the pencils and pens that will be stored in the pencil case. Connect these two parts with tape.
- Prepare a snake with the diameter of the sleeve.
- Take the fabric, measure the length of the remaining, third part of the sleeve, and make a cut equal to the length of the zipper using this measurement.
- Sew the zipper onto this slit.
- Fold the fabric in half lengthwise, with the wrong side facing out, and sew along the edge with neat stitches.
- Insert the pencil case parts into the fabric cover in relation to the zipper, leaving the side seam outside.
- Insert cardboard circles-bottoms on both sides, sew fabric ones on top along the edge. If the size allows, you can put a cotton pad between the cardboard and the fabric - it will add volume.
- Remove the cover and turn it inside out, put it on the pencil case parts.
- Decorate to taste if desired.
Organizer for office supplies or cosmetics
Among DIY toilet paper roll crafts, the most popular are organizers for office supplies, craft supplies, or cosmetics. They can be made with or without a stand.
In the first case, the sequence of execution is as follows:
- Prepare the required number of bushings and adjust their length.
- Prepare a base from cardboard, plywood or any other dense material.
- Decorate the cup sleeves to your taste.
- Glue the cups to the base, decorate it too. If the author of the work intends for them to fit tightly one to another, then you can glue them together beforehand.
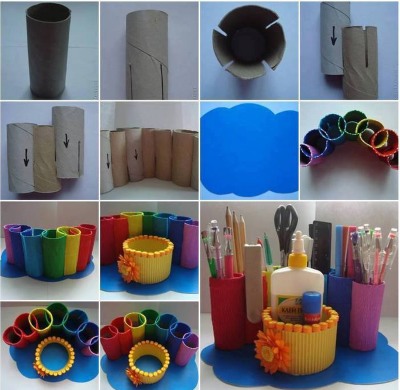
To make an organizer without a base, you need to connect all the cups together with glue after decorating them. In this case, it is recommended to cut out bottoms for each sleeve from thick cardboard and glue them.
How to decorate an organizer in an original way
The range of materials for creativity allows you to experiment with decorating crafts endlessly.
The most successful options:
- Paints, nail polish, markers and pencils - those who like to draw can give free rein to their imagination and decorate their organizer as they wish. Acrylic or voluminous paints will look gorgeous.
- Paper:
- Colored, including wrapping - you can glue it to each sleeve, cut out elements from other colors for appliques. The original design of the organizers, for which newspaper or magazine pages were used. A very simple and economical way.
- Newspaper - by twisting thin tubes from newspaper sheets, you can paint them in any color and glue them along the cups, tightly pressing one to the other. The process is long, but the result is worth it.
- Napkins — usually used as an alternative to colored and newsprint paper, as well as for decoupage designs.
- Plastic drinking straws are used as a simplified alternative to newspaper ones.
- Fabric, lace - it has been very popular lately to use a combination of burlap + lace or felt. It looks impressive, original and stylish. If you choose felt, it is also easy to cut out details for appliques or sewing.
- Threads - cups wrapped in threads of different colors look beautiful.
- Buttons, pebbles, coffee beans, shells, small toys - are glued to the finished product at the very end.
- Ribbons, thick threads for tying the organizer.
There are no limits to decorating products; you can combine decoration options as you like, the main thing is that the process brings pleasure and you like the result.
DIY crafts with kids from bushings
Toilet paper rolls are a great material for creativity with children. They themselves are already the body of an animal or a person, the main part of a vehicle or structure.
It is easy to work with bushings and you can make crafts like these:
- Cartoon characters.
- Animals.
- Transport.
- Houses and castles.
Children from the age of three are able to make toys with the help of their parents. This is a great option for leisure or educational activities.
Making animals. DIY zoo from bushings
The simplest and most exciting process would be to create your own zoo from tubes.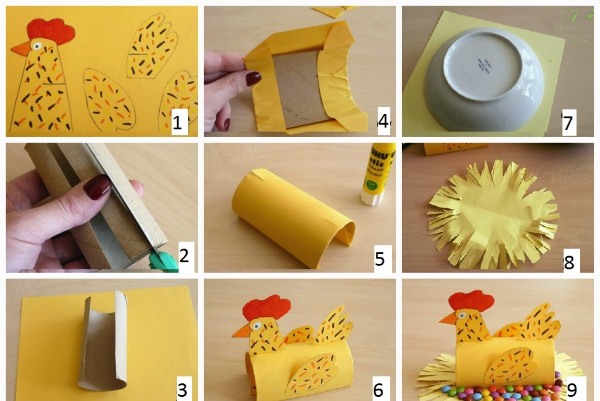
The easiest and fastest way to make animals are:
- Giraffe — a bushing is used as the body. The head with the neck, paws (2 V-shaped parts) are cut out of thick paper and attached in two ways: with glue or inserted into cuts in the cardboard of the bushing. Then the animal is painted as desired.
- Monkey — the roll is painted brown or covered with the appropriate colored paper. Using applique or paints, a muzzle is created, paws, ears and a tail are cut out of cardboard and inserted into the cuts in the rolls — it looks neater this way.
- Family of lions. 3 bushings are made of different heights to make a lion, a lioness and a lion cub. A part of the bushing is cut out along the book edge in the shape of an arc to make paws. Then, using paints and parts from colored paper, muzzles and tails are made.
- Elephant — the sleeve is painted in a suitable color, a trunk and ears are cut out of thick paper, glued or inserted into the cuts of the "body", eyes are drawn. Using a felt-tip pen, you can also draw the elephant's paws.
- Crocodile — a mouth is created on one edge of the sleeve using V-shaped cutouts on each side. Small white teeth are glued to them at the top and bottom. A triangle from one of the cutouts is used as a tail and glued to the upper part of the body, paper paws are attached to the sides. It is most convenient to paint the crocodile green, rather than to cover it with paper. When the paint dries, eyes and patterns are drawn on the back.
- Chanterelles. The upper edges of the sleeve are bent towards the center to form an arc connecting the 2 edges - they will be the ears. The cardboard needs to be glued along the fold line. Next, the craft is painted orange, a muzzle is drawn or made using applique in the middle. A tail is cut out of paper and glued or inserted into the hole.
- Kittens - they are made according to the same principle as chanterelles.
- Shark — the mouth is made in the same way as the crocodile’s, the fins and tail are attached with glue.
Owl. Master class on creating an owl from a roll
DIY crafts from toilet paper rolls in the form of owls are easy to make. They are good as a souvenir, toy or interior decor element.
To make it you will need:
- One sleeve per owl.
- Colored paper.
- Pencil.
- Scissors.
- Glue.
- Paints.
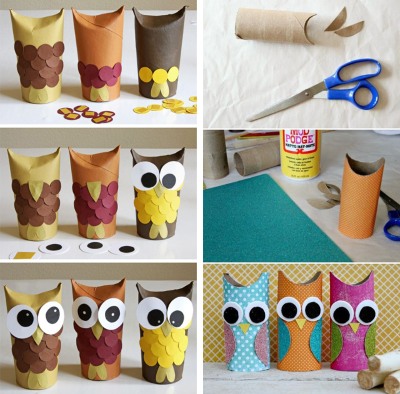
Step by step instructions:
- Paint the bushings and let dry.
- Cut out wings, eyes (from 2 circles of different colors), paws, and a tummy from paper.
- Glue all the parts in the right places. The wings can be glued along the body, creating an imitation of folded ones, or only on one edge, so that they rise up and down.
- Use felt-tip pens to decorate the owls: feathers, eyelashes, pupils.
Various toilet roll men
Toilet paper rolls can be turned into little people, cartoon characters or mythical creatures.
The easiest way to do it is:
- Mermaids or dolls — a face, dress or scales for a tail are drawn on the roll base. Then strips of colored paper are cut out and curled with the blade of scissors — this will be the hair, which needs to be glued only to one end of the “head” so that it flutters. Decorations are inserted into the hair — beads, paper flowers.
- Ninja — the roll is covered with black or red paper, leaving a small rectangle for the eyes. They are drawn with a felt-tip pen. The ninja belt and sword can be made from plastic drinking straws.
- Pirate — a face is drawn on the roll, a blue and white vest, a hat and an eye leash are cut out of colored paper. A skull is drawn on the hat with paint.
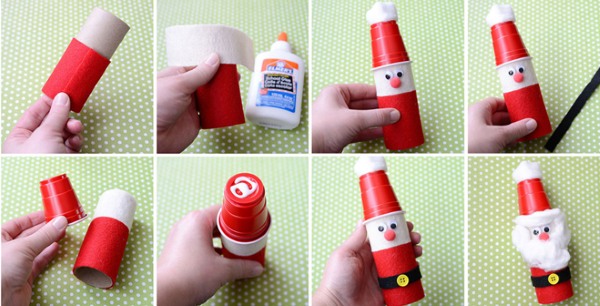
- Santa Claus — the base is painted in a color scheme that matches his costume, a beard, hat and gift bag are cut out of paper or felt and glued to the body. A disposable cup can be used as a hat. Additionally, hands in mittens are cut out and inserted into the holes in the sleeve on the sides.
You can make DIY crafts from toilet paper rolls together with your children, which will further contribute to their development. - Snowman can be made from 1 or 3 bushings. In the first case, it is enough to cut out the hat or use a plastic cup instead, and paint the body. In the second case, one bushing remains unchanged, and the other 2 are cut, imitating snowballs, from which the snowman is molded. You should get three parts that fold into a pyramid. The top one should be the shortest - this is the head, it is painted with felt-tip pens and put on a hat made of colored paper. Then the second layer is glued to the lower wall of the head, the third to the second and the body is painted with buttons and a scarf. Any stick can be pulled through the middle layer - the snowman's hands. Tie a thread on different sides, by which the craft can be hung on the Christmas tree.
Racing cars and planes
To keep a boy busy, you can make these crafts from bushings:
- Cars — for this, paint the bushing in the desired color, cut out a rectangular hole in the middle of one of the walls — this will be the cabin. Glue colored paper wheels to the sides. You can complicate the task and make small cuts in the "cabin" on both sides to raise this part like a windshield. Paint on the outside and glue the steering wheel on the inside.
- Aircraft — cut off one side of the bushing to form an arc. Attach the wings to the sides at the top and the wheels at the bottom. Cut out a square in the middle — the pilot's cabin.
- Rockets — the sleeve is painted, a triangle is glued on top, and “legs” and papers are glued on the bottom. Circles-windows are drawn on the base.
Houses and a castle
For the house, the sleeve is decorated with felt-tip pens, drawing bricks and windows. Doors can also be drawn, or they can be cut out on three sides so that they open. The roof is made from a paper cone, into which a chimney can be inserted or "snow" made of cotton wool can be glued on top.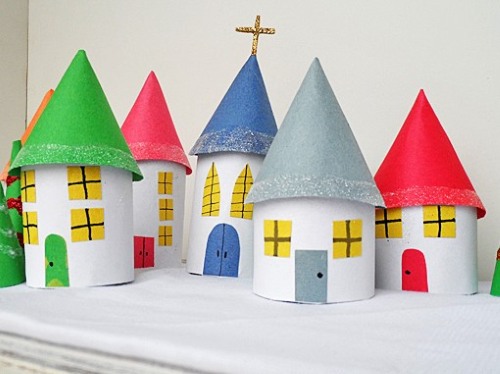
A multi-story building can easily be made from a simple sleeve painted with many windows.
To create a castle, it is enough to make several houses of different heights and glue them together. For a fortress, a roof cut into teeth will do instead of a cone.
Panel for the development of small children from bushings
One of the multifunctional DIY crafts made from toilet paper rolls is a panel for the development of small children.
To make it you need:
- The base is made of rough cardboard or plywood, measuring from 1 sq.m. and more.
- As many toilet paper or paper towel rolls as possible.
- Felt-tip pens or paints.
- Cardboard or plastic box for chicken eggs.
Step by step instructions:
- Paint the base in one color or in different colors. It is advisable to draw geometric figures and household items on it in different colors - this way the panel will have more functions.
- Prepare the bushings - make them different lengths, you can cut them straight, diagonally and in half lengthwise. Paint them in bright colors.
- Attach the bushings to the base in any order so that you can throw different objects into them: into a ring or slide down a bushing, or down a hill. To develop the child's logical thinking, it is advisable to place them in the form of a labyrinth so that they converge at the bottom with several vertically placed bushings. Place an egg box under them - toys and balls will fall there, passing along all the paths of the panel.
Cat toy
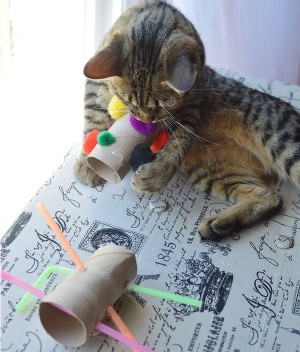
A toy for your beloved pet is made very simply and quickly.
For the cat toy you will need:
- Thick rope or wire.
- A long roll, preferably not from a toilet paper roll, but from towels.
- Feathers, beads, colored paper, bells.
Manufacturing:
- Pull the rope or wire through the bushing and tie it at the top.
- Paint the feathers in different colors, cut out various oblong figures from paper to resemble Christmas tree branches or garlands.
- All toys are fixed to the bottom of the sleeve using a needle, thread, tape or glue. Feathers can be used to pierce the cardboard for fixation.
- The toy is hung on a window or door handle.
Bird feeder from toilet roll
Taking care of birds is easy with a toilet paper roll.
It is enough to perform a few steps:
- Pull the thread through the paper cylinder.
- Dip the sleeve in thick sugar syrup or honey.
- Roll the sleeve in cereals or crumbs.
- Hang the finished feeder on a tree branch.
Seedling containers
Eco-friendly and free mini pots can be made from tubes by folding the bottom edge to form a bottom. 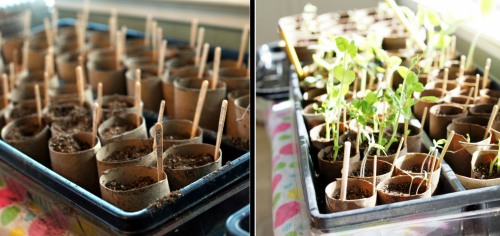 These homemade containers are ideal for all summer residents for growing seedlings.
Home decor from tubes
By cutting toilet paper rolls into rings about 1 cm thick, it is easy to lay out pictures from them on a paper or cardboard base. They can be left round, or flattened to form leaflets. What design will be made from these parts is up to the owner of the apartment. A composition of such rings can be glued directly to the wallpaper or to the base.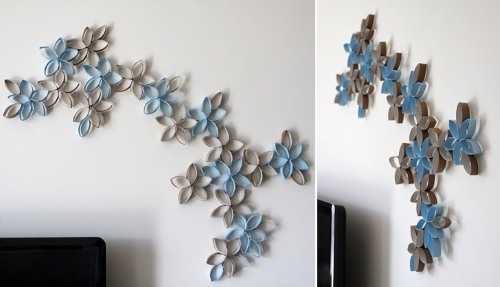
This decor will look good both in the open and under glass or in a frame. If your creativity allows, you can cut out ornaments, landscapes or figures of people on the walls of the bushings and hang several of them on a chandelier or cornice. In dim lighting, a night light or lamp creates a stunning view thanks to the shadows from the carving.
By pulling a thread through the walls of several rolls, we get a kind of garland. You can paint it on any theme - New Year, Valentine's Day, Easter, wedding.
Ideas for other uses of toilet rolls
In addition to crafts from toilet paper rolls, you can create many useful things in everyday life with your own hands:
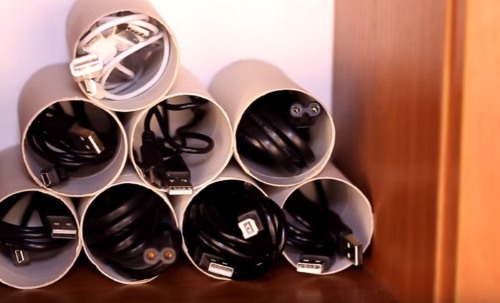
- Reins Storage CasesBy decorating them with drawings or appliques, we get a nice and useful thing.
- Cutlery covers - If you flatten a cylinder on both sides and paint it to look like Santa or an Elf, you will get a decoration for the New Year's table.
- Curlers - by curling the hair on the rollers, their owner will have gorgeous large curls in the morning.
- Mobile phone stand - to do this, you need to cut a hole for the phone on one side and use stationery needles to make legs, piercing them in the lower part of the sleeve.
- Storage place for small children's toys — glue many bushings together with their walls facing each other and place the structure against the wall.
- Roll clamps wallpaper or wrapping paper.
Toilet paper rolls are very multifunctional. Just use your ingenuity and imagination - and economical toys, everyday items and home decorations are ready.
Video on how to make DIY crafts from toilet paper rolls
Interesting crafts from toilet paper rolls, watch the video:
Life hack with toilet paper roll, watch the video: