Fluffy wire is an elastic multi-colored material used to create original crafts. Fluffy wire is easy to work with, and the material can be used several times. There are many options for crafts.
What is chenille wire
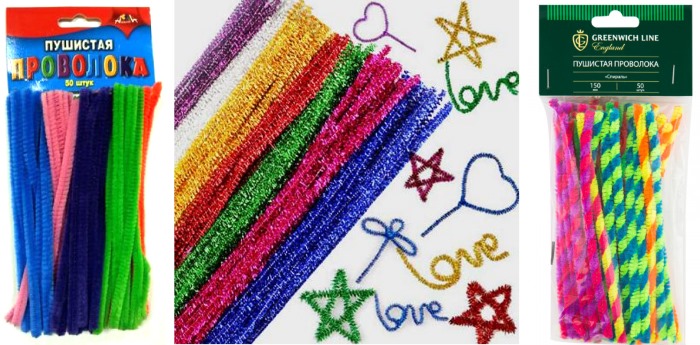
Chenille wire is a flexible, thin metal rod wrapped with colored hair. The diameter of the fluffy wire is from 4 mm to 15 mm. The length is not less than 30 cm.
Initially, this wire with bristles was used to clean smoking pipes. When used correctly, the material is completely safe.
Crafts made from fluffy wire can be made both flat and voluminous.
Where to buy fuzzy wire
Chenille wire can be purchased at any craft store. Fluffy wire is sold in large packages of 50 or 70 pieces. The set includes material of several colors.
Features of working with fluffy wire
Recommendations for working with fluffy wire:
- Before work, it is necessary to check the material for integrity;
- During the work process, the wire must be bent with smooth movements: chenille is an easily damaged material;
- Before creating the craft, for safety reasons, it is necessary to bend the ends of the wire into loops;
- individual parts can be glued together; regular PVA glue is suitable for this;
- To give the craft the desired shape, it is recommended to use cylindrical objects, such as pencils, during the work process.
Chamomile from fluffy wire
To create one chamomile flower you will need:
- chenille wire of 3 colors: white, yellow, green;
- scissors;
- glue.
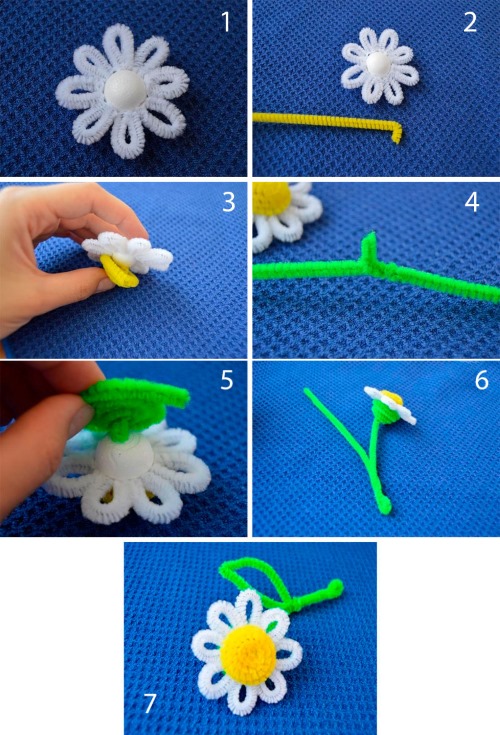
Making a flower:
- The white wire is bent in a zigzag shape along its entire length, forming petals. During the process, it is important to ensure that the petals are of the same size.
- Close the wire into a circle (there should be a small hole left in the middle), twist the ends together to form a flower.
- Cut off 1/3 of the yellow wire, twist one end into a flat spiral, the other should remain straight.
- Wind the straight end of the yellow blank onto the green wire.
- Pull the formed white element through the lower end of the stem to the yellow element.
- Glue the yellow and white elements together in the inner area.
- Form a plant leaf from green wire as follows: twist a piece of working material in a zigzag pattern, with the middle loop being larger than the others, and connect the ends of the wire.
- Glue the leaf to the stem.
Soft Wire Crowns
| Type of decoration | Materials and tools for manufacturing | Fastening devices |
| Small crown | Several pieces of silver chenille wire, scissors | Hair bands, hair clips or hair pins |
| Big Crown | Soft wire with multi-colored shiny pile, scissors, glue | Not required |
| Crown on the headband | White or silver fuzz wire, scissors, rhinestones or beads | Rim |
Crafts from fuzzy wire in the form of crowns are made in several ways.
Method 1. Making a small crown:
- Twist one fluffy wire into a ring, which will be the base.
- The top part of the crown is formed from the following 5 equal pieces of wire: each piece of material is bent in half and screwed to the base of the crown (the ends should be a few cm apart), loops are formed at the bends.
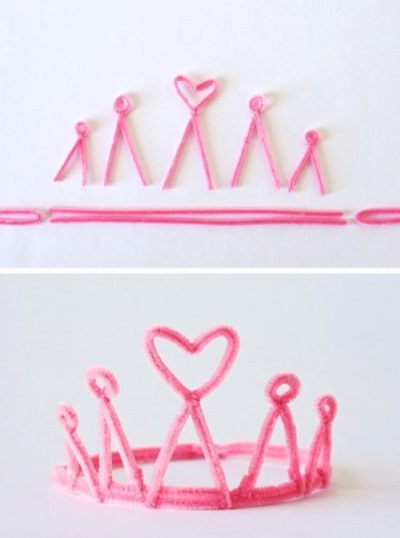
- For better fixation, wrap the crown rays at the bottom several times with chenille wire of the same color.
Method 2. Making a large crown:
- Twist 2 wires together. Form a ring based on the circumference of the head.
- The next 2 wires of a different color are also connected. Bend in a zigzag and attach to the base with glue.
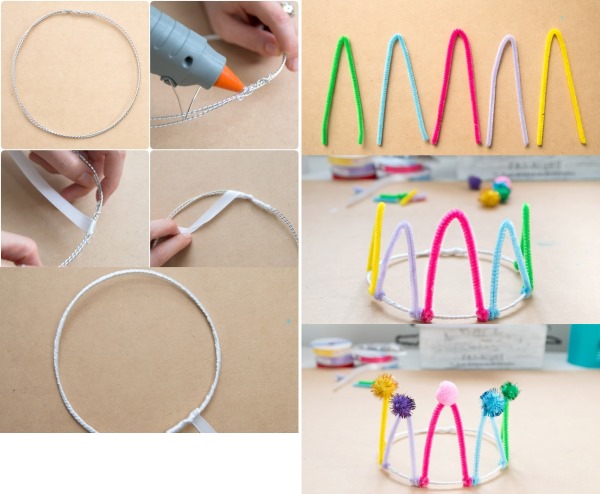
- Tighten the top part of the craft with a ring made from the main working material to secure the craft.
Method 3. Making a crown on a headband:
- Wrap the visible center of the headband with art wire.
- In the center, the main and largest figure of the decoration is created in the form of a star or triangle.
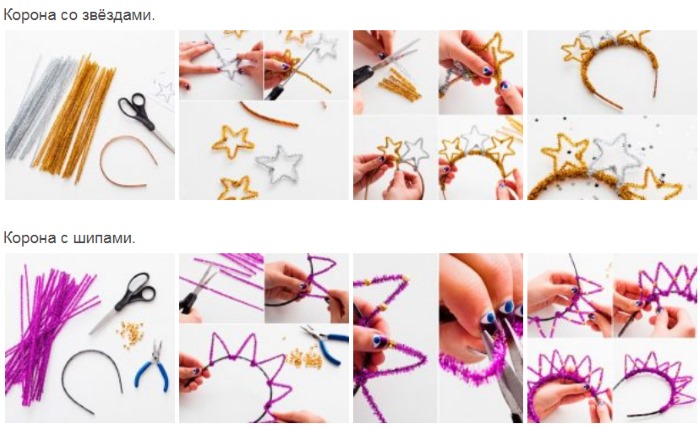
- Smaller elements in the form of curls or geometric shapes will be located symmetrically relative to the central figure.
- Decorate the crown elements with beads and rhinestones.
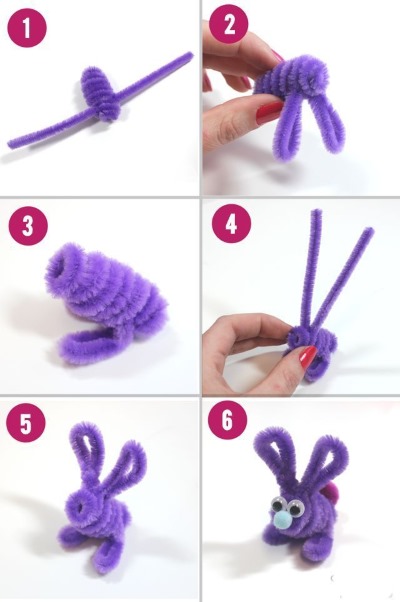
Bunny
To make a bunny craft from fluffy wire, you will need:
- chenille wire of one color - 2 stripes;
- 2 pom-poms to form the nose and tail;
- glue;
- cylindrical pencil;
- plastic eyes.
Making the craft:
- Wrap the first strip of working material around a pencil, forming a spiral.
- Bend the second wire in half. Then bend the edges down so that 2 equal semi-ovals (animal ears) are formed at the top.
- Connect the ends of the second piece, put a spiral-shaped element on them (the part should cover the bend point of the second wire). The lower ends of the second element should remain outside.
- Form loops from the protruding ends of the second piece. Bend at a 90° angle relative to the first element.
- Glue the eyes to the top turn of the spiral of the first piece.
- Form a nose from a pompom and glue it to the central area just under the eyes.
- Glue another pompom to the back of the animal's lower body, forming a tail. The craft is ready!
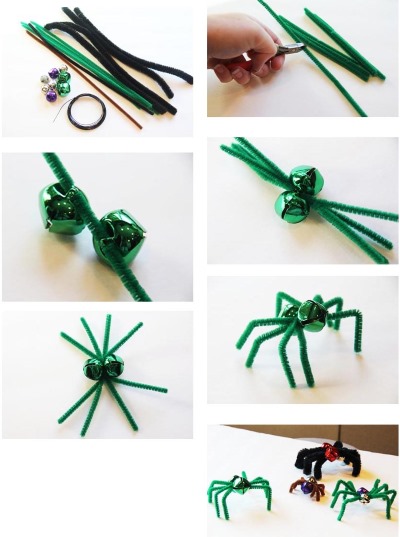
Spider
To make a spider from chenille wire, you will need the following materials and tools:
- 2 pcs of fluffy wire of the same color;
- 2 small pompoms matching the color of the wire;
- glue;
- scissors;
- plastic eyes;
- colored beads (the hole size should match the wire diameter).
Work process:
- Both pieces of wire are placed together and cut in half.
- The 4 resulting segments are twisted together in the middle. The ends of the wire will be the spider's legs, they are placed symmetrically.
- String 3-4 beads onto each paw. Bend the end and shape each paw into a semicircle.
- Glue the pom-poms together, the resulting figure will represent the head and body of the spider.
- Glue the head and body to the center of the first element. Glue the eyes to the head.
Owl
To make an owl craft from soft wire with pile, you will need:
- chenille wire in 3 colors: dark brown, light brown and orange;
- scissors;
- cylindrical pencil;
- glue;
- plastic eyes.
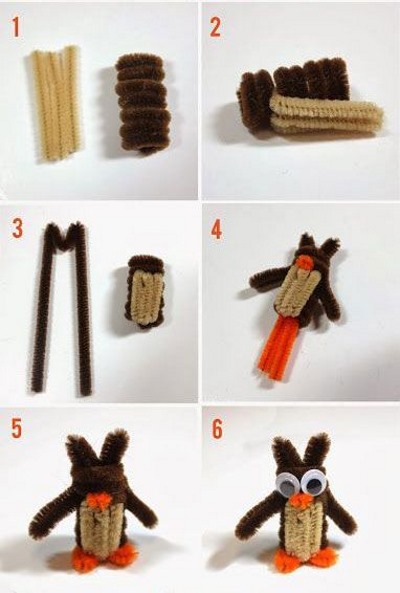
Procedure:
- Prepare 3 equal pieces (length about 5 cm) of light brown wire.
- Wind a 30-centimeter section of the darkest wire onto a pencil and remove. Step back the top 2 turns. Stretch the spiral a little between the 2nd and 3rd turns. Insert sections of light wire, bend the top and bottom ends inside the spiral.
- From a strip of the main material of a dark tone, form the ears and wings of the bird according to the following scheme: bend the wire in half, bend the ends downwards (the shape of the figure should resemble the letter M), place the element inside the spiral so that the bird's ears are in the upper part of the workpiece, while the free sections are passed through the widened gap between the 2nd and 3rd turns of the spiral on the sides, forming the wings.
- Form the bird's beak and paws from orange wire. Secure the beak under the 2nd turn of the spiral element. Attach the paws to the bottom of the craft.
- Glue the eyes, they should be located on the top 2 turns of the spiral part.
Squirrel made of nuts and wire
Crafts from fuzzy wire can be made using other materials, such as nuts.
So, to make a squirrel you will need:
- hazelnuts;
- dark brown fluffy wire;
- glue;
- scissors;
- dark brown or black marker.
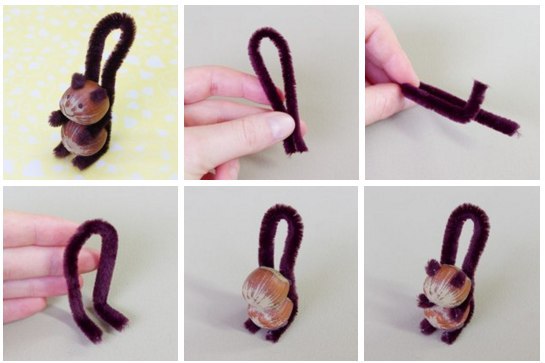
The order of actions during manufacturing:
- Glue the hazelnuts together.
- Bend the chenille wire in half so that a semi-oval is formed at the bend. Bend the ends of the workpiece at a right angle.
- Apply glue to the hazelnut blank at the bottom and back, and glue it to the wire element. The semi-oval should be positioned on top.
- From the second piece of fluffy wire, cut 4 pieces about 2 cm long. Glue the first 2 pieces on each side of the nut joint. Bend the second 2 pieces into a semicircle and glue to the top nut, forming the animal's ears.
- Use a felt-tip pen to draw the animal's eyes, mouth and nose.
Ladybug
To make a ladybug from fluffy wire, you need to prepare:
- chenille wire in black and red colors;
- glue;
- scissors.
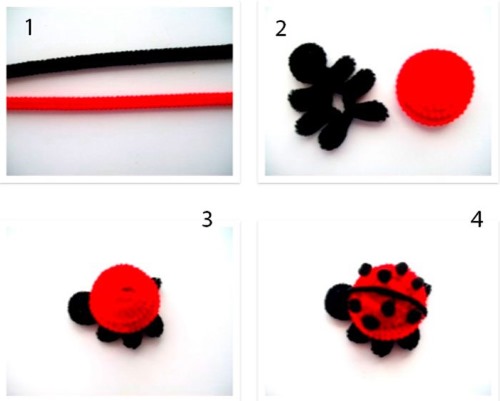
Job Description:
- The end of the black chenille wire is twisted into a tight flat spiral (no more than 3 turns) to form the head of the insect.
- The remaining piece of working material is visually divided in half. On each of the resulting halves, 2 folds are formed, each of which will be the insect's legs.
- The unused end of the wire is fixed on the inside.
- A 30 cm long piece of red chenille wire is twisted tightly into a flat spiral. The central part of the resulting circle is lifted from the inside.
- Glue the red piece to the black piece.
- Cut a small piece of black chenille wire equal to the diameter of the red element. Glue it on top of the red element, dividing the circle into 2 equal parts (insect wings).
- Cut several small pieces of black wire and glue them onto the insect's wings.
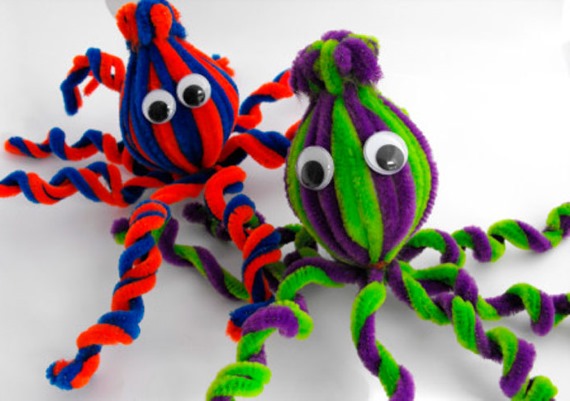
Octopus
To make an octopus craft from fluffy wire, you will need the following tools and materials:
- fluffy wire of 2 matching colors;
- a small foam ball;
- rubber bands;
- cylindrical pencil;
- scissors;
- glue;
- plastic eyes.
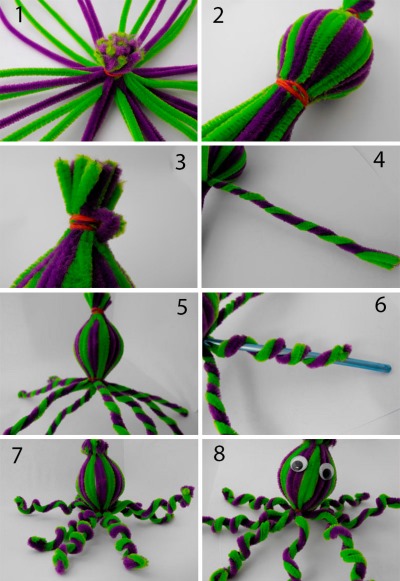
Step-by-step production of the craft:
- Select 8 pieces of chenille wire of each color. The length of all pieces should be the same.
- Lay out the wire pieces in front of you, alternating colors. Secure them at the top with a rubber band.
- Place a foam ball inside the blank, cover it tightly with wire, and tighten it from below with an elastic band.
- Twist the wire pieces in pairs to form the octopus's tentacles.
- Wrap each octopus limb around a pencil to form a spiral.
- Finally, glue on the eyes.
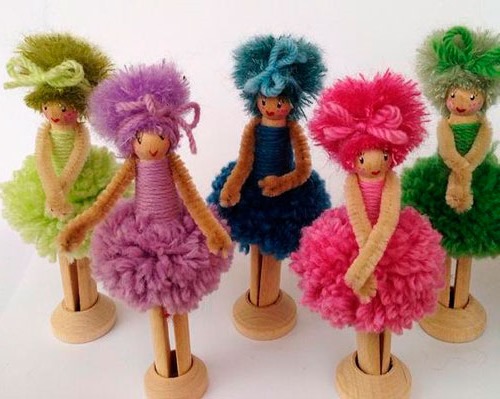
Puppet doll
To make an ostrich puppet from fluffy wire, you will need:
- chenille wire;
- pompoms;
- 2 cylindrical pencils;
- feathers for crafts;
- scissors;
- sewing threads;
- beads;
- plastic eyes;
- glue.
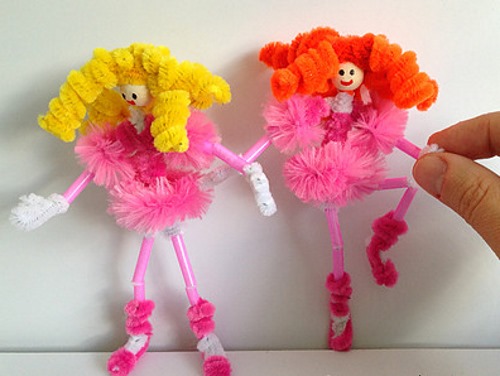
Manufacturing process:
- Wind one piece of fluffy wire onto a pencil, remove the resulting spiral. Apply glue to one end and glue a pompom, which will be the bird's head. Glue the eyes to the top of the pompom.
- Cut half of the second piece of fluffy wire and twist it into a flat spiral. Form a triangle (bird's beak) from the resulting circle and glue it to the pompom. Glue feathers to the back of the head.
- Glue another pompom to the other end of the wire twisted into a spiral, which will be the body of the bird.
- Twist 2 identical pieces of chenille wire onto a pencil, remove, and glue to the bottom of the second pompom (the bird's lower limbs). String beads onto the bottom ends, bend the ends of the wire.
- Twist 2 small pieces of fluffy wire in a circle (bird's wings) and glue them to the sides of the bird's body along with the feathers.
- Form a tail from feathers and glue it to the back of the body.
- Tie the ends of two sewing threads at least 20 cm long to the ends of a pencil. Then glue the end of one thread to the back of the head, the second to the back of the body. The puppet doll is ready!
Carnival mask decorated with chenille wire
To make a carnival mask decorated with chenille wire, you will need:
- fluffy wire of 2 colors;
- carnival mask made of thick paper;
- glue;
- scissors.
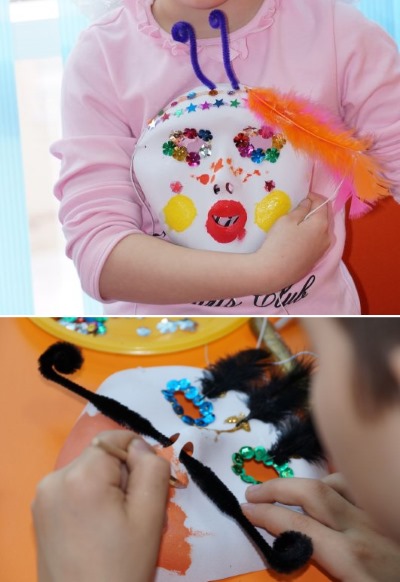
Manufacturing process:
- Place a wire of a different color between two wires of one color, make two similar blanks and place them opposite each other.
- Step back a few cm from the end, form a loop on the left blank, which should be on top of the right blank. Then the lower part of the right bundle of chenille wire is placed on the lower part of the left bundle, then passes under the upper part of the left bundle of wire.
- Placed on top of the loop turns, but passes under the top of the right wire bundle that was originally under the loop. Tighten the knot carefully. It is recommended to make a knot in the middle of the wire segments.
- Turn the blank towards you so that the free ends of the wire are located on the sides, and the knot resembles the figure 8 in shape. The knot will be located on the bridge of the nose. The free ends are bent into ovals. When making wire decor for a mask, it is necessary to check the wire blank against the template.
- Twist the ends of the wires of each bundle together. Connect the ends of the wires of the upper and lower bundles.
- Cut 4 small pieces of chenille wire of 2 colors, bend each piece in half. Twist at the center point with the ends of the wires at the edges of the workpiece. Direct the decorative elements upwards, bend the ends.
- Apply glue to the inside of the chenille wire blank. Place it on top of the carnival mask template.
New Year's crafts from chenille wire
Crafts from fluffy wire with New Year's themes: snowflake, star, Christmas tree.

In order to make a snowflake craft from chenille wire, you must first create a life-size sketch of the future craft. The snowflake craft should consist of 6 identical elements arranged in a circle. In some cases, each element is created separately, then all the parts are attached to a small-diameter central circle.
Another option for creating a snowflake: a circle is formed from 3 pieces of chenille wire of the same length, where the intersection point of all 3 parts is the central point of the circle; each of the 6 rays of the snowflake is decorated using small pieces of wire; to fix the craft, a common circular part is glued to the rays of the snowflake.
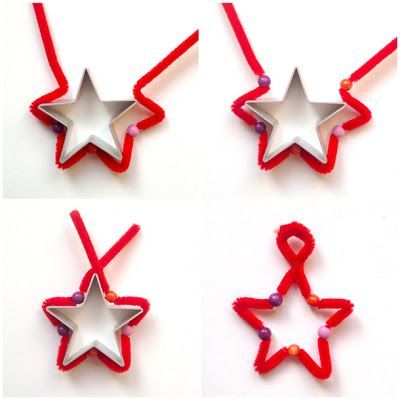
To make a star from fluffy wire, you first need to make a life-size sketch of the craft. The work begins with creating a ring from fluffy wire, from which the rays of the craft will diverge. Then the working material is bent according to the contours of the sketch.
At the points of contact with the base ring, the wire of the rays embraces the wire of the ring. It is recommended to tighten the base ring inside with several diametrical pieces of wire to fix the craft.
To make a Christmas tree from fluffy wire, you will need:
- green chenille wire;
- glue;
- scissors;
- wooden skewer;
- beads of different sizes.
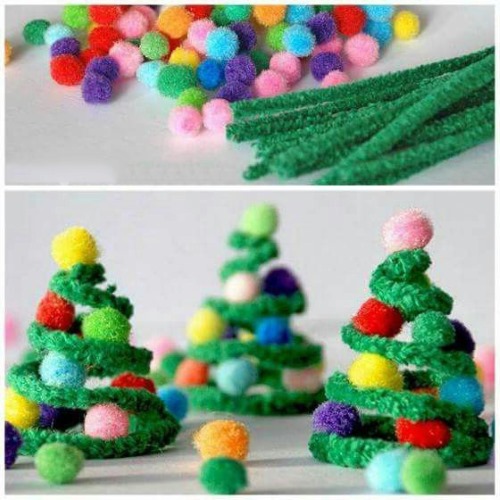
The order of actions when creating a craft:
- Cut 3 pieces of fluffy wire, each 10 cm long. Attach 2 small pieces of wire to each end to imitate a coniferous plant. Glue all 3 pieces of wire together to form a snowflake.
- Place the first tier of tree branches on a skewer.
- The next tiers of plant branches are made in a similar way, only the diameter after each level must be reduced.
- Carefully straighten the craft. Attach the largest bead to the top of the tree. Glue the remaining beads to the tree branches.
Easter crafts from chenille wire
You can make the following Easter crafts from fluffy wire: a basket with a chicken, an Easter egg, an Easter bunny.
All the parts of the Easter basket are made separately and then fastened together. First, you need to twist a small piece of yellow chenille wire into a flat spiral (this is how the chicken's head is formed) and glue the spiral vertically to the pompom (the chicken's body).
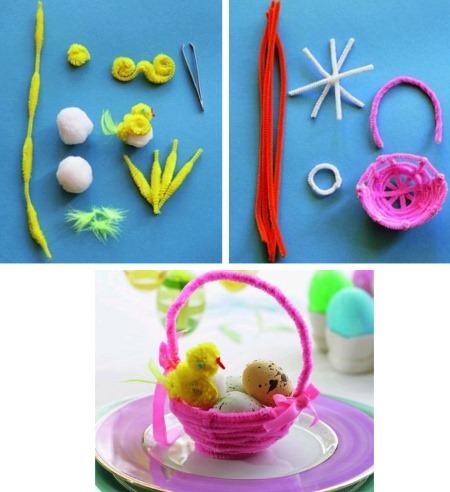
Twist a small piece of yellow wire to form the number 3, bend in half, glue to the pompom (chicken wings). Wrap a small cup tightly horizontally with chenille wire. Twist 3 chenille wires into a bundle, attach the ends of the bundle to the basket. Place Easter eggs and a chicken figure in the basket. The craft is ready.
To make an Easter egg you will need: a plastic dummy egg, chenille wire, scissors and glue. The dummy egg is opened, first the lower half is wrapped with wire. The rows of winding should be horizontal and tightly in relation to each other.
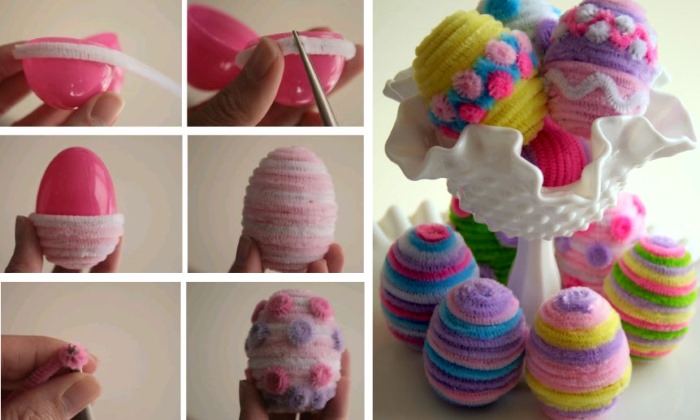
Before work, the plastic form must be greased with glue. When the lower part of the craft is finished, connect the halves of the plastic blank and continue wrapping with wire. The finished craft can be decorated as you wish.
To make an Easter bunny from fluffy wire and pom-poms, you first need to glue 2 pom-poms together, and the 3rd smaller pom-pom is glued to the bottom pom-pom (the animal's tail).
From the fluffy wire, form 4 semi-ovals, 2 of which will represent the ears of the animal, and the other 2 will be the lower limbs of the rabbit. Glue the blanks to the figure of the animal. For the mouth, nose and eyes, use small pieces of chenille wire.
Fluffy wire is a material for unlimited imagination. Crafts made from such material are not only beautiful and easy to make, but also help develop fine motor skills of hands, which is important for the development of children of any age.
Author: Doroshenko E. N.
Article formatting:Natalie Podolskaya
Video about crafts from fuzzy wire
Crafts from fluffy wire - video on how to make a dog:
Wow! Cool topic)
I'll definitely try it.