The product that was knitted by a beginner knitter, may have rough joints and uneven loops. To solve the latter problem, it is enough to use the steaming method. To avoid protruding seams, it is recommended to use a mattress seam, which makes it possible to create invisible connections.
Necessary tools and materials
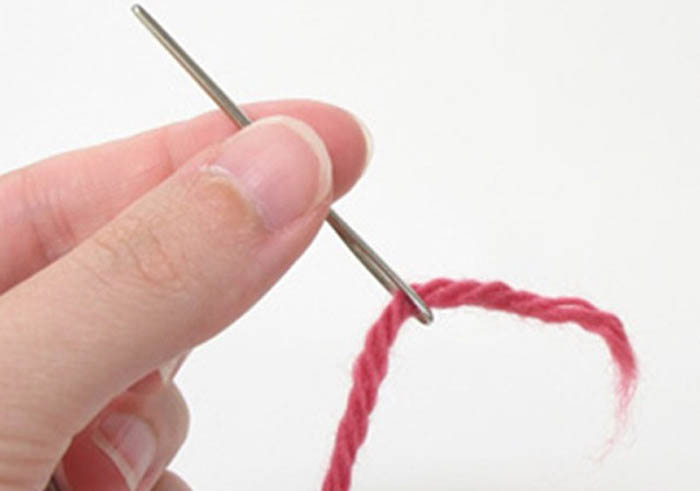
In knitting, a special needle with a blunt end is often used to sew the parts of the product together, since it easily passes between the holes without deforming the thread. You can also use a wool needle to sew the elements of the fabric with a mattress stitch.
If the fabric is made of slightly fluffy or smooth yarn, it is recommended to use the same yarn for joining the parts that was used to tie the product. However, when using mohair with a long pile, bouclé or thickened yarn, it is necessary to use yarn of the corresponding shade with a smooth surface for stitching.
It is not recommended to make a mattress stitch in knitting with knitting needles from regular sewing threads, because they do not have an elastic structure. If the product was knitted from voluminous thick yarn, to create this type of seam, you need to use thinner threads so that the joining area is invisible and neat.
Technique of making a mattress stitch in knitting
The mattress stitch in knitting is a kind of universal method of joining elements of the fabric that have the same number of rows.
Experienced knitters recommend that beginners use the mattress stitch when knitting, as it has many advantages:
- It can be used for almost any product, such as a blanket or scarf. However, this type of stitch is not suitable for openwork knitting.
- There is no need to carefully prepare the canvas. The elements do not need to be basted to each other.
- It is necessary to connect the parts on the front side of the future garment. Thanks to this, there is no need to turn the fabric inside out, getting confused with the zones of joining the elements.
- Very easy to do.
- The seam will be invisible. As a result, there is no need to select threads with which to join the parts, especially those with different shades.
To obtain a perfect connecting seam, you should ensure that the edge loops are even during the work stage:
- At the end of the row, you need to knit with purl or face elements. At the beginning of the row, you should remove the purl (thread in front of the fabric) or face (thread behind the product). Thanks to this method, one edge hole will correspond to two rows.
- The beginning and end of the front row must be knitted with front holes, and the back rows with back holes. One row will correspond to one edge element.
Edge loops will never be used in patterns, reductions or increases. If the main thread is used to sew the parts together, when casting on loops it is permissible to leave a free edge longer than necessary so as not to hide the knot.
As a result, you can make a seam with this thread:
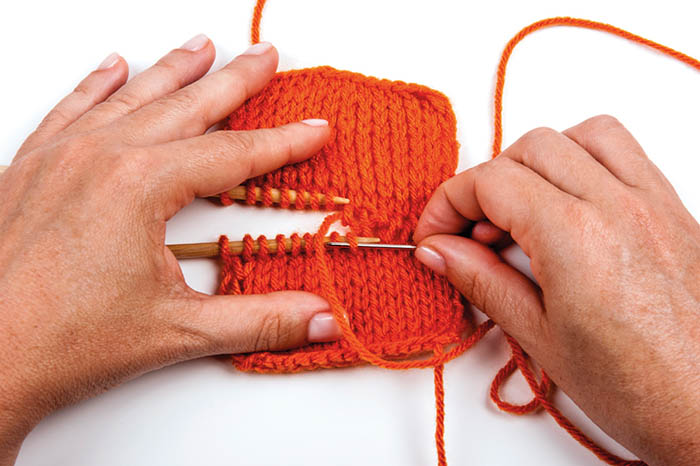
- Place the pieces side by side with the front sides facing up.
- Make the first stitch from the back side, creating a fastening.
- Pull the thread through the thread between the edge hole and the one following it to the front area.
- Using the second stitch, pick up one drawstring that matches the edge drawstring on the other piece. As a result, the stitching frequency will be equal to one row. To obtain a more elastic seam, pick up two drawstrings of the edge drawstrings that are placed on different opposite elements.
- Do not tighten the working thread. After stitching 4 cm, pull the joined area a little so that the thread is evenly distributed along the segment.
Thanks to this connection, the edge holes are folded to the wrong side, forming a beautiful braid.
Beginner knitters are initially recommended to master the classic knitted mattress stitch, performed on the front surface. It must always be performed from the front side so that it folds inward, what will be underneath. As a result, the joining area will be reliably hidden.
For stitching you will need the following materials:
- a needle with a blunt end and a wide eye;
- 2 pieces that are knitted with the front surface and have the same number of rows.
Technique for performing a mattress stitch in knitting:
- Place 2 pieces of fabric on a flat surface so that they face up with the front side facing up.
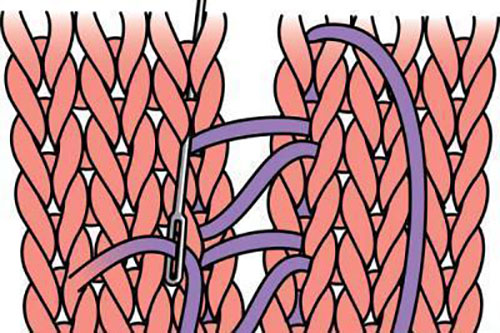
- Insert a thread into the eye of the needle. Grab the instrument with the membrane of the front opening of the workpiece, which is located on the right side. Skip the edge element, picking up only the first knitted loop of the row.
- Pull out the needle, performing similar manipulations with the left part of the workpiece.
- After making a few stitches, carefully pull the seam so that it retains its elastic structure.
- Sew the pieces to the end. As a result, a classic face stitch will be formed on the front side, and a thin seam will appear on the back side.
It is necessary to join the holes of the same row in order. Otherwise, the seam will be crooked, spoiling the appearance of the canvas.

If the product was knitted with coarse threads, to create a seam it is necessary to grab 2 legs of the edge hole with a needle, pulling the thread. If you bring the tool under only one loop, you need to make a stitch twice as often. For this reason, the seam will not be elastic and will have a fixed, thick appearance.
There are 2 types of mattress seam:
| Type | Peculiarities |
| Loop to loop | In order for the area where the parts are joined to be completely invisible, it is necessary to use the “Loop to Loop” stitch. For sewing, it is not necessary to close the holes on the parts. They must be left on the knitting needles, moving them very tightly towards each other. This type of stitch should be made from right to left. |
| Line | The "Line" stitch is recommended for sewing together knitted fabric elements that were created with a simple pattern of front and back holes, such as a braided pattern, back or front satin stitch. This type of stitch allows you to sew a sleeve into an armhole, connect elements with beveled or straight edges, and also join step-by-step places on trousers. This stitch must be made exclusively from the back side. To do this, the fabric elements must be folded with the front parts, stitching with small stitches using the "Back stitch". For longitudinal seams, it is recommended to stitch near the edge holes of the parts, for transverse seams - along the line of closed loops. The stitch must be laid at a distance of 5 mm from the edge. |
Connecting parts
The mattress stitch in knitting is the main type of joining parts, so it is used in many cases.
A feature of the seam is the displacement of the holes by one row, which should be taken into account in a number of cases:
- Shoulder and side seams with transverse knitting. When joining the shoulder pieces, the seam will not be too elastic and will be quite dense. The openings must be sewn so that the knitting closure loops are located on the wrong side.
- Sewing the placket and sleeve to the garment. This seam is used when the beginning of the part is located on the knitting needles. The joining process will be similar to the overedge cast-on. As a result, three holes will correspond to the two edge elements. The loops of the placket or sleeve can be combined with the fabric without removing them from the knitting needle. Thanks to this, the purl seam will have a neat appearance.
- Sewing the side and sleeve seams vertically. When joining elements that were knitted with the front surface, the seam will be invisible. The situation is different with the back surface, where the displacement of the holes is clearly visible. As a result, the rows will be laid towards each other with teeth. To achieve complete symmetry, it is necessary to pick up the edge loops with a needle not opposite, but shifting one row.
When knitting a garter stitch, the vertical seam will not look very nice. However, to achieve excellent results, it is recommended to familiarize yourself with some of the subtleties of its creation.
Required materials and tools:
- needle with knitting thread;
- two items made with a kerchief pattern.
The seam must be made from the front side. If you need to join pieces of fabric that were knitted with garter stitch, the seam will not look good because the scars of the pattern will shift by one row. If the product is completely knitted with such a pattern, this problem will be less noticeable. However, when alternating garter stitch with another ornament, the mismatch of the scars will be a big problem.
To correct the situation, it is recommended to do the following:
- On one of the products, always attach two membranes of one edge hole.
- On another product, grab one leg of one hole, the other leg of the second element.
- Reach the end of the part in this way.
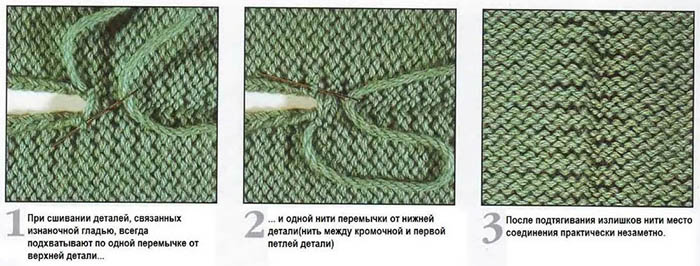
It is permissible to knit a mattress stitch using a drawstring. As a result, the needle will catch not the hole, but the drawstring between the edge and the first element of the row. The tool should initially be inserted into the drawstring of one, then the other part. Every 2 cm, the thread should be pulled up, otherwise the quality of the joining will be poor.
In this case, the stitching line will have a neat appearance from the back of the fabric. If the clothes are made of thin yarn, it is recommended to hook 2 broaches at once.
In knitting, when sewing the side edges of the parts, a mattress knitted seam is used vertically or horizontally. Edge holes that open and close rows can be sewn completely unnoticeably thanks to such a seam. Often, the lower area of the fabric begins with an elastic band.
The vertical mattress stitch is mainly used to join pieces that have been knitted using the 2x2 pattern.
Materials you will need:
- knitting thread that matches the main shade of the yarn;
- darning needle.
Often, at the beginning of a set row, the end of the thread is always saved. If it is long enough, it can be used to sew the parts. As a result, this will help solve 2 problems at once: you will not have to hide the end in knitting, and also attach an additional thread to the end of the row, which will prevent a knot from appearing on the fabric.
Step by step instructions:
- Thread the end of the cast-on thread or new yarn if the end is very short into a needle with a large eye. The length of the thread should be 3 times the length of the seam.
- Place the pieces face up on the table surface. The joint areas should face each other.
- Using a needle, hook the outermost hole of the set row at the part to be attached.
- Pull the thread, without pulling it too tightly, towards the first piece. Bring the tool under the knot of the set row. The two pieces should be sewn together in the set row area.
- Separate the vertical of holes in one of the parts. If the fabric was knitted with two purl and two front loops, there should be purl elements near the column of holes where the vertical seam will be created.
- Carry out similar manipulations on another part, separating the column of back holes.
- To create a seam, grab the loops of the selected stitches one by one, joining them one after the other on two pieces.
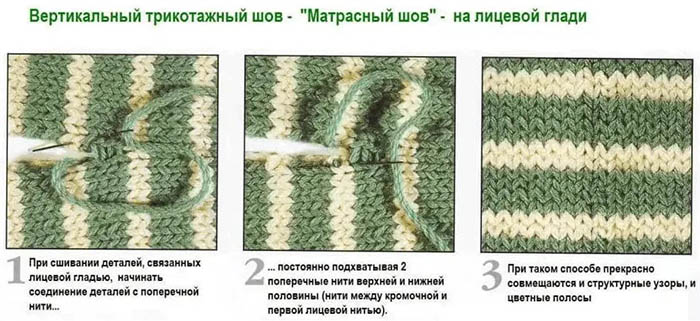
As a result, the front side of the fabric will have a similar connection, where it will be almost impossible to see the joining area. On the back side, there will be a neat seam.
A horizontal mattress seam is suitable for joining parts along the lower and upper cuts along the openings of the initial and closed rows with the same number of loops. This type of seam is easy to create, while its principle is similar to the implementation of a vertical mattress seam. However, the needle will need to pick up not the opening crossbars horizontally, but their vertical arcs.
This seam is similar in its creation to a knitted horizontal seam on the front surface. However, the loops of the parts will be closed, and the seam will not stretch.
Step by step instructions:
- Prepare the parts for sewing. Place the elements next to each other with the sides to be joined facing up. Secure the thread near the edge of one of the parts.
- Insert the needle from top to bottom into the first hole of the last row of one part. Remove the tool from the adjacent element of the same row of the part.
- Perform similar manipulations with the holes of the second part, which is located opposite.
- Return to the first piece again and insert the needle into the hole from which the fastening thread comes out. Remove the needle from the adjacent element.
- Perform similar manipulations with the holes of the second part.
- Sew the two pieces together to the end of the seam.
At the stage of creating the seam, it is necessary to pull the thread very tightly so that the edges of the part are covered. If you use a contrasting shade of yarn for the seam, it will not be noticeable. From the back of the fabric, the fastening thread will also not be noticeable. If the back surface protrudes as the front side, the parts must be connected with a horizontal mattress stitch.
Preparing the product for assembly
The mattress stitch in knitting requires preliminary preparation of the fabric parts, since it is convenient to create the joint on a flat surface that will not curl inward. In this case, the knitted elements must be processed with a damp heat method, by washing or steaming through an iron.
To wash the product, you need to prepare warm water, as well as conditioner with liquid detergent for washing woolen items.
Step by step description:
- Fill the basin with warm water, the temperature of which reaches 40℃.
- Pour in the detergent, dipping the fabric into the liquid.
- Carefully turn the product over in water. Do not rub or wrinkle the fabric.
- Pour out the liquid and fill the container with clean water, adding conditioner.
- Rinse the product thoroughly, place it on a towel and roll it up, squeezing it out with your hands without twisting it.
- Place the towel on a flat surface and lay the fabric on top. When smoothing the product with your hands, give it the desired shape and wait until it dries completely.
With wet-heat treatment, knitted parts of the product can take the optimal shape, while unevenness and small defects will disappear. The loops will become even and the yarn made of down or wool will be fluffy.
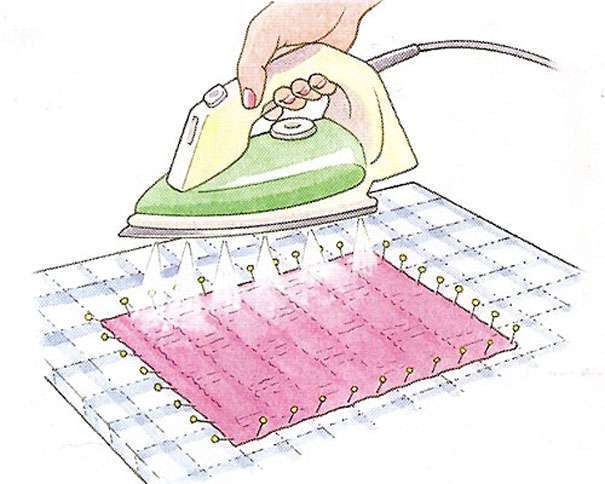
To steam-treat the canvas parts, it is recommended to do the following:
- Prepare a special steamer or iron with a steam function.
- Fill the steamer with distilled or boiled water and heat it.
- The steaming process should be carried out at a short distance from the fabric. When interacting with artificial or acrylic yarn, it is recommended to use a piece of gauze for steaming.
- Process the canvas with your hands. Smooth out the product, giving it the required shape and size.
- Set the canvas pieces aside for 2 hours to dry completely.
When using an iron, you need to slightly touch the surface of the ironing board. In this case, the yarn is able to absorb the amount of moisture that is necessary for the complete alignment of all the loops.
After processing, the parts can be pinned onto the pattern, leaving it until completely dry. For pinning, it is recommended to use a special mat, onto which it is permissible to transfer the contours of the pattern using chalk. Afterwards, the knitted elements of the fabric can be straightened along the contours.
In knitting, the mattress stitch is often used to connect knitted parts of the fabric. This stitch is convenient to use if the number of edge loops of the parts is the same. When knitting with knitting needles, this type of stitch has many advantages, since the area where the elements of the product are joined will be practically invisible.
Video about mattress stitch in knitting
Master class on joining knitted parts with a vertical mattress stitch: