Plastic forks and spoons can not only replace metal utensils on a hike, but also become the main material for creativity. To learn how to use these utensils for other purposes, you need to learn what types of crafts there are, as well as consider several interesting things made from disposable utensils with step-by-step descriptions.
The benefits of crafts from disposable tableware
Making various crafts from disposable plastic tableware is a hobby for 35% of people in Russia.
This type of handicraft is popular for several reasons:
| Low cost of material | In shops and cafes such cutlery costs from 1 to 3 rubles per piece. |
| Availability | Spoons and forks are sold even in small food kiosks. |
| Beneficial influence on the development of imagination | To assemble an original thing from many identical forms, you need to think carefully. Therefore, such a hobby is especially useful for children. |
| Environmental benefits | Some people collect plastic dishes from tables after the holidays, wash them and use them in creative work. So spoons and forks that would otherwise have been sent to landfill to decompose in the ground for over 150 years are finding a new use. |
The advantage is the ability to create exclusive items. Even the most famous designers once did handicrafts and used cheap and accessible materials. This is how they developed their skills. In addition, plastic spoons make stylish and beautiful crafts that can be used as a full-fledged decoration for home decor.
Types of crafts from disposable spoons and forks
Crafts made from plastic spoons and forks come in different forms.
They can be classified as follows:
- interior decor;
- decorations for clothes and hair;
- toys;
- functional things for everyday life.
Below are step-by-step instructions that you can follow to make something unusual out of plastic utensils.
Fan of forks
This fan is suitable for decorating a room in an oriental style or for performances and masquerades.

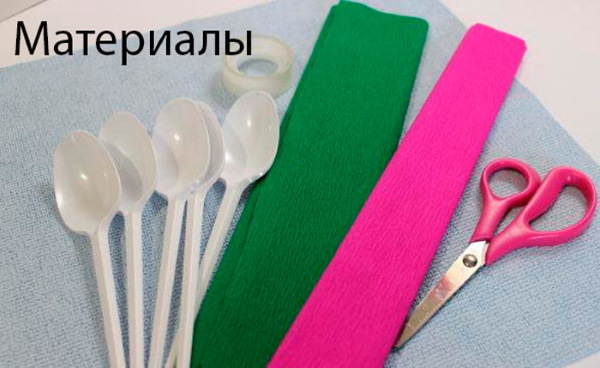
What materials and tools are needed for the work:
- 23 plastic forks;
- hot melt glue;
- thick cardboard;
- acrylic paint;
- wide artistic brush;
- marker or pencil;
- scissors;
- 45 medium beads;
- satin ribbon 1 cm wide, 1.5 m long;
- 1.5 m of lace ribbon or frills of different colors.
How to make a fan:
- Cut out 2 rectangular blanks with sides of 10x15 cm from cardboard. Draw a semicircle on each of them. For convenience, you can use a small saucer. It should be attached to the cardboard and traced with a pencil.
- Cut out the blanks and paint each one with acrylic paint on 1 side. Let dry.
- On the unpainted side, inside 1 semicircle, draw another one, stepping back 1.5 cm from the edge. No need to cut. This line will help to glue the forks to the cardboard evenly.
- Using a glue gun, glue all the utensils to the cardboard with the teeth facing up. It is important that the end of each handle does not go beyond the mark.
- When the entire blank is filled, you will need to hide the ends of the forks. To do this, apply glue to the 2nd blank and place it evenly on top.
- Take the tape and thread it between the forks in a "snake" pattern. There should be 1 cm ends left on each side. They should be folded and carefully glued.
- At the top, between the teeth, thread lace or frills in a similar manner.
- Apply glue to the teeth that remain visible from the front side and carefully place the beads on.
- Thread a frill or lace of a different color between the forks, above the ribbon, in a checkerboard pattern. That is, this strip should cover those parts of the handles that remained open when threading the ribbon. Cut off the excess and glue the ends.
- In the same way, thread another piece of satin ribbon on top and secure the ends.
The fan made of plastic forks is ready. From the remains of the satin ribbon you can twist small roses and glue them to the cardboard along the edge.
Flowers and decorations
Crafts made from plastic spoons can be designed in the form of flowers. The resulting buds can easily be used to make a bouquet for decoration or to make an ornament for clothes or hair.
Below are detailed descriptions of several options.
Decorative tulip
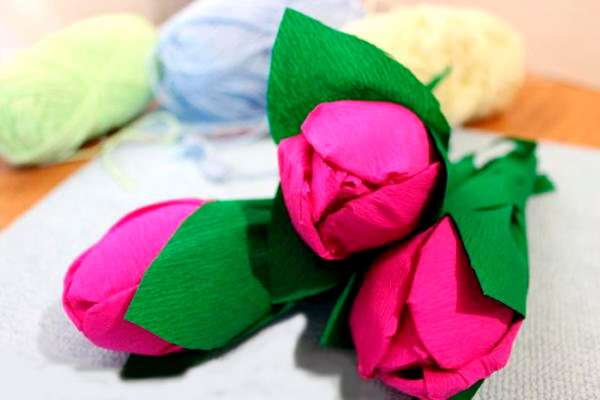
If you make several of these flowers, you will get a beautiful bouquet of everlasting tulips.
What you need to make 1 flower:
- 6 spoons;
- a small piece of yellow plasticine;
- candle and matches;
- gouache;
- strong hold hairspray;
- self-adhesive green tape for artificial flowers;
- green corrugated paper;
- green sewing thread;
- glue gun;
- scissors.
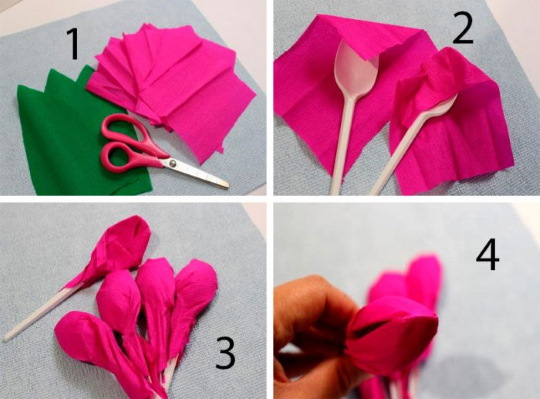
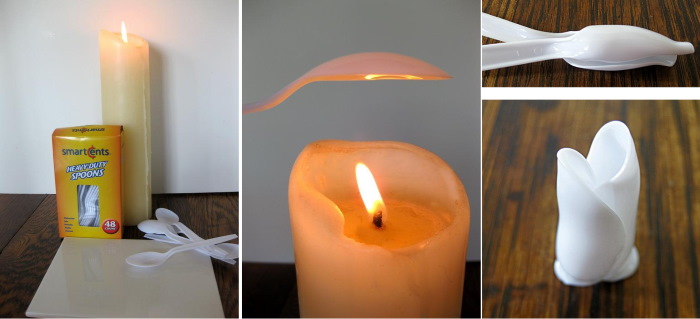
Step by step instructions:
- Light the candle wick and carefully melt the edges of each spoon. Do not hold the spoon too close to the fire, because the plastic will curl and turn black. You just need to warm it up so that the material becomes soft and pliable. Use your fingers to carefully bend the edges, giving them the shape of petals.
- Cut off the handles from 5 spoons, leaving about 2 cm at the top.
- All petals need to be painted with thick gouache on both sides and left to dry. Then spray them with hairspray. This will make the coating more reliable.
- Glue a piece of plasticine onto a spoon with a long handle, placing it at the base.
- Carefully attach the remaining petals by pressing them into the plasticine, then use hot glue to strengthen the structure.
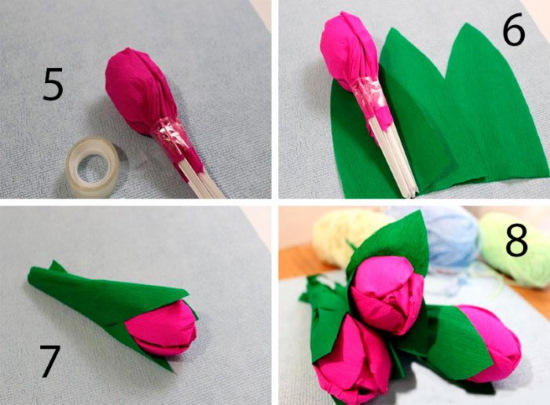
- Take the cut off handle from another spoon and extend the stem of the flower using glue.
- Cut out 2 leaves from colored paper and place them near the bud. Attach the leaves to the stem with thread.
- Wrap the stem with artificial flower tape so that the threads become invisible.
The tulip from a plastic spoon is ready. You can make several flowers and put them in a vase.
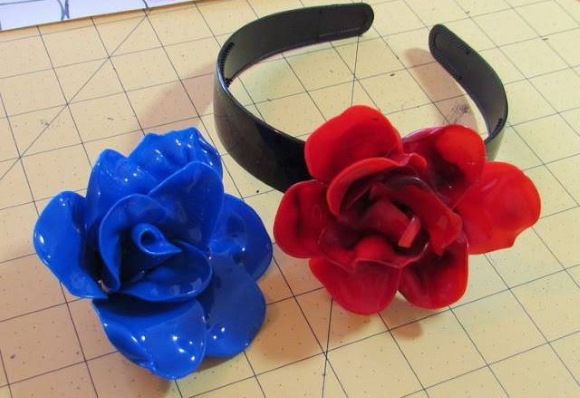
Hair band with plastic flower
Disposable spoons can be not only white, but also colored or transparent. For the craft described below, colorless material is suitable.
What is needed:
- a simple hair tie without decoration;
- 8 spoons;
- candle and matches;
- transparent glue Moment;
- pearlescent spray paint or glitter paint;
- 1 large bead;
- scissors.
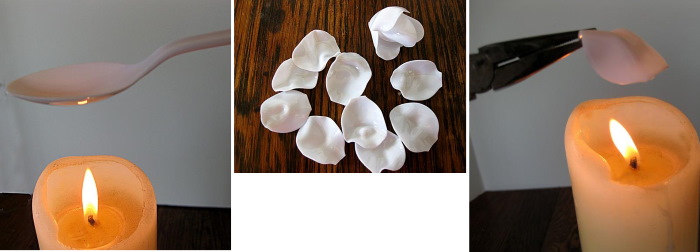
How to do:
- Cut off the handles of all appliances.
- Light a candle and carefully melt the edges of all the spoons. While the material is hot, carefully use your fingers to fold the edges inward. 4 spoons need to be deformed more strongly, they will be in the center of the flower.
- The 4 petals that are less twisted need to be glued together with Moment glue in the shape of a cross.
- Place the more twisted petals on top and glue them so that they cover the gaps between the lower petals.
- Spray paint onto the flower from a spray can. You don't need to paint the flower too much, just give it a little shine.
- Glue a bead into the center.
- On the back side, coat the bud with glue and attach an elastic band.
This decoration is suitable for decorating a braid or a high ponytail.
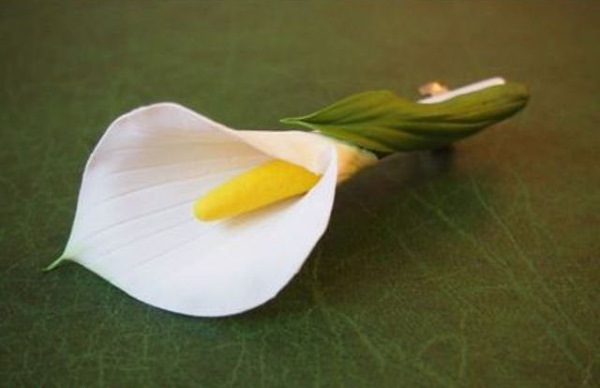
Small brooch in the form of a calla flower
These flowers are also called calla lilies.
What you will need for work:
- 1 large white spoon;
- scissors;
- yellow acrylic paint;
- candle and matches;
- glue gun;
- pin.
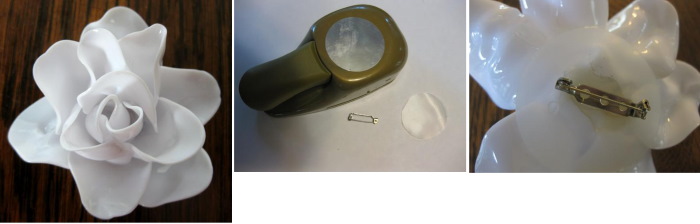
How to make a brooch:
- Cut the handle off the spoon at the base.
- Light a candle and melt the spoon. Use your fingers to form a flower bud. Bend the top outward and bend the sides inward.
- Cut off 2 cm from the bottom of the handle and paint this part. Let it dry. Using glue, fix this part in the center of the petal. The handle will imitate the long core of the flower.
- Glue a pin on the back side using a glue gun.
A small and original brooch is ready. It can be used to decorate a dress or a jacket.
Interior decoration
Crafts made from plastic spoons and forks can become a decorative item in any room.
To make these decorations look better, you need to buy colored utensils or paint them only with spray paint. This way, there will be no brush marks on the spoons. Below are 2 options that are easy to implement.
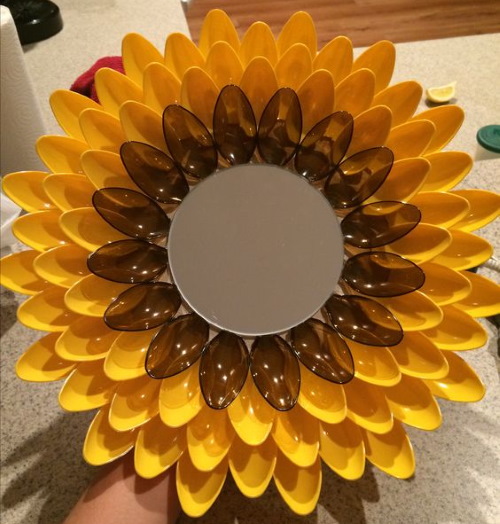
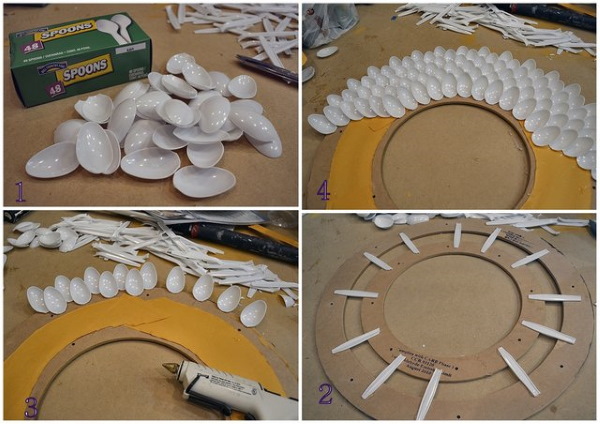
Sunflower Mirror
This craft is suitable for decorating a kitchen, bathroom or children's room.
What materials and tools are needed:
- a small round mirror (10-15 cm in diameter);
- thick cardboard (a box from household appliances will do);
- pencil;
- scissors;
- glue gun;
- Moment glue;
- yellow and black spray paint;
- 80 white spoons or 16 black and 64 yellow;
- screwdriver.

Step by step instructions:
- Draw 2 circles on cardboard: 25-30 cm in diameter and 5-7 cm in diameter. Cut out the circles with scissors. Determine the center of the large circle and glue the small one to this place with Moment glue, then find the center of the small circle and glue the mirror evenly.
- Paint 16 spoons black and the rest yellow. If the dishes are already painted, then simply cut off all the handles at the base.
- With the concave side facing up, the black petals need to be glued to the cardboard with a glue gun so that the bases of the spoons fit into the gap under the mirror, which was formed due to the small cardboard circle.
- Glue all the yellow spoons in a circle in a checkerboard pattern so that they cover the gaps between the petals in the previous rows. The bases of each of them should not be visible.
To hang the mirror on the wall, you need to make a hole on the back side with a screwdriver, closer to the center. In this place, the cardboard is thicker because of the small circle. Now you can "put" the mirror on the nail.
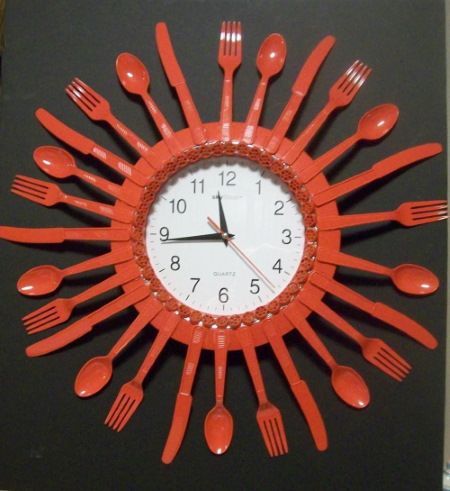
Clock for kitchen or cafe
For this craft, disposable cutlery does not need to be cut or deformed. It is the original forms that will help create a kitchen-themed clock.
What you will need:
- a small round watch with a flat frame around the dial;
- A4 office paper;
- compass;
- pencil;
- scissors;
- 10 disposable forks, 10 knives and 10 spoons;
- glue gun;
- a handful of small wheel-shaped pasta;
- spray paint.
How to design a watch:
- First of all, you need to protect the dial glass from glue and paint. Use a compass to draw a circle on paper equal to the diameter of the glass. Cut it out and place it on the dial.
- Glue cutlery onto the frame in a circle, alternating them (fork, knife, spoon).
- Glue the pasta in a circle, separating the handles of the utensils from the glass.
- Holding a piece of paper, spray paint onto the clock.
It is important that all parts are well covered with paint, so 2 cans may be required.
Vases, candlesticks, lamps
Crafts made from plastic spoons can be not only decoration, but also become part of a functional and useful household item.
Such products can be presented to friends and relatives as gifts. Below are 3 interesting ideas described in detail.
Multicolored flower vase
You can put artificial and real flowers in such a vase.
Materials and tools:
- stationery knife;
- scissors;
- transparent plastic bottle;
- 75 spoons of different colors;
- spray paint in 3 or more colors (if the dishes are available in only 1 color);
- glue gun.

Step by step instructions:
- Paint all the spoons in different colors and cut off the handles, leaving 1 cm.
- Use a utility knife to cut off the neck of the bottle so that a straight part remains.
- Cover the bottle with spoons in several rows, from bottom to top. The utensils should be placed with the convex side facing out.
In the last 2 rows, the spoons need to be glued with the concave side facing outwards. You should get a vase with widened edges.
Water lily shaped candlestick
This craft made from plastic spoons will serve as a candlestick for mini candles in an aluminum sleeve.
What you will need:
- 1 tin can;
- small saucer;
- paper and metal scissors;
- hammer;
- green spray paint;
- 5 large spoons and 5 small ones;
- glue gun;
- 1 spark plug in a sleeve.
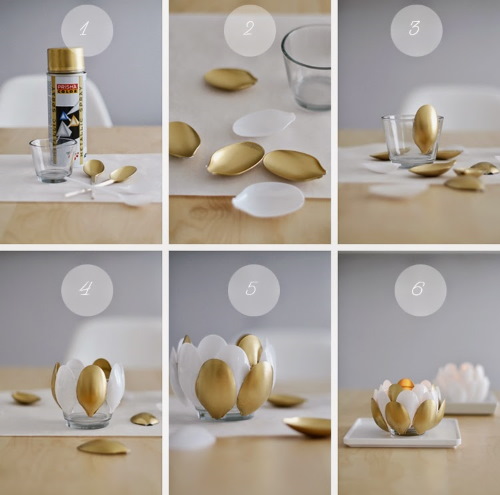
How to make a candlestick:
- Cut off the neck and bottom of a tin can. Then cut it lengthwise on one side, turn it over with the curved side up and hammer it to get a straight sheet of tin.
- Place the saucer on a tin sheet, open the scissors and trace around it with the sharp end. Carefully cut it out and paint it from a spray can.
- Cut off the handles of all spoons, leaving 1 cm ends.
- When the paint on the tin circle dries, you need to put a candle in the center and glue large spoons around it. Their concave side should be facing up. The handles of the spoons are the bases of the petals. They need to be positioned so that there is about 5 mm of free space left to the sleeve.
- Glue small spoons on top in the same way.
The candlestick is ready. The distance between the sleeve and the plastic is necessary so that the spoons do not melt from the heated candle.
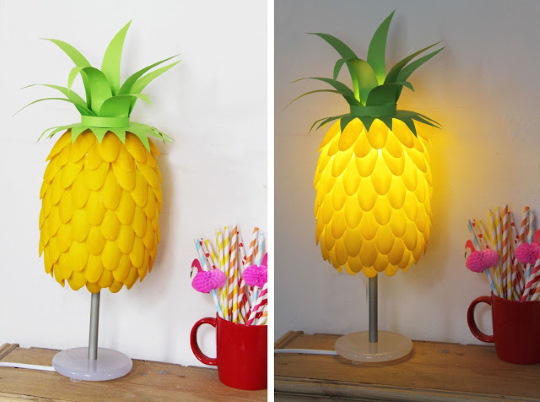
Pineapple Table Lamp
This craft is much more difficult to make than the previous ones. You will need at least minimal skills in working with wood and electrical appliances.
Materials and tools:
- a circle cut from a thick plywood board (diameter 10-15 cm);
- a piece of plastic pipe (15 cm) or an aluminum sleeve from a toner printer cartridge;
- 1.5 m cable with plug (can be cut from an old extension cord);
- a drill and a feather drill bit equal to the diameter of the pipe or bushing;
- lamp base;
- LED lamp;
- transparent bottle with a capacity of 3 liters;
- sandpaper;
- wood varnish;
- 4 silicone feet for stand;
- green felt;
- thread and needle;
- 100-150 yellow plastic spoons;
- yellow spray paint;
- glue gun;
- thick wire 50 cm.
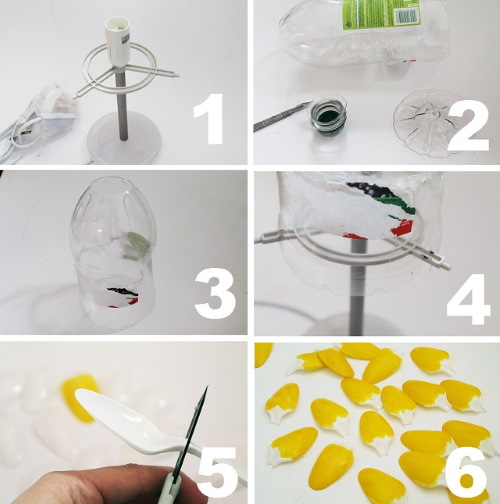
Step by step instructions:
- Drill a through hole in the center of the wooden circle with a feather drill. Sand the edges and the entire surface of the future stand. Cover the circle with varnish on top and let it dry. Glue silicone feet on the bottom.
- Paint the tube or sleeve from a spray can and let it dry. Then coat one end with glue and insert it into the hole on the stand. It is important that the edges of the tube do not stick out from the back side.
- Cut off the bottom and neck of the bottle. Make a frame from wire. Which will hold the bottle up. It can be designed as a spiral and fixed with glue on the tube so that the hole remains open.
- Pull the wire under the stand and pull it out of the tube. Connect it to the socket. Glue the socket to the tube with hot glue.
- Place the bottle on a wire frame and secure it with glue, coating its lower edges from the outside and inside.
- If the spoons are white, they need to be painted. Cut all the handles at the base. Then glue them to the bottle in rows, staggered. The convex side should be the front side. It is important to attach each spoon overlapping. In the widest part of the "pineapple" they should overlap each other more, and when the shape narrows, on the contrary, they need to be glued a little further.
- The leaves are made from felt. First, you need to cut out a circle with a diameter slightly larger than the bottle and trim the edges so that they resemble sharp pineapple leaves. Make a small hole in the center.
- Cut out long leaves separately (5-6 pcs.) and sew them together at the bottom, gathering them into a bunch. Insert into the hole on the circle from the previous step and carefully glue the ends.
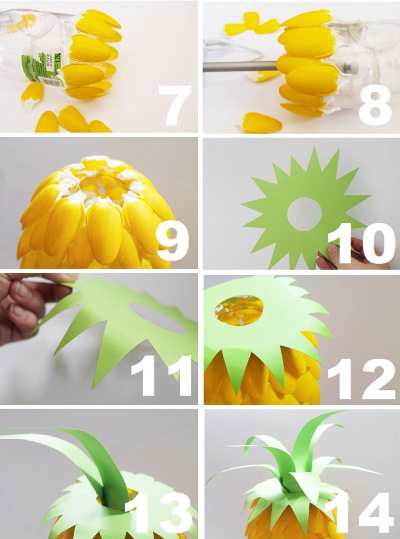
The felt should form a lid that can be removed and the lamp replaced if necessary. It is important to use only LED lighting, otherwise the plastic will heat up and deform., besides, ordinary lamps are fire hazardous, as they heat up very much. All that remains is to screw the lamp into the socket and the lamp can be used.
Simple crafts from plastic spoons and forks can be made with your own hands. The material is very cheap and easily accessible. If you use your imagination, you can come up with an endless number of useful things that will decorate your home and beyond.
Video about crafts from plastic dishes
Crafts from plastic spoons and forks: