You can do it yourself simple crafts from improvised materials together with the child, regardless of his age. For example, with the help of knitted, rubber, leather or knitted gloves, even a novice craftsman will be able to construct not only primitive New Year's decorations, but also a doll, animals or representatives of ocean fauna (for example, octopuses).
To do this, it is enough to have a basic set of necessary tools and materials, as well as strictly follow certain instructions.
What kind of gloves and mittens are used to make crafts?
Crafts from gloves (you can make a structure of any size and complexity with your own hands) are most conveniently made from:
- knitted goods;
- leather or suede;
- rubber;
- knitted.
Knitted gloves
Knitted gloves are best used to create soft animal toys, as well as dolls and Christmas tree decorations. The color of the source material should be selected depending on what object should appear as a result of the work (for example, if you need to make a bear from mittens, it is advisable to give preference to mittens in brown or black shades).
The key points in choosing the material for the craft in this case are:
- the quality of the mittens (they should not have holes or abrasions, as such defects will negatively affect the process of creating the craft, as well as the final result of the creative process);
- absence of a pattern and minor decorations (a pattern or decorations on the original material may interfere with the joining of the parts of the craft, and in some cases may look out of place. Before starting the work process, it is necessary to remove all decorations, regardless of the method of their attachment).
Leather, suede
Leather and suede gloves are the most convenient for making decorations intended for fastening to the head or clothing. When choosing the material of the type in question, it is important to pay attention to the uniformity of the color of the outer surface of the mittens, as well as its integrity.
Otherwise, the craft may become shapeless or deformed during further use after 2-3 weeks of regular wear.
Rubber
Any rubber gloves are suitable for crafts, regardless of their thickness and original purpose.
With the help of medical or household gloves, you can make unusual Christmas tree decorations, as well as animals, birds, and even characters from famous anime and cartoons.
Workers
If you have work gloves at home, which in the vast majority of cases are knitted items with several rows of rubber dots on the inner surface (to minimize slipping when using the gloves for their intended purpose), you can make a cat, a dog, or New Year's decorations.
Cute Glove and Mitten Craft Ideas. Easy Step-by-Step Master Classes
Crafts from gloves (it is recommended to make items with your own hands that correspond to the interests and existing skills of a particular craftsman) are recommended to be made in accordance with generally accepted algorithms of the work process.
Cat
To make a cat out of a glove, you will need:
| Material | Required quantity |
| Knitted or crocheted glove | 1 – 2 pieces, depending on how many crafts you want to make in the end. |
| Material for filling the inside of the toy (for example, cotton wool or synthetic padding). | 100 g |
| Colored cardboard (black, red and white) | ½ sheet of each shade |
| Minor tools and materials | Needle, thread, scissors, glue, ribbons |
The algorithm for creating a craft in this case will look like this:
- Cut the fabric from the glove where it was originally intended that the middle finger and little finger would be placed.
- Fill the inside of the glove with stuffing.
- Sew up the holes in the cut areas using a needle and thread in a neutral shade.
- The cut out parts are also stuffed with filler, and then sewn to the back and side surfaces of the craft (tail and second paw). The part of the glove placed on the side should be at the level of the "pocket" for the thumb.
- Sew the top of the mitten, securing the filling inside the craft.
- Under the elastic band located in the upper area of the mitten, tie a ribbon of a contrasting color, pulling part of the craft, visually separating the cat's head from the rest of the body.
- Cut out circles from black and white colored paper so that the white shapes are 1 mm larger than the black ones.
- Glue the circles together, placing the black shapes on the white ones (the cat's eyes).
- Glue the animal's eyes, fixing them at the same level.
- Cut out a small oval (nose) from black colored paper, then glue it onto the cat's face.
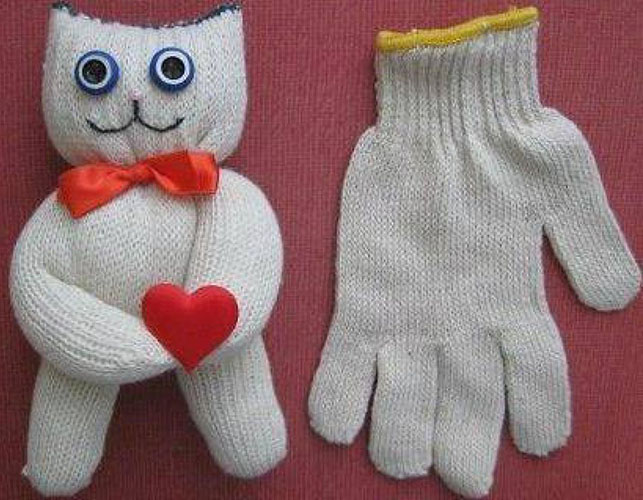
DIY Glove Crafts: Cat - Glue a small red triangle (open mouth) under the nose.
Fox
Crafts from gloves (with their own hands, a child can make a toy that will look no worse than a store-bought one, and also be as safe as possible for their health), as a result of which a fox will be obtained, imply the use during the work process of:
| Material | Required quantity |
| Knitted or jersey glove in orange (preferably a glove with an extended cuff insert) | 1 pc. |
| Filler (for example, cotton wool or synthetic padding) | Depending on the size of the glove |
| Minor materials and tools | Orange thread, needle, scissors |
| Colored cardboard or buttons (for the animal's eyes) | 1 sheet or 2 pcs. |
| Beads or small beads (for pupils) | 2 pcs. |
The algorithm for creating a craft in this case will look like this:
- Cut off 3 pockets from the glove for the thumb, middle and ring fingers. It is important to cut the thumb not at the root, but leaving 1-3 cm from the main part of the glove.
- Sew the cut areas with orange thread and a needle.
- Cut off the cuff and then press the filling into the craft (the body and paws of the future fox).
- Make an animal's head from the cut out cuff, slightly tucking in the edges of its upper part and sewing up the opening while maintaining the shape (the outline of the head with fox ears).
- Make a diagonal cut at the base of the cuff so that the fox's muzzle is triangular in shape.
- Press the filling into the cut off parts of the glove (paws and tail), as well as into the head.
- Sew the pieces of the craft together.
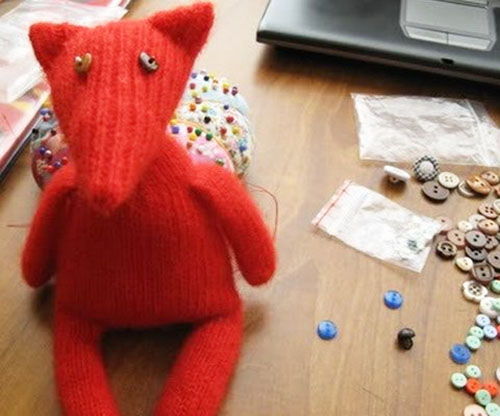
- Attach the eyes to the face of the resulting animal by sewing on buttons with beads in the center (pupils) or gluing on cut-out figures.
Hare
To make a hare out of a glove, you will need:
| Material | Required quantity |
| Knitted or jersey glove in white or grey | 1 pc. |
| Filler (for example, cotton wool or synthetic padding) | Depending on the size of the glove |
| Minor materials and tools | White thread, needle, scissors |
| Colored cardboard or buttons (for the animal's eyes) | 1 sheet or 2 pcs. |
| Beads or small beads (for pupils) | 2 pcs. |
The algorithm for creating a craft in this case will look like this:
- Turn the glove inside out, then cut off the pockets of the middle, thumb and ring fingers.
- Sew up the holes in the places of the cuts, reducing the distance between the ears by 1-2 cm.
- From colored paper or other material intended to make the eyes of the toy hare, cut out 2 small circles.
- Turn the glove right side up, then glue the previously cut out eyes onto the animal.
- Attach a nose (a triangle cut out of black cardboard or paper) under the eyes.
- Glue a small red triangle under the nose – open mouth.
- Fill one of the cut out pockets with stuffing, then sew the cut to form a circle.
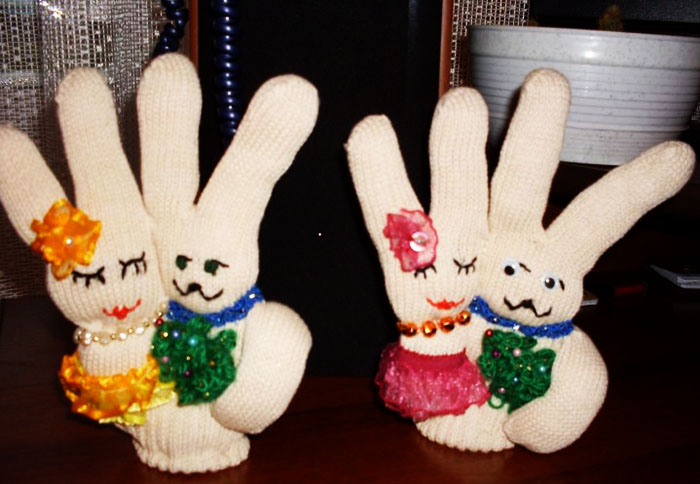
- Sew the tail to the back of the glove.
Octopus
To make an octopus from a glove, you will need:
| Material | Required quantity |
| Knitted or jersey glove of any color | 1 pc. |
| Filler (for example, cotton wool or synthetic padding) | Depending on the size of the glove |
| Minor materials and tools | Thread, needle, scissors |
| Colored cardboard or buttons (for the animal's eyes) | 1 sheet or 2 pcs. |
| Stick or pencil | 1 pc. |
The algorithm for creating a craft in this case will look like this:
- Pack the cotton wool or synthetic padding into the glove, pushing the filling into the finger pockets using a stick or pencil.
- Make a seam under the elastic band - cuff using a needle and white thread, then tuck the top of the glove inside and tighten the hole securely.
- Using a blind stitch, tighten the space between the thumb and little finger pockets.
- Attach buttons or pre-cut paper eyes to the front surface of the toy. The figures should be located at the same level.
- Using simple stitches made with red thread, mark the mouth under the octopus's eyes.
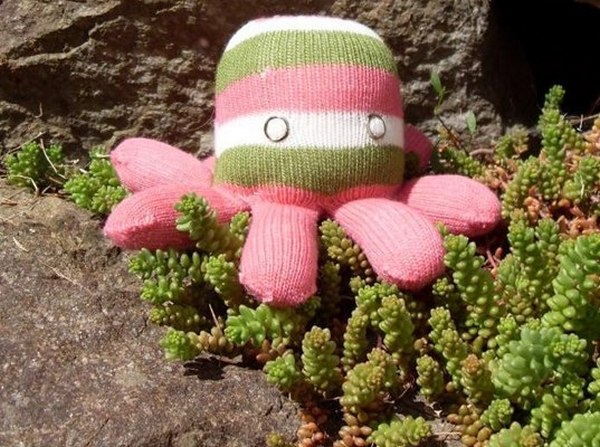
- If desired, you can add more detail to the craft, for example, by attaching a bow made of multi-colored ribbons or hair to the top.
Chicken
Crafts from gloves (with your own hands you can make not just a few toys, but create a family of animals, for example, a hen with chicks and a rooster), as a result of which you will get a chicken, involve the use of:
| Material | Required quantity |
| Rubber glove yellow or orange | 1 pc. |
| Filler (for example, cotton wool or synthetic padding) | Depending on the glove size. Optional |
| Minor materials and tools | Thread, needle, scissors |
| Colored cardboard (white, red, black) or buttons (for the animal's eyes) | 2-3 sheets or 2 pcs. |
| Additional decor | For example, a basket, streamers or foil |
The algorithm for creating a craft in this case will look like this:
- The basket needs to be filled with serpentine or foil. At the final stage, you will need to fix the finished craft there.
- Inflate the rubber glove or fill it with water, then, if necessary, paint it in the desired color.
- Cut thin strips from black cardboard, the length of which corresponds to the length of the pockets for the fingers of the glove.
- Glue the strips to the finger pockets, leaving only the index finger area empty.
- Cut out a small oval and then glue it to the side of the glove (chicken wing).
- Using paints, markers or acrylic paint, refine the bird's appearance by adding black spots in a random pattern.
- Glue pre-cut circles (eyes) to the top of the thumb on both sides.
- Cut a triangle (beak) out of red cardboard and then glue it onto the edge of the thumb on top.
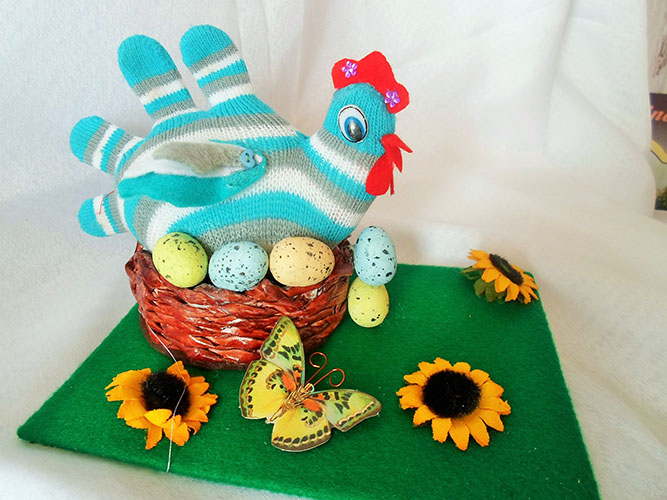
- Secure the finished chicken in the basket by placing the glove with the thumb facing up.
Chickens
To make chickens from a glove, you will need:
| Material | Required quantity |
| Knitted or jersey glove of yellow color | 1 pc. |
| Filler (for example, cotton wool or synthetic padding) | Depending on the size of the glove |
| Minor materials and tools | Thread, needle, scissors |
| Colored cardboard or buttons (for the animal's eyes) | 1 sheet or 2 pcs. |
| Green ribbon | 1 piece, 10-20 cm long |
| Beads | 2 pieces per 1 chicken |
| Yellow, red and orange felt | 1 square each, size 10 cm * 10 cm |
The algorithm for creating a craft in this case will look like this:
- Press the filling into the finger pocket area.
- Step back 1-2 cm from the top edge of the filled pocket and tie a green ribbon on each of the fingers.
- After gathering the finger pockets together, press the stuffing into the bottom of the glove, then turn the bottom inside out and hem it.
- Cut a circle out of yellow felt, the diameter of which will match the size of the glove.
- Sew yellow felt to the bottom of the craft.
- Glue buttons or small pre-cut circles (eyes) to the top of each finger.
- From orange felt, cut out small diamonds in a quantity corresponding to the number of resulting chickens.
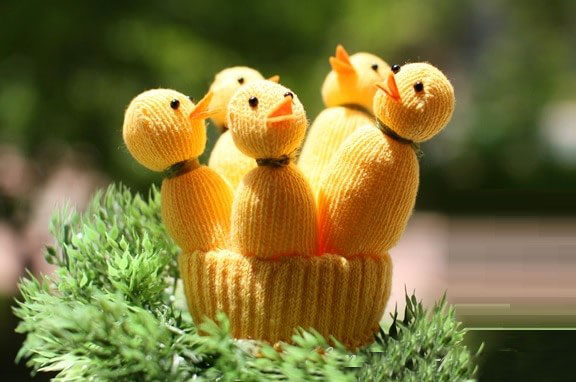
- Secure the diamonds to the top of the finger pockets by folding them in half first.
Squirrel
To make a squirrel out of a glove, you will need:
| Material | Required quantity |
| Knitted or jersey glove of brown color | 1 pc. |
| Filler (for example, cotton wool or synthetic padding) | Depending on the size of the glove |
| Minor materials and tools | Thread, needle, scissors |
| Colored cardboard or buttons (for the animal's eyes) | 1 sheet or 2 pcs. |
| Green ribbon | 1 piece, 10-20 cm long |
| Beads | 2 pieces per 1 chicken |
| Wire in a sheath | 5 segments |
The algorithm for creating a craft in this case will look like this:
- Turn the glove inside out, then draw lines on the surface with chalk or pencil: thumb – tail; area from the cuff to the middle of the index and middle fingers – body; right area of the palm, including the ring and little fingers – squirrel’s head.
- Cut out the details of the craft, then insert wires into the boundaries of the animal’s limbs.
- Tamp the stuffing down inside the piece, then sew the cut areas together so that each piece resembles a specific part of the animal's body.
- Sew the pieces of the craft together.
- Attach buttons or pre-cut cardboard circles (eyes) to the squirrel's face.
- Glue a small triangle under the eyes – the animal’s mouth.
Bear
To make a bear out of a glove, you will need:
| Material | Required quantity |
| Knitted or jersey glove in brown, white or grey | 1 pc. |
| Filler (for example, cotton wool or synthetic padding) | Depending on the size of the glove |
| Minor materials and tools | Thread, needle, scissors |
| Colored cardboard or buttons (for the animal's eyes) | 1 sheet or 2 pcs. |
| Pencil | 1 pc. |
| Beads | 2 pieces per 1 chicken |
| Sheet of paper | 1 pc. |
The algorithm for creating a craft in this case will look like this:
- The glove must be turned inside out, and then drawn with chalk or pencil as follows: the little finger and ring finger are the paws; the index and middle fingers are the lower paws; the thumb is the tail; the half of the palm closest to the thumb is the bear's body; the half of the palm closest to the side edge is the head.
- Connect the edges of the piece of glove that will be the body of the toy, then sew them together, leaving small holes at the top.
- Turn the craft parts right side out and press the filling into them.
- Connect the parts of the craft by sewing them together with thread.
- Attach buttons or small circles (eyes) cut out of paper to the bear's face.
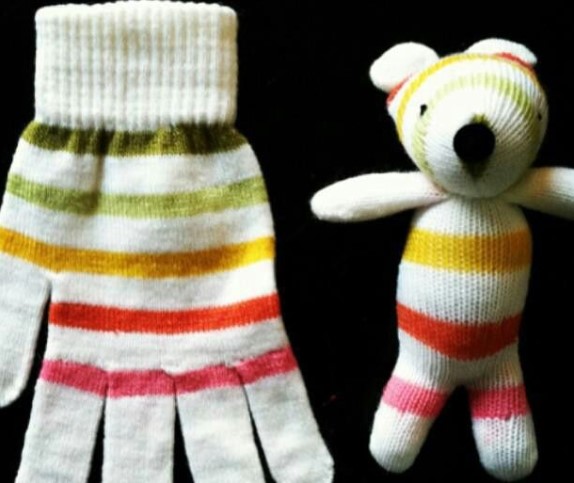
- If desired, decorate the toy with additional attributes, such as bows, beads or wardrobe items.
Doll
To make a doll from a glove, you will need:
| Material | Required quantity |
| Knitted or jersey glove | 1 pc. |
| Filler (for example, cotton wool or synthetic padding) | Depending on the size of the glove |
| A piece of fur | 10 g |
| A piece of cloth | Size 10cm * 10cm |
| Ribbon | Length 10-20 cm |
| Additional tools | Scissors, glue |
| Colored paper in white and black | 1-2 sheets, depending on the format |
The algorithm for creating a craft in this case will look like this:
- Cut off the pocket intended for the middle finger, then sew up the cut area.
- Cut out a pocket for the little finger, then stitch it and fix it on the side at the level of the thumb.
- Pack the inside of the glove with stuffing.
- The cuff needs to be tied with a ribbon, forming the doll's neck. Sew up the upper part of the glove cuff.
- Make hair for the doll from colored wool or a small piece of fur.
- Detail the doll's appearance by cutting out and attaching the eyes, nose and mouth to her face.
- If desired, make clothes for the doll from pieces of colored fabric.
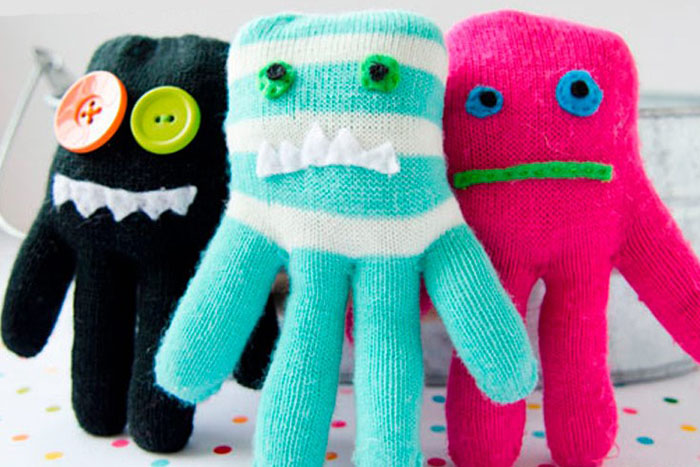
Multicolored monster
You can also make a multi-colored monster out of a glove with your own hands.
For this craft you will need:
| Material | Required quantity |
| Glove, preferably a brightly colored mitten or a multi-colored striped item | The number of gloves is determined by the planned end result. |
| Buttons | 2 pcs. for each monster |
| Satin ribbon | 1 piece for each monster, at least 5 cm long |
| A piece of bright fabric in a contrasting shade (compared to the main color of the glove) | 1 piece, no more than 10 cm * 10 cm in size |
| Filler (for example, cotton wool or synthetic padding) | Depending on the size of the glove |
The algorithm for creating a craft in this case will look like this:
- Cut off the glove pocket intended for the thumb, then sew up the hole formed after the cut.
- Press the filler into the inner cavity of the glove.
- On the front side of the toy, closer to the top edge, sew on 2 small squares at the same level, previously cut out from pieces of fabric in a contrasting shade.
- Buttons must be placed on the squares so that they do not cover the main figure (eyes).
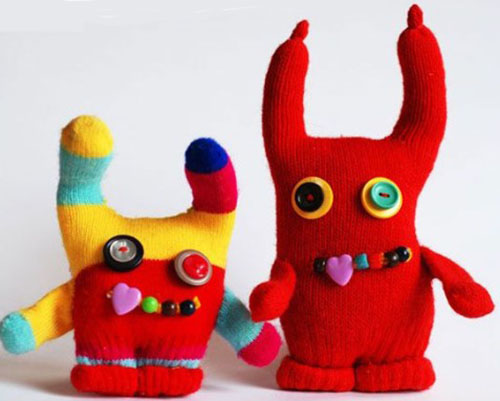
- Transform the upper edge of the used tape into a zigzag, and then sew or glue it to a level 3-4 cm below the eye level.
New Year's crafts
To make a New Year-themed craft, you will need:
- a wooden or plastic stick, the length of which is determined by the height of the future tree;
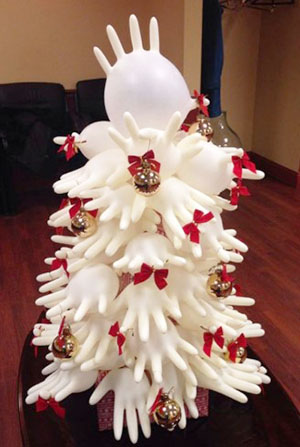
- several rubber gloves;
- strong thread, white rope or cable;
- thread in the color of the gloves used.
To make a Christmas tree, you need:
- Inflate all the gloves, securing the air in them by tying the top of the rubber product.
- Using a strong thread, rope or cord, tie the gloves to a wooden base, distributing them so that there are fewer gloves on top than on the bottom.
- Decorate the craft with tinsel, masking the joints of the gloves with the wooden base.
Decorations
The easiest way to make jewelry from leather gloves is as follows:
- Cut 3 circles from leather gloves so that the diameter of each subsequent one is slightly smaller than the previous one.
- Make several cuts along the entire length of each circle – petals.
- Trim the corners to make the petals of the future flower more rounded.
- Each piece must be evenly coated with glue, after which the leather product must be allowed to soak in the composition for 1-2 minutes.
- Twist the petals, then make sure that the glue has set and leave the flowers in a dry place for 10 minutes.
- Cut out another circle, then stick a pin into it (fastening for future decoration).
- Straighten the petals, then glue all 3 layers of the future flower together, fixing them in the center.
- A twisted strip of leather gloves or a round stone or button can be used as a core. The core should be fixed in the center of the flower with glue.
Crafts made with your own hands from scrap materials, such as gloves, not only allow you to reveal your creative potential, but also help relieve mental stress, which in some cases leads to depression.
Initially, a beginner is recommended to strictly follow the standard algorithm of the work process, and as he acquires basic skills in constructing crafts, the generally accepted scheme is allowed to be modified and adjusted at his own discretion.
Video about crafts from gloves
Master class on making a bunny from a glove: