Schemes and description crochet blanket can interest and inspire not only an experienced craftswoman, but also a novice needlewoman to make interesting large-scale projects, especially since you can use leftovers of different yarns.
Necessary tools and materials
Crochet blankets (patterns and descriptions are simple and clear) can become a stylish element of room decor, a cozy addition to your favorite chair or a warm gift to a loved one.
At first glance, it may seem that not everyone can knit such a large thing, but this is far from true:
- The hook allows the needlewoman to knit a small element in the form of a square or a separate strip, and then simply connect them beautifully into a finished product.
- This method is very good because in case of a mistake or missing a loop, there is no need to unravel or re-tie the entire blanket, but it is enough to change just one small element.
- Crocheting from individual motifs can be called the most creative process, implying the ability to change and combine different patterns and techniques, so such a large product does not become boring with a tedious monotonous process.
- Knitting a blanket with a crochet hook will allow you to approach the issue of choosing yarn more freely, and if there is not enough of it, replace one type with another color, and even mix threads of different quality.
So, for a beautiful knitted product you will need the following tools and materials:
- The required amount of yarn, which can be put together from leftovers from various items or specially purchased for the intended blanket.
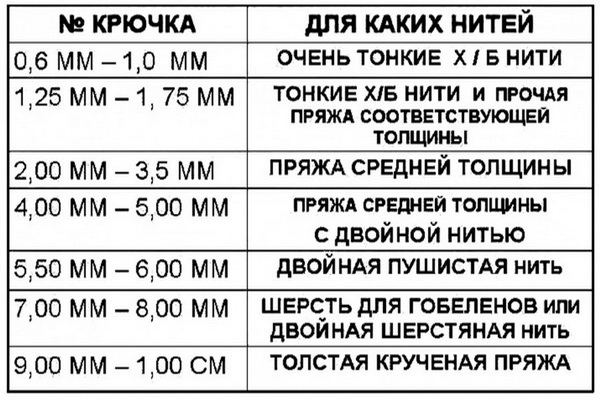
- Choose the right hook, which should be about 2.5 times thicker than the thread used for knitting. The material the hook is made of does not play a special role in this case, it is important that it does not spoil the yarn, does not stain, does not cling and slides well along the thread.
- It is also necessary to get your bearings with the knitting pattern, select patterns and methods of making the product that are appropriate for your skill level, and think through the method of connecting the elements.
It is necessary to choose the right quality of yarn, based on the intended purpose of the intended product.
| Purpose | Yarn | Quality of selected yarn |
| For a newborn | Plush | Softness, lightness, warmth, volume. |
| Openwork | Fine threads, cotton | Smooth thread will help to demonstrate the beauty of the pattern, and light fluff helps to hide small mistakes, adds warmth and tenderness. |
| Volumetric patterns | Wool | A medium-thick thread highlights the intended pattern most effectively and is warm. |
| Patchwork | Mixed | The ability to use leftover yarn, you can take threads of various quality and colors, but it is advisable to select ones with the same thickness. |
After selecting the necessary material and tool, it is necessary to knit a sample or element of the product, then it is advisable to wash and steam it in order to correctly calculate the loops and count the amount of yarn if the product is knitted as a whole.
Schemes with description of works
Crochet blankets (patterns and descriptions can be easily adjusted at your discretion) have recently become very popular, so it is worth mastering some basic models.
For newborns
Crochet blankets (patterns and descriptions of simple models can be mastered by a novice needlewoman) are very convenient to use for a newborn's discharge or as a gift for a baby's christening.
Also, the expectant mother herself will be able to handle it while waiting for her daughter or son, if you take into account a few simple tips:
- It is advisable not to use voluminous designs and complex weaves for children.
- When choosing yarn, you need to pay attention to the markings “children’s” or “hypoallergenic”.
- You shouldn't choose too dark and bright colors; let the blanket be a soft pastel color.
- It is not advisable to decorate such a product with fringe, tassels or pom-poms.
- A blanket for a newborn should be easy to care for, so you should not knit colorful patterns that may fade.
- Do not use threads with fluff or lint for this product, as this may harm the baby if it gets into the eyes or nose.
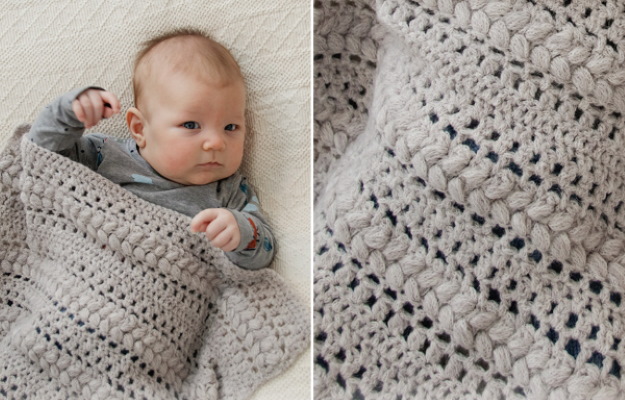
The simplest version of a knitted warm blanket made of thick and light velour yarn, a suitable delicate color. In this solid-colored yarn of the middle price category, a simple pattern of bobbles, knitted loosely, will look beautiful. You can choose contrasting threads in color to emphasize the main pattern of the blanket with a border or make multi-colored stripes in the product.
The appropriate hook and knitting needle size is always indicated by the manufacturer on the packaging of knitting threads.
Step by step knitting:
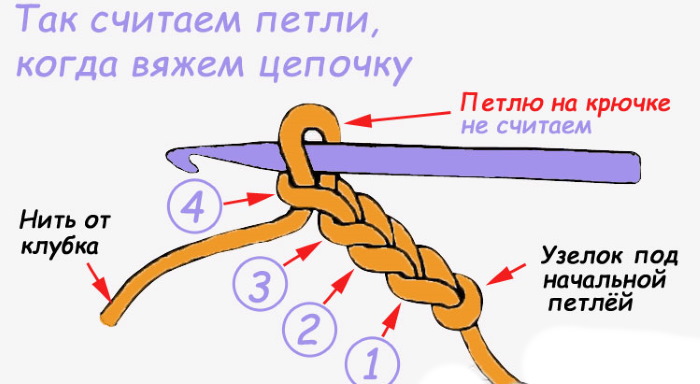
- First, you need to make a loose chain of air loops with a thick hook, dialing them without counting until the desired length of the product.
- The next row begins with knitting 5 air loops, which are necessary for a neat lift and an even edge in the finished product.
- Then you can start knitting the main pattern, for which you need to pass the hook through both threads of the next loop of the base of the cast-on chain, grab the working thread and pull it through without knitting, leaving it on the back of the hook next to the existing loop.
- The next step is to grab a new yarn, which then needs to be passed through the loop you just created. This connected element is called a partial single crochet.
- Next, you need to insert the hook in the same way into the same 1st base loop and knit a new incomplete single crochet from it, leaving the loops unclosed on the back of the hook.
- This operation must be repeated several times to form a voluminous cone from 3-5 elements, for which you should carefully pull the captured thread of yarn through all the open loops on the hook, simultaneously closing them together.
- Then you need to knit a connecting post from 1 air loop, and begin to form a new next volumetric detail of the pattern, skipping 2-3 loops from the knitted cone in the collected chain of the base of the product.
- Next, you need to repeat the alternation of volumetric elements to the end of the row loops, placing the cones at the same distance from each other, and do not forget to knit an air connecting loop.
- In the next row, you can knit the cones in a checkerboard pattern over the connecting posts or reproduce them evenly one above the other.
- Continue knitting in the described manner until the end of the product, until the desired dimensions are reached.
- The finished blanket can be tied with a contrasting border, making a single crochet in each loop, and at the end, going around the entire perimeter of the product with a crab step, changing the direction of knitting the columns from left to right.
Easy pattern for a striped baby blanket
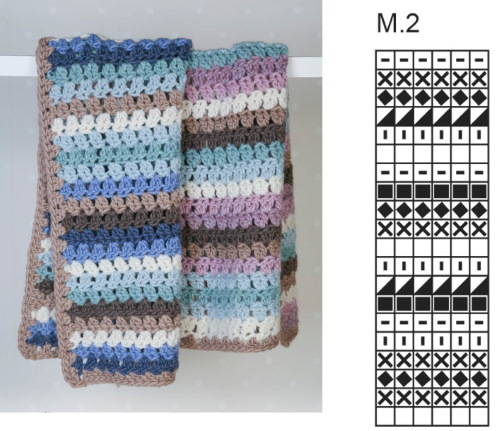
For this product, it is advisable to purchase 3-4 colors of threads of the same quality and footage, which can be easily alternated to create beautiful stripes. There is no need to knit a sample and calculate the number of loops to cast on. The convenience of this product is the ability to knit it if necessary, so the favorite thing can grow with the baby.
A blanket with such a dynamic pattern is suitable both for a child and for room decoration; it can be spread out when walking on the grass or placed under it for warmth when playing on the floor.
Step by step knitting:
- To cast on stitches, you need to knit a chain of air loops of the desired length.
- The next row begins with 3 chain stitches, and then you need to knit double crochets into each loop of the chain until they end in the row.
- Then comes a row with a new color, where you need to alternate single crochets with 2 air loops. You need to knit the columns for both walls in every 3rd loop, skipping 2 elements of the previous row, and alternate knitting the arches in this way until the very end.
- The next row is knitted again with a new thread of a different color. It is required to knit 2 double crochets in each hanging arch to the end of the row. Moreover, in this case, you can pull the thread directly under the arch itself or choose a method similar to the previous knitting for both walls of the lower loop.
- Above the third row, repeat the pattern of knitting arches with a single crochet with 2 air loops. This row is knitted with a thread of the base color.
- The next row should be knitted with double crochets, but use the thread color of the 2nd row.
- In this way, you need to continue alternating the colors and patterns of the stripes until the very end of the product.
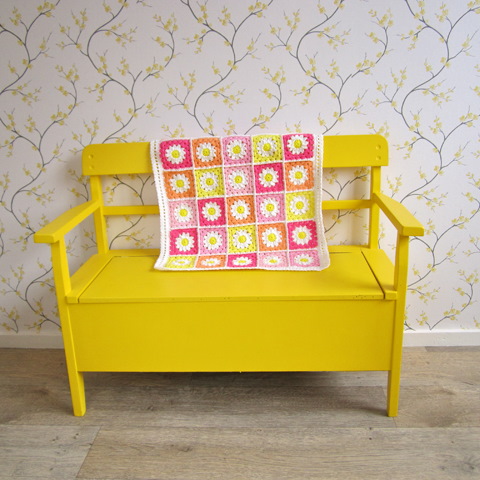
From square motifs
Knitting this blanket from simple motifs will take quite a lot of time, but will please you with the result of an elegant product. You need to buy yarn of different colors, 300 g of each shade. In total, you will need 6 different colors, which should be beautifully combined with each other.
You should choose calm neutral shades for the background and 1-2 colors as a dominant that are suitable for interior design. In terms of yarn quality, you can choose both semi-woolen threads and acrylic. In this case, it is better to choose a hook with number 4 or 5.
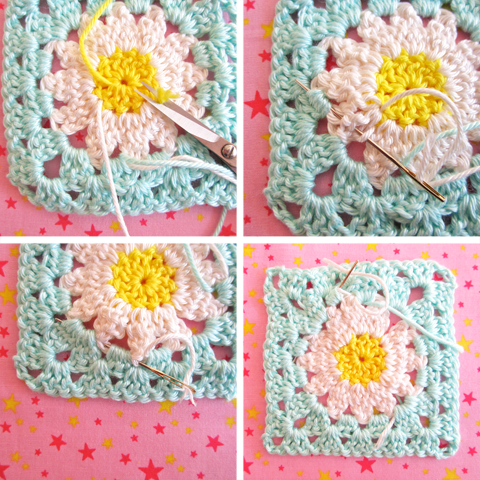
The simplest option would be to knit colored squares of the same size, and then sequentially connect them together using a connecting stitch or a needle, alternating shades in a certain order.
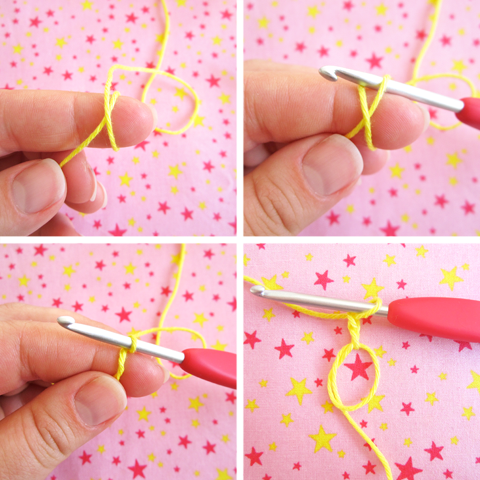
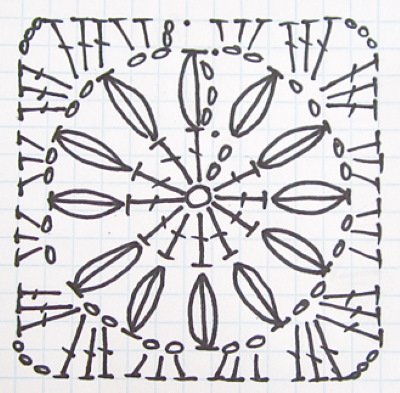
Step by step knitting:
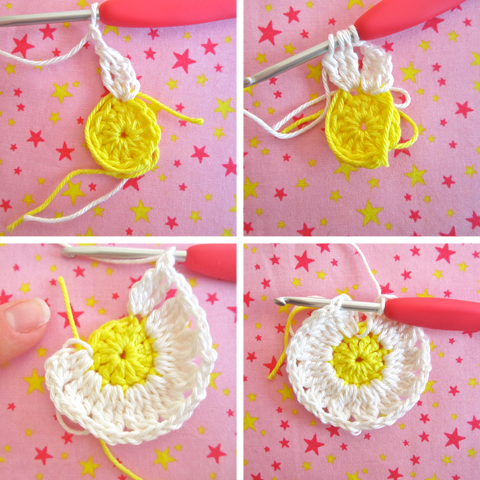
- Knitting a simple pattern for a blanket begins with a set of 8 chain stitches, which should be connected into a closed ring by knitting together the 1st and last loops.
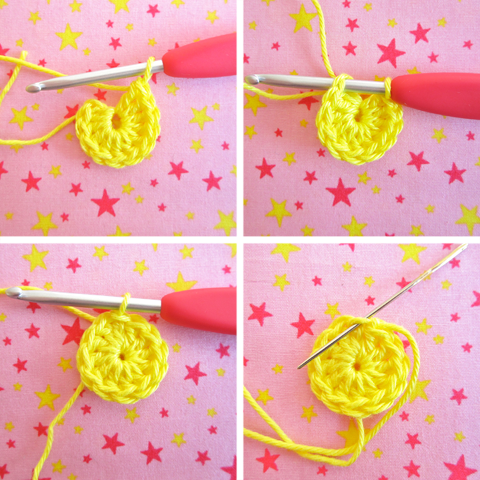
- Then you need to knit 2 air loops for lifting, and after that make 11 single crochet stitches, placing the hook directly in the center of the formed ring. The last loop also needs to be closed with the 1st, knitting them together with a slip stitch.
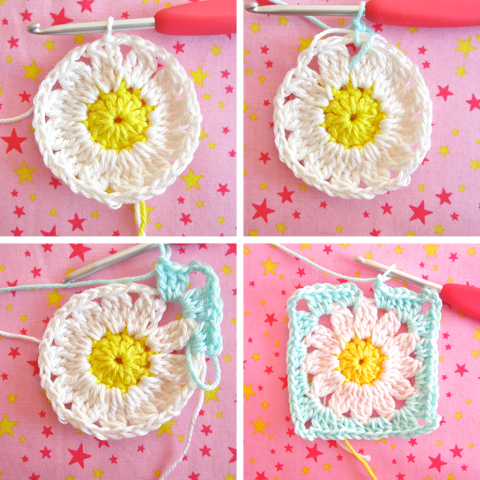
- The next and all subsequent rows must begin with 3 lifting chain stitches, and the corners of the square element must be formed by knitting 4 chain stitches.
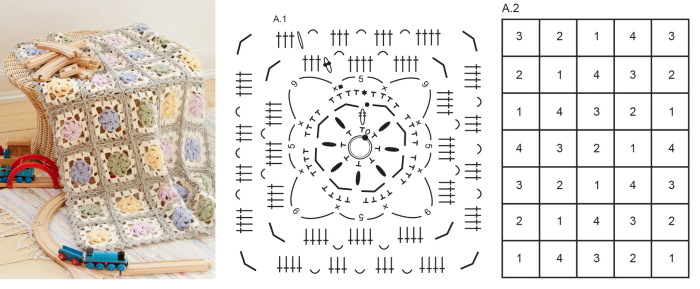
- Each side of the square is knitted with double crochets into each loop of the previous row.
- When introducing a thread of a new color, this must be done when closing the loops of the knitted row.
- In each subsequent row, the number of columns should increase by 4 pieces on each side of the square.
- The colors of the yarn inside the square element can be changed each time at your own discretion, alternating them every 1-2 rows in a different sequence.
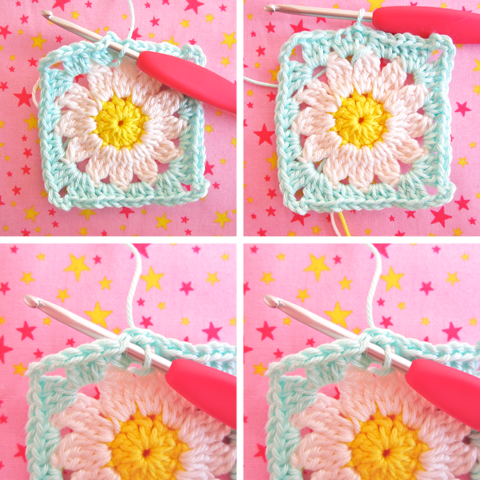
- Each finished motif at the end of the work should be tied with a row of single crochets.
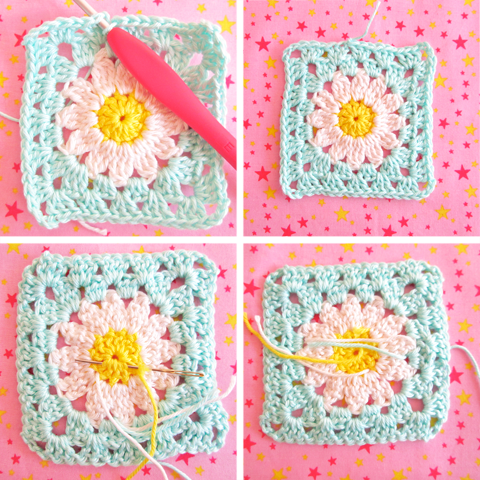
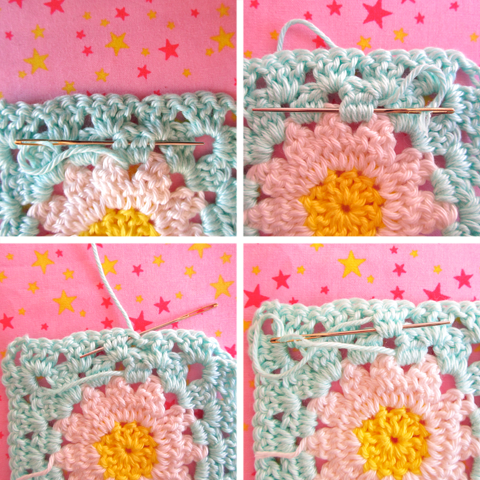
All connected square elements must be ironed through a damp, well-wrung-out fabric from the back side, so that it is easier to sew them into a finished product. You can connect the squares with a hook, knitting only the back walls of the edge loops together.
As an additional decorative element, you can sew with a contrasting thread along the front side of the blanket, creating a voluminous seam. The finished blanket must be tied again along the entire perimeter with a row of single crochets, and then make a decorative row with a crab step.
From the remains of yarn
Crochet blankets (patterns and descriptions must be selected depending on the desired level of complexity) will help to effectively implement the remains of yarn, skillfully combining them with each other in various options.
For this option of recycling numerous knitting wastes, a simple square motif knitted from the corner is suitable. For a large blanket measuring 2 m by 1.8 m, which can decorate a bed in a child's room or a sofa in a living room, you will need at least 2-2.5 kg of yarn of the same thickness.
The main secret of this product lies in beautifully selected threads of different shades, which should go well together:
- To begin, you will need to close a chain of 4 air loops into a ring.
- Then there are 3 loops for lifting, and then you should knit 2 double crochets, after which, to form a right angle of the square element, you need to make 2 air loops, and then finish knitting the row with 3 double crochets.
- In the next turning row, you will need to knit 4 double crochets into each loop of the previous row after the lifting loops, then form the corner of the square using 2 air loops, and finish the row with 5 columns.
- So it is necessary to continue knitting the square motif to the intended size of the elements, periodically changing the color of the yarn at the end of the previous row.
- Having finished one square, you need to start knitting the next one.


- To assemble the blanket, it is recommended to tie all the finished elements in one neutral color with a simple dense pattern of single crochets, and then tie them together behind one wall of loops with connecting posts or sew with a thick needle with a blind stitch from the back side of the product.
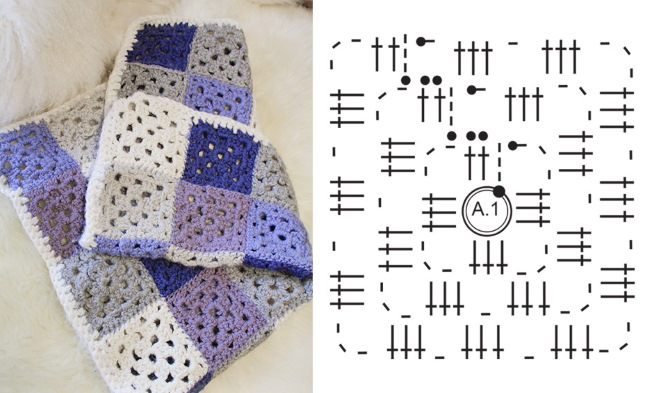
On the sofa
An interesting technique of alternately knitting straight and reverse rows looks very impressive, so it is suitable for a beautiful bedspread or a cozy large blanket, which is assembled from separate squares. This product uses different types of techniques from colored contrasting threads of medium thickness, which combine well with each other.
Each element of the product must be knitted in the following sequence:
- First, you need to knit a small square with a side of 4 cm from the center using yarn of one color using double crochets.
- Then you need to tie 2 adjacent sides with a corner with a row of single crochets using yarn of another contrasting color, then tie 2 rows with the same thread with double crochets, and then finish this color with a row of single crochets.
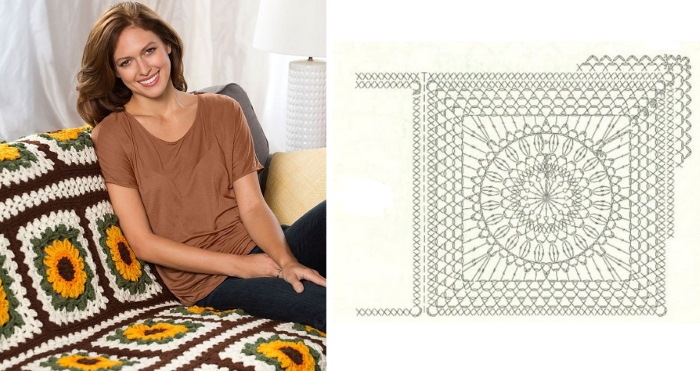
- Now you should introduce a thread of the third color and tie it around the 2 remaining sides of the base square in the same sequence as described.
- After this, you can knit 2 rows of a bobble pattern with white yarn along any 2 sides of the square.
- Then the same pattern, but with a different color of yarn, should be done on the 2 remaining sides of the element to maintain uniformity of the row increases.
- If necessary, you can repeat the patterns of the cones in tying the paired sides of the square element until you reach the desired size of the square, changing the colors of the yarn used.
- Then you should proceed to knitting other square elements of the product in a similar manner.
Once you have reached the required number of squares, you can begin assembling the blanket by carefully steaming it with a hot iron through a damp cloth from the inside.
Secrets for Beginners
Even a beginner craftswoman can crochet blankets without any special skills, using simple patterns and clear descriptions, with just a little effort and patience.
And some useful tips will help make the product a real masterpiece:
- When casting on, try not to tighten the chain stitches of the base too much so that the edge of the product does not look pulled together.
- If you are planning a rectangular product, it is recommended to use the long side of the blanket as the basis for the set of loops, so it will look more impressive.
- It will be easier for a beginner needlewoman to knit a product from smooth, non-twisted yarn without lint, since loops and rows are clearly visible on it, and it is easy to grab the working thread.
- It should also be noted that it is much easier to knit with light-colored threads than with dark yarn of similar quality and thickness.
Blankets knitted with love with your own hands using knitting needles or a crochet hook according to simple and clear patterns with a detailed description can become a real work of art and bring great pleasure not only during use, but also during the creation of a warm and cozy masterpiece.
Video about knitting blankets
Crochet blankets. Patterns and description: