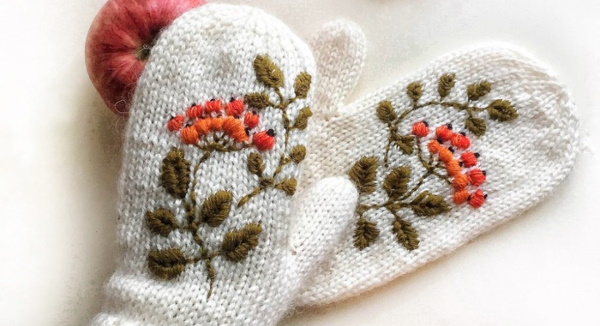
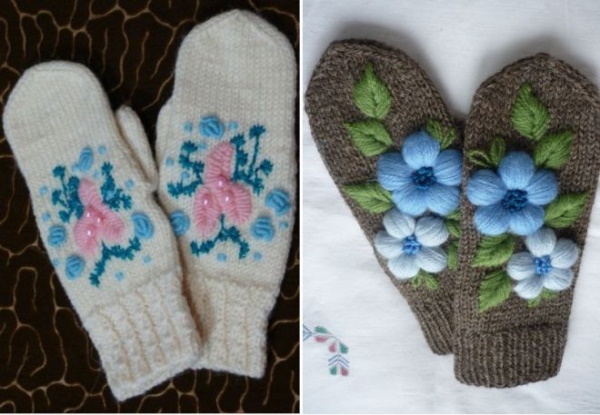
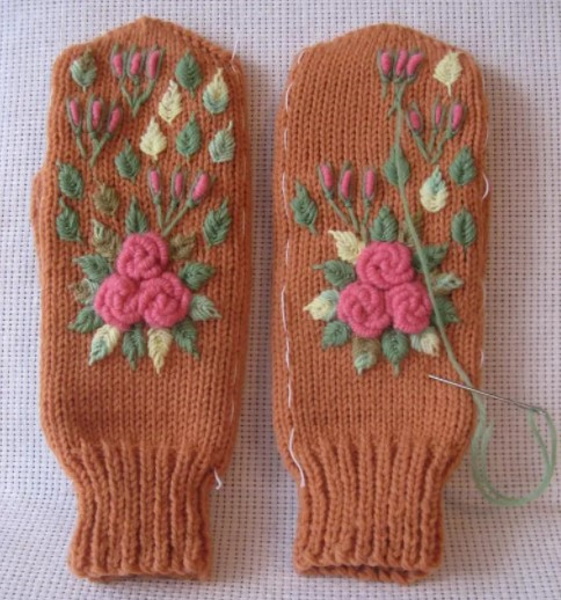
Embroidery on knitted items gives them an unusual and unique look. This applique is often used to decorate mittens. Winter-themed designs are usually used as patterns for these items. Decorating mittens with snowflakes and various New Year's designs is not difficult even for beginner craftswomen.
What threads can be used for embroidery on mittens
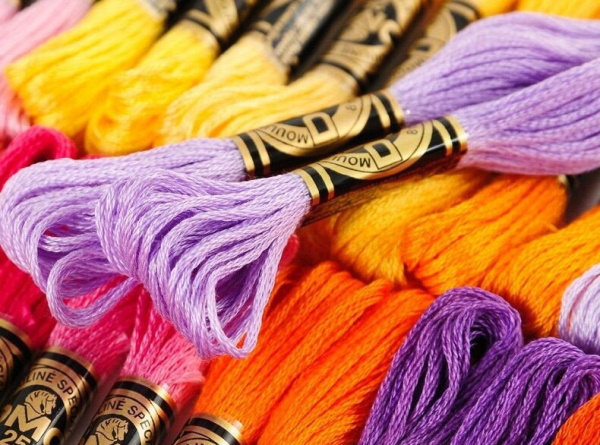
For embroidery on knitted items, you can use both natural and synthetic threads. It is advisable to select yarn for decorating mittens in accordance with the thickness and texture of the threads used to knit the item. Since mittens are usually knitted from natural yarn (wool, linen, cotton), it is recommended to use threads of a similar type and thickness for embroidery on them.
Depending on the complexity and size of the pattern that needs to be applied to the mittens, several options of threads of different thickness and type are selected. For fine work, you can use silk threads or floss. If the pattern does not include complex decorative elements, you can limit yourself to woolen threads. It is also permissible to use braid, and special linen and cotton threads for embroidery.
For additional decoration of mittens, beads and various glitters, as well as metallic threads (lurex) are often used.
Types of threads for embroidery on knitted items:
| Thread type | Description | Peculiarities |
| Mouline thread | It consists of synthetic and cotton fibers and is a twisted strand consisting of 6 twisted threads. | It practically does not get tangled during work and holds its color well during long-term use of the product. |
| Metallized | It consists of a special metallic fiber (polyester or viscose), which gives the thread a bright shine. | High strength. Can be combined with cotton threads. Usually such threads are used when working with beads or for edging the contours of thin parts of the pattern. |
| Woolen | Consists of natural wool and dyes. | Typically used for embroidering large patterns on knitted garments. |
| Acrylic | It consists of fibers obtained from polymer solutions. | Used for embroidery on pillows, plush items and various decorative fabrics. The thread has hypoallergenic properties, but absorbs moisture too quickly. |
Tools and materials
Embroidery on knitted mittens does not require a large number of tools:
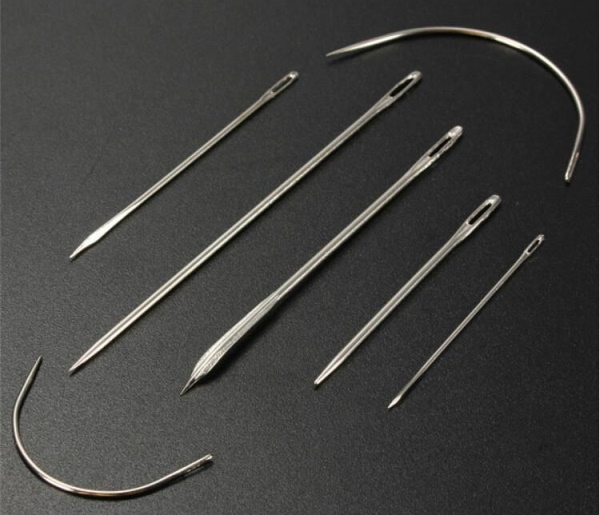
- Needles (for working with beads and embroidery with thin threads, needles of thickness No. 0 or No. 1 are used, while for embroidering patterns with medium and thick threads, needles of thickness from No. 3 to No. 12 are used).
- Needle threader (a small device that helps thread a needle).
- Scissors (it is advisable to have small and large scissors on hand, the first of which are used for cutting threads, and the second for cutting out contour blanks from the material).
- Puncture (a thin plastic or metal stick, pointed at the end, used to create holes in fabric, align loops in knitted fabric, and also to extract contour threads from fabric).
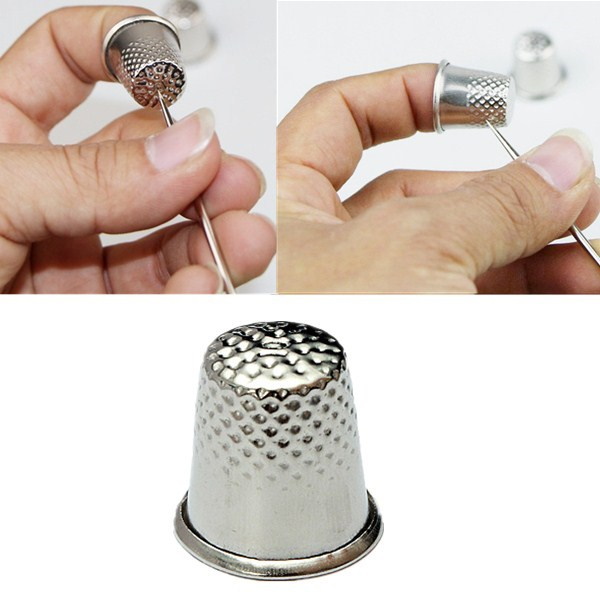
- Thimble (a metal or wooden device that is worn on the middle or ring finger of the hand and used to push the thread through while embroidering).
For ease of use, it is recommended to purchase a special set of sewing and darning needles. When selecting a needle for the thread used, it is necessary to take into account that its thickness should be slightly larger than the thickness of the thread. This will make its passage through the fabric more freely, will not lead to excessive tension and twisting.
Embroidery master classes, image patterns and instructions
The following types of sewing are used to embroider patterns on knitted mittens:
- embroidery on loops (stitches are made over the loops of the product sequentially in horizontal rows);
- satin stitch embroidery (stitches are made independently of the product loops and can have different lengths);
- Rococo embroidery (uses decorative stitches with curls).
Flowers
Embroidery on knitted mittens adds a certain elegance and sophistication to the product if the pattern is a drawing with flowers. The “rococo” type of embroidery is usually used to create such patterns. The work is done with set stitches, which adds volume to the pattern. Before you start embroidering such drawings, you need to master the execution of a basic set stitch.
Embroidering a stitch consists of the following steps:
- Insert the needle from the back side of the fabric and bring it out from the front side, then pull the thread out to the stop from the back side of the fabric.
- Insert the needle from the front side at a distance of 0.5 mm from the previous point of needle exit, and then bring the needle out from the back side to this point and leave it in the fabric (so that half of the needle is visible from the front side).
- Place several loops (curls) of free thread on the needle, tightening them one after another. The number of curls should correspond to the stitch length of 0.5 mm.
- Insert the needle into the previous insertion point and tighten the stitch.
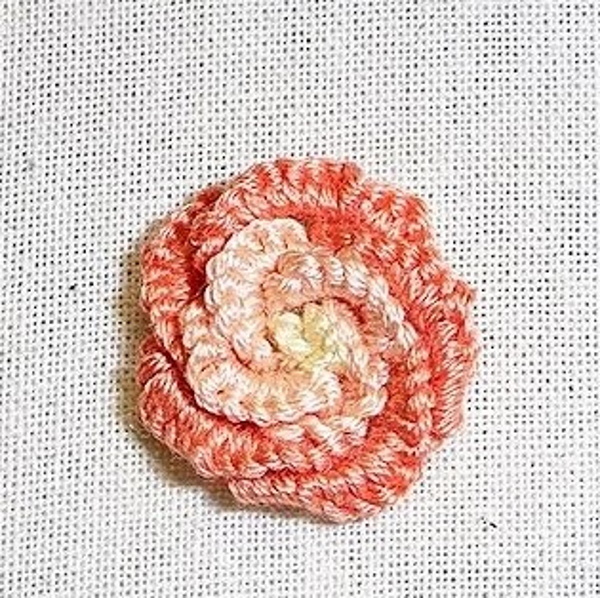
If you need to make a twisted element, you need to make such a number of curls on the needle that their total length exceeds the length of the stitch several times. Using the "rococo" stitch, you can decorate the mittens with several voluminous roses.
The process of creating each rose looks like this:
- Cut a circle of the required size out of paper (the diameter of the circle will correspond to the diameter of the future rose) and sew it with thin threads to the back of the mitten. Then sew it along the contour with a marking thread, and then remove the paper.
- Insert the needle from the wrong side into the top point of the circle and pull the thread until the knot is connected to the wrong side of the fabric. Then insert the needle into the middle of the right lower quarter of the circle.
- Bring the needle out to the front side through the previous point, while the needle should remain in the fabric. Then throw several loops (curls) from the free thread on it, tightening them one after another. Then insert the needle into the middle of the right upper quarter of the circle and bring it out from the back side.
- Bring the needle out to the front side through the point in the middle of the lower right part of the circle, while it should remain in the fabric. Then throw several loops (curls) of free thread onto the needle, tightening them one after another. Then insert the needle into the middle of the upper right quarter of the circle and bring it out from the back side.
- Repeat steps 3 and 4 for the middle of the lower left part of the circle, and then for the middle of the upper left part of the circle.
- Make 4 more stitches in a circle inside the stitches already created.
- Make a French knot in the center (a cast-on stitch gathered and tightened in the center of the pattern).
In addition to roses, green leaves can be embroidered on the mittens. You can use the satin stitch method to make them.
To embroider one petal you need:
- Cut out a petal from paper and sew it with contour threads to the desired place on the mitten (near the flower). Then you need to remove the paper.
- Insert the thread from the wrong side into the point where the base of the petal will be located, and then pull the thread until its knot is connected to the wrong side of the fabric.
- Insert the thread into the lower left part of the petal outline, and then bring the needle and thread out of the lower central part of the pattern.
- Sew the left part of the petal, repeating step 3, gradually shifting the point of insertion of the needle by the thickness of the thread along the left part of the contour.
- Similar to point 4, sew the right part of the petal, moving in the opposite direction (from the top of the petal to its base).
You need to embroider the required number of petals. Using threads of different shades of green, you can diversify the appearance of the pattern.
Animals
Embroidery on knitted mittens is often used to update the appearance of the products. For embroidery of animals, threads of the same composition and thickness as the yarn of the product itself are usually used. Patterns are often made on loops. A thick needle with a blunt end is used for work. It is recommended to first wet the mittens with water and then let them dry completely. As a result, the loops of the product will be aligned and it will be much easier to embroider on them.
Embroidery method:
- Insert the needle from the wrong side into the bottom of the stitch (under its base), and then pull the needle out from the front side, leaving some of the thread on the wrong side.
- Insert the needle from the front side into the area located above the left upper part of the product loop, from the base of which the thread comes out. Then completely bring the thread out from the back side.
- Insert the needle from the back side into the area located above the right upper part of the product loop. Then bring the thread out completely from the front side.
- Insert the needle into the bottom of the loop (under its base), and then pull the thread completely out from the wrong side.
- Repeat steps 1-4 for each stitch horizontally, according to the pattern diagram.
The embroidery on loops is carried out along horizontal rows of knitted fabric. After completing one row, a rise of 1 row is made up, after which the movement of the thread changes in the opposite direction. In colored patterns, rows of the same color are embroidered sequentially with one thread. Then the thread in the needle is changed, and work continues on the rows of the next color of the pattern.
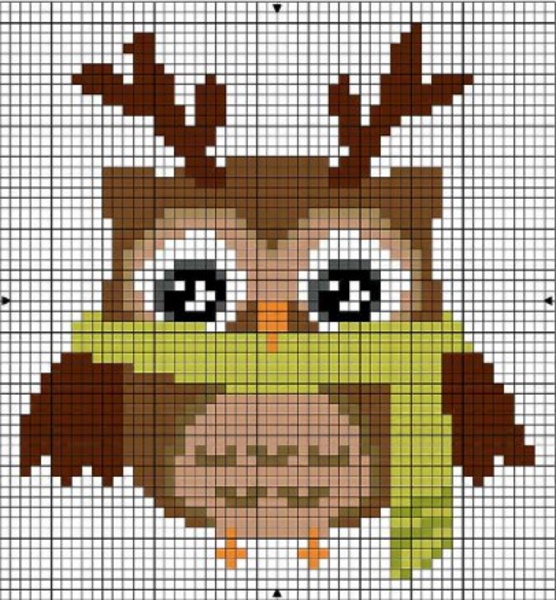
A pattern for an owlet, which is embroidered using the method described above using loops.
Abstraction
Embroidery on knitted mittens radically changes their appearance. If you want to give the product an unusual and unique style, you can use abstract drawings or ornaments as a pattern. Such motifs are suitable not only for mittens, but also for almost all knitted products (scarves, hats and sweaters).
Abstract patterns can be embroidered both on loops and cross-stitch. The color of the thread should not contrast strongly with the color of the mittens. Embroidery should begin from the lower left point of the pattern and make stitches along horizontal rows.
Upon reaching the end of the row, you need to move the needle up 1 row, and then continue working along the next horizontal row in the opposite direction.
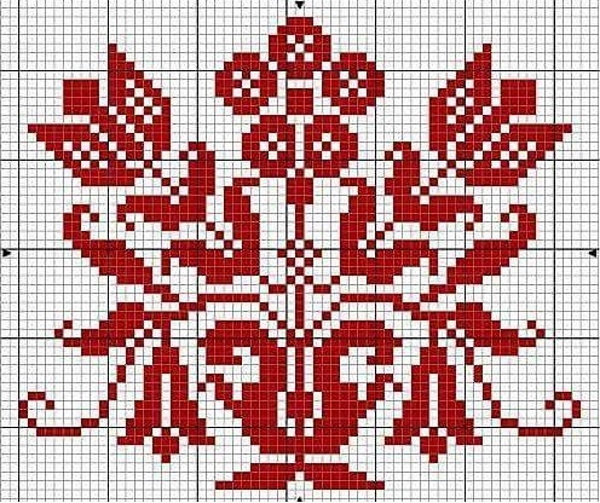
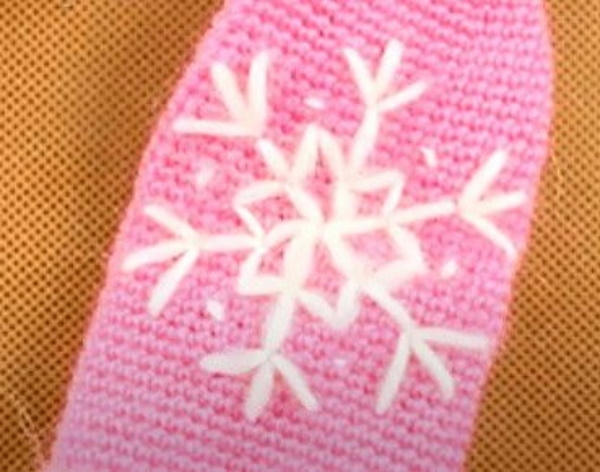
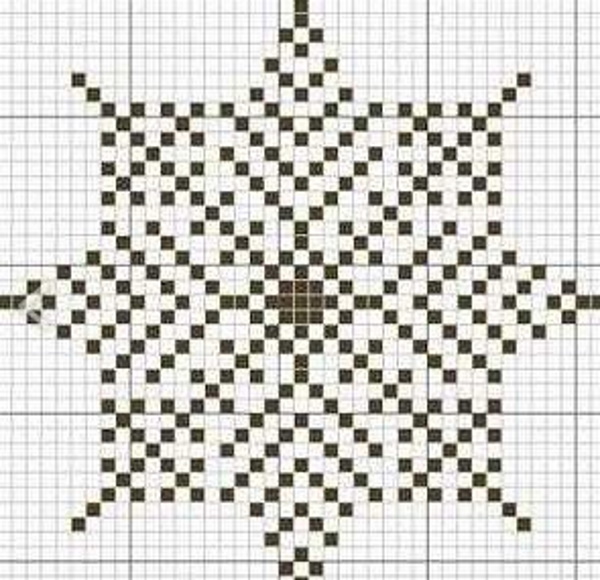
Snowflakes
Winter-themed patterns are great for mittens. Embroidering a snowflake on a knitted item is not difficult. The most preferred way to create such designs is cross stitching. For simple patterns, you can use satin stitching. The picture shows a snowflake pattern that is embroidered with simple stitches:
To create such a pattern, you need to use thick woolen yarn of white color. If the mittens are knitted from white yarn, then for the pattern you should choose a thread of dark tones.
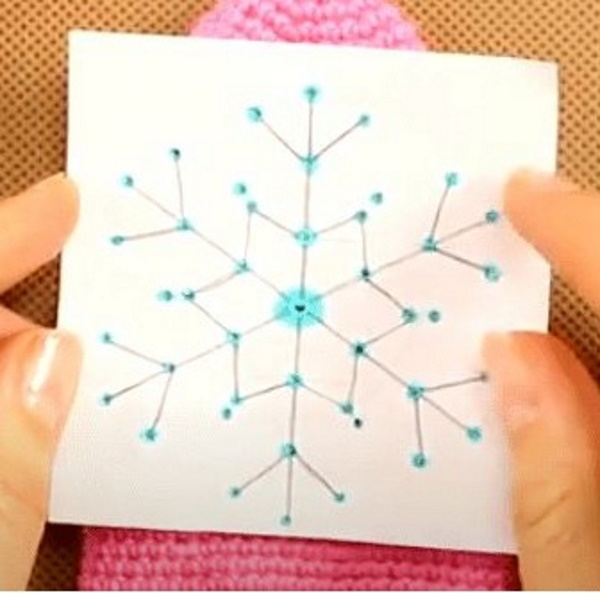
The process of making a snowflake consists of the following steps:
- Draw a snowflake pattern on paper and pin it to the back of the mitten with needles.
- Insert the needle from the wrong side into the highest point of the pattern, and then pull the thread until its knot touches the product.
- Insert the needle into the next point below the previous one according to the pattern and pull it out from the wrong side.
- Insert the needle into the top left point of the pattern from the back side and pull it out until it stops from the front side.
- Insert the needle into the previous point and bring the thread out from the wrong side.
- Insert the needle into the top right point of the pattern from the back side and pull it out from the front side.
- Insert the needle into the previous point.
- The result will be a snowflake element consisting of 3 stitches.
- Embroider the remaining similar elements throughout the snowflake pattern, using the stitch knitting principle in points 2-7.
- Remove the paper from under the pattern.
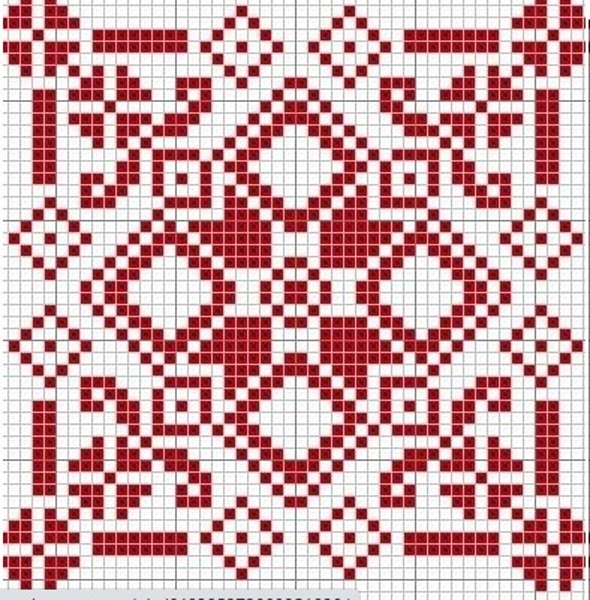
You can also embroider snowflakes with thin threads. Such patterns are small in size and are created using cross stitching. The picture shows a snowflake pattern that can be embroidered in the center of the mitten:
The snowflake is embroidered in one color, different from the color of the mitten itself. The pattern should be embroidered in horizontal rows, using the cross stitch method. Before starting work, you need to imagine that the mitten fabric consists of small squares, on which the embroidery will take place.
The process of typing one cross consists of the following steps:
- Insert the needle from the wrong side into the upper left point of the imaginary square and bring the thread out from the front side.
- Insert the needle into the lower right point of the imaginary square and bring the thread out from the wrong side.
- Insert the needle into the lower left point of the square and bring the thread out from the front side.
- Insert the needle into the upper right point of the square and bring the thread out from the wrong side.
Moving horizontally along the rows, it is necessary to stitch all the crosses according to the given scheme. The embroidered snowflake can be decorated with beads or some of its parts can be sewn with metallic thread.
Birds
To create patterns of birds and other animals, it is recommended to use loop embroidery.
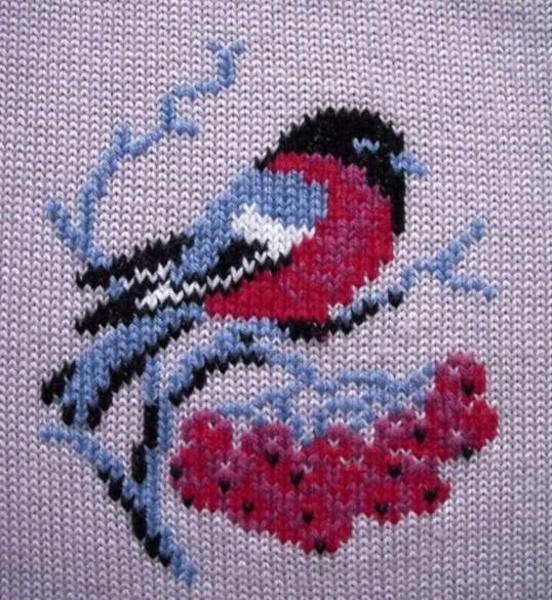
The picture shows a pattern for embroidery of a bullfinch, for which white, purple, gray, black and red wool threads are used. The pattern of this bird is presented in the picture:
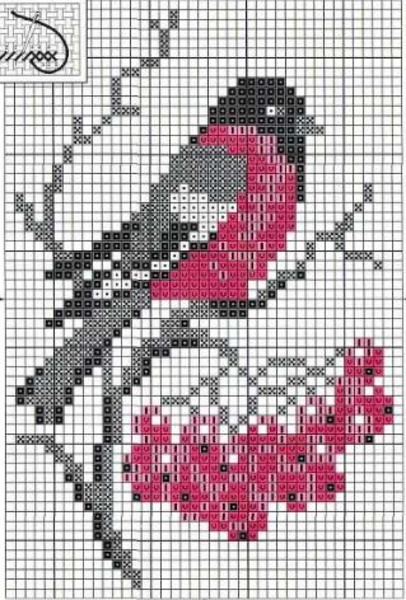
This design is recommended to be embroidered on loops. The work is done on horizontal rows, and the sections of the same color are embroidered with one thread of the corresponding color.
The process of embroidering one loop of the pattern consists of the following steps:
- Insert the needle from the wrong side into the bottom of the stitch (under its base), and then pull the needle out from the front side, leaving some of the thread on the wrong side.
- Insert the needle from the front side into the area located above the left upper part of the product loop, from the base of which the thread comes out. Then completely bring the thread out from the back side.
- Insert the needle from the back side into the area located above the right upper part of the product loop. Then bring the thread out completely from the front side.
- Insert the needle into the bottom of the loop (under its base), and then pull the thread completely out from the wrong side.
Upon reaching the end of each row, it is necessary to move the needle 1 row higher, and continue the embroidery movement in the opposite direction. Embroidery on knitted products is often used for their stylistic design. You can also restore the product with the help of decor. If the mittens have lost their original appearance and are showing signs of wear, an embroidered pattern will help to give them a new look.
Video about embroidery on knitted mittens
How to embroider mittens: