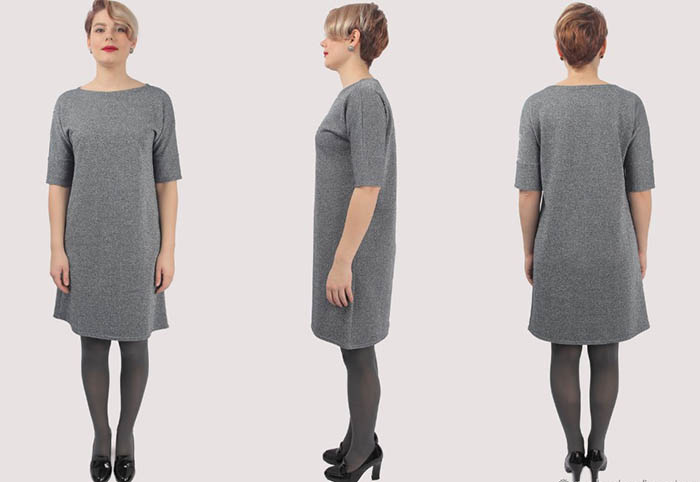
Dress from knitwear you can sew very quickly with your own hands. Such an outfit will be exclusive and will allow you to save your budget, since buying a ready-made product will cost much more. To cope with sewing a knitted dress yourself, it is enough to stock up on the necessary materials and tools.
Specifics of working with knitted fabric
We sew a dress from knitwear ourselves, but taking into account the specifics of this fabric in order to get the desired result. If you work with this material incorrectly, it can lose its properties and the product will be unsuitable for wearing.
When cutting out the future garment, it is necessary to take into account the direction of the fabric loops. In knitwear, it is the same as in hand-knitted items. For this reason, it is necessary to cut out the garment along the grain line and ensure that the lower edges of all the parts of the future dress are directed in the same direction. That is, if the sleeve pattern is laid out on the fabric in such a way that its lower edge looks down, then all the other parts should be laid out on the fabric in exactly the same way.
It is important not to stretch the fabric during cutting to avoid distortion of the product.
It is most convenient to mark the lines of future seams with a small thin piece of soap. Some types of knitwear are very slippery, which makes it difficult to mark seams. When working with such fabric, you should pin it to the paper pattern pieces and leave seam allowances at a distance from the cuts.
Care must also be taken when ironing the fabric. To choose the right ironing temperature and determine the steam supply, it is better to first experiment with an unnecessary piece of fabric. If you try to iron the work piece right away, you can ruin the fabric if the heating temperature is too high, for example.
Iron knitwear only on the reverse side and through gauze or a piece of cotton fabric. When ironing, do not stretch the fabric, otherwise it will become wavy.
In order to strengthen the neck and armhole cuts, shoulder seams, and also to preserve the shape of the product, thin interlining materials, such as interlining, are used. Strips 1 cm wide are cut out of it, which are glued to the cuts of the product parts with an iron.
It is better to strengthen the neck not only with interlining, but also to make a facing. If the facing is cut from a dense, non-stretchable fabric, then it is not necessary to use interlining. You can also use bias tape to process the neck. And if you starch the cut and stitch it with a double needle, then you will not need to waste time gluing interlining and sewing on the facing.
If the product is planned with a narrow stretch neck without fasteners, then it is necessary to preserve the elasticity of the material. In this case, only overlock processing is used to process the neck, or on a sewing machine, but with an overlock seam.
When working with thin knitwear, you should first test it on an unnecessary piece of fabric to see if the interlining will be imprinted on the front side of the garment and spoil the entire look of the dress.
When working with cotton jersey, you should take into account the nuance that it shrinks after washing. It is necessary to wash and dry the material twice, only after that you can safely sew a dress, otherwise the sewn product will shrink after the first wash and it will be impossible to wear it.
To prevent the seam from stretching when sewing the parts together, you can put toilet paper or newspaper under the fabric when sewing. You need to stitch the seams directly through the paper, which can then be easily removed. Thanks to this technique, the seams will be neater and will not stretch.
If you have to work with very stretchy knitwear, it is better to either starch the seams or use a special Avalon film, which will dissolve when washed.
To make slits for buttonholes, it is necessary to reinforce the fabric with interlining or adhesive webbing in the places where they will be made. The same should be done if the dress has a zipper. In places where the zipper will be sewn in, the cuts must be reinforced with adhesive tape or interlining.
If you follow these simple rules, you can create a beautiful, neat dress that will delight the owner of the outfit and cause admiration in others.
Tools for working with knitwear
Knitwear is a rather “capricious” material and in order to make it easier to work with, you can use special tools:
| Tool | What is it for? | Subtleties of use |
| Knitting needles (with round head) | To avoid "runs" on the fabric. Such a needle does not pierce the material when it enters it, it pushes the threads apart. | Stretch type needles are designed for working with synthetic knitwear or with material that contains a lot of lycra. Jersey type needles are needed for making items from woolen knitwear or cotton. It is usually recommended to select the thickness of the needle depending on the thickness of the fabric, i.e. for thin fabric it is better to choose a thin needle. But this rule does not always work, so for each material you should choose a needle by experimenting on an unnecessary piece. |
| Double needle | This is a device that is used to process armholes and the bottom of the future product. It immediately leads 2 parallel lines. | Suitable for any sewing machine. It is threaded with 2 threads from 2 spools. It is for this device that the sewing machine has 2 pins on which the spools with threads are located.
The spools are installed in such a way that the threads on them unwind in different directions. |
| "Walking foot" or upper conveyor | Used to sew together 2 pieces of slippery fabric. | It is necessary for those who do not want to waste time manually basting the parts of the product to each other.
The lower conveyor, working in tandem with the upper one, simultaneously scrolls both layers of material at the same speed, due to which the upper fabric will not slip or gather, and the parts of the product will be sewn together evenly. |
Is it possible to sew a dress without a pattern?
Creating a pattern for a future dress is a time-consuming task. In addition, you also need to have the skills to cut correctly and the necessary knowledge. Those who do not have the art of creating a pattern and do not want to spend extra time on it can do without a pattern.
To do this, you can use the following tricks:
- sew a dress from a tunic;
- use a ready-made T-shirt as a pattern;
- sew a wrap dress;
- cut out the details of the future dress without using a paper pattern - directly onto the fabric, and so on.
Master classes with step-by-step instructions
We sew a dress from knitwear ourselves, without using patterns. This method is the least time-consuming. It is even possible to create an outfit in just a few minutes.

Below are the best ideas with step-by-step master classes, using which you can quickly and easily sew a new dress without using patterns. In this selection, every fashionista will be able to find a suitable option for herself.
To sew a dress you will definitely need:
- a piece of knitted fabric;
- threads in the same tone as the fabric;
- scissors;
- a piece of soap, chalk or pencil;
- sewing needles;
- measuring tape.
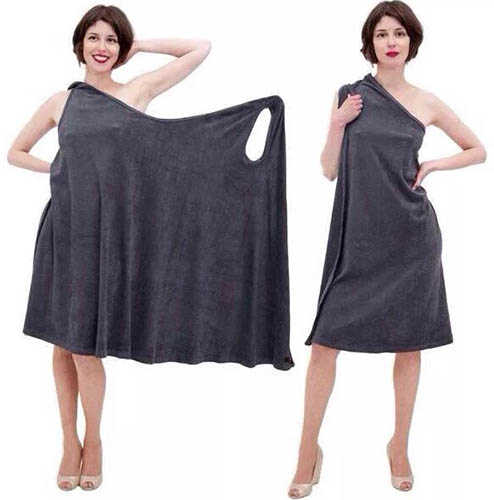
Summer wrap dress without pattern
This is the simplest version of a dress, for sewing which you will not only not have to do cutting, but even use a sewing machine. This is a great option for girls who are planning to go on vacation.
To sew this dress, you will need the following materials:
- a piece of knitted fabric;
- threads in the same tone as the material;
- satin ribbon or braid.
The piece of fabric should be taken in such a size that the width of the future dress corresponds to its length. And the length of the finished product should correspond to the hip circumference of its owner, multiplied by 2.
The dress needs straps. They can be made from ribbon or tape. To do this, measure the shoulder from the back of the armpit to the front. You can do this without even using a tape measure, just take the tape and measure the length of the future strap, then cut off the required piece and measure the second strap along this piece. Now the straps need to be sewn to the upper edges of the fabric cut (to their corners).
The dress is put on like a pareo. First, you need to put the fabric behind your back, and then wrap yourself in it like a towel. Only the upper corners of the dress are not tied at the neck, but are put on the arms with the help of straps. The left strap is put on the right hand, and the right one on the left.
If desired, you can complement the dress with a belt or a thin strap made of rope or leather.
A-line dress
A knitted dress called a "trapeze" is also sewn quickly. It is comfortable and will suit any type of figure. For self-sewing, you will need 1.5-2 m of knitted fabric.
The fabric for cutting must be folded in half, edge to edge. Then, the details are cut out directly on the fabric. First, a dotted line is drawn, from which all constructions will be made. Cutting begins from the back.
First, you need to draw the neckline. Its dimensions depend on how open or closed you want the dress to be. Now you need to measure half the width of the back. This value should be measured along the shoulders with a tape measure. 2.5 cm is set aside along this line and the shoulder slope should be drawn from it.
Now measure the length of the back from the top of the shoulder. The waist line will be here. Between the waist line and the neckline, exactly in the middle, mark the armhole line. The armhole length from the fold of the fabric is drawn at a distance of ¼ of the chest circumference with an addition of 1 cm.
A line parallel to the fold of the fabric is drawn from the chest line. To get small sleeves on the dress, you need to extend the shoulder slope to the fabric cut line. The sleeve width will be from the shoulder slope to the armhole line. The sleeve is one-piece.
Now you need to draw an oblique line from the armhole line to the very edge of the fabric edge (to the corner), with an extension towards the bottom. On the sides, when cutting out, you can round the hem a little so that the dress lies more beautifully.

The back is ready, now it needs to be cut out. Then the front part of the dress is cut out on the second part of the fabric. Then all that remains is to process the edges, sew the details, fold the bottom and the dress is ready. You can wear it loosely or with a belt to emphasize the waist.
Dress with a loose skirt
You can sew such a dress in 30 minutes. As a basis, you need to take your own T-shirt or tank top that fits well and is comfortable to wear. The length of such a dress can be absolutely any, which the future owner likes.
The piece of fabric needs to be folded in half and a T-shirt or vest attached to it. Along the contour of the finished product, stepping back 1 cm, you need to draw the contours of the future top of the dress. The 1 cm step is needed for the seams.

Now you just need to draw the outline of the hem of the future dress. It can be made any width, as far as the fabric allows. You can start drawing the hem from the middle of the T-shirt (T-shirt), if the model assumes that the skirt will start from the waist. If the skirt will start under the chest, then, accordingly, you need to start drawing it from the chest line.
Now all that remains is to cut out the dress pieces, process the edges and sew the pieces together. The new fashionable dress is ready.
Dress sewn with one seam
We sew a dress from knitwear ourselves, which will always be in trend and will decorate any figure. For sewing, you will need a piece of knitwear 220 cm long and at least 150 cm wide. It is better to take stretch material. You can sew this outfit in just 20 minutes.
First, the fabric needs to be divided into 2 pieces - 150 cm and 70 cm. You should get 2 pieces - a square measuring 150x150 cm and a rectangle measuring 150x70 cm. The square will be sewn into a skirt, and the rectangle will become the top part of the dress.
After the pieces are cut out, you need to take the square and fold it in half, and then in half again. Now the resulting corner, the central one, where all the fabric meets, is cut with scissors (the very edge of the corner is cut off a little). Next, the square of fabric needs to be unfolded, the resulting hole should be in the center of the piece of fabric.
Now you need to measure your waist with a measuring tape or any tape and immediately transfer this circumference to the fabric. Place the tape or ribbon exactly around the central hole on the square and outline it with chalk. Now you need to cut out this resulting circle.
Next, you will need to round off the edges of the square so that the hem of the future dress is round. And if you want to make the dress more original, you can leave the skirt shape square, in which case the corners of the square will hang down like tongues.
Now you need to make the top of the dress. The rectangular piece needs to be folded in half widthwise, and then in half lengthwise. You need to make the same as in the skirt piece, a small cutout of the central corner to mark the center of the dress bodice and then also cut out the waist, but not in a circle, but a straight line from the central opening, the length of which is equal to half the waist circumference.
Now the top and skirt pieces are folded together, right sides together, so that the waistline on both pieces matches. Next, you need to baste the pieces together by hand and then stitch them together by machine. This is the only seam that will be done when making this dress.
Once the waistline is sewn, the dress is put on and pinned at the shoulders with decorative pins. Now you can put on a belt or a thin strap to hide the only seam that this dress has. The outfit is ready.
Knitted tunic dress
We sew a dress from knitwear ourselves, using a tunic as a base. This is a way to make an exclusive outfit quickly and with a minimum of effort.
It is necessary to cut off the sleeves and the upper part of the tunic - the shoulders to the chest line. Next, you need to take the sleeves and cut out even, straight, narrow strips from them, which will serve as the bodice of the dress. Now the remaining part of the tunic (skirt) and the bodice are sewn together.
At the junction of the top and bottom pieces, on the inside, you need to sew on an elastic band, gathering the fabric a little.
The summer dress is ready.
Loose fit dress
To sew this product, you need to take the following measurements:
- hip circumference;
- length of the product;
- chest circumference;
- length of the front from the shoulder to the waist.
First, you need to take the fabric and cut out 2 rectangles from it, the length of which should be equal to the length of the future product plus 3 cm, and the width - the hip circumference. When cutting, it is important to pay attention to the fact that the length of the dress should be along the length of the shared thread.
The fabric should be folded in half with the right side facing inward and pinned so that it does not shift during cutting and marking of the pieces. From the left bottom point along the length of the product, you need to measure the length of the front to the waist and draw a straight line. Also, from the left bottom point, you should now measure ¼ of the hip circumference and add 1.5 cm to this figure.
Next, curved lines are marked from the waistline to the bottom and from the waistline upwards. These are the future side seams. You can cut out the dress parts, but you do not need to cut the fabric along the fold line. As a result, you get 2 identical parts - the back and the front.
Now, at her own discretion, the craftswoman can cut out the depth and width of the neck and armhole. Next, the dress belt is cut out - it consists of 2 pieces measuring 72x6 cm.

Sewing the product begins with the belt. It should be folded in half along the long side, so that the front side remains inside. The stitching should be done along 1 short side and 2 long sides. The fourth edge should be left unstitched so that the belt can be turned inside out. After that, it is ironed and the free edge is stitched.
Now all that's left is to process the edges of the dress parts, baste the parts together and process the neckline. Before sewing the parts together, they should be pinned or basted by hand so that all the seams are even and the fabric does not come apart during stitching.
To make the hem neat, you need to fold its edge to the wrong side, stitch and iron.
Every girl can easily and quickly make a dress from jersey, even if she does not know how to cut and sew at all. We use the advice given above, sew exclusive outfits ourselves without patterns and enjoy the result.
Author: Ariadna Lynnik
Video about sewing
How to sew a turtleneck dress from jersey: