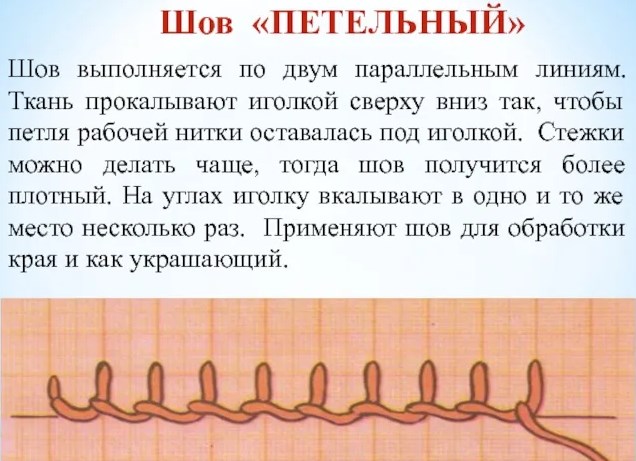
The loop stitch made with a needle can be called by different names: overlock stitch, loop stitch, cast-on stitch. The loop stitch, sewn with a needle in certain steps, is one of the most common stitches in embroidery.
To make the seam look neater, it is necessary to place all the stitches at the same distance from each other. This type of seam is done quickly and easily, so both beginners and more experienced craftswomen can use it in embroidery.
Where and why is the seam used?
Most often, the loop stitch helps to avoid fraying of the edges of the fabric. Since some types of fabric often fray at the edges, the appearance of the finished product can be spoiled. The loop, overlock stitch allows you to improve the appearance of the finished embroidery, making it more neat.

Another advantage of the buttonhole stitch is that in some cases, buttonhole stitches sewn by hand can replace seam lines sewn on a sewing machine.
The loop stitch, sewn with a needle step by step, is also used to join parts. To save time, you can join the edges of two pieces of clothing together and then sew with a loop stitch.
To decorate any item in the interior of the room, for example, curtains or a tablecloth, you can use a loop stitch. In products with floral motifs, you can also use this type of stitch. In openwork Richelieu embroidery, this type of stitch is called Richelieu scallops.
Thus, the use of a loop stitch allows you to solve several problems: for example, while protecting the edges of the fabric, you can decorate the finished product.
Materials and tools
The buttonhole stitch with a needle step by step can be sewn on any type of fabric. To avoid problems during embroidery, you should correctly combine the needle, fabric and thread. So, if the fabric is too dense and the needle is too thin, it will not be able to pierce the fabric and may break.
It should be noted that the selection of threads and needles also depends on the purpose of the seam. If the seam is made for the purpose of overcasting the edges, you can buy ordinary sewing threads that match the color of the fabric. In addition, on thin fabric, stitches sewn with thick threads will look sloppy.
If the purpose of the stitch is decorative, any threads can be used: floss, iris, wool, satin. Wool threads can make the pattern of loop stitches more voluminous. The same can be achieved by using thick threads, for example, floss in several folds.
It is important to remember the stitch size, because if the stitches are too big, the loops will not be able to hold their shape and will look sloppy. If thick threads are used to make small loop stitches, the appearance of the finished work will deteriorate.
A fabric marker allows you to mark the lines along which stitches should be made. This tool will also help make stitches neater and more even. If you cannot buy a marker, you can replace it with tailor's chalk or a bar of soap with a sharp edge.
Execution order
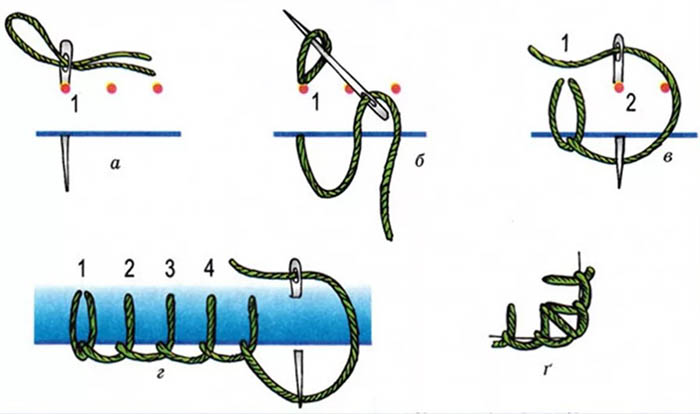
The loop stitch with a needle, performed step by step during the creation of any item, should begin with securing the thread to the product. First, the thread is threaded into the eye of the needle, then a small knot is tied at one of the long ends. To prevent the needle from falling out during embroidery, you can tie two pieces of thread into a knot at once.
The seam that is made for the purpose of overcasting the edge of a piece must be started as follows:
- Insert the needle into the top seam line, leaving a small piece of thread on the front side of the garment.
- Pass the working thread over this piece of thread and sew a stitch.
- Sew a row, bring the thread to the wrong side.
- Make several small stitches (2-3 stitches on top of each other) next to the last loop stitch. It is very important to catch only the base fabric with the needle.
It should be noted that the beginning of the stitch line with seams can be marked with a fabric marker or tailor's chalk. It is most convenient to start from the corner of the fabric. In addition, the execution of the seam depends on its purpose. So, if the seam is to be overcast the edges of the fabric, the knot securing the thread should be located on the back side.
If two layers are being processed, it is most convenient to place the knot between these layers to hide it completely. In the case where an applique is sewn using a buttonhole stitch, for example, a small detail on a large piece of fabric, sewing should begin on the base fabric.
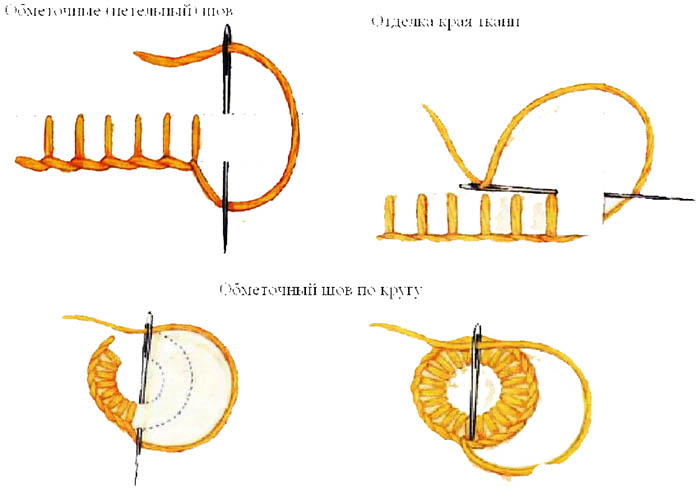
The loop stitch, which serves to protect the fabric edges from fraying, is performed as follows:
- Pass the needle from the wrong side to the right side, piercing the fabric. Hold the thread with the thumb of one hand so that it does not come out of the eye of the needle.
- Move the thread back through the fabric edge, pass the needle through the same hole in the fabric. Since the beginning and ending stitches pass 2 times through 1 point, they will always be vertical.
- Pass the needle through the formed loop.
- Move the thread slightly to the right if the stitching is from left to right. Pierce the fabric with the needle in approximately the same place where the first stitch was made.
- Pass the needle through the resulting loop. The loop should be under the working thread. The first loop stitch is complete. Continue working, repeating the steps described above.
- When the stitch reaches the corner of the fabric, pierce the fabric diagonally, directing the needle toward the corner. Pass the thread through the loop in the same way as when making a regular buttonhole stitch. This step completes the buttonhole stitch on the corner of the fabric.
- To move to the other side of the fabric, the next stitch must be made in a vertical direction.
Many embroiderers face the problem of running out of thread while sewing.
To change the thread correctly during sewing, you can use the following instructions:
- When finishing the embroidery with the old working thread, pierce the fabric with a needle in the same way as when stitching a regular loop stitch. The difference is that when securing the old thread, the loop stitch does not need to be finished.
- When working with 1 layer of fabric or joining a small patch and a large piece of clothing, it is recommended to move the needle to the wrong side of the fabric.
- If you need to fasten 2 layers of fabric, you need to pass the needle through one of the pieces of fabric and place the remaining part of the thread between the parts being connected.
- Leave a small loop through which you will then thread the new thread. If the loop is too small, this will not work.
- Tie a knot in the old working thread so that it is located as close to the surface of the main fabric as possible.
- Thread a new thread through the eye of the needle. Secure it in any convenient way.
- Pierce the fabric with a needle, continue embroidering. Pick up the loop left from the old working thread with the needle. The whole point of this technique is to continue the loop stitch with a new thread.
- Pull up a new working thread and continue working the stitch line.
The buttonhole stitch, a step-by-step stitch used to secure the edges of fabric, can be sewn in several ways. The way the buttonhole stitch is made depends on the type of fabric.
For example, to overcast the edges of elastic fabric, you need to follow these steps.
- Secure the thread in any way convenient for the craftswoman.
- Bring the needle and thread to the front side along the bottom of the seam.
- Bend the fabric and bring the needle out from the wrong side to the front side at some distance from point 1. Repeat the steps to the end of the line. To give the seam a more decorative shade, you can alternate the colors of the threads, change the length of the stitches and the distance between them.
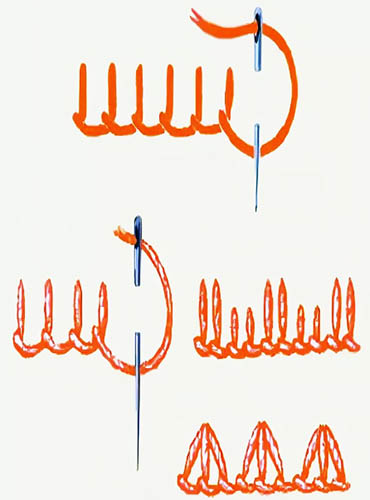
If the buttonhole stitch is going to be used to decorate a finished product, the appearance of this stitch can be changed in various ways.
The table shows several variations of the loop stitch used in embroidery.
| Types of buttonhole stitch | How it is performed |
| A seam with stitches of different lengths | While the stitches should be spaced evenly, their length can vary. The stitching should be done in the same manner as a simple buttonhole stitch. |
| Pyramid seam | To give the stitch a pyramid shape, you need to alternate stitches of different lengths. Performing this type of stitch is no different from performing a regular buttonhole stitch. |
| Loop stitch in the circle | The stitches are made in a circle. The loops should be located on the outside of the circle, and the vertical stitches should be directed towards the middle of the circle. To complete the circle, a vertical stitch should be made. Bring the needle out through the hole where the sewing began. |
| Seam along the edge of the patch | The edging of the smaller part is done with stitches in the direction of the needlewoman. Pierce the fabric with a needle above the vertical stitches, catching both layers of fabric, bring the working thread to the front side of the sewing. |
The final part of working on a buttonhole stitch is finishing the line. To do this, you need to connect the final and initial stitches. To do this, you need to pick up the top of the very first stitch with a needle.
This action will help to connect the entire line of loop seams. After this, it is necessary to pierce the fabric with a needle with a working thread, bring it to the wrong side. On this side, it is necessary to tie a small knot so that the line does not unravel.
Thus, strictly adhering to the established steps, you can make a neat stitch of loop stitches with a needle. Both adults and children will be able to understand the principle of performing this type of hand stitches, so this type of stitch is one of the most common in sewing and embroidery.
Video about buttonhole stitch
How to make a blanket stitch correctly: