To sew clothes or make beautiful embroidery, you need to be able to perform hand stitches with a needle. They can be main, secondary, hidden, decorative and are classified depending on the shape and direction of the stitch.
Where are hand stitches used?
There are more than 20 types of hand stitches. Their names and areas of application depend on the direction of the stitch on the fabric. Stitches can be straight, diagonal, crosswise, and looped.
The following table shows the classification of the main hand stitches:
| Stitch type | Seam |
| Direct |
|
| Oblique |
|
| Cross-shaped |
|
| Loop-shaped |
|
| Loopy |
|
| Special |
|
The use of the whole variety of stitches comes down to several areas of application:
- temporary hemming and stitching of parts, copying of stitching lines;
- decorative finishing;
- processing the edges of products using overcasting or hemming;
- joining parts with a permanent stitch using invisible and decorative seams.
Selection of threads, needles
Beautiful hand-stitched needle stitches are made using the right threads. The wide range of sewing materials can sometimes be confusing. So before going to the store, it's worth familiarizing yourself with the existing types of needles and threads.
Types of sewing needles:
- For handwork. Universal type for any type of sewing. They have different sizes and are used for both thin and thick fabrics.
- For quilting. Shortened with a rounded eye.
- For knitwear. They have a rounded end and do not damage loops.
- For decorative work with thin fabrics. Short, blunt with a large eye.
- For darning and masking holes. Long with a wide eye for threading several folds of thread.
- For embroidery. Sharp with a wide oval eye.
- For leather and leatherette. Distinguishing feature is a triangular tip.
- For beads and seed beads. Very thin, long and flexible.
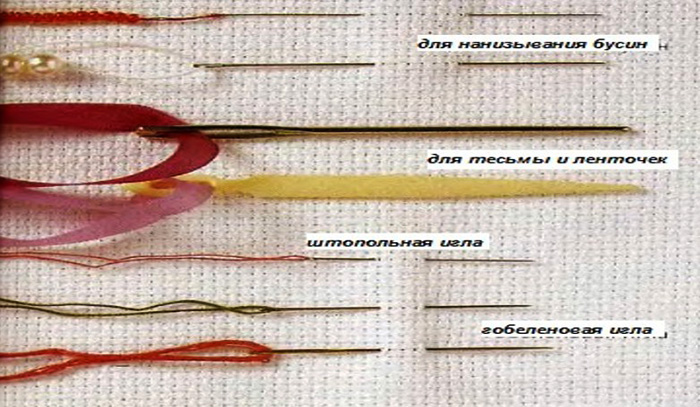
- For furniture and decorative fabrics. Can be straight or curved with a wide eye for threading thick threads.
When choosing needles, you should pay attention to the following nuances:
- The better the quality of the needle, the better it will glide through the fabric. Cheap analogues may have unevenness and nicks on the tip, which can lead to damage to the fabric and snags.
- The thinner the fabric, the thinner and sharper the needle should be.
- The thickness of the needle and thread must match each other.
- Rusty or bent needles must not be used in work.
- Choose the right needle for each type of work. Do not use blunt-tipped cross-stitch needles for hand sewing.
The choice of threads depends on the type of work planned. For temporary basting work, thin threads that are easy to tear are suitable. For durable stitching of clothing parts, strong synthetic threads are chosen. And for embroidery - special decorative materials.
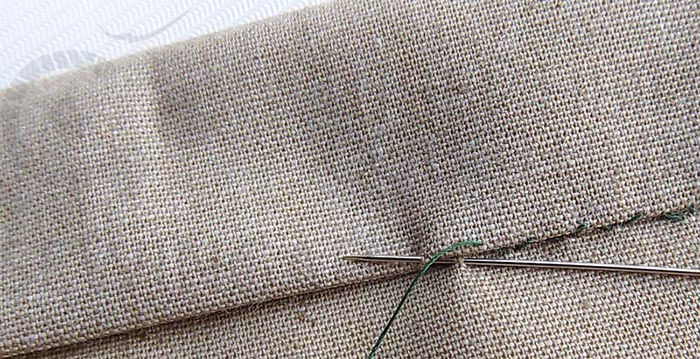
Basic rules for hand stitching
Hand stitches have a structure that consists of the following elements:
- stitch – 1 completed cycle of thread weaving;
- line – a sequence of stitches:
- stitch pitch – the distance between 2 needle punctures.
To ensure that hand stitches are even and neat, you need to follow some rules:
- Work on a flat, well-lit surface. This will reduce eye strain and allow you to control the tension of the fabric and thread.
- When sewing, it is recommended to use a thimble. This will protect your fingers from punctures, save your nails and speed up the work.
- To obtain an even stitch, pull the thread, controlling its tension.
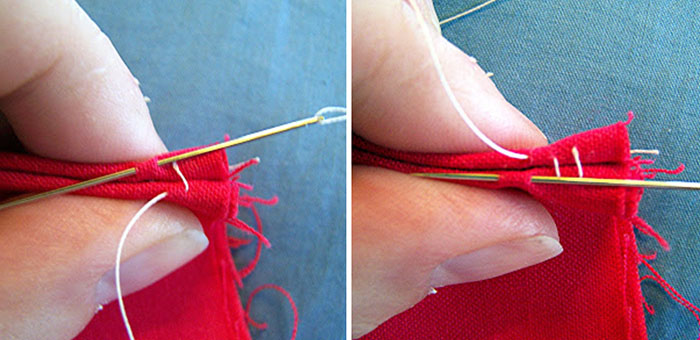
How to make a knot?
Some needlewomen secure the thread to the fabric using 2 small stitches placed crosswise.
Another way is to secure the beginning of the thread with a knot.
To create a knot, you need to perform simple manipulations:
- Pinch the end of the thread between the pads of your thumb and index finger;
- Wrap the thread once around your index finger, making a loop on it.
- Use your thumb to twist the crossed threads and move them towards the end of your index finger.
- Pinch the twisted loop between your fingers, pull the working thread, and tighten the knot.
How to secure the thread at the end?
A beautiful stitch made by hand with a needle can unravel if the end of the thread is not secured correctly.
There are 2 ways of fastening:
- knot;
- securing stitches.
To make a knot-shaped fastening, you need to do the following:
- At the end of the last stitch, make 1 small back stitch with the needle and pull the thread until a small loop is formed
- Thread the needle through the resulting loop and begin to tighten the thread again until you get a second loop, into which you thread the needle again.
- Tighten the thread until a knot is formed.
If you are finishing a seam with a fastening, you need to make several small stitches of the same length in one place.
Beautiful stitches and hand needle stitching techniques
The techniques for making hand stitches are simple and accessible to beginners. Below are step-by-step instructions and recommendations for making different types of stitches.
Back the needle
The backstitch is a very popular stitch. From the front side, it resembles a machine stitch. From the back side, the stitching does not look as neat, the stitches are longer.
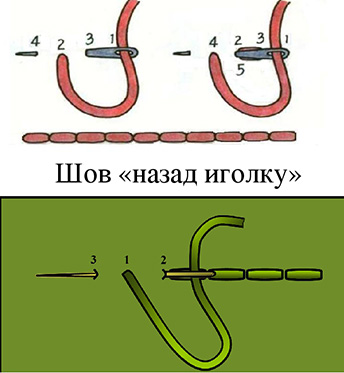
This type of stitch is used for hand stitching of clothing parts and their strong fastening in hard to reach places.
The order of execution of the line:
- Prick the fabric from the inside and bring the thread to the top.
- Make a stitch 2-3 mm long to the right side.
- Bring the needle out again to the front side on the left, 2-3 mm from where the needle entered.
- Make another stitch to the right, inserting the needle into the fabric where the last puncture was.
- Continue the sequence until the seam is complete.
- Fasten the thread.
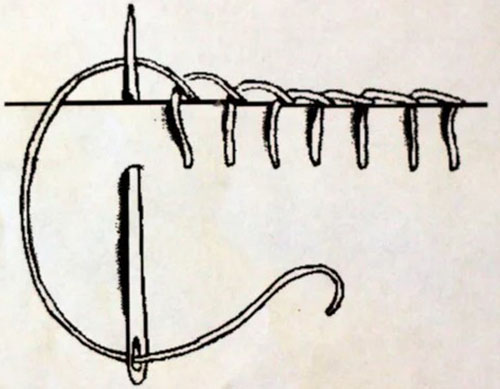
Loop option
This stitch can be decorative and functional. It can be used to beautifully process the edges of felt, fleece, embroider loops and belt loops. Or you can overcast the edge of the fabric to prevent it from fraying and give it a neat, finished look.
The sequence of execution of the line:
- Start the seam from the left side. Place the fabric with the cut side down.
- Insert the needle from the bottom side and secure the thread at the edge of the cut with a loop.
- Insert the needle at a distance of 5 mm from the edge of the cut and about 4 mm from the first puncture of the needle. Bring the thread to the front side, passing the working thread from below. Slightly tighten the loop
- Repeat the sequence until the edge is finished.
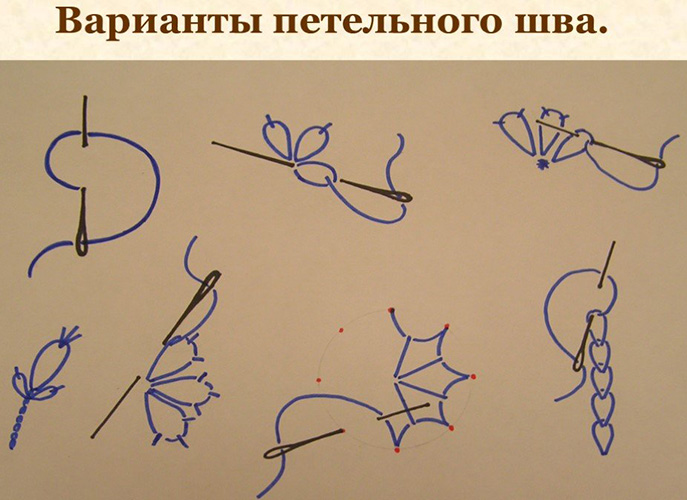
Beautiful stitches with a needle by hand: loop stitch - The width of the stitch step depends on the desired density of the edge processing. Thus, when overcasting buttonholes, each subsequent stitch is located close to the previous one.
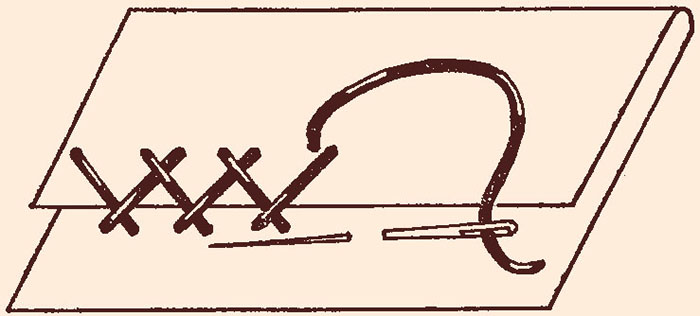
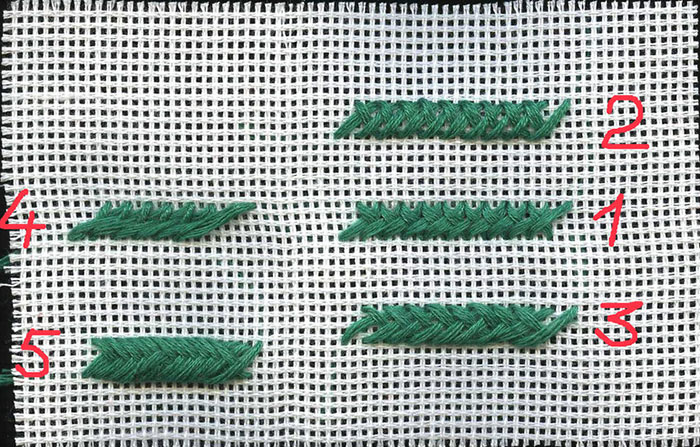
Goat or Christmas tree
Beautiful hand-needle stitches are also used for the semi-movable joining of two pieces of fabric. The "goat" stitch is one of these stitches. It is used for stitching the lining to the main product or for hemming knitted fabric.
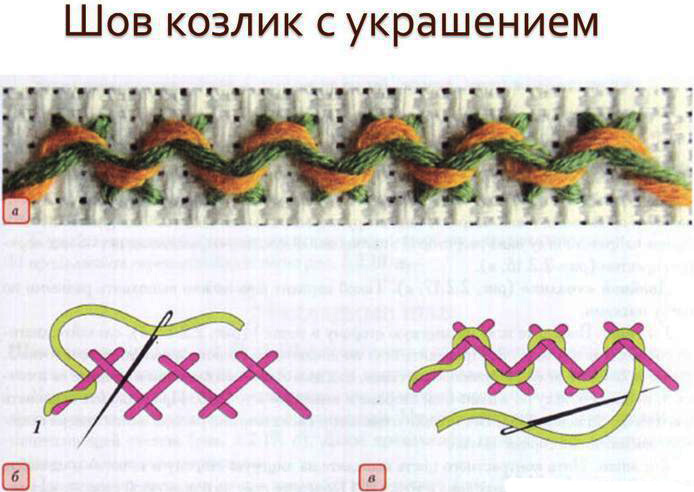
For hidden and hem stitches, it is recommended to use thin and strong threads.
The order of seam execution:
- Place the fabrics in front of you with the edges folded to the wrong side. Start working from the left side.
- Insert the needle from the wrong side into the bottom piece and bring it into the top piece, making a slanted stitch to the right at a 45 degree angle.
- Pick up 2 threads on the left side directly at the junction of the 2 pieces and bring out the needle.
- Insert the needle into the lower fabric on the right side at an angle of 45 degrees from the line of the fabric connection and bring it out to the left after 1-2 mm.
- Continue stitching until the seam is complete. Fasten off the thread.
French tack
This method attaches the hem of the lining to the hem of the main product.
The result is a small thread bridge that prevents the lining from moving away from the bottom of the garment.
Sequence of execution:
- Make 2-3 long stitches (approximately 3 cm) between the lining and the hem of the product.
- Join the stitch threads with a loop stitch laid on top. Place the stitch loops close to each other.
Hemming stitch
The hem stitch is also called a blind or invisible stitch. It is used to inconspicuously sew two parts together or hem the bottom of a garment. The method of execution is forward with a needle. The difference from a simple stitch is that the stitches pass inside the fabric of the parts being joined.
To perform a hem stitch, use thin, strong threads that are very close in color to the fabric. The needle should be short, thin, and sharp.
Method of execution:
- Work should be carried out on the right side.
- Insert the needle into the edge of the fold and bring it out to the working side.
- Step back diagonally 3-4 mm, pick up 1-2 threads of the face fabric, pull the thread through.
- Step 3-4 mm to the left again and pass the needle through the edge of the fold. Pull the thread slightly.
- Continue the sequence of stitches. Fasten off the thread.
Whipping
An easy-to-make stitch. Can be used by sewing beginners. This stitch is used to process the edge of the fabric to prevent it from fraying. The thread for the work is selected to match the fabric. The needle should be a comfortable size (not too thick and not too long) with a sharp end.
It is more convenient to sew the seam on the left side, holding the fabric with the cut facing up.
Procedure:
- Insert the needle, stepping back 5 mm from the edge of the fabric and bring it out to the front side.
- Throw the thread over the edge of the fabric and insert the needle again from the wrong side.
- Make stitches at equal distances.
- Finish the row and fasten the thread.
Dotted line
A variation of the backstitch. Used to attach zippers and other elements to velvet and velour fabric. The thread should match the fabric color, and the needle should be sharp and thin.
Method of execution:
- Start working from the right side. Insert the needle from the wrong side and make a stitch, picking up 1-2 threads to the right side.
- Pass the thread from the back and bring it out to the front side at a distance of 5 mm from the first puncture of the needle. Again make a small stitch to the right.

- Repeat the sequence of stitches until the fabric is finished. Fasten the thread.
Hidden
Beautiful hand-stitched needle stitches can be not only decorative, but also invisible. The beauty is that such a stitch is invisible, and the product looks neat.
This stitch is often used to sew parts together on the front side. For example, this method can be used to mask a hole in clothing or sew up a seam on a soft toy.
Sequence of execution of a blind seam:
- Turn the edges of the sewn parts inside out.
- To make the seam even and unnoticeable, the edges should have clear fold edges. To do this, you can iron them.
- Insert the needle from the wrong side under the fold and bring it out to the front side. Along the line perpendicular to the edge of the fold, insert the needle into the edge of the second piece of fabric and pass the needle inside the fold. Bring the thread out through 2-4 mm.
- Again, place the thread perpendicularly and insert it into the opposite fabric being sewn.
- The stronger the parts need to be sewn, the smaller the stitch steps should be.
- At the end of the work, secure the thread with a knot.
Macrame
Macrame stitches are used when working with leather, leatherette and other dense materials whose edges do not unravel. This type of stitch is used to firmly connect the edges of two parts. This stitch is often used for upholstery of furniture or car interiors.
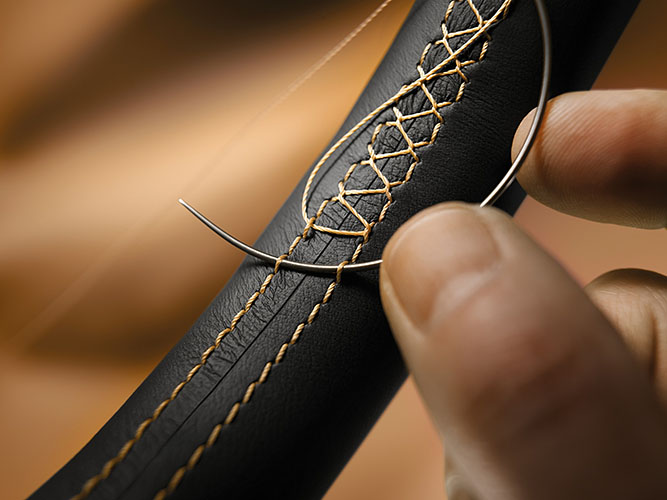
Initially, a machine stitch or a backstitch is made along the edges. The stitches of these stitches serve as the basis for further work. When working with thick materials, a strong needle with a blunt end and synthetic thread are selected.
Sequence of seam execution:
- Secure the thread at the beginning of the work with several stitches through both edges. Use the first holes made when laying the machine stitch.
- Next, work only on the front side, using machine stitches.
- Pass the thread alternately through the stitches, lacing through 1 stitch.
- After completing the lacing, begin to tighten the working thread, forming a beautiful, strong seam.
Sports seams
Sports stitch is used in the production of sports equipment from leather materials. These stitches help to firmly connect the edges and tighten the leather trim.
The stitch is made similarly to the macrame stitch. The difference is that the lacing goes through each stitch of the machine stitch.
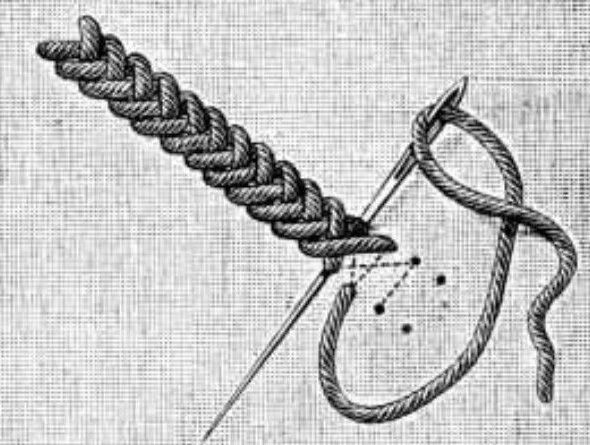
Pigtail
One of the types of sports stitches used for working with leather. It is made using ready-made holes that are made along the edge of the cuts with an awl or a thick needle.
The parts being sewn must be taut, then the seam will be textured and neat.
Method of execution:
- Secure the thread with a few stitches in the starting holes.
- Following the pattern, start making stitches. Do not tighten the thread.
- After finishing stitching, begin to tighten the working thread, forming a relief seam.
- Secure the thread with a few stitches and bring it to the wrong side.
Sooner or later, every person has to pick up a needle and thread. Beautiful hand stitches do not require experience and skill, it is enough to study the patterns and follow the advice on choosing materials and tools.
Author: Maria Andryukova
Video about beautiful seams
Four beautiful hand stitches:
Kerek