Taking measurements is one of the most important stages in in the construction of a pattern and in the manufacture of a garment, in generalThere are various tables that are aimed at making this task easier, containing all the indicators necessary for sewing.
Sequence and methods of taking measurements to construct a pattern
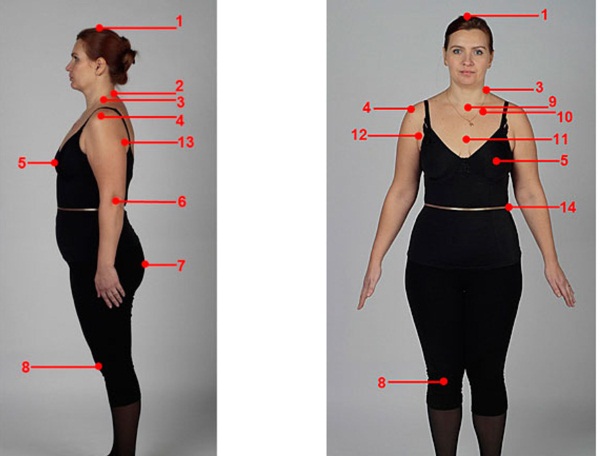
To sew clothes of the required size, you should follow the sequence of measurements when taking measurements.
This process is carried out in the following order:
- Ssh (half neck girth). The measurement starts from the depression located on the front of the neck, which is called the jugular, passes through the 7th vertebral disc of the neck and ends at the depression, connecting with the beginning of the measuring tape. The result obtained must be divided in half.
- Сг1 (1 half-girth of the chest). The measuring tape is placed at the front above the bust and at the back on the shoulder blade line and armpits. The result should be divided by 2.
- Cg2 (2 half-girth of the chest). Measured from the back in a horizontal position on the shoulder blade line, level with the armpits. In front, the measuring tape should cross the protruding area of the bust. The resulting value should be divided in half.
- Cg3 (3 half-girth of the chest) The measuring tape is applied horizontally on any dorsal line at the level of the mammary glands at the back, and from the front it crosses the chest at the place of the greatest protrusion. The result should be divided in half.
- St (half-girth of the waist). Place the elastic band on the waist in the most comfortable place, then place the measuring tape over the elastic band. Divide the resulting data in half.
- Sat (femoral half-girth). The measuring tape should connect the most protruding point of the gluteal muscle with the front part of the line in the horizontal plane, taking into account the protrusion of the abdomen. For accuracy of measurement, you can substitute a ruler. The result should be divided in half.
- Chest width (chest width). This measurement is taken from the chest side, above the bust, on the line that connects the armpits. The resulting number should be divided in half.
- Cg (center of the chest). The measurement is taken horizontally around the chest along the protruding line of the bust. The resulting measurement value should be divided in half.
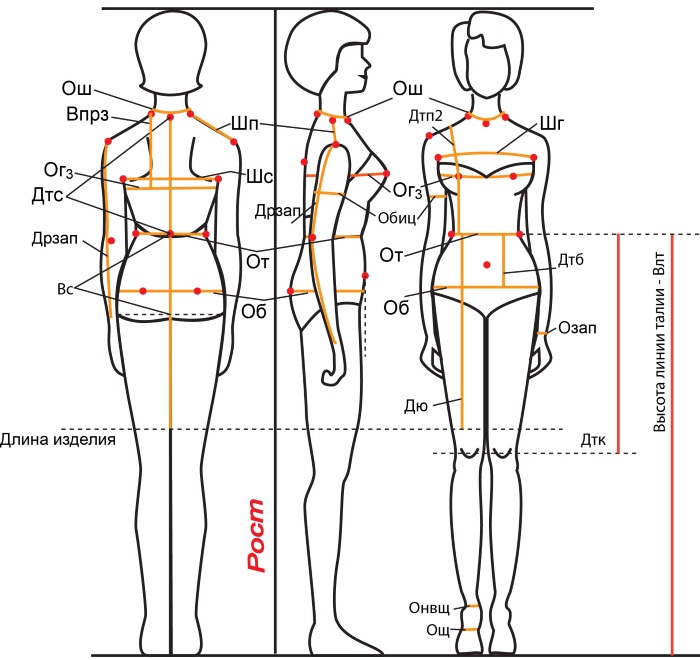
Sewing measurements - Bg (height of mammary glands). The measuring tape is positioned vertically, connecting the place on the shoulder where the seam is supposed to be with the upper border of the bust. The resulting number does not need to be divided in half.
- Dpt (distance from the front to the waist). The measurement is carried out as a continuation of the chest height measurement, only the waist line is the lower point. The result does not need to be divided by 2, the full measurement is used.
- BW (back width). The measuring tape is placed along the shoulder blade line, passes through the armpits and connects. The resulting number should be divided in half.
- Vprz (armhole height from the back). To take measurements, you need to hold a ruler or any other flat object under your arm. Then, using a measuring tape, vertically connect the highest point on your shoulder next to your neck with the point at the level of the ruler. The full measurement is used.
- Dst (length of the back to the waist line). You can take the measurement as a continuation of taking the armhole height measurement, only the lower point will be the waist level, which is in line with the place on the shoulder. The full measurement is used.
- VPK (oblique shoulder height). The measuring tape from the back connects the waist line point on the spine to the farthest point on the shoulder. The full measurement is used.
- Shp (shoulder slope width). Measurements are taken along the shoulder from its last point to the neck. A full measurement is used.
- Dr (sleeve length). When taking measurements, the tape is placed on the outside of the arm, connecting the extreme point on the shoulder and the point of the expected sleeve length. A full measurement is used. In order to construct clothing with long sleeves, measurements should be taken with the arm bent at a right angle.
- OP (shoulder circumference). Measurements are taken from armpit to armpit and across the widest part of the shoulder. The full measurement is used.
- Ozaw (wrist circumference). Measure around the wrist. Use the full measurement.
- Du (skirt length). The measuring tape should connect the point on the waist line with the point of the desired length of the garment. The full measurement is used.
This order of taking measurements is standard, but for convenience you can swap the order of different measurements.
Basic rules for taking measurements
Sewing measurement charts are a good helper when creating new clothes.
However, in order for the product to fit correctly, the following rules must be followed:
- Before taking measurements, it is necessary to remove the person's clothes. This is necessary in order to avoid errors in measurement.
- The person being measured should take a relaxed, upright position. It is recommended to maintain normal posture, lower your arms, and place your feet so that your toes are turned out and your heels are together.
- To take measurements, it is better to use a measuring tape made of thick fabric. When taking measurements, it should not be stretched or relaxed, but should fit the person's body precisely.
- The standard of measurements to be taken on both sides is the right side. They should not differ by more than 0.5 cm.
- When measuring, remember that you will need fabric for the allowance, so you need to add 1-2 cm to each measurement.
For clothes that are not meant to be tightly fitted, special measurements are provided that take into account the cutting features and provide for a loose fit.
Their values are presented in the table: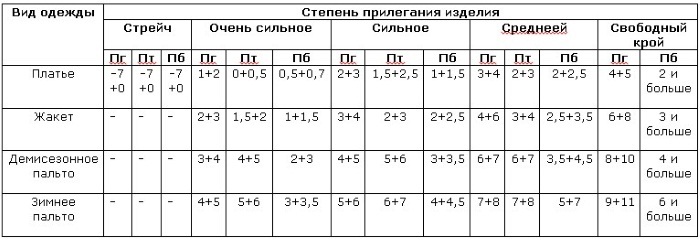
The given values are sufficient to construct a pattern using the main methods of clothing manufacturing.
Table of sizes according to GOST
According to GOST, there are 509 typical female figures, the parameters of which are used to determine standard measurements.
The parameters by which the division into types of figures occurs are:
- Height (classified as the most important feature).
- Third chest circumference.
- The circumference of the thigh, taking into account the distance that the belly protrudes.
The listed parameters are usually sufficient to determine the size of clothing according to GOST, however, the following are currently mainly used:
- Chest circumference (CG). The chest circumference is measured, with the measuring tape placed horizontally and passing through the most protruding parts of the chest in front and along the shoulder blades in the back.
- Hip circumference (HC). The indicator is measured as a circumference around the thigh, which passes through the most protruding parts of the buttocks at the back and in the front, leaving a reserve to take into account the protrusion of the abdomen.
- Waist circumference (WC). Measure at the most comfortable place using a horizontal elastic band located at the waist.
- Height. The indicator is measured using a tape that connects the highest point of the head to the floor.
The creation of a size grid according to GOST is possible due to the distribution of selected typical female figures. According to the height indicator, clothing for adults is designed from 134 cm to 182 cm. Each subsequent size differs from the previous one by 6 units of measurement.
According to the third chest circumference, the difference is 4 cm, and the size range starts at 72 cm and ends at 136 cm. The sizes according to the hip circumference parameter start at 80 cm and end at 152 cm with an interval of 40 mm.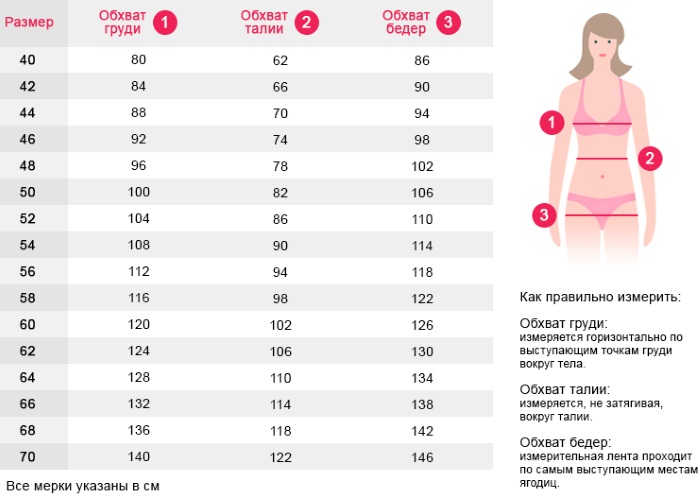
Sewing measurements (the table reflects the features of the figure) are determined separately for women who have very large sizes. For them, according to the height parameter, clothes are designed from 160 to 170 cm, each subsequent size is larger than the previous one by 6 cm.
The chest circumference is determined by the indicators 140-148 cm with an interval of 40 mm. The hip circumference, taking into account the protrusion of the abdomen, has a value of 140-166 cm with an interval of 40 mm.
For children
The children's size chart is divided into 3 categories:
- for children under 6 years old;
- for boys from 6 to 18 years old;
- for girls from 6 to 18 years old.
Clothing sizes for children under 6 years old do not differ by gender, so at this age the size chart is uniform and suitable for children of both sexes.
| Age, years | Size | Height, cm | Chest circumference, cm | Waist circumference, cm | Hip circumference, cm |
| 1 | 22 | 74 | 44 | 45 | 50 |
| 1.5 | 24 | 80 | 48 | 48 | 54 |
| 2 | 26 | 84 | 52 | 52 | 56 |
| 2.5 | 26 | 92 | 52 | 52 | 56 |
| 3 | 28 | 98 | 54 | 53 | 58 |
| 3.5 | 28 | 104 | 56 | 53 | 62 |
| 4 | 30 | 110 | 60 | 54 | 66 |
| 5 | 30 | 116 | 60 | 54 | 68 |
The choice of clothes for children under 12 months is made only according to their height. Usually, when producing such things, a sufficient width of the product is laid down, which will suit a child of any build.
The size chart typical for the average girl aged 6 to 18 years is shown in the table:
| Age | Size | Height, cm | Chest circumference, cm | Waist circumference, cm | Hip circumference, cm |
| 6 | 30 | 122 | 60 | 54 | 68 |
| 7 | 32 | 128 | 64 | 56 | 72 |
| 8 | 34 | 134 | 68 | 60 | 76 |
| 9 | 36 | 140 | 72 | 62 | 82 |
| 10 | 38 | 146 | 76 | 62 | 84 |
| 11 | 40 | 152 | 80 | 63 | 88 |
| 12-13 | 42 | 158 | 84 | 64 | 92 |
| 14-15 | 44 | 164 | 88 | 66 | 96 |
| 16-17 | 46 | 170 | 92 | 70 | 100 |
| 18 | 48 | 176 | 96 | 74 | 104 |
For boys aged 6 to 18 years, the following distribution of clothing sizes and body parameters is typical:
| Age | Size | Height, cm | Chest circumference, cm | Waist circumference, cm | Hip circumference, cm |
| 6 | 30 | 122 | 60 | 54 | 65 |
| 7 | 32 | 128 | 64 | 57 | 68 |
| 8 | 34 | 134 | 68 | 60 | 72 |
| 9 | 36 | 140 | 72 | 63 | 76 |
| 10 | 38 | 146 | 76 | 65 | 80 |
| 11 | 38 | 152 | 76 | 65 | 81 |
| 12-13 | 40 | 158 | 80 | 68 | 85 |
| 14-15 | 42 | 164 | 84 | 70 | 88 |
| 16-17 | 44 | 170 | 88 | 73 | 92 |
| 18 | 46 | 176 | 92 | 76 | 95 |
In the tables, which reflect clothing sizes for boys and girls from 6 to 18 years old, the data in the last columns (from 14 to 18 years old) may differ from reality.
This is possible due to the different development of children, some may be significantly ahead of the average height of their peers. In addition, at this age, secondary sexual characteristics begin to actively develop, so the size of clothing may be different. This is especially true for teenage girls. In the event that the measurements of children's clothing do not fit, you need to use the tables of adult parameters.
For women
Measurements for sewing (table below) women's clothing according to GOST:
| Size | Chest circumference, cm | Waist circumference, cm | Hip circumference, cm | Neck circumference, cm |
| 42 | 84 | 65 | 92 | 35 |
| 44 | 88 | 70 | 96 | 36 |
| 46 | 92 | 74 | 100 | 37 |
| 48 | 96 | 78 | 104 | 37.5 |
| 50 | 100 | 82 | 108 | 38 |
| 52 | 104 | 86 | 112 | 39 |
| 54 | 108 | 90 | 116 | 39.5 |
| 56 | 112 | 94 | 120 | 40 |
| 58 | 116 | 98 | 124 | 40.5 |
| 60 | 120 | 100 | 128 | 41 |
| 62 | 124 | 104 | 132 | 41.5 |
| 64 | 128 | 106 | 136 | 42 |

The size range of women's clothing according to GOST includes sizes from 42 to 64. However, 42 should also be considered a teenage size, so it is not so common among adult women. There is also a division into categories by height for women.
This classification includes 6 types:
- Height No. 1 – from 146 to 151 cm;
- Height No. 2 – from 152 to 157 cm;
- Height No. 3 – from 158 to 163 cm;
- Height No. 4 – from 164 to 169 cm;
- Height No. 5 – from 170 to 175 cm;
- Height No. 6 – from 176 cm and above.
Women with a height below 146 cm and a thin build are advised to use the measurements of teenage clothing.
For men
The size range of men's clothing starts with size 44 and ends with 70. Clothing up to size 44 is considered teenage. In this case, you need to focus on the measurements from the table for teenagers.
| Size | Chest circumference, cm | Waist circumference, cm | Hip circumference, cm | Sleeve length, cm | Neck circumference, cm |
| 44 | 88 | 70 | 92 | 59 | 38 |
| 46 | 92 | 76 | 96 | 60 | 39 |
| 48 | 96 | 82 | 100 | 61 | 40 |
| 50 | 100 | 88 | 104 | 62 | 41 |
| 52 | 104 | 94 | 108 | 63 | 42 |
| 54 | 108 | 100 | 112 | 63 | 43 |
| 56 | 112 | 104 | 116 | 64 | 44 |
| 58 | 116 | 108 | 120 | 64 | 45 |
| 60 | 120 | 112 | 124 | 65 | 46 |
| 62 | 124 | 116 | 128 | 65 | 47 |
| 64 | 128 | 120 | 132 | 66 | 48 |
| 66 | 132 | 124 | 134 | 66 | 48.5 |
| 68 | 136 | 128 | 136 | 66 | 49 |
| 70 | 140 | 132 | 140 | 66 | 49.5 |
From the data in the table it follows that there is a decrease in the difference between the waist and hip measurements proportionally to the decrease in height. From this we can conclude that the taller the man, the larger his belly size. However, this statement is not always true, so before sewing men's clothing it is always necessary to take individual measurements in order not to make a mistake with the size.
Men's clothing is also divided into 6 categories depending on height:
- Height No. 1 – from 158 to 163 cm;
- Height No. 2 – from 164 to 169 cm;
- Height No. 3 – from 170 to 175 cm;
- Height No. 4 – from 176 to 181 cm;
- Height No. 5 – from 182 to 187 cm;
- Height No. 6 from 188 cm and above.
Clothes with a height below 158 cm are considered teenage.
Basic measurements for shoulder garments
To make a pattern for a shoulder garment, which includes dresses, coats and jackets, you need to take the following measurements:
- R (height). The measuring tape should connect the extreme point of the head to the floor with a straight line parallel to the body.
- Ssh (half-girth in the neck area). Measurements are taken from the jugular notch in front of the neck along the cervical base, vertebral discs and end at the notch. The height of the neck is measured if the product has a collar.
- Сг1 (1st half-girth of the chest). The circumference of the chest above the mammary glands is measured at the level of the scapular protrusions and armpits.
- Cg2 (2nd half-girth of the chest). The circumference of the chest is measured along a horizontal line at the level of the armpits, taking into account the shoulder blades and chest.
- Cg3 (3rd half-girth of the chest). The chest circumference is measured only taking into account the protrusion of the chest.
- St (half-girth at the waist). The measuring tape is placed at waist level around the torso.
- Sb (femoral semicircle). The circumference of the thigh is measured. The tape crosses the most protruding points of the buttocks from the back, and passes in front, taking into account the protrusion of the abdomen.
- Chest width (width of the chest). The measuring tape is placed horizontally over the mammary glands from one armpit depression to the other. The result should be divided in half.
- Dts (length of the back to the waist line). Measure from the back from the waist to the highest point on the shoulder. The tape should be parallel to the spine.
- Dtp (length of the front part to the waist). Measurements are taken from the front from the horizontal waist to the seam on the shoulder joint. The tape should pass along the chest protrusion, which should be marked.
- BH (bust height). It is measured in the same way as the accident, only the lower measurement point is the protruding part of the chest.
- Cg (center of the chest). The measuring tape is placed from one most protruding point of the chest to the other. The measurements taken are used after dividing them by 2.
- VPK (oblique shoulder height). Measurements are taken from the point where the waist line intersects the spine to the point where the shoulder seam ends.
- Шс (width of the back). The measuring tape connects the armpit hollows from the back side. The measurement should be divided in half.
- Shp (shoulder width). The highest point of the shoulder at the neck is measured from the place where the shoulder joins the arm.
- L (length of the sleeve of the product). The measuring tape connects the point of the intended sleeve length to the top point of the shoulder joint.
- Op (full arm circumference). The circumference of the shoulder is measured at the widest point.
- Wrist circumference (Wrist circumference). Measurements are taken around the circumference of the wrist at its narrowest point.
- Back armhole length. Measurements are taken from the highest point of the seam on the shoulder to the horizontal line, which runs along the horizontal line of the armpit hollows.
- Di (length of clothing). The measuring tape connects the point of the intended length of the garment with the highest point of the seam on the shoulder.
All measurements that include the word "half girth" must be divided by 2 to obtain the desired value.
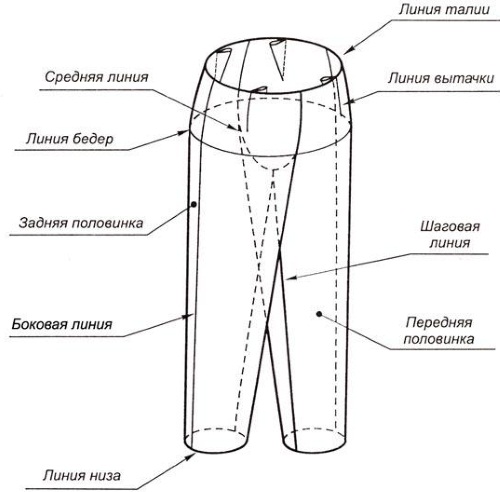
Basic measurements for trousers
Measurements for sewing (the table for similar clothes is standard) of trousers of different sizes should be taken as follows:
- LSL (length of trousers along the side). The measuring tape is placed along the outer thigh and runs from the intended length of the product to the tape located at the waist. The tape should cross the most convex part of the thigh.
- DtK (length from the horizontal waist to the knee level). It is measured consistently with the DSB measurement, only the middle of the knee joint acts as the lowest point, and the waist line remains the highest point.
- Chipboard (length of the product along the front side). The measuring tape is placed along the front side of the leg from the waist line to the intended length of the product. At the same time, it should cross the maximum bulge of the abdomen.
- ДШ1 (1st step length). This measurement is taken "on the ruler" from the highest point of the ruler to the floor line. Measurements are taken from the inside of the leg.
- DSh2 (2nd step length). The measurement is taken along the back of the leg, starting from the fold under the buttock to the point of contact with the floor. The correctness of the measurements of the first and second step lengths can be checked by comparison, usually the first measurement is 10-40 mm longer than the second.
- SSH (sitting height). Measurements are taken while sitting on a chair from the waist of the product to the point of contact with the chair. The measuring tape is placed on the side.
- OB (femoral circumference). The measuring tape is placed horizontally across the widest part of the hip. It should pass under the crease of the buttock.
- HE (leg coverage). Measurements are taken in a horizontal plane 15 cm above the knee.
- OK (knee coverage). The measuring tape goes around the knee in the middle. For loose-fitting trousers, measurements are taken with the knee bent at a right angle, and for tight-fitting trousers, with the leg straightened.
- DPr (armhole length). This measurement is a control one. The measuring tape is located from the front part of the product belt on the waist line to the elastic band on the waist line at the back. The tape passes through the groin.
- ШН (width of the lower part of the trousers). Determined individually depending on the product model.
Measurements for sewing a skirt
Sewing measurements (the table will help you take the measurements correctly) of the main The parameters for making the skirt are taken as follows:
- St (half-girth at the waist). The measuring tape is placed horizontally at waist level where the belt of the garment is to be placed.
- Sat (thigh half girth). The circumference is measured in the thigh area at the most protruding points of the buttocks at the back and taking into account the protrusion of the abdomen at the front. If there are fat deposits, then the measurement should be taken at the widest point.
- Dts (length of the back to the waist). The measuring tape is placed parallel to the spine and connects the highest point on the shoulder seam to the waist line.
- Du sb (length of the product from the side). The estimated length of the skirt is measured from the belt at the waist on the side.
- Du sp (length of the product from the front side). The measuring tape is placed in front from the waist line to the intended length of the product.
- Du sz (length of the product from the back side). This measurement is not taken, but calculated after constructing the pattern of the product.
All measurements that are used with the prefix "half-girth" must be divided in half after taking them and the half size must be used in the future.
Measurements for sewing hats
To design a headdress pattern, 3 main measurements are used, which include:
- OG (full head coverage). This measurement is also called the finished product size. To take it, place the tape around your head so that it runs horizontally, crossing your forehead and touching the brow ridges with its edge in front, and crosses the most convex part of the back of your head and meets the beginning of the tape on the side.
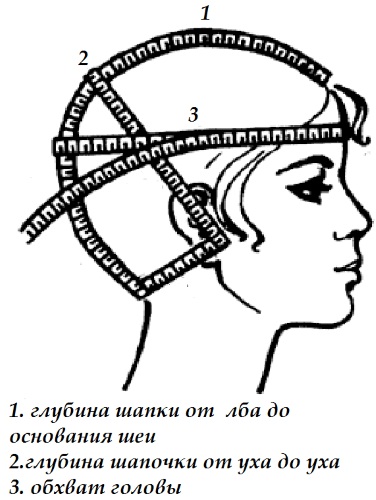
Also, when taking this measurement, you should take into account what kind of headwear is being designed, since measurements should be taken according to the circumference of the head on which the product will be worn. For example, for a hat pattern, the ribbon should be raised in the front and lowered in the back, and for a skullcap, the horizontal line should be raised to the desired level.
- Transverse measurement of the head. When taking this measurement, the tape should run along the highest part of the head, connecting the points above the ears.
- Longitudinal measurement of the head. When taking this measurement, the tape should also pass through the most convex part of the head from front to back. In this case, the extreme points of measurement are the points of intersection of the measuring tape with the line along which the full head circumference was taken.
The parameters listed are basic and will be enough to make standard headwear. However, to create special models, additional measurements may be required, which the tailor must determine independently. For example, to sew a beret, you also need to know its widest part.
Thus, tables containing the basic parameters for constructing patterns of standard clothing are very valuable, because with their help you can sew clothes without even taking measurements from a person.
Article formatting: Vladimir the Great
Video about taking measurements
Let's learn how to take measurements correctly: