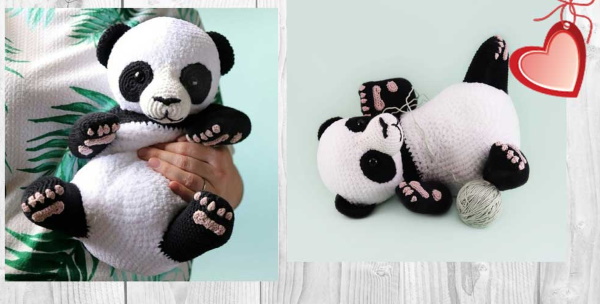
Crochet Pandas, look very simple in terms of knitting. However, experienced craftsmen believe that it is important for beginners to study the patterns and their descriptions before starting work. Below are several knitting instructions, as well as tips and tricks that will help you create toys and other things in the form of adorable pandas.
Materials and tools for crocheting a panda
To knit amigurami pandas and other figures, it is important to choose the right yarn. The thread should hold its shape well and have a certain elasticity.
The table below shows the names and characteristics of the yarns used by experienced craftsmen:
| Name | Characteristics |
| Cotton and polyacrylic | A soft but not elastic thread. The knitted fabric is slightly rough and holds its shape well. The body, head and limbs of toys are knitted from such yarn. |
| Mercerized cotton | Smooth yarn with a subtle shine. The fabric is soft and smooth. |
| Stretch cotton | This type of thread is stretchable and is used for knitting doll clothes. |
| Grass | A thread with long pile. Suitable for imitating the fur of bears, hares and other furry animals. |
| Plush yarn | The material is slightly stretchy, so the stuffing of such toys should not be dense. Knitted figures are soft and fluffy to the touch. |
When choosing a hook, remember that it should be 2 times thinner than the thread. If the tool is too large, the details of the product will be lacy, and the filler will come out through the gaps. Amigurami figurines differ from other knitted toys in their cuteness. They are decorated in a special way, using additional materials.
What you may need:
- black plastic eyes and multi-colored noses;
- large black beads;
- felt of different colors;
- satin ribbons;
- floss threads.

To secure the decor, you will need a glue gun, sewing needles and embroidery needles with rounded ends.
Conventional symbols on diagrams
The body, head and paws of the animals are knitted with single crochet stitches. In graphic diagrams, these stitches are indicated by a vertical line (|). When a yarn over is required, the vertical line will be crossed out at the top by a short horizontal line.
The number of horizontal lines is the number of yarns. Air loops are indicated by a small empty circle (○), and a ring of air loops by a large circle. Increases and decreases are clearly visible in the diagrams. In the first case, 2 columns will come out of 1 point, in the second, on the contrary, 1 loop will be skipped.
Master class for beginners on knitting amigurumi panda crochet
Panda amigurami, like other figures in this style, are crocheted in a circle, without rises and connecting loops between rows. Finished toys in photos on the Internet seem simple, but experienced craftsmen believe that determining the number of loops and rows "by eye" is very difficult. Therefore, beginners should understand how to read graphic diagrams in order to do the work correctly.
In addition to the drawings with symbols, it is important to pay attention to the text descriptions. When reading, it is easier to navigate the work, it is easier to correct mistakes, since all the steps are described in order. Below is a detailed instruction on knitting amigurami panda crochet.
To work you will need:
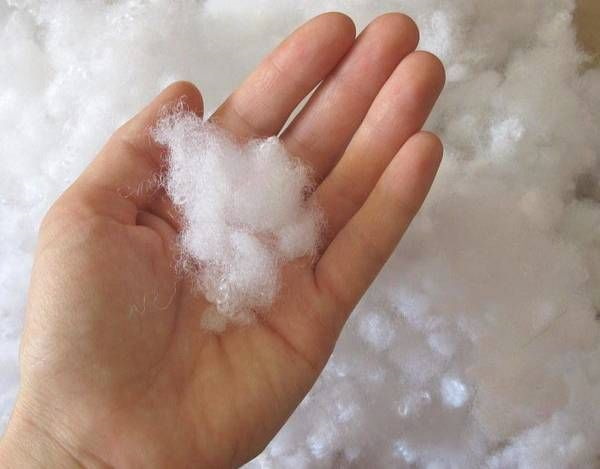
- stuffing material (holofiber, cotton wool or fabric scraps);
- hook No. 2 or 2.5 (depending on the thickness of the thread)
- scissors;
- eyes for toys with fasteners or beads;
- a thick embroidery needle and black floss;
- sewing needle and thin sewing threads of black and white colors;
- black and white yarn (polyacrylic or mercerized cotton).
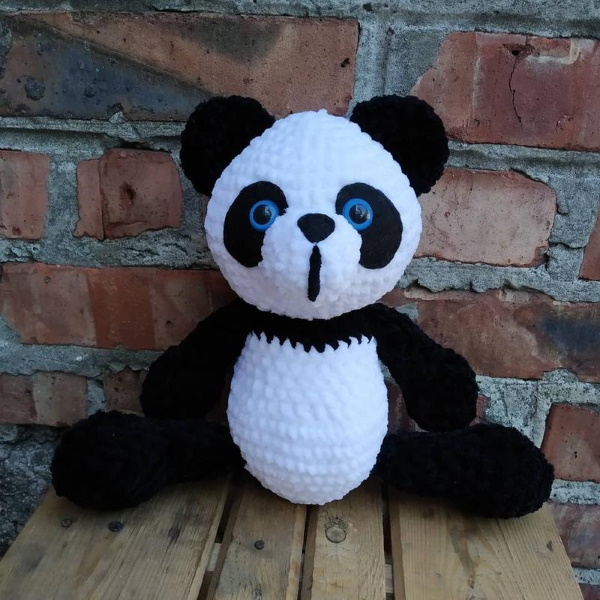
For this work the author used Vita cotton "Rivera" yarn. The toy turned out to be 12 cm high. If the yarn is thicker/thinner, then you need to consider that the size of the product will increase/decrease.
Head
Panda crochet (pattern, description will help beginners to knit a toy with the correct proportions) is knitted from the head. Amigurami figures differ from other products by special shapes. The heads of all animals should be slightly larger than usual. Thanks to the large head, the toy looks more cute and charming.
How to crochet a panda head:
- To avoid leaving a hole on the top, start with an amigurami ring, making 6 single crochets with white thread. Carefully tighten the circle.
- The next chain consists of 6 increases. That is, you need to knit 2 single crochets through 1 loop.
- Knit 1 single crochet, make 1 increase. Knit like this until the end of the row. This combination should be repeated 6 times. You will get 18 loops.
- In chain 4, as in chain 3, you need to alternate an increase with 2 single crochets. The number of loops at the end of the row is 24.
- By analogy, you need to knit up to the 8th row, each time increasing the number of single crochets in the combination by 1. Repeat the steps 6 times. That is: in the 5th row, you need to alternate 3 single crochets and 1 increase (6 times to the end of the chain), in the 6th row there should already be 4 single crochets and 1 increase, and so on.
- On row 9 there should be 48 loops. Up to the 15th chain you need to knit columns without yarns and increases.
- From row 16, the loops are reduced. Here the combination consists of 6 single crochets and 1 decrease. In each following row, 1 column should be removed.

Row 21 is the penultimate row, it has 12 loops. The stuffing is placed through the hole in the base of the head. It remains to make the 22nd chain of decreases to reduce the number of loops to 6, and tighten the ring.
Muzzle
This is a separate part, so it is filled and then sewn to the head with a sewing needle and simple white thread:
- Make an amigurumi ring from 6 single crochet stitches and tighten.
- Knit a row of increases to make 12 loops.
- Alternate 1 single crochet and 1 increase 6 times until the end of the chain.
- Knit 18 single crochet stitches, make a knot and cut the thread.
If the panda has a plastic nose with a threaded mount, you need to install it first, and then lay the filler. You can sew the muzzle to the head, and then embroider the nose with black floss.
Eye spots
Knit with black threads. The amigurami ring of 3 columns is pulled together and 4 rows are knitted with increases in a circle. The 2nd spot is knitted similarly. You will get flat circles that are sewn to the head with black sewing threads, using a blind stitch.
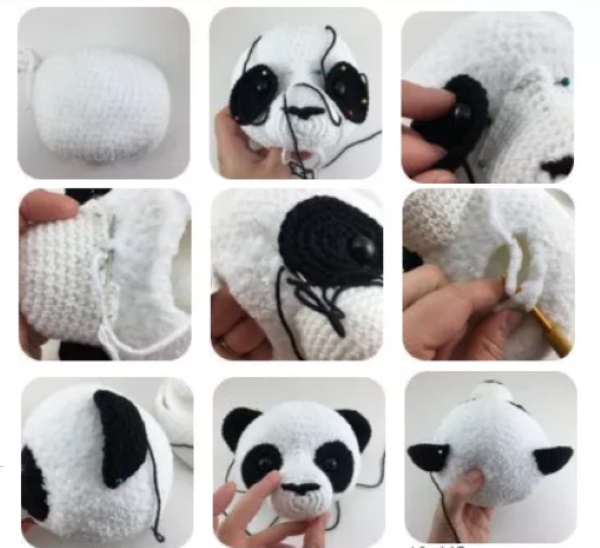
If you have chosen eyes on a mount for your work, they need to be installed before sewing the spots and the head.
Ears
These are 2 pieces that are knitted in the same way, with black thread:
- Make an amigurumi ring from 6 single crochet stitches, tighten.
- Knit a row of increases to get 12 loops.
- Alternate 1 single crochet and 1 increase 6 times to the end of the chain.
- Alternate 6 times 2 single crochets and 1 increase.
- Fold the piece in half, knit 12 single crochet stitches, piercing both sides with the hook.
Each ear is folded into a semicircle, 3 rows are counted from the top of the panda's head and sewn on. The second edge of the piece is placed about 8 rows from the top of the head.
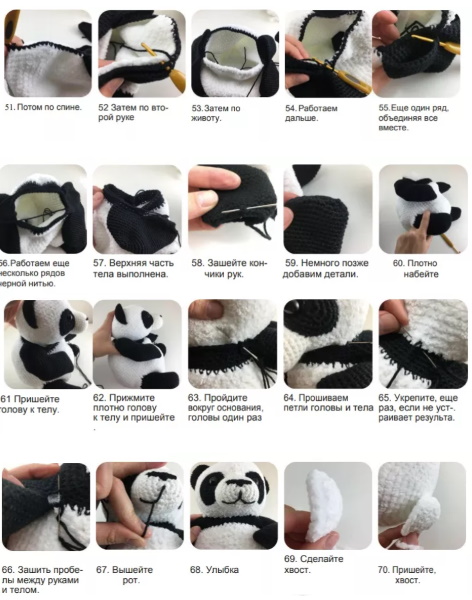
Body
The body of the toy is knitted from the bottom, with white thread:
- The amigurami ring is made from 6 single crochet stitches and tightened.
- Knit 6 loops with increases.
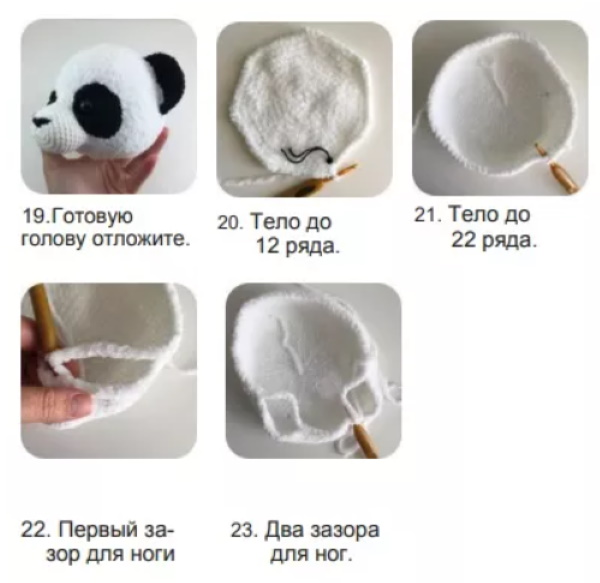
- Alternate 1 single crochet and 1 increase 6 times to the end of the chain. Knit 7 more rows in the same way, adding 1 single crochet to the combination.
- From rows 8 to 13, knit 42 stitches in single crochets and increases.
- On the 14th chain, start decreasing by alternating 8 double crochets (the number of which must be decreased by 1 with each row) and 1 decrease, knit 1 combination 6 times until the end of the row.
- In row 20, you need to change the white thread to black and continue knitting with decreases until there are 12 loops left in the row.
- Stuff the body with stuffing.
- Knit the last row with decreases to get 6 loops. Tighten the ring.
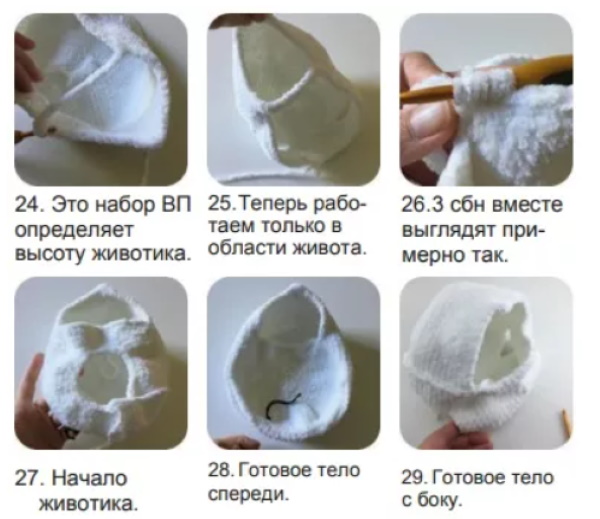
Connect the body and head by sewing them with threads. The upper part of the body where the last chains are connected with black yarn.
Hind legs
A crochet panda (a diagram, a description of step-by-step work will help beginners make 2 elements identical) can be crocheted in different positions, for example, standing or sitting. Following the instructions below, you can crochet "universal" hind legs. Their shape will suit any position of the toy, the main thing is to sew them to the body correctly.
How to knit:
- Using white thread, make a ring of amigurumi from 6 double crochets, tighten.
- Knit a row of 6 increases.
- From the 3rd to the 6th row, knit alternating columns with yarns and 1 increase 6 times. In the 3rd row, you need to make 4 columns, in the 4th - 3. Reduce the number of columns on each chain.
- Knit 1 row with single crochets and increases.
- Change the white thread to black. Knit 2 rows of single crochet stitches.
- Now you need to make decreases, but not in a circle, but along the upper part of the leg. Knit 5 rows.
- When the hole changes its position to the edge of the workpiece, you need to fill the most convex part with stuffing.
- The next 10 rows need to be knitted with decreases.
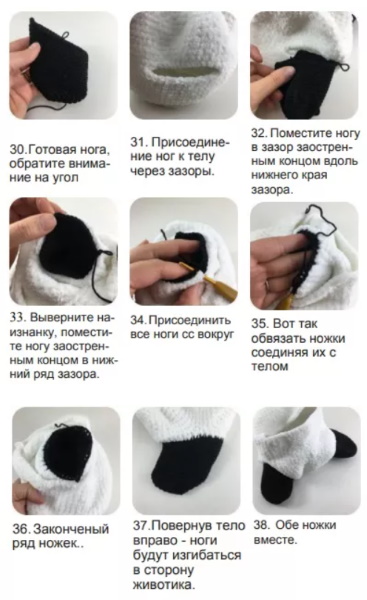
When there are 12 loops left in the work, you need to put the filling in the leg, knit the last row of decreases and tighten the ring.
Front paws
You need to knit 2 identical parts from black yarn. The work begins with an amigurami ring of 6 single crochets.
How to knit further:
- Knit a row of 6 increases.
- From this chain, knit 12 single crochet stitches in 6 rows.
- In the 7th row, repeat the combination 4 times: 1 single crochet and 1 decrease.
- To help the piece hold its shape, you need to put some filler inside.
- Knit 8 single crochet stitches from rows 8 to 11.
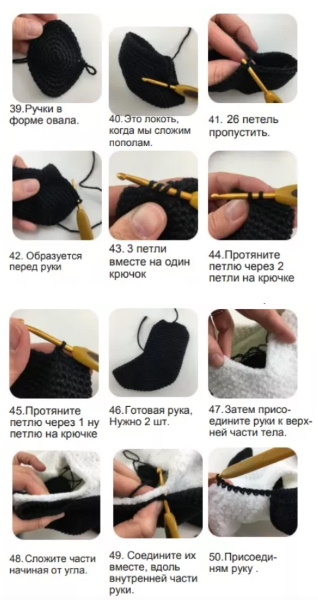
Fold the piece in half and knit along the edge, piercing 2 layers, 2 single crochets, 1 decrease, and 1 slip stitch.
Connection of paws and body
Another important feature of amigurami figures is movable limbs. Ideally, they are attached to special hinges, but they are difficult to get and install. Therefore, the panda's paws need to be sewn on in a special way. Experienced craftsmen do not recommend using the same thread from which the toy is knitted. It will quickly fray, and the limbs will fall off. It is better to take a nylon fishing line or weave dental floss into the yarn. To securely fix the threads, you will need buttons or smooth black beads.
All 4 paws are sewn together. How to insert the needle correctly:
- Turn the toy over so that the front side is facing you. Insert the needle and thread from the side where the right hind leg should be. Tie a knot at the end of the thread.
- Release the needle from the opposite side. Pass it through the upper part of the back left paw so that the needle comes out in the middle of the part. String a bead and insert the needle into the paw, 2-3 mm from the exit. Carefully pull the part to the body.
- Bring the needle out to the opposite side, pass it through the upper part of the right hind leg. String a bead and pass the needle through the leg. In the body, point the needle upwards and pass it along the right side inside the toy, to the place where the right front leg should be attached.
- Now you need to pull the thread through the panda's chest and pull the needle out from the side where the left paw will be attached. Pass the needle with the thread through the middle of the upper part of the part, string a bead and stick the needle into the body, piercing the paw through. Pull the part slightly.
- Pull the thread through the toy's chest to the opposite side again. Bring it out, piercing the right paw. Thread the bead and return the needle to the body and bring it out through the panda's right shoulder. Tie a knot and cut the thread.
It is important to use a long embroidery needle with a rounded end. A sharp sewing needle can easily injure you, and it can also split the thread from which the toys are knitted, and the details will begin to unravel.
Tail
The tail can be made from a pompom. Wind a black thread around a regular table fork, then tie it in the middle, between the tines, and cut the winding along the edges. Fluff up the pompom and cut off any threads that are too long. Sew it to the toy.
Finishing of paws
To make the panda more charming, you need to work on small details, decorate the paws, add decorations. Craftsmen decorate the paws of knitted animals with amigurs in different ways.
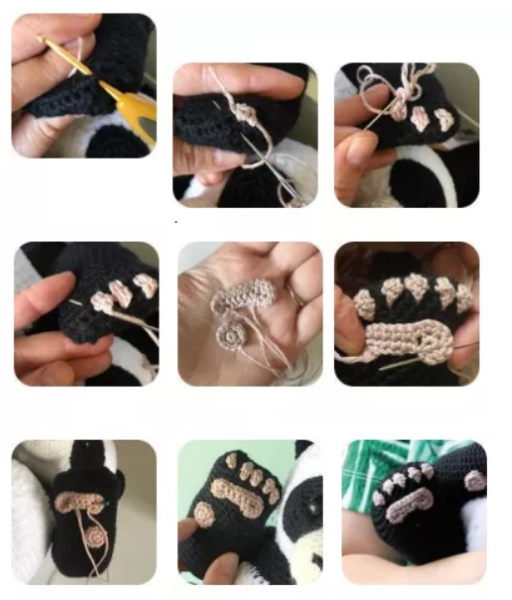
Below are the simplest options. You will need black felt, threads and embroidery needles.
Fingers
On the front paws you need to mark 3-4 toes.
This is done using a black thread and a needle:
- Tie a knot at the end of the thread and secure it to the knitted fabric on the inside of the paw.
- Pierce the paw through and make a stitch 1-2 cm up the outside.
- Bring the needle out from below. Secure the thread on the inside of the paw with a short stitch and repeat step #1.
1 stitch will divide the paw into 2 parts. The more stitches, the more toes you will get on the paw.
Soles
From felt you need to cut out 2 circles with a diameter of 3 cm and 4 circles with a diameter of 1 cm. Sew them on the hind legs so that the large circles imitate the heels, and the small ones - the toes. The toy can be additionally decorated with satin ribbons, beads or rhinestones.
Crochet Panda Patterns
Panda crochet (diagram, description will help beginners to knit the product neatly and correctly) is knitted from different threads and can have unusual shapes. Below are short instructions for knitting figures from popular amigurami types of yarn, as well as descriptions of other products in the form of a panda.
Amigurumi from plush yarn
Plush yarn is voluminous and large toys from 25 to 50 cm are knitted from it. You can knit a panda using the same pattern as provided above.
Only 3 points need to be changed:
- Make amigurumi rings not from 6, but from 9 double crochets.
- Knit the ears in a semicircle, without folding them in half. The thread holds its shape well, and a piece folded in half will look too massive.
- To sew on the muzzle, ears, and eye spots, use yarn. The plush is soft and its pile will easily be pressed under the sewing thread. All stitches will be visible.
It is also important to remember that this type of thread is elastic, so the stuffing of the toy should not be too dense.
Grass Amigurumi
Grass is a yarn with pile. Experienced craftsmen recommend choosing a thread with a more natural composition, because toys made from it are more symbolic and neat. From grass you can knit a panda amigurumi from 12 to 25 cm and more.
The knitting pattern is almost the same as above, but you will need to make some minor changes:
- It is difficult to knit small parts from grass, so beginners can not knit the panda's muzzle separately. The head needs to be filled with stuffing a little less than planned. Then tighten the muzzle, inserting a needle with a white thread first from the right edge, then bring it out under the right eye. Again insert under the left eye and bring it out from the lower edge of the muzzle. Tighten and secure the thread.
- You don't have to knit the eye spots either. Plastic eyes will "hide" in the toy's fur. So it's easier to cut the eye spots out of felt.
- You need to sew the parts of the toy together with yarn. Because sewing threads will be very visible on the grass.
Finally, the panda needs to be gently brushed with a slicker brush to make the fur look more natural.
Amigurumi from velour
Velour yarn is very similar to plush, but has a rough texture and is less elastic. You can knit a panda from it according to the standard description without changes. To assemble the toy, you need to use the same thread from which it is sewn.
Keychain
For work it is better to use coarse cotton threads, they hold their shape well and wear out longer.
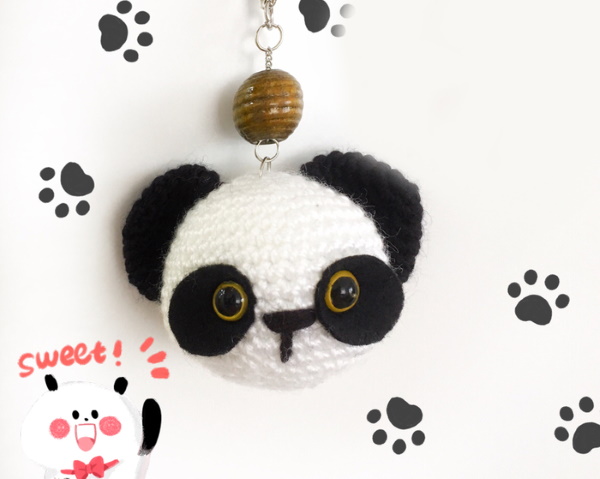
How to crochet a panda keychain:
- Knit a base ball for the head. Instead of 6 columns, there should be 3 in the amigurami ring.
- Knitting 2 ears begins with a ring of amigura from 3 columns. The next row is knitted from increases, and then 2 more rows of simple columns without a crochet.
- Knit eye spots up to 4 rows, with black thread.
- Embroider the nose with black floss.
Sew all the parts to the head, decorate the eyes with beads. Make a loop on the top of the head, which will be used to attach the key ring.
Panda girl in a dress
To turn a black and white bear into a panda girl, all you need to do is knit a dress.
How to knit:
- Measure the circumference of the panda's belly and make a chain of air loops that will be equal in length to this circumference.
- Knit 3-4 rows with columns with 1 yarn over.
- Row 5: knit single crochet stitches.
- Then start making increases so that the hem of the dress becomes wider and more voluminous.
- Knit to desired length.
Then put the dress on the panda and sew on the straps using stitches from the same thread that the entire dress is knitted with.
Baby hat
It is very easy to knit a panda-shaped hat. You can take as a basis the pattern of a regular children's hat with ties and knit it from white thread.
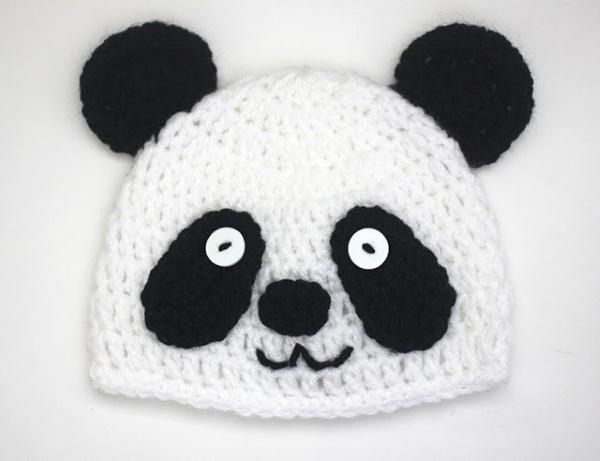
Knit the ears, eye spots and eyes from black yarn. Carefully embroider or glue the nose.
Bamboo Bear Kung Fu
You can crochet a toy in the form of a hero from the famous cartoon "Kung Fu Panda". The basis of the knitting pattern is the same as described above.
There are a few details that need to be changed:
- The panda's muzzle should be slightly wider. To understand what shape is needed, you should look at the pictures of the hero.
- The belly and arms need to be made larger, and the legs, on the contrary, a little smaller.
- The hero needs pants. They can be knitted separately, or you can change the color of the thread in the process of work in the middle of the legs and at the bottom of the body.
- The panda from the cartoon has green eyes.
A bamboo bear can be knitted from cotton or velour yarn.
Round rattle
To make a rattle, you will need a plastic ring, a chocolate egg container, and buckwheat. Pour the cereal into the yellow container so that it rattles. Knit the panda's head with ears, a muzzle, and eye spots. While filling, put the Kinder egg inside with the stuffing. Decorate the head and glue the eyes and nose. Tie the ring halfway with black thread and sew the head to the middle of the binding.
Sleeping Panda Booties
Knit the sole and sides of the booties with black thread, corresponding to the size of the child's foot. Then knit 2 identical circles from white thread. Their size should cover the toe of the booties. Sew the white circles to the booties. Then embroider the sleeping panda's eyes and nose on the circles with black thread.
Make 2 loops in place of the ears. The diagrams and descriptions will help beginners understand how to crochet toys correctly. It is important that all proportions are observed and the paired parts are the same. When the skill becomes higher, you can crochet not only pandas, but also other bears, changing the color of the threads.
Video about making a crochet panda
How to crochet a panda: