A drawing of a deer for children may be relevant at a certain time of year or when completing a certain program. The child is asked to depict an animal, based on his or her creative abilities and age, in a simple schematic form or in a more detailed and realistic way.
Step by step drawing of a deer for beginners
When introducing children to the Western tradition of celebrating New Year and Christmas, you can tell them about Santa Claus's helpers - reindeer and ask children to depict them in motion or standing. Reindeer are also found in cartoons, films and literary works, so the child can focus his attention on the work more strongly.
A simple drawing of a deer for children is made using basic geometric figures, which are then outlined. This method helps to depict the animal in precise proportions.
During the drawing process you will need the following tools:
| What is needed | For what |
| Paper | Choose a thicker sheet if the finished drawing is to be painted with paints. |
| Simple pencil | The hardness is chosen based on the child's age. Hard or medium-hard pencils are recommended for preschool children. |
| Eraser | Remove unnecessary sketches. |
| Liner or black pen | Trace the finished outline of the drawing. |
| Colored pencils or paints | Color the finished drawing. |
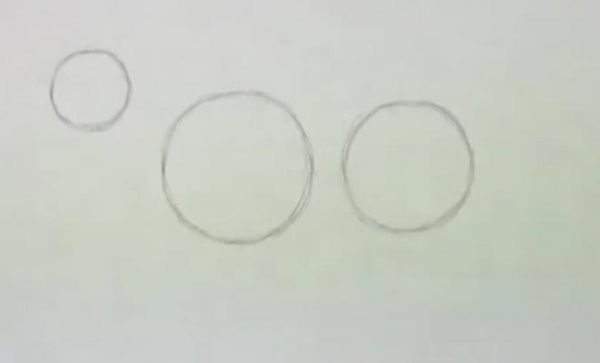
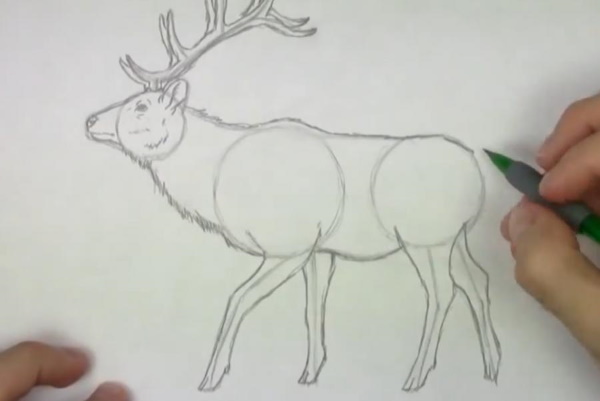
The sheet is placed horizontally and they begin to draw the figure of a deer in the center of the sheet:
- Draw 3 circles of different sizes, as shown in the picture. These figures schematically represent the head, front and back of the body.
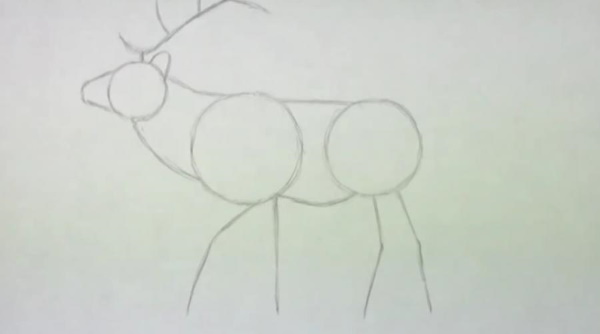
- On the circle-head, draw an elongated muzzle and ears on the top. On top, schematic lines depict branched antlers. Connect the head and the front part of the body. The neck widens closer to the body. Draw a straight line from the back to the back of the body. A curved line shows the belly. Schematic lines show the legs of the deer.
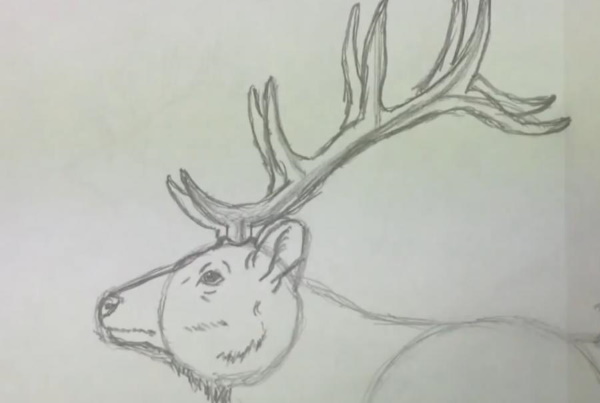
- Draw the head in detail - outline a smooth contour. Draw a nose at the tip of the muzzle. Add a mouth, eye and lines on the ear. Add volume and type of fur with small strokes.
- The horns are given volume, the design is duplicated with a small indentation so that a pair of horns is visible from behind.
- Using strokes, draw the fur on the back, neck and other parts of the animal's body. Outline the lines that represent the legs - add a little more volume in the bending places, sharpen the hooves, draw them as bifurcated.
- Light strokes are used to depict the places where the shadow falls to give volume to the figure - near the eyes, on the horns, in the ears and folds of the body. Most of the shadow is applied to the inner parts of the legs and the neck.
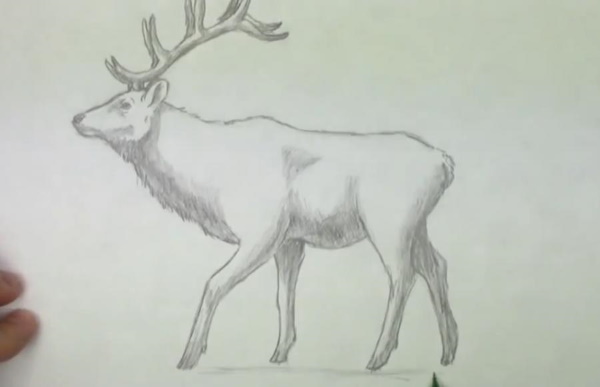
- The drawing is shaded with light strokes to make the drawing look realistic. If desired, the main contours and areas of deep shadows are outlined with a liner, and the rest of the drawing is shaded with colored pencils.
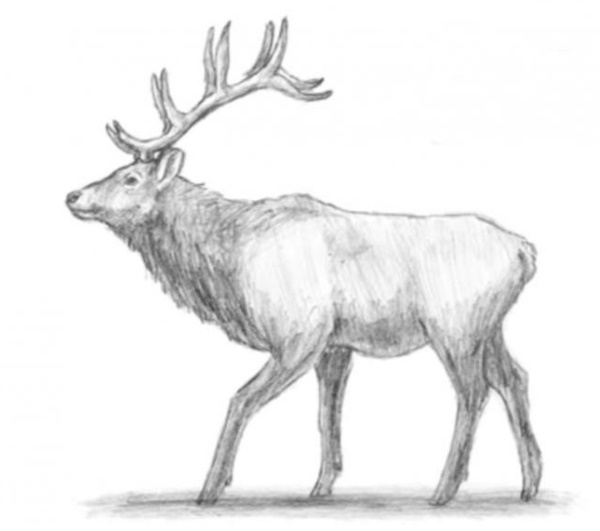
Ready.
Simple quick sketch of a deer
A deer (a drawing of this animal for children can be made realistic, but simpler if depicted schematically) can be depicted in this way by those who are learning to draw - the drawing implies light and uneven strokes.
The following tools will be required for this process:
- A4 paper;
- a simple pencil of medium hardness;
- black pen or liner;
- colored pencils or paints;
- eraser.
Draw a deer following these steps:
- In the center of the drawing, draw a horizontal oval, indicating the body of the deer. A little higher and to the left, draw a smaller vertical oval, indicating the place of the head and neck.
- The legs of the deer are depicted with schematic broken lines and the hoof positions are shown at the ends with triangles.
- The animal's muzzle is depicted in more detail - an elongated muzzle with a nose, ears and horns are drawn. The eyes are indicated and the head is connected to the body with light lines. The neck widens closer to the body.
- The body is drawn with curved lines and a small tail is added at the end.
New Year's deer
A simple way to draw a deer for a New Year or Christmas theme is suitable as a practical lesson for preschool or primary school children. All stages are easy to repeat, despite the presence of curved lines.
If desired, you can add other New Year-themed characters to the drawing or color the finished image:
- The sheet is placed horizontally. In its center, draw an elongated oval depicting the body of a deer. The oval is slightly narrowed towards the end of the figure. To the left and above, a circle is used to indicate the head, showing an elongated muzzle. The head is connected to the body with straight lines. The legs are schematically indicated by lines, at the ends of which triangles are drawn - hooves.
- They draw the head in detail - they add a pointed ear, smoothly outline the line connecting the head and the muzzle. They add a nose and a mouth.
- A small circle is used to represent the eye. Thin lines are added to the ears to represent the auricle.
- Draw branched horns with a backward slope. The lines are smooth, it is not necessary to repeat every bend, it is enough to depict the branches.
- A scarf tied in front is drawn on the deer's neck. If desired, it can be replaced with a bow or a New Year's bell.
- Draw the front legs and pay attention to the hooves, making them pointed. In the areas of the joints, the legs are made a little thicker.
- Draw the main outline of the body and move on to the hind legs. Draw them in detail, just like the front legs. Add a small tail.
- Excess details are erased with an eraser. The main outline is outlined with a liner or pen.
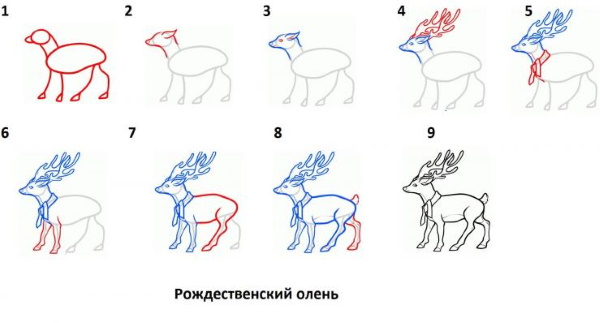
- They color the drawing with colored pencils or in another way, or add other characters.
In Disney style
A deer (a drawing for preschool children can be interesting if it is depicted as a cartoon character) is depicted more easily in a fairy-tale form than in a realistic one.
Drawing:
- The sheet of paper is placed vertically. In the center, a circle is drawn, indicating the head. It is schematically crossed by a line, which will indicate the location of other parts of the muzzle. A little lower, a horizontal oval is drawn larger than the head - the body of the deer. Both figures are connected with straight lines.
- A small bow is depicted on the top of the head - this is how the gender of the animal is often indicated in cartoons. If desired, this can be done differently, for example, with long eyelashes.
- On both sides of the bow, draw elongated ears. The ear on the left will be less visible, since the deer is standing half-turned, it is drawn as a small semicircle. The head with an elongated muzzle is drawn with a general outline. The mouth and nose are shown.
- In the ears, the auricle is shown with a pointed oval. On the crossed line, the deer's eye is drawn as an oval with pointed edges. The pupil is shown in a circle. Eyelashes are added. The other eye is not visible, but the deer's long eyelashes may be visible.
- Draw a contour line from the head down to show the neck and front legs with hooves.
- Add the hind legs, tail and draw the line of the back more evenly.
- Fine rounded lines add details – areas of color on the neck, back and tail.
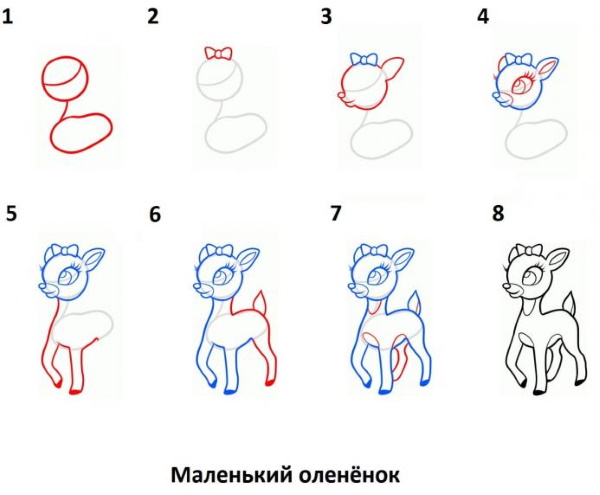
- Outline the general outline with a liner and erase the pencil sketch with an eraser. Color in any way.
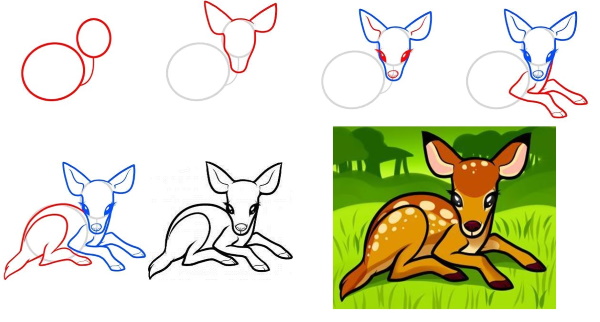
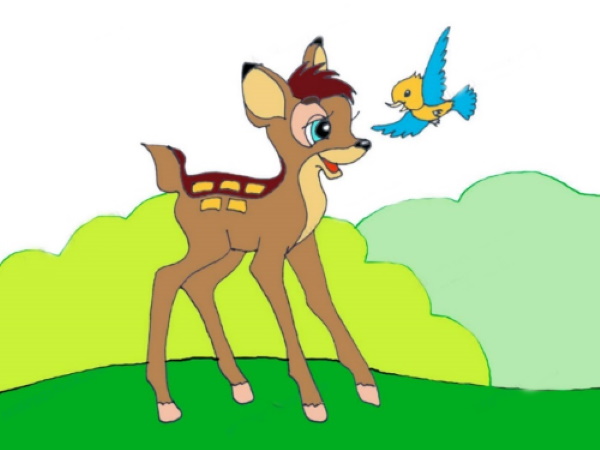
Bambi the deer
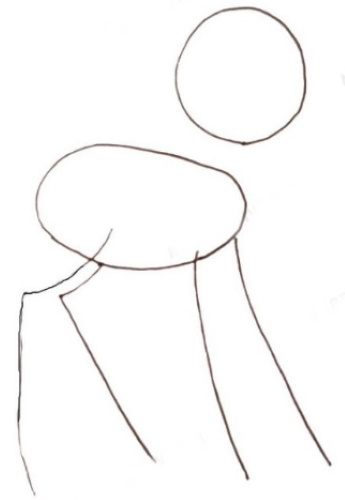
One of the famous literary heroes in the form of a deer is Bambi. Children are familiar with this character in the form of a Disney cartoon. This is a simple drawing option that will be easy for preschool children to repeat. Draw Bambi on a sheet of paper located horizontally.
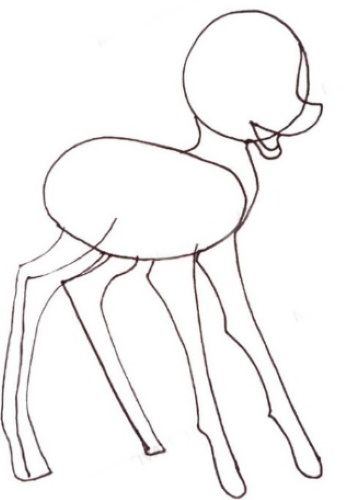
The process begins with a schematic representation of the head, body and legs, gradually drawing in new details:
- In the center of the sheet, draw a horizontal elongated oval - the body of the deer. From it, with thin lines, indicate the long legs and mark the bending points. A little to the right and above, in a circle, indicate the head of the fawn.
- Add volume to the legs by drawing precise lines on both sides of the sketch. Draw the bends and hooves pointed. Draw the muzzle in detail, making it more elongated and the nose slightly upturned. Draw the mouth slightly open in a smile. Connect the head to the body, showing the neck.
- Add details to the muzzle: draw the large eyes of the fawn with eyelashes and a large pupil in the form of a circle in semicircles. Add the upper eyelid. The far eye on the muzzle is not visible entirely, but the eyelashes are visible. Pointed ears are drawn on the top of the head and a tail of the same shape at the end of the back.
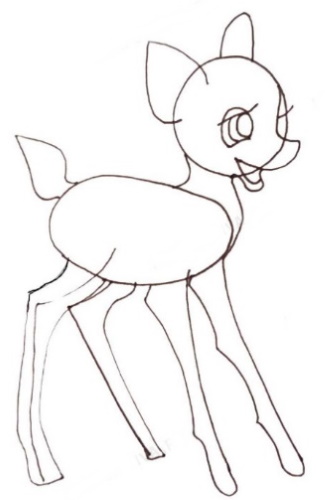
- To make the fawn look like a boy, draw a tousled crest on the head between the ears with sharp lines. Draw semicircles around the eyes, neck and nose. Here the color of the fawn will differ from the main one. On the legs, hooves are shown with small rectangles.
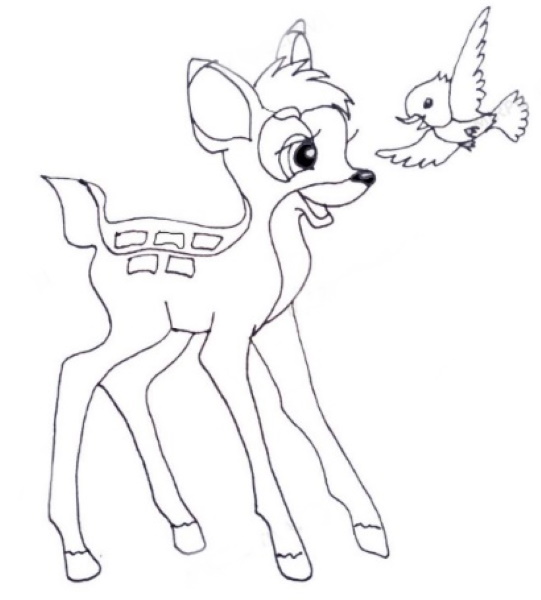
- Erase excess contours.

- Using rectangles of the same size, draw spots on the back.
- If desired, add other characters to the picture - a bird, a butterfly or flowers.
- Color the finished image with colored pencils or paints.
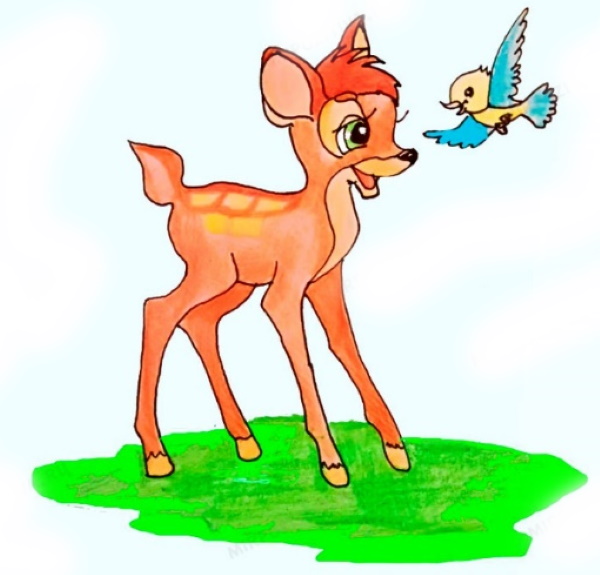
- To add volume and brightness to the picture, add a dark color along the main contour line.
Step by step drawing for kids
A deer (a drawing of this animal for children can be done in a simple manner, following the step-by-step instructions), done in this way, is suitable for preschool or primary school children, since it includes several easy-to-do steps. All figures are easy to copy from the example or add your own details to the image.
Draw a fawn on a sheet of paper placed horizontally, indicating the body and head of the animal in the center:
- The body and head are depicted as ovals, connected by a curved line that denotes the neck.
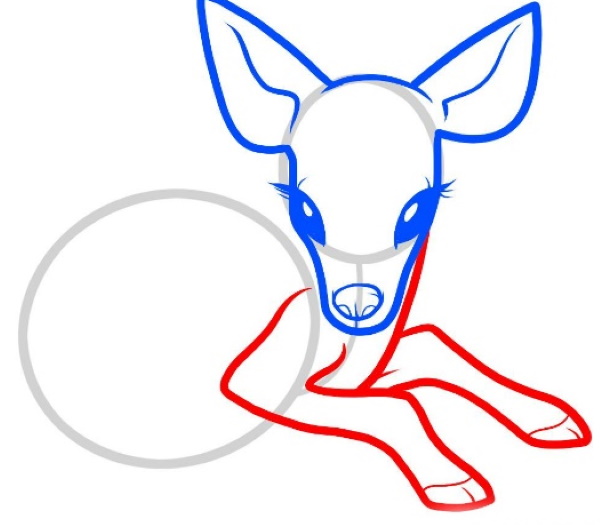
- They add details to the outline of the head - they stretch the muzzle downwards, add pointed ears on the top of the head. They try to make them not too big in relation to the head itself.
- Pointed ovals at the edges of the head show the eyes with pupils in the form of small circles and with eyelashes. In the center of the elongated muzzle, draw the nose and small nostrils at the bottom. Curved lines show the ears.
- From the right side of the muzzle, the neck line is drawn downwards. Bent front legs are added, which end in cloven hooves. The bending points are made slightly pointed.
- The back of the fawn is depicted as a semicircle, ending in a small pointed tail. Additional lines show the long hair on the tail of the fawn. At the bottom, the hind leg with a hoof is drawn, the second leg is not visible.
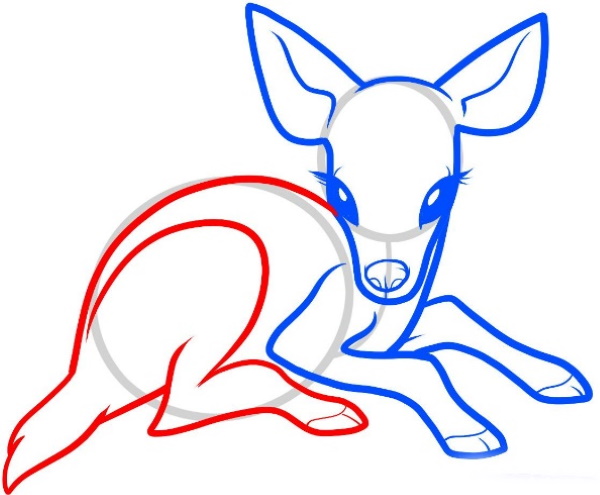
- Use a pen, marker or liner to outline the finished outline. Erase any extra pencil lines and color the drawing in any way you like.
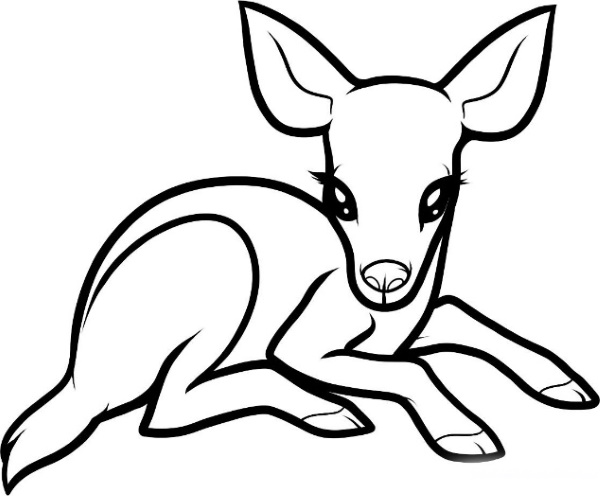
Ready.
On the move
A way to depict a deer in motion. This animal runs in leaps, tucking its long legs under itself during a jump. A lesson on depicting a deer in this pose is suitable for those who have drawing skills, since you will have to draw a realistic figure with the correct body proportions.
They start with a schematic representation of the main features of the body and head, gradually moving on to smaller details that give the image a realistic look:
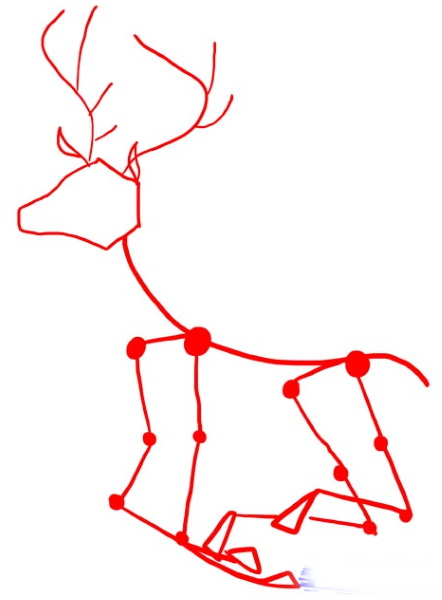
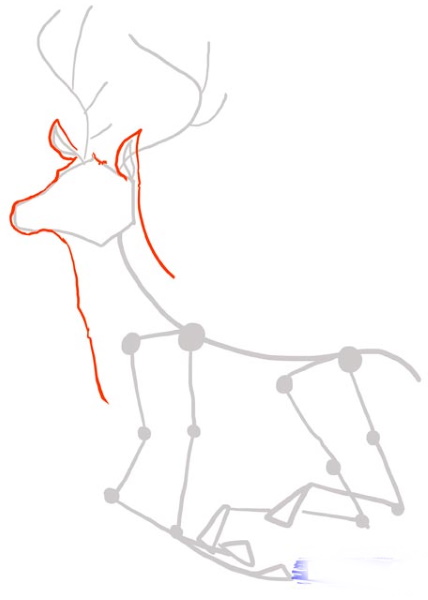
- The sheet is placed horizontally. In the center, the beginning and end of the body are marked with dots, as well as the places where the front and back legs bend. These dots are connected with smooth schematic lines, indicating the back and legs with hooves. The head is shown as an elongated shape with ears and horns.
- Draw a clearer outline of the head and neck. The muzzle is made round and extended forward, the ears are given a curve and volume, the neck smoothly widens closer to the body.
- The outline of the deer's body, back and legs is drawn with smooth lines. The tail is depicted as a small bump at the end of the back. The bends and hooves are sharpened.
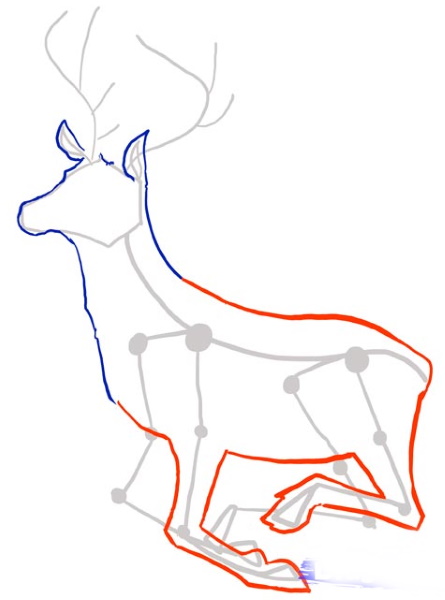
- Add auxiliary lines on the hips, legs and neck. All lines are rounded, showing volume.
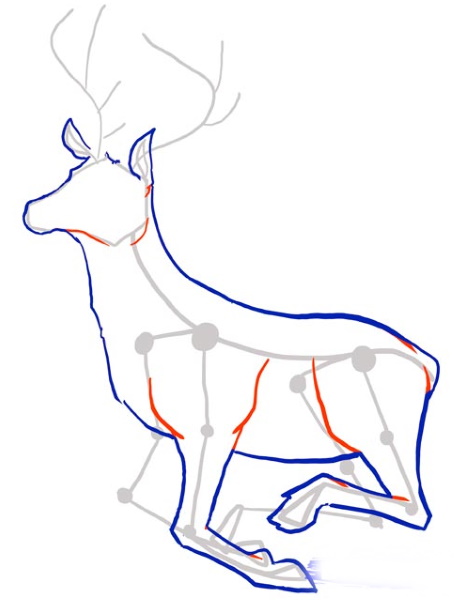
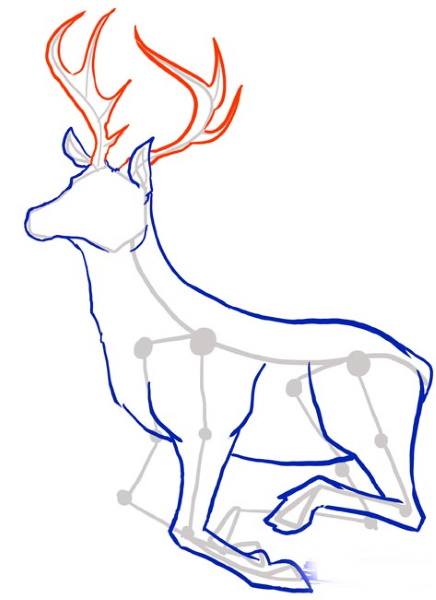
- The schematic image of the horns is outlined on the sides, adding volume. The branches on the horns are made pointed.
- On the muzzle, draw an eye in the form of a small circle and add lines to the cut. The second eye is not visible due to the angle. Nostrils on the nose and ears are added with lines.
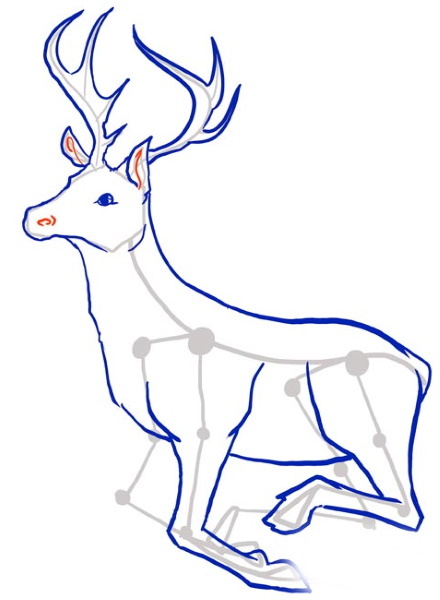
- Draw the hind legs. Short lines show the split hooves.

- The animal's fur is shown with strokes. They are added to the muzzle, neck, bending places and side.
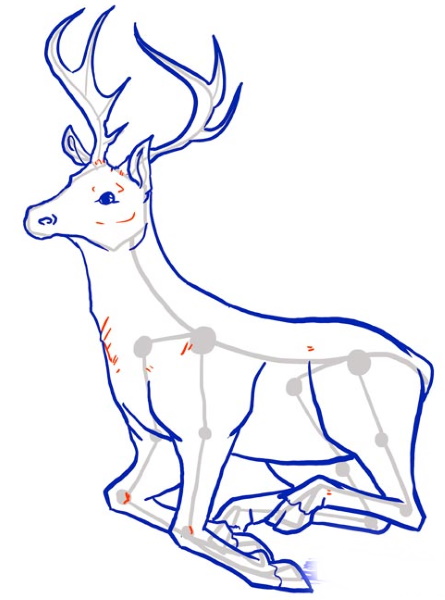
- Outline the finished outline and all additional lines with a pen or liner. Erase the auxiliary sketches with an eraser. Color the finished drawing with colored pencils or paints.
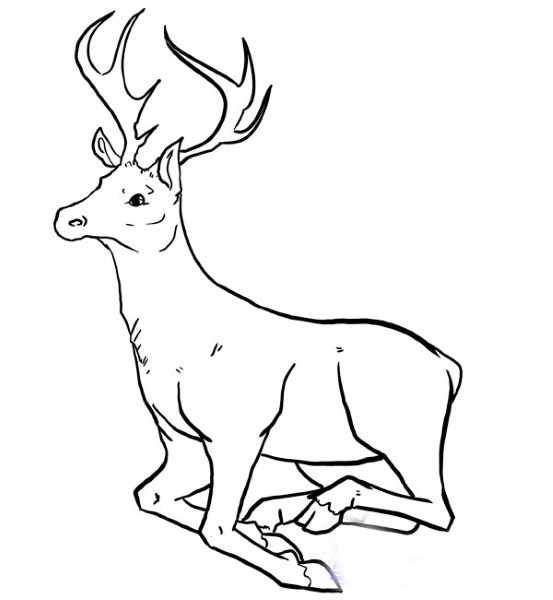
Ready.
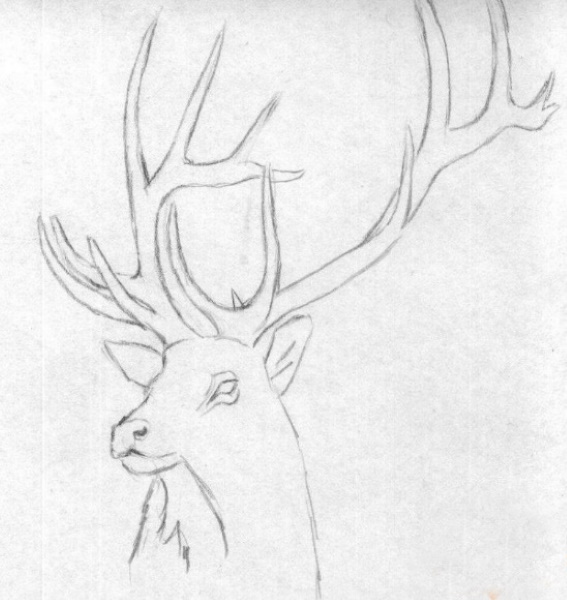
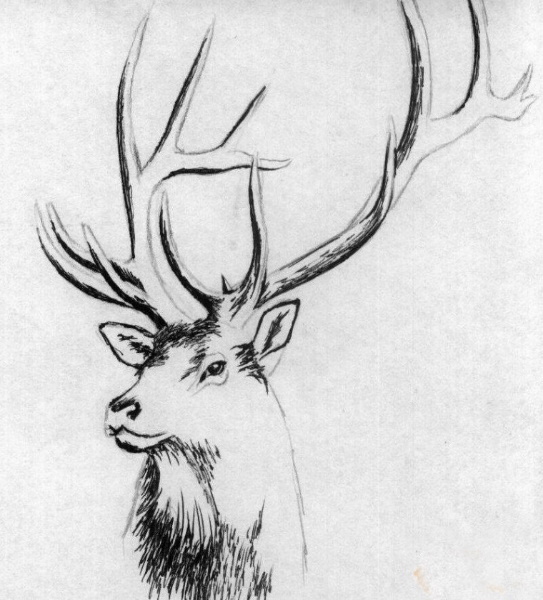
Deer head
To depict a deer, you can show only its recognizable part - the head with spreading antlers. Step-by-step drawing with a pencil on paper is suitable for those who have drawing skills. In the process, uneven lines and shapes are used. Draw on a sheet located vertically. Do not use auxiliary geometric figures for a schematic image.
They start immediately with a sketch of the head:
- A schematic outline of the head is drawn with a hard pencil. A wide neck is shown, turning into the head, an elongated muzzle with a nose and mouth. Only one eye is visible due to the turn of the head. Pointed ears are drawn on the top of the head, directed in different directions. Symmetrical horns are drawn from the center of the head. Each branch has its own direction and ends in a point, so the same number of branches are drawn, but in different directions. Additional lines are used to show places where the coloring differs from the main one - on the neck, around the eyes and on the inside of the ears.
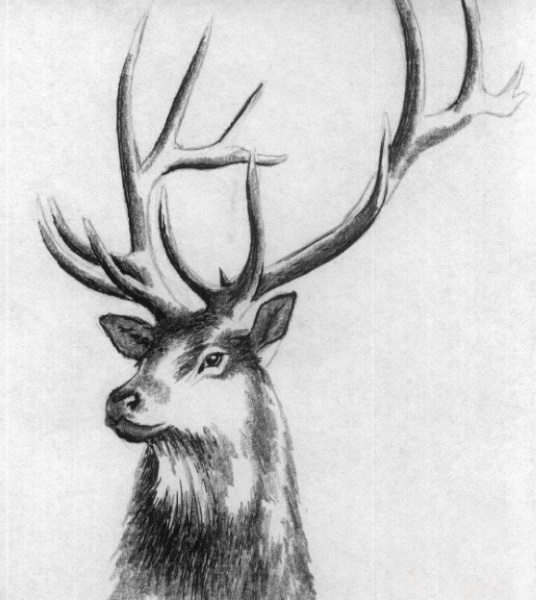
- Use a black pen or liner. Use strokes to show where the shadow falls to add volume and realism. All lines are short and point in one direction.
- Use a soft pencil to add soft shadows to the horns, horns, neck and ears. Make a gradual transition from light areas to pen shading.
- Add final shading with a hard pencil.
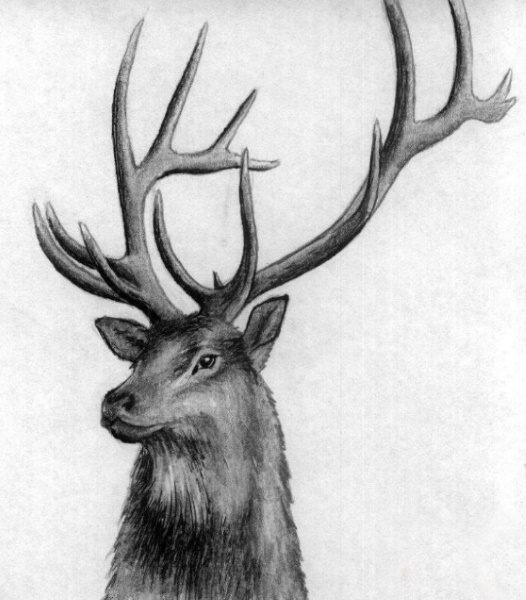
- A piece of paper is used to softly shade the drawing. A pen is used to add an outline for brightness.
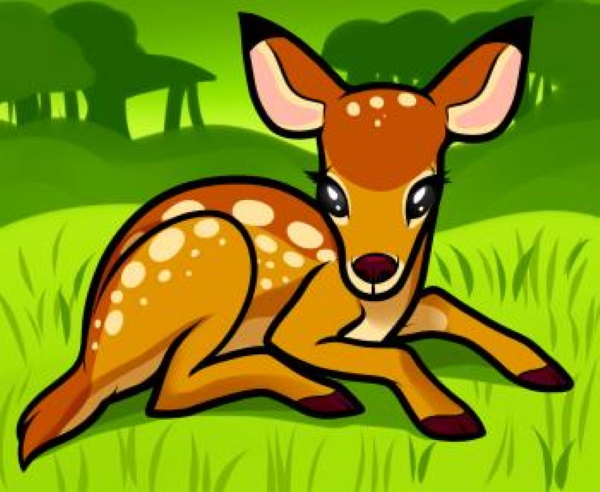
Deer head in cartoon style
Deer (a drawing for preschool or primary school children who do not have the skill to draw realistic pictures, can be done with simple geometric shapes) in this drawing method will be done using paper, marker and colored pencils.
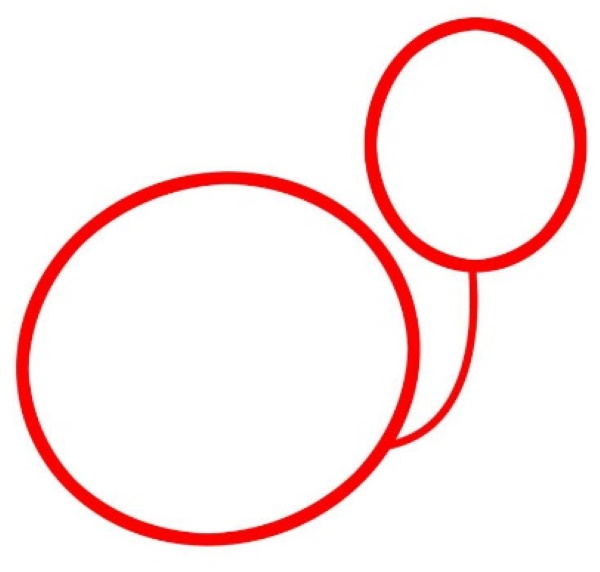
Drawing:
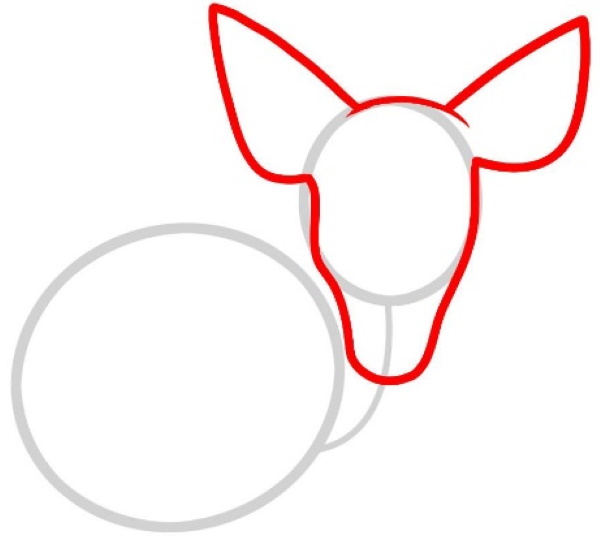
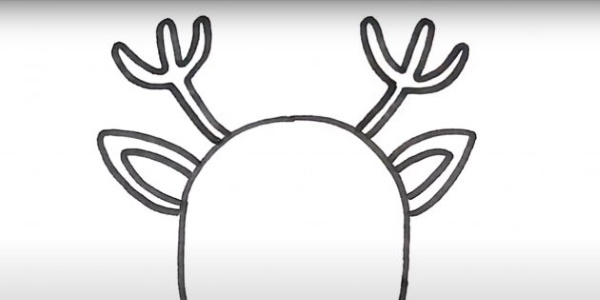
- The head is depicted in the center of the sheet as a circle, flattened at the top and bottom. At the top, on both sides, ears are drawn in the form of leaves, and inside, this line is repeated with an indent.
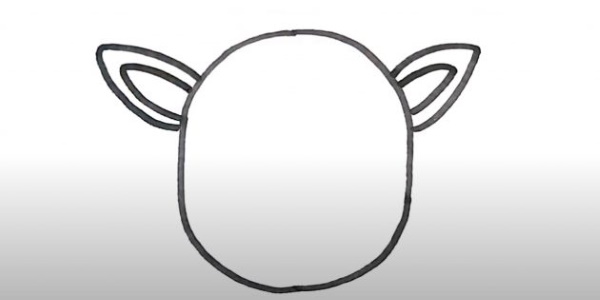
- Above the ears, draw small rounded horns. To do this, draw the letter "Y" with a line in the middle.
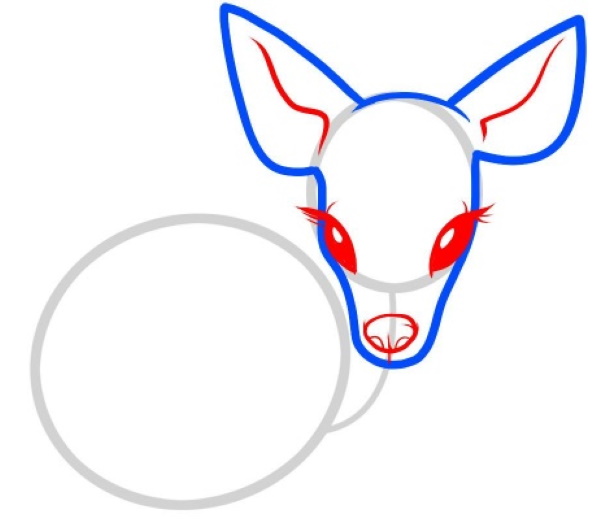
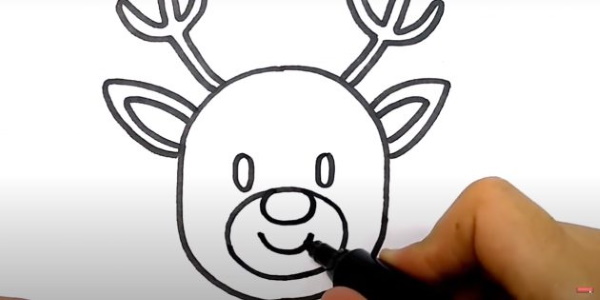
- The eyes are drawn as small ovals in the center of the head. Below, the muzzle is shown as a horizontal oval. Inside it, another smaller oval is drawn – the nose. Under the nose, a smile is shown as a semicircular line.
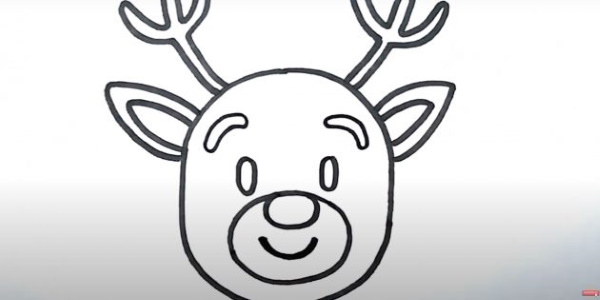
- Curved lines at the same distance from the eyes indicate the eyebrows.
- They begin to color the drawing with colored pencils. They color the nose red, leaving a white circle on the side to represent a glare. They color the eyes completely black or also leave a white glare. They color the antlers and eyebrows of the deer brown.
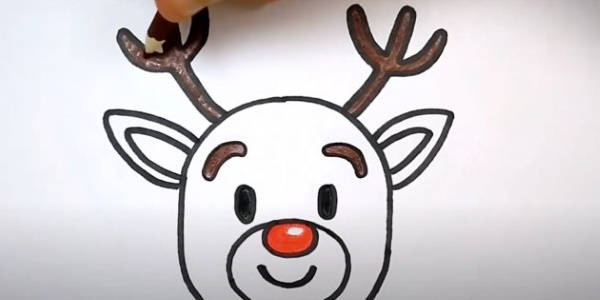
- The head and ears are painted in brown. Press harder on the pencil near the outline to make the color more saturated. Closer to the muzzle, the pressure is reduced to make the color lighter. This gives the drawing volume.
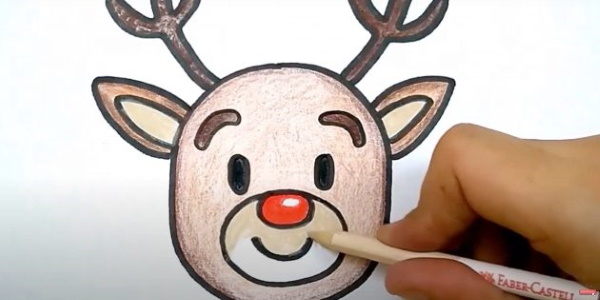
The muzzle is painted beige.
Useful tips and recommendations
A drawing of a deer for children can turn out better if you tell your child some secrets:
- If the drawing is done with a simple pencil, it can be additionally colored with colored pencils or paints. In this case, do not press too hard on the pencil or use a non-bright color of paint so that the drawing looks realistic and the pencil shadows do not rub off.
- If children do not have enough drawing skills, you can make a stencil for them in the form of a head or a figure of a deer. Children will draw all the auxiliary lines themselves.
- To make the drawing look complete and alive, children are asked to complete the plot in the form of a landscape or other characters in the background.
- If the first drawing is not successful enough, they try to repeat it. With each subsequent time, drawing familiar lines becomes easier.
- It is not necessary to repeat every curve of the lines, as shown in the example. If you cannot repeat the line, you can do it as you like, then the drawing will be unique.
- To depict a sika deer realistically, pay attention to the proportions of its body. The front legs are shorter than the back legs, which is why the back of the body is always raised. The neck is depicted as long and slightly curved. The head is proportionally smaller than the body.
Video on how to draw a deer for a child
How to draw a deer for a child step by step: