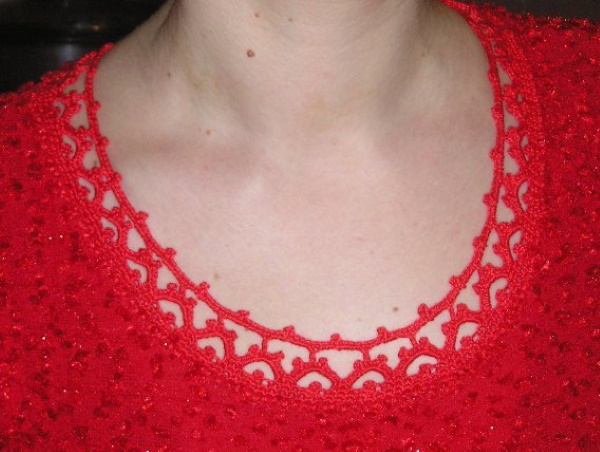
The fashion trend of "eco-style" transforming old clothes into new ones has millions of followers. Using a crochet hook, you can refresh your old wardrobe by tying a beautiful border of colored threads around the neck and edges of things.
Why tie the neck?
Whether you want to tie the neck of your favorite sweater to freshen up the look, or choose a beautiful pattern for the collar of a knitted pullover, there are countless reasons for creative inspiration for needlewomen.
When starting to finish the product, it is worth paying attention to the following recommendations:
- The style of the edging should match the type of clothing: for a romantic blouse, an openwork collar, a pattern of shells or picot columns will do, and for a strict model - edging with simple columns, a crab step or a knot pattern.
- The binding pattern and its width depend on the type of neckline.
- The complexity of the pattern chosen for the edging is determined by the skill level of the needlewoman. Beginners are advised to choose simple patterns with clear descriptions.
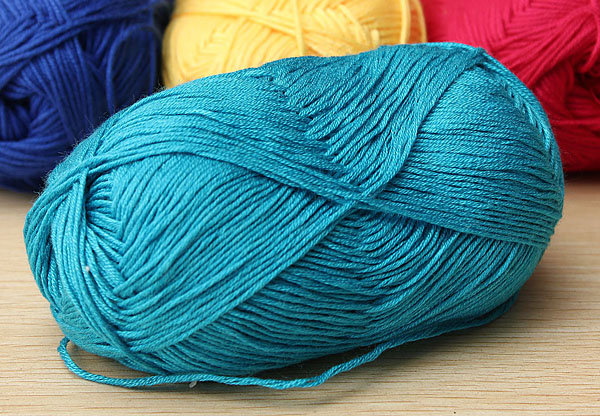
- The color of the yarn is chosen to match the product, or contrasting shades are selected.
- The type of thread depends on the type of knitted item. Fluffy items can be edged with thin silk threads, while a strict sweater is best trimmed with yarn of the same thickness and texture.
- You can also make a crochet edging on fabric items. To do this, the edge of the neck is pre-treated with a special stitch, which serves as the basis for knitting loops.
The features of neck processing depend on its shape.
The main types are presented in the table:
| Neck type | Features of edging |
| Round | Any patterns that do not tighten the edge are suitable for finishing |
| Square | You should pay attention to smoothing the corners, evenly reducing the loops in them. |
| V-shaped | To avoid gathering of the border, in the corner, knit stitches not in every loop, but through 2 or 3. |
Where to start crocheting?
You can beautifully crochet a neckline by following the simple diagrams and descriptions presented in this article.
First, you need to determine:
- Knitting style and pattern for edging.
- The color of the knitted collar and the texture of the yarn.
- The hook size corresponds to the thickness of the threads.
The choice of color and thickness of yarn is an individual task. The following formula will help you choose a hook for knitting: the optimal hook size should be 1 mm larger than the thread diameter. So, for a thread with a diameter of 4 mm, hook No. 5 is suitable.
For knitting you will need:
- knitted, jersey, textile product;
- yarn or thread for knitting;
- hook;
- scissors;
- ruler;
- pins.
Master class for beginners: How to knit a sample of simple single crochets and tie a neckline?
Beginner knitters can find many patterns of simple patterns for tying the neck. One of them, the simplest, is a border of columns. To knit, you will need to select yarn to match the product and arm yourself with a hook.
Recommendations for the design of the neckline:
- If the product is knitted or crocheted, the knitting step of the loops should correspond to the knitting density.
- You need to knit the stitches along the edge of the edge loops.
- On rounded sections, you should ensure that the loops are laid evenly, knitting the loops in the row located below.
- To make the collar attachment point more even, it is recommended to tie the neckline starting with the chain stitch.
The order of tying the neck using a chain stitch and simple single crochets:
- Determine the front side of the product and mark a line with chalk close to the edge of the neckline for laying the chain stitch.
- Use a crochet hook to knit a chain stitch, which looks like a chain of air loops laid across the surface of the fabric. Start work from the left shoulder seam. To do this, insert the hook from the front side, pull out the loop, make a second loop after a short distance and pull it through the first.
- Crochet the neckline, making single crochet stitches into the top loop of the chain stitch.
Beautiful patterns for crocheting collars of knitted clothes. Schemes, description
A beautiful favorite item can acquire a new style if you replace the old collar with an openwork edging of the neckline, crocheted patterns.
Depending on the type of product, the finishing can be different: airy openwork and dense strict. But even the simplest edge processing pattern will give the product a finished look.
Crayfish step
The pattern for processing the edge with a crab step is simple and at the same time effective. The pattern has several variations. The simplest pattern consists of only 1 row. The pattern consists of knitting in the opposite direction from left to right, while the product should be positioned with the front side facing you. The pattern is quite dense, its use is appropriate for a discreet style.
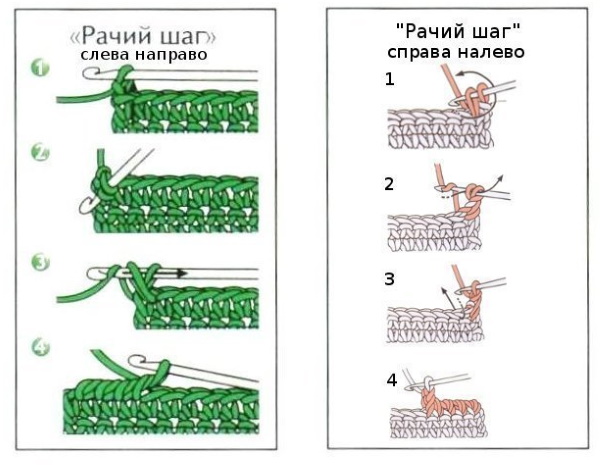
To knit the border you need to do the following:
- Pull out the first loop, starting from the left edge of the product and secure it with a half-column.
- Draw the next loop from the post located on the right and knit both loops as a single crochet.
- Continue the sequence until the row is complete.
Knots
You can beautifully crochet the neck of a children's summer blouse using the knot pattern. To do this, you will need threads that match in color and texture and a crochet hook.
Twisted knot pattern diagram:
- Make a chain of 3 loops and make a yarn over. Insert the hook in front on the right side of the chain, catch the thread, make a yarn over again.
- Insert the hook again to the right of the chain and pull up the loop. Repeat the sequence again.
- After skipping 1 loop, insert the hook into the next one and pull the thread through all the loops.
- Repeat the pattern until the row is complete.
Pico
Knitting picot has more than 10 variations. These are classic picot, flat, triple, coin picot, triangular and so on. The picot pattern in the form of triangles looks unusual.
It is knitted like this:
- Knit a chain of 5 loops and knit the following sequence in it: half-column, single crochet, column with 1 yarn over and column with 2 yarn overs.
- Attach the triangle to the fabric with a connecting loop, through 3 loops in the fourth of the previous row.
Combination of columns and picots
A smart ring-shaped pattern is suitable for women's and children's blouses. This pattern can be used by beginner needlewomen. Simplicity and effectiveness of the edge finishing is the principle of this pattern.
Knitting sequence:
- Cast on a chain of 3 loops, knit 2 double crochets into the next loops in sequence.
- For the ring, cast on 10 loops and knit this chain with 9 half-columns, leaving the first air loop unknitted.
- Bend the chain into a ring from the right forward, insert the hook into the first chain stitch and at the same time into the top of the single crochet and pull the working thread through them.
- Continue knitting the sequence until the end of the row.
Caterpillar
The caterpillar harness is knitted by constantly turning the knitting to the right and left. This pattern is suitable for small items that are easy to rotate.
The sequence of knitting the border:
- Secure the thread in knitting.
- Knit a single crochet.
- Turn the fabric, insert the hook into the side edge loop, knit a single crochet.
- Turn the product. First, put 2 loops of the knitted caterpillar cord on the hook, insert the hook into the base loop, pull the thread through 2 loops. Knit the remaining loops.
- Turn the knitting. Put 2 loops of the caterpillar cord on the hook. Knit 2 times 2 loops.
- Continue knitting until the end of the row.
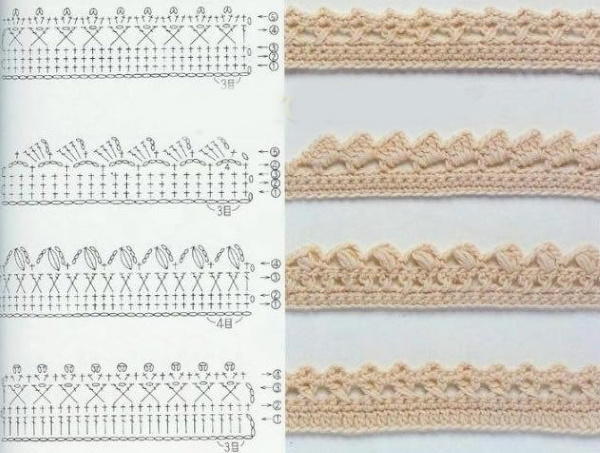
Openwork
Patterns of various openwork patterns will help you beautifully crochet the neck. Any sequence of repeating elements will do for knitting. The width of the openwork border can be different.
Tips for knitting lace edges:
- For openwork knitting, smooth yarn is used, which allows the pattern to be made more distinct.
- For work, choose a smaller hook so that the knitting is tight.
- The openwork design is suitable for women's summer blouses, children's knitted dresses and boleros.
- The selected pattern should match the product in color and style.
- Beginner knitters should choose patterns from simple sequences of known elements (column, chain of air loops, column with 1 or 2 yarns).
- A border that is too wide may bunch up, curl up, and look untidy.
Flag
The pattern looks like a sequence of rectangular elements resembling flags. It is a simple scheme, suitable for beginners.
Execution of the pattern:
- Tie the neckline with single crochet stitches.
- In the second row, 2 air loops for lifting, 1 double crochet into the 3rd base loop.
- On a double crochet, knit as follows: 2 chain stitches, 3 double crochets.
- Make 1 double crochet again, skipping 2 base loops. Crochet the crochet according to the pattern in point 3.
- Continue knitting to the end of the row.
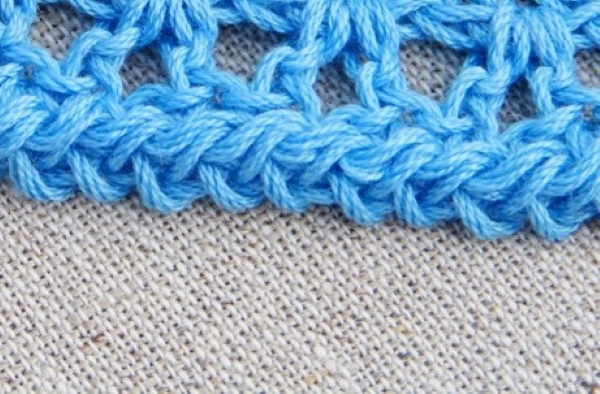
Arches of air loops
Arches made from air chains are the simplest openwork pattern for processing the edge of the neck. This pattern is recommended for beginner needlewomen to use for processing the necks of summer openwork items.
An example of such a border:
- Tie the edge with single crochets.
- Make a chain of 6 loops (including 1 lifting loop) and connect to the fabric through 3 loops with a connecting post.
- Make a chain of 5 loops and again knit a slip stitch through 3 base loops.
- Repeat the sequence to the end of the row. Close the row with a slip stitch.
- Start the 2nd row with a double crochet and make 2 chain stitches. Connect them to the center of the arch of the previous row. Continue knitting until the end of the row.
- Repeat the sequence of rows of air arches 2 more times.
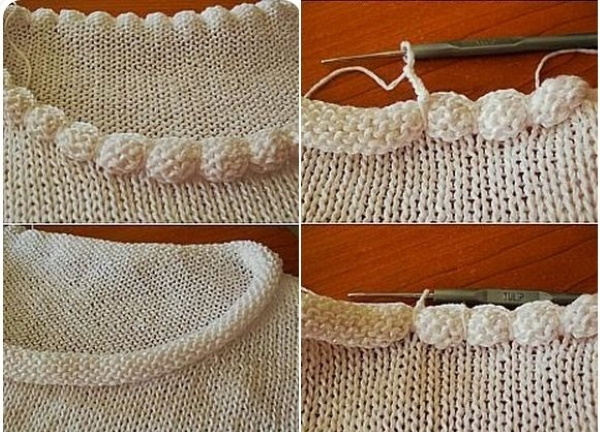
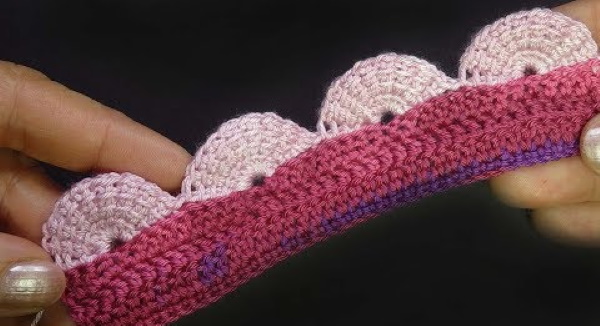
Pompoms
This is a beautiful stylish edging, which is based on simple elements. This type of decoration is more suitable for the lower edges of products, because under the weight, the pompoms hang down. If this option is acceptable according to the idea, then you can apply it to the edging of the neck.
Knitting pattern:
- Tie the edge with single crochet stitches.
- Knit 2 single crochets, 1 chain stitch
- Knit a pompom consisting of 2 elements: knit 3 air loops, make 3 untied columns in the 3rd loop from the hook, knit the resulting 4 loops with one loop. Repeat the sequence 1 more time. You should get 2 round elements, located one above the other. Lower the upper element forward and fasten the pompom at the base with a connecting column. Knit an air loop.
- Make 2 single crochet stitches and continue knitting according to the pattern.
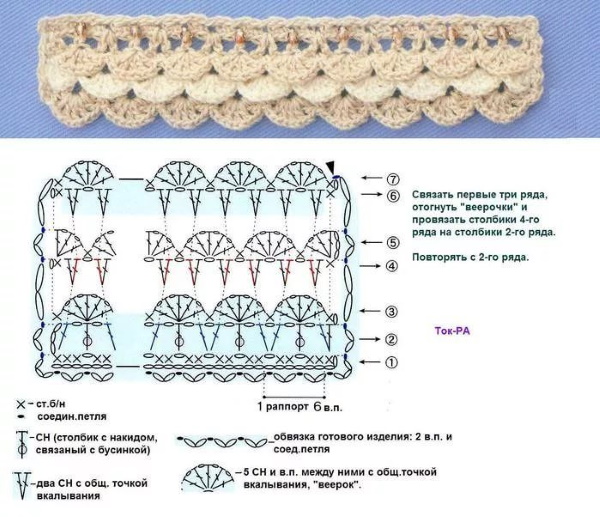
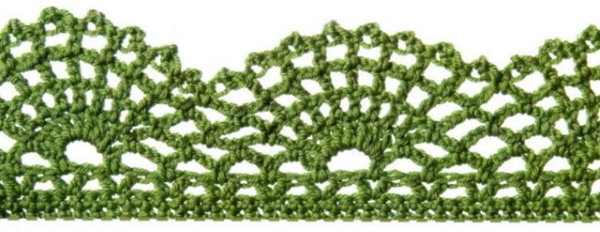
Shells
A beautiful wavy border is created using a shell pattern. First, the neck edge is bound with single crochets, and then the pattern is repeated with double crochets.
Knitting pattern diagram:
- Insert the thread into the knitting, making a loop.
- Skip 1 foundation loop and in the next loop make 5 columns with 1 yarn over. Skip 1 foundation loop and in the next loop make a slip column.
- Continue knitting according to the given pattern.
- The shell pattern can be done in 2 or 3 rows.
Beads
A very neat compact pattern. It is made with a sequence of single crochets. The edge of the product resembles bead embroidery. This edging is suitable for children's products and for women's knitted sweaters.
Knitting pattern:
- Insert the thread into the knitting.
- Bead element: in the first loop of the previous row, knit 4 single crochets. Remove the loop, put the first loop of the just knitted columns on the hook, then insert the hook again into the removed loop and knit them together with the working thread.
- In the next loop of the bottom row, knit 1 single crochet.
- Repeat the bead element.
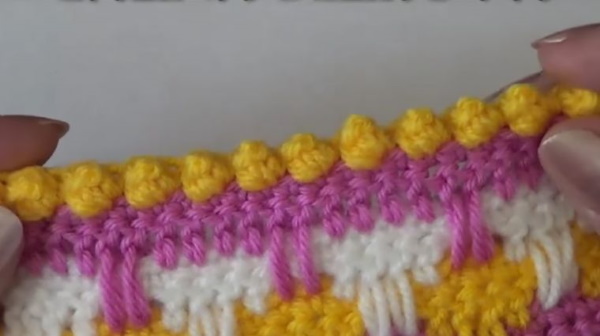
- Knit the pattern until the end of the row.
Small border of one row
You can beautifully tie the neck with the simplest pattern. A pattern of one row looks laconic and complete. An example of such knitting is the "Corners" pattern.
Knitting pattern:
- Finish the edge with single crochet stitches.
- At the beginning of the 2nd row, for lifting, knit 1 air loop and make a “corner” element: in the next loop, knit a single crochet, knit a chain of 3 loops and in the same loop, knit 3 double crochets.
- After 3 loops of the bottom row, repeat the “corner” pattern.
- Knit until the end of the row.
The simple patterns provided in the article will help any needlewoman transform her favorite things and crochet a beautiful border around the neck. The choice of pattern depends on the style of the product and the skills of the knitter. Often the simplest patterns look fashionable and attractive.
Video on how to beautifully crochet a neckline
Crochet neckline processing: