Knit mittens, fluffy or smooth, plain or multi-colored jacquard, with a smooth or embossed pattern, made of natural or artificial wool, anyone can. Basic knitting skills, yarn, knitting needles and clear step-by-step instructions will allow you to create a model for any taste in a few evenings.
Step-by-step instructions for knitting double mittens with knitting needles
There are many known models of mittens, depending on the knitting technique.
They can be:
- single or double layer,
- with a round or triangular toe,
- with the thumb located on the side or inside of the palm.
The warmest version of knitted mittens is double. Such a model can be made double-sided if only the front or back surface, shadow pattern, as well as garter stitch or jacquard are used in knitting (except for the cuff or also in it).
Double mittens are especially convenient for knitting jacquard patterns: the drawstrings are inside between the layers, causing no inconvenience when putting them on. The outer side is often decorated with braids and cords, openwork knitting, shadow patterns and embroidery, while the inner side is made with a garter stitch.
Before you start working, you should knit a sample and carry out its wet-heat treatment according to the instructions on the yarn packaging. This step is especially important for beginner knitters or when working with unfamiliar yarn.
After the sample has completely dried, measure the knitting density, i.e. the number of loops in 10 cm, and find the number of loops in 1 cm. Multiply the number found by the circumference of the palm at its widest point, and you get the number of loops to cast on.
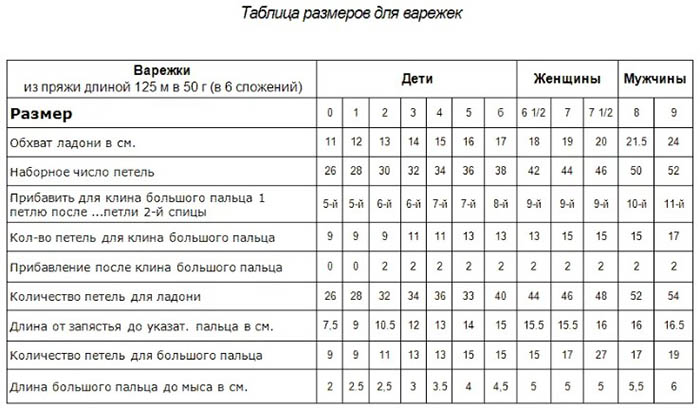
Sometimes 10-15% is subtracted from the found value. This depends on the elasticity of the yarn and how tightly the mittens should fit, although such subtraction is more practical to use for tighter-fitting gloves.
The density of the rows for knitting mittens is important to know only if they are made without the possibility of trying them on, although for reliability it can be calculated at the same time.
Knit double mittens with knitting needles step-by-step instructions will help even a beginner. Thanks to the detailed explanation, readers, even with very little knitting experience, will be able to create a beautiful and warm winter accessory.
In the process of creating mittens, several stages should be distinguished:
- Casting on stitches and knitting the cuff.
- Knitting the body of the glove while simultaneously forming the wedge of the thumb.
- Continue knitting the body of the mitten to the toe – the top of the mitten.
- Forming the toe and closing the loops.
- Knitting the thumb and closing the loops in it.
The step-by-step instructions recommend repeating these steps to knit the inner layer of the mitten. If the loops of the outer part are cast on to the needles using the open method, then knitting the inner layer begins with transferring the loops to the needles and attaching the working thread.
Then continue knitting according to the step-by-step instructions. The only difference is that in two-layer models, the inner layer for the right mitten is knitted like the left one, and for the left one - like the right one.
Knitting the cuff
You can knit double mittens with knitting needles (the step-by-step instructions clarify the differences in the section on the thumb wedge) for both hands at the same time.
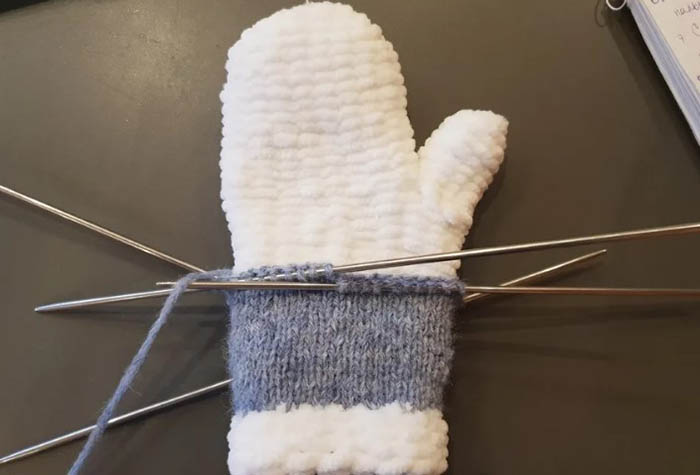
The peculiarity of double mittens, knitted with knitting needles, is the open method of casting on loops for the cuff, from which knitting begins. The open cast on loops can be done with a crochet hook, using a contrasting auxiliary thread.
In this case, if both sides (outer and inner) are the same, it is convenient to knit a double length of the cuff at once. The inner part can then be started immediately with an extension for the palm or knitting a wedge of the thumb, if the finger is formed in this way.
The cuff is usually knitted with elastic band. There are quite a few types of bands. The most common and elastic are 2*2 and 1*1 bands. Although the elasticity of the band is also affected by the quality and composition of the yarn, and this should be taken into account and checked on a sample prepared in advance. The convenience of the finished product will depend on how the yarn "holds the band".

There are models in which the cuff is knitted in the same way as the body of the mitten - with satin stitch or a combination of satin stitch and patterns. In this case, the needles are of the same size for the entire product.
It is advisable to knit the elastic band with knitting needles of a full size - a number smaller than the knitting needles with which the main fabric is knitted. For thin yarn, it will be enough to take knitting needles of a full size smaller for the cuff, for thick yarn - a number.
You can knit mittens both traditionally with five double-pointed needles, and on circular needles, using the so-called “magic loop” method. The convenience of this method is that when using it, you can knit two mittens at the same time. In this case, there will be no discrepancies in the number of rows.
Having cast on the required number of loops, close the knitting in a circle, paying special attention to the fact that the loops cast on the needles do not twist. Take the main thread into work and then knit with it the pattern chosen for the cuff.
When knitting on circular needles, to make it easier to distribute the stitches when knitting the wedge of the thumb, the body of the mitten and decreasing the stitches at the toe, markers are used to separate the stitches on the back side of the mitten and the inside.
| Markers | For what purpose are they placed? |
| Elementary | At the beginning of the row, a marker (a special one, or replacing it with a paper clip or a small ring of contrasting thread) is placed on the working knitting needle. |
| Second marker | They are placed by counting from the first half of all the loops cast on minus two. That is, the back of the mitten should be two loops wider than the inner one, which is anatomically correct. When working with double-pointed needles, it is enough to distribute the loops on two “inner” needles and two “outer” ones. On a pair of “inner” needles there are also two loops less than on a pair of “outer” ones. For convenience, the needles are positioned so that the row of loops on the inner side of the palm is on the near needle. |
| Subsequent | Markers are transferred to the working needle at the beginning of each next row. |
Having knitted the elastic to the desired height, begin knitting the body of the mitten up to the hole for the thumb or until it widens to form a wedge for it.
If the cuff is knitted with a rib, then after its last row, in the case of knitting a wedge, knit several rows of the mitten body with the pattern of the main fabric. This distance depends on the size of the palm and can be up to 2 cm.
For children's mittens, you can skip this step or knit one row with the basic pattern chosen for the body of the mitten, and proceed straight to the expansion by the wedge.
Formation of the thumb wedge
The inside of the mitten (from the palm side) is most often knitted with the front surface. This is the most convenient (both in wearing and knitting) and neat option. Decorative design with patterns should be done only for the outer - visible part of the accessory.
You can knit a thumb in any way, with experience choosing the best one for a particular model and the most convenient for the knitter.
Below is a description of how to knit a thumb wedge using the "Indian" method. This model of mittens is one of the most comfortable to wear, beautiful, easy to knit, but requires attention and simple calculations. The wedge is formed on the palm.
At the same time, the above-mentioned method of knitting both the right and left mittens on circular needles is very convenient. It allows you to track the symmetry and not get confused in the increases. For the right mitten, the increase line will go to the left as the fabric grows, for the left one - vice versa, to the right.
The frequency of increases depends on the size of the mitten, the thickness of the thread and the density of knitting. For example, when knitting children's mittens with a thread with a footage of 250 m in 100 g, an increase should be made in every 2 rows, that is, every other row.
Increases are made from the draw-throughs of the previous row. For the right palm, the draw-through is thrown over the left knitting needle so that its right wall is in front of the knitting needle, and the left wall is behind it. This wall indicates the direction of the increases.
For the left palm, it is the other way around, that is, the right side of the yarn over is behind the knitting needle, the left side is in front of it. Yarn overs are knitted with crossed loops. This will avoid holes in the places of increases.
The first increase is made by stepping back from the middle of the palm towards the thumb for adults 3 loops, for children - 2. This rule is used when knitting mittens of any size. The proportions of children's hands are different, so the division is done a little differently - more than half of the loops of the palm are allocated for the thumb.
For example, if 15 out of 32 loops are allocated for the palm, then for a child's hand it would be correct to allocate 9 loops for the thumb and the remaining 6 for the palm area, which will be expanded due to increases. In this case, the first increase on the right mitten is made after 9 knitted loops.

For the right mitten, these first 9 loops will relate to the thumb, for the left – the last ones. Each subsequent increase as if expands the area of the palm, but the number of loops allocated for the thumb remains constant until the last increase.
Particular care should be taken during the second increase, when a mistake is made in which the wedge is formed incorrectly.
The first row of increases for the gusset increased the number of stitches from 6 to 7 per palm for the right mitten (to the left of the first 9 thumb stitches) and for the left mitten (to the right of the 9 thumb stitches).
Now the second increase for the given example will be done for the right palm also after 9 knitted loops of the thumb, increasing the palm area by another 1 loop, up to 8.
For the left one - after 7 (6 initial loops + 1 increase) loops of the palm. That is, for the right mitten the number of loops increases to the left of the thumb area, for the left one - to the right.
Such increases should be made so that the number of loops for the palm equals the initial number of loops on the inside of the mitten - 15. In the given example, knitting should be continued until there are 15 loops in the palm area on both mittens.
The principle is as follows: the first loop of the thumb is connected to the loops from the palm area, and the remaining loops of the finger are removed to a pin or waste thread. This is necessary to close the loops of the palm and separate the loops of the thumb, which is temporarily not involved in knitting.
Thus, for the given example:
- For the right mitten, knit the first loop of the thumb, remove the remaining 8 loops onto a waste thread or pin, knit 15 loops of the palm.
- For the left mitten, knit 15 loops of the palm, remove 8 loops for the thumb and knit the last (9th) loop, attaching it to the loops of the palm.
You can finish knitting the thumb after you have finished knitting the body of the mitten and its toe.
You can knit double mittens with knitting needles (the step-by-step instructions in this case consist of the stages of knitting the cuff, body and toe) without a thumb. This model, known as "anti-scratch" - is ideal for very young children.
Body of the mitten
After separating the loops for the thumb, continue knitting the body of the mitten in a circle using the pattern chosen for it. Now the number of loops on the knitting needles should match their number at the beginning of knitting. For the model above, this is 30 loops.
There are no special knitting features here - the usual circular method on 2 or 4 double-pointed needles. The increases for the thumb wedge are not visible from the front side.
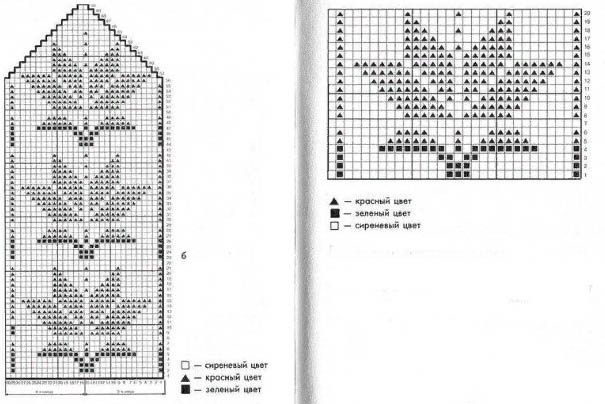
There are many ways to decorate the back of a mitten. Even a regular stockinette stitch knitted with beautiful yarn can be surprisingly beautiful. High-quality bobbin yarn gives a particularly neat knit.
Loops of such thread after wet-heat treatment straighten out perfectly, aligning and laying one to one. The result is sometimes difficult to distinguish from machine knitting.
Fluffy yarn – angora, mohair, alpaca – is perfect for knitting with the stockinette stitch. Such material, which conceals flaws in knitting, can be recommended even to beginners.
You can knit double mittens with knitting needles (the step-by-step instructions here differ only in that when you move on to knitting the body of the mitten, you will need to add a few loops) using relief patterns - various braids, arans, cables.
This design is ideal for smooth yarns like merino or yarns that "open up" slightly, giving a light fluff after washing. Cashmere has a similar effect.
Mitten toe
Knitting of the upper part of the mitten – its toe – begins as soon as the little finger is completely hidden. That is, when taking measurements from the palm, it is necessary to determine the distance from its base to the tip and knit the body of the mitten to this length.
To form the toe, make cuts along the edges of the inner and back sides of the mitten.
To get a nice decrease line, do the following steps, the same in one row for the inside and back of the palm:
- the first two loops of the inner (outer) side of the mitten are knitted with the main pattern,
- the next two loops are knitted together with a leftward tilt - the first loop is removed, the second is knitted and the previously removed loop is thrown over it,
- knit the body of the mitten up to the last four loops,
- two loops are knitted together with a tilt to the right behind the front walls,
- The last two loops of the row are knitted with the main pattern.
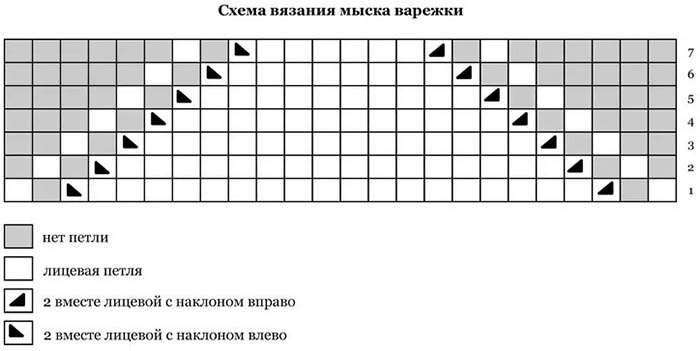
These decreases are performed in each row. To give the top of the mitten a nice rounded shape, decreases are finished when there are about 7 loops left on each side. Finish on the same side where you started to perform decreases - on the inside or back. Then cut off the working thread, leaving a tail about 30 cm long for convenience.
Insert the hook into the loops, pick up the thread and pull it through all the loops first on one side of the mitten, then on the other. For strength, pull the thread through twice and secure it on the back side of the mitten. This completes the knitting of the toe. You can also secure the thread with a needle, also inserting it twice into the loops of the last row.
If desired, you can make the toe of the mittens pointed. To do this, decreases are performed up to the last 4 loops on each side, closing them further in the manner described above.
Thumb
Knitting the thumb is the final stage of knitting the mitten. To do this, the loops from the temporary thread are transferred equally to 2 stocking needles. The working thread is attached from the back and from the loops of the mitten body, at the junction of the palm and thumb, additional loops are collected, missing for the full encirclement of the thumb.

In the example above, this is 5 loops. Try to pick up the extra loops so that no holes are formed in this area.
All the resulting loops are then knitted in a circle to the height of the finger, that is, until the tip of the finger is completely hidden. Close the loops in one row, knitting two loops together and tightening with a thread in the same way as the toe.
Knitted mittens will be a wonderful winter gift. This wardrobe item, knitted with knitting needles and decorated with embroidery or fashionable jacquard with stylized animals, will especially please children. And detailed instructions describing each step will help to understand the principle of work and easily master knitting double mittens that seem complicated at first glance.
Video about knitting
Master class: Double mittens with Indian wedge: