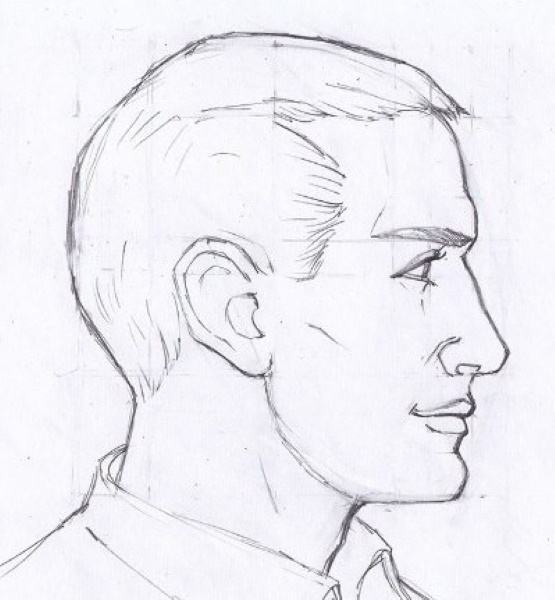
Drawing a face in profile is not that difficult. In order for the drawing to be realistic, it is necessary to observe the basic proportions of the parts of a male or female face, and also take into account the features of the stylistic design of the drawing.
Drawing tools
A face in profile is a drawing that requires fine work. For such drawings, it is recommended to use hard pencils of type B, which practically do not smear on the surface of the sheet during drawing. For simple drawings, you can additionally use felt-tip pens.
According to the thickness of the writing tip, felt-tip pens are divided into:
- thin (up to 2 mm);
- thick (from 6 mm);
- average (from 3 to 5 mm).
When choosing felt-tip pens, it is advisable to use models with water-based ink. Unlike alcohol-based felt-tip pens, such felt-tip pens are non-toxic.
Some recommended brands of markers are listed in the following table:
| Brand | Quantity in set | Rod thickness |
| Faber-Castell | 36 | 1-2 mm |
| Touch | 60 | 1-6 mm |
| Yunlandia "Drawing Lessons" | 12 or 24 | 2 mm |
| Carioca “Magic Markers” | 20 | 6 mm |
When choosing a drawing album, you should pay attention to the density of its sheets, which should be 100-122 g/m2.
It is recommended to use albums with spiral binding of sheets, which ensures a flat surface of the sheet during drawing.
Master classes
Before you start drawing male or female faces, you need to master the differences in the anatomical structure of a man's and a woman's face.
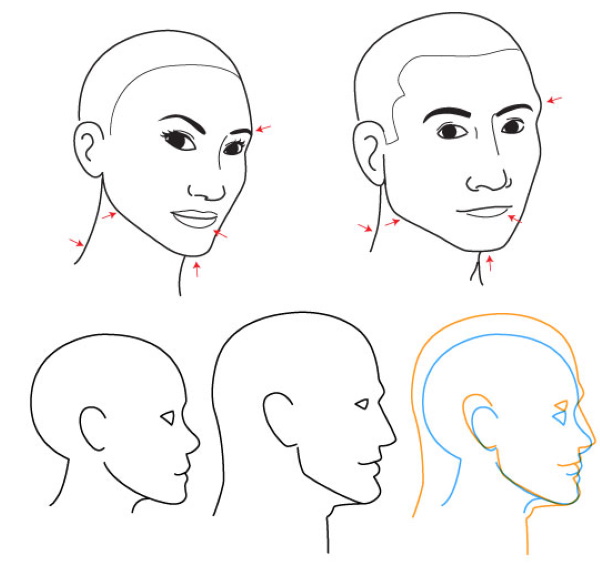
These differences are summarized in the following table:
| Part of the face | Peculiarities of a man | Peculiarities of a woman |
| Forehead | Wide, tall and straight | Low and round |
| Brows | They protrude slightly forward and have a horizontal shape. | Thin and arched in shape |
| Bridge of the nose | The transition from the forehead to the nose is smooth and often has straight outlines. | The transition from the forehead to the nose has a round, concave shape. |
| Nose | Long and wide, and its base is parallel to the lip line. | Medium length and narrow, with its base slightly raised upwards relative to the lip line |
| Lips | They are often thin and located slightly lower relative to the nose than women's. | They are often thicker and located closer to the nose than in men. |
| Chin | Wide (usually square) and has sharp outlines | Narrow and has rounded outlines |
| Back of the head | Wide and often rectangular in shape | Narrow and often oval in shape |
Man
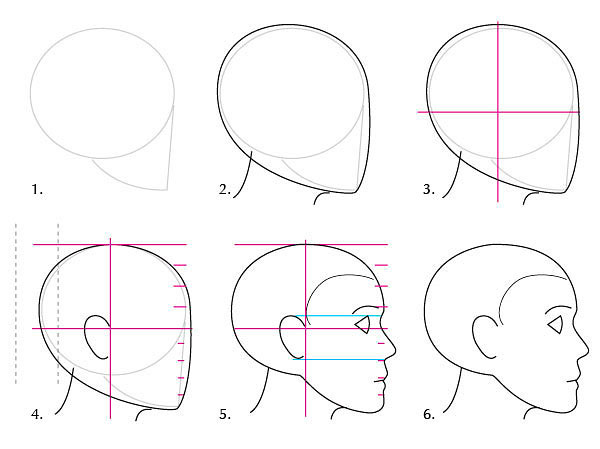
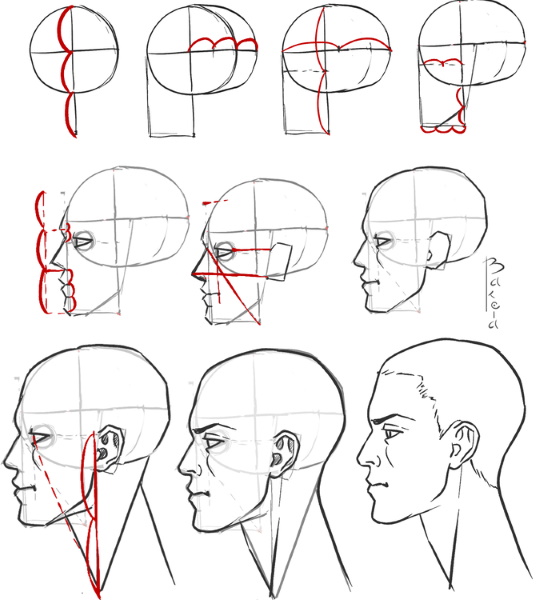
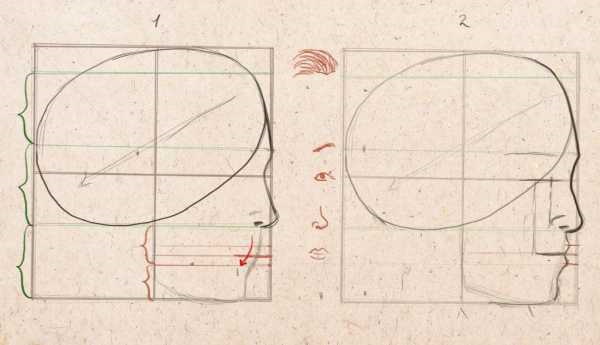
A face in profile is a drawing that can be drawn with an ordinary pencil. In order to draw a man's face in profile, you first need to draw an auxiliary square in the center of the album sheet, the width of which should occupy 2/3 of the width of the sheet. Then you need to divide the square into 4 equal parts with horizontal and vertical lines. The central horizontal line will correspond to the eye level.
Next, you need to divide the square into 3 and a half parts horizontally. The lower line will correspond to the level of the lower part of the nose. The middle line will determine the level of the eyebrows, and the upper horizontal line determines the border between the lower border of the hair and the upper part of the forehead. After the auxiliary square is ready, you can begin to create the drawing itself.
The process of drawing a male face consists of the following steps:
- Inscribe an oval into a rectangle, the lower side of which is the auxiliary line of the nose, and the upper side corresponds to the upper line of the main square. The oval should be inscribed into the rectangle at an angle of 45°.
- Fix the pencil at the right extreme point of the oval, and then draw an inclined line to connect with the right extreme point of the eyebrow line. The result will be the forehead.
- At the level of the eyebrow line, draw a small convex protrusion to the right.
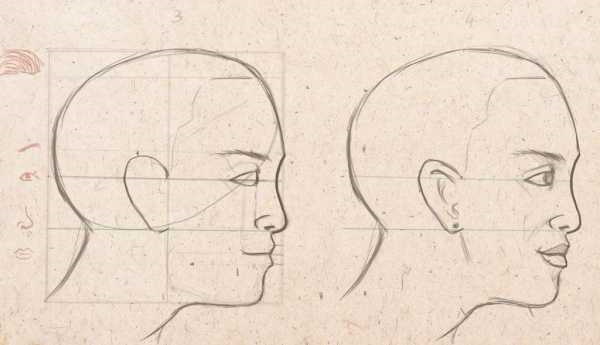
- Draw a straight nose in the form of a triangle stretched downwards from the eyebrows. Then erase the left part of the triangle and round the tip of the nose, which should extend slightly beyond the right border of the auxiliary square. Then, in the lower left part of the nose, draw a nostril in the form of a small horizontal oval. After that, on the left above the nostril, draw the wing of the nose in the form of a small semi-oval.
- Starting from the bottom of the nose, draw the outline of the jaw in the form of a square, slightly concave inward relative to the right lower part of the main square. The lower part of the jaw should be parallel to the lower line of the auxiliary square, and its left part should connect with the vertical auxiliary line of the main square.
- Mark the line of the lower lip of the mouth, which should be located in the middle between the line of the nose and the chin.
- Mark the line of the upper lip of the mouth, which should be located in the middle between the line of the nose and the lower lip.
- Mark the mouth line, which should be located in the middle between the lines of the upper and lower lips.
- In accordance with the marked lines, draw narrow lips, slightly convex to the right. The line of the mouth between the lips should be strictly horizontal.
- Mark the center of the eye, which should be located on the auxiliary line of the eye at the level of the left edge of the mouth.
- Mark the right edge of the eye, which should be located on the auxiliary line of the eye at the level of the wing of the nose.
- In accordance with the marked boundaries, draw an eye in the form of a triangle, the right side of which should be slightly convex to the right. Then draw the pupil, and above and below the eye draw the eyelids and eyelashes.
- Above the eye, draw an eyebrow in the form of an elongated curved oval, pointed at the edges.
- Fix the pencil in the center of the main square, and then draw the ear in the form of a semi-oval elongated to the left and upwards, which should end at the level of the nose line. Then, inside the ear contour, draw the auricle in the form of a semi-oval, repeating the shape of the outer contour of the ear.
- Draw the back line of the neck, which should start at the level of the nose line.
- Draw the front line of the neck, which should start from the left side of the chin and should also be parallel to the back line of the neck.
Face in profile drawing step by step of a man. - Draw the contours of the eyes, nose and lips in more detail.
- Fix the pencil at the upper right part of the ear, and then draw a curved line of the hair edge contour towards the upper part of the forehead. Then from the lower part of the ear contour, draw the lower part of the hair edge contour as a slanted line.
- Draw hair in the form of lines directed from the contour of the edge of the hair to the left part of the contour of the head.
- Draw a collar around the neck in the form of two elongated rectangles.
Woman
A face in profile is a drawing that requires taking into account the structural features of a male and female face and their differences. In order to draw a woman's face in profile, you first need to draw an auxiliary square in the center of the album sheet, the width of which should occupy 2/3 of the sheet's width. Then you need to divide the square into 4 equal parts with horizontal and vertical lines. The central horizontal line will correspond to the eye level.
Next, you need to divide the square into 3 and a half parts horizontally. The lower line will correspond to the level of the lower part of the nose. The middle line will determine the level of the eyebrows, and the upper horizontal line determines the border between the lower border of the hair and the upper part of the forehead. After the auxiliary square is ready, you can begin to create the drawing itself.
The process of drawing a female face consists of the following steps:
- Inscribe an oval-shaped oval into a rectangle, the lower side of which is the auxiliary line of the nose, and the upper side corresponds to the upper line of the main square. The oval should be inscribed into the rectangle at an angle of 45°, and the narrow part of the oval should be directed to the right and upwards.
- Fix the pencil at the right extreme point of the oval, and then draw a convex line to the right until it connects with the right extreme point of the eyebrow line. The result will be the forehead.
- Draw the bridge of the nose and the nose using a concave vertical line connecting the eyebrow line with the right extreme point of the nose line.
- Continue drawing the nose, rounding the line of the nose to the left, while its tip should go slightly beyond the right border of the auxiliary square. Then, in the lower left part of the nose, draw a nostril in the form of a small horizontally located grain. After that, on the left above the nostril, draw the wing of the nose in the form of a small semi-oval.
- Starting from the bottom of the nose, draw the outline of the jaw in the form of a square, slightly concave inward relative to the right lower part of the main square. The lower part of the jaw should be slightly raised on the left, and its left part should connect with the vertical auxiliary line of the main square.
- Mark the line of the lower lip of the mouth, which should be located in the middle between the line of the nose and the chin.
- Mark the line of the upper lip of the mouth, which should be located in the middle between the line of the nose and the lower lip.
- Mark the mouth line, which should be located in the middle between the lines of the upper and lower lips.
- In accordance with the marked lines, draw wide lips, slightly convex to the right. The line of the mouth between the lips should have a slightly arched shape.
- Mark the center of the eye, which should be located on the auxiliary line of the eye at the level of the left edge of the mouth.
- Mark the right edge of the eye, which should be located on the auxiliary line of the eye at the level of the wing of the nose.
- In accordance with the marked boundaries, draw the eye in the form of a horizontally located oval, narrowing on the left side. Then draw the pupil, and draw the eyelids and eyelashes above and below the eye.
- Draw an eyebrow above the eye using hatching.
- Fix the pencil in the center of the main square, and then draw the ear in the form of a semi-oval elongated to the left and upwards, which should end at the level of the nose line. Then, inside the ear contour, draw the auricle in the form of a semi-oval, repeating the shape of the outer contour of the ear.
- Draw the back line of the neck, which should start at the level of the nose line and end in the left corner of the main auxiliary square.
- Draw the front line of the neck, which should start from the left side of the chin and should also be parallel to the back line of the neck.
- Draw the contours of the eyes, nose and lips in more detail. Then, using fine shading, add shadows above the upper and lower lips, under the eyebrow, and under the left side of the chin.
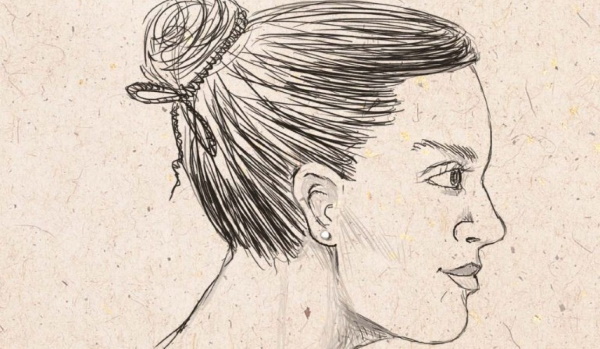
- Fix the pencil at the upper right part of the ear, and then draw a curved line of the hair edge contour towards the upper part of the forehead. Then from the lower part of the ear contour, draw the lower part of the hair edge contour as a horizontal line.
- Draw the hair in the form of lines directed from the contour of the edge of the hair to the upper left part of the main auxiliary square.
- In the upper left part of the hair, draw a ball of gathered hair in the form of an oval, in the lower part of which draw a ribbon with a bow.
Anime (boy)
Profile face is a drawing that can be done in anime style. A feature of anime characters is the similarity of male and female face shapes. The only features that distinguish boys from girls in these cartoons are their hairstyle and eye shape. Therefore, drawing faces of this kind of characters is much easier than classic human faces.
To draw a guy's face in anime style, you need to follow these steps:
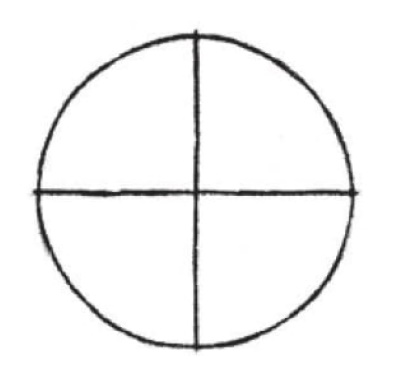
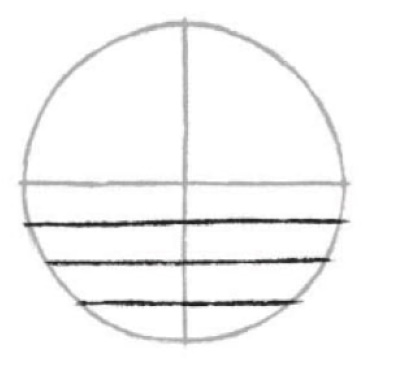
- Draw an auxiliary circle with a diameter half the width of the album sheet.
- Divide the circle into 4 parts using horizontal and vertical auxiliary lines.
- Divide the lower half of the circle into 4 equal horizontal parts using horizontal lines.
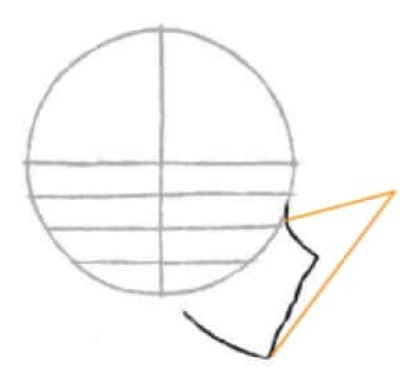
- Fix the pencil between the 2nd and 3rd lines (you need to count from the central horizontal line down) and draw a curved line to the right and down, slightly short of the horizontal level of the 4th line. Then draw a line down and slightly to the left. This line should have 2 bulges in its middle and end under the circle at a distance of 1/4 of its diameter. After that, continue moving the pencil towards the lower central part of the auxiliary circle and stop the pencil slightly below the outline of the circle. The result will be the nose, lips and chin.
- On the right side of the auxiliary circle, between the 2nd and 3rd lines, draw an eye in the form of a triangle. Then on the right side of the eye, draw the pupil in the form of a vertically located rectangle with a glare inside. After that, you need to outline the upper part of the eye with a pencil, and add a small horizontal segment on top, which will form the upper eyelid.
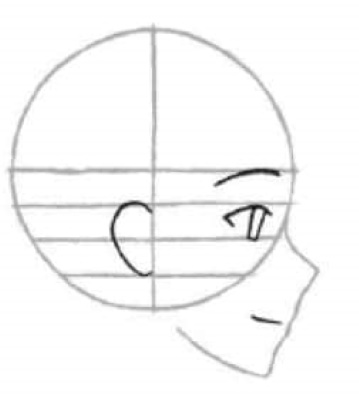
- On the right side of the auxiliary circle, under the horizontal central line, draw an eyebrow in the form of an upward convex arc.
- Between the nose and chin, draw a mouth in the form of a horizontal segment.
- In the central part of the auxiliary circle, between the 2nd and 4th lines, draw an ear in the form of a semi-oval, tapering downwards. Then, inside the ear, draw the auricle in the form of a semi-oval, repeating the shape of the outer contour of the ear.
- Draw the back line of the neck, which should start from the lower left part of the auxiliary circle at the ear level, and should be directed at an angle of 45° to the vertical of the drawing.
- Draw the front line of the neck, which starts in the middle of the chin and goes down parallel to the back line of the neck.
- Draw a shadow between the chin and neck in the form of a triangle and color it gray.
- Draw a hairstyle in the form of elongated and curved triangles over the outline of the top of the head.
- Use a black marker to outline the contours of the face and hair.
- Dye your hair grey.
- Color the pupil blue.
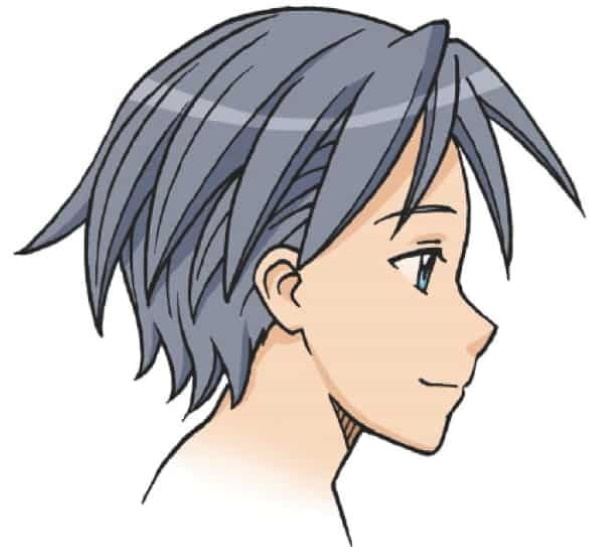
- Paint your face beige.
Anime (girl)
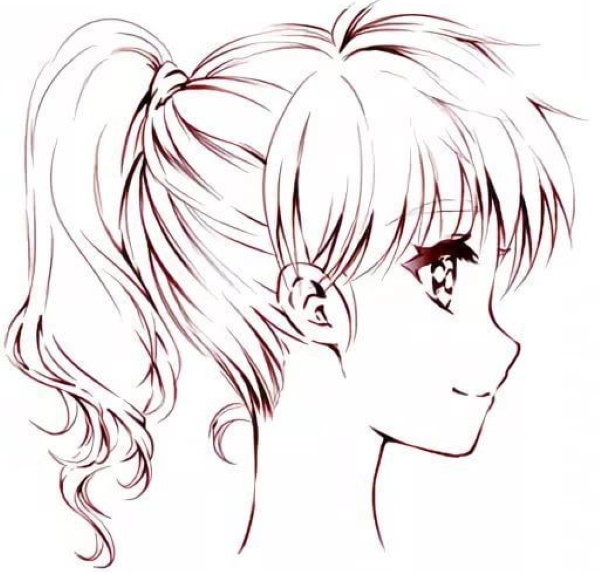
The girl's profile picture differs from the man's in the shape and size of her eyes, as well as her lush hairdo.
To draw a girl's face in anime style, you need to follow these steps:
- Draw an auxiliary circle with a diameter half the width of the album sheet.
- Divide the circle into 4 parts using horizontal and vertical auxiliary lines.
- Divide the lower half of the circle into 4 equal horizontal parts using horizontal lines.
- Fix the pencil between the 2nd and 3rd lines (you need to count from the central horizontal line down) and draw a curved line to the right and down, slightly short of the 4th line. Then draw a line down and slightly to the left. This line should have 2 bulges in its middle and end under the circle at a distance of 1/4 of its diameter. After that, continue moving the pencil towards the lower central part of the auxiliary circle and stop the pencil slightly below the outline of the circle. The result will be the nose, lips and chin.
- On the right side of the auxiliary circle, between the 2nd and 3rd lines, draw an eye in the form of a large triangle, the upper line of which should be several times thicker than the others. Then, on the right side of the eye, draw a pupil in the form of a wide and vertically located oval with several triangular highlights inside.
- Draw large eyelashes in the upper right part of the eye.
- On the right side of the auxiliary circle, under the horizontal central line, draw an eyebrow in the form of an upward convex arc.
- Between the nose and the chin, draw a mouth in the form of a horizontal segment, slightly convex downwards.
- In the central part of the auxiliary circle, between the 2nd and 4th lines, draw an ear in the form of a semi-oval, tapering downwards. Then, inside the ear, draw the auricle in the form of a semi-oval, repeating the shape of the outer contour of the ear.
- Draw the back line of the neck, which should start from the lower left part of the auxiliary circle at the ear level and should be directed vertically.
- Draw the front line of the neck, which starts at the left side of the chin and goes down parallel to the back line of the neck.
- Draw a shadow between the chin and the neck.
- Draw a hairstyle in the form of elongated and curved triangles over the outline of the top of the head.
- On the left side of the hairstyle, draw a ponytail with curls of hair curling downwards.
- Use a purple marker to outline the contours of the face and hair lines.
To create a drawing of a male or female face in profile, it is enough to have a minimum knowledge of the proportions of its parts. When creating drawings of cartoon characters, you should additionally take into account the unique features of the shape of their faces.
Video on how to draw a face in profile
How to draw a human face in profile: