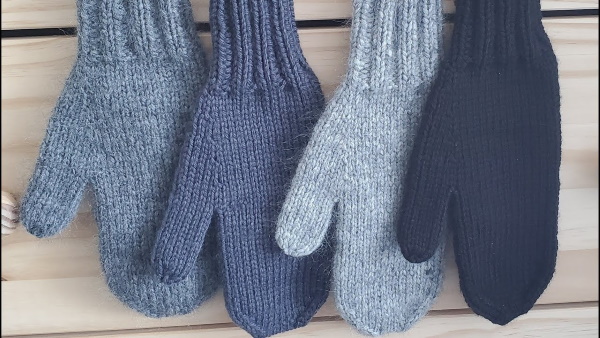
Crocheting mittens is quite simple. The products are perfect for teaching beginner knitters. Crochet mittens are distinguished by their high density in comparison with knitted products.
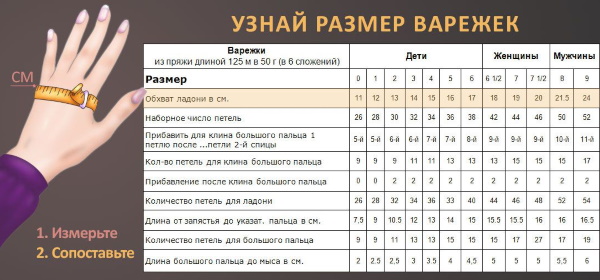
How to calculate the size of mittens and the number of loops for women, men, children
Before you start working, you need to calculate the number of loops for different parts of the product.
The sizes of the main parameters of the product for men are given in the following table:
| Size | Palm circumference (cm) | Number of loops for palm | Cast-on number of loops | Length from wrist to center of mitten | Number of loops for the thumb |
| 7 | 20 | 60 | 56 | 16 | 21 |
| 8 | 22 | 64 | 60 | 17 | 22 |
| 9 | 24 | 72 | 68 | 18 | 23 |
The sizes of the main parameters of the product for women are given in the following table:
| Size | Palm circumference (cm) | Number of loops for palm | Cast-on number of loops | Length from wrist to center of mitten | Number of loops for the thumb |
| 5 | 17 | 53 | 50 | 15 | 17 |
| 6 | 18 | 54 | 52 | 16 | 18 |
| 7 | 19 | 56 | 54 | 17 | 19 |
The dimensions of the main parameters of the product for children are given in the following table:
| Size | Palm circumference (cm) | Number of loops for palm | Cast-on number of loops | Length from wrist to center of mitten | Number of loops for the thumb |
| 0 | 11 | 34 | 34 | 7 | 10 |
| 1 | 12 | 36 | 36 | 9 | 11 |
| 2 | 13 | 40 | 38 | 10 | 12 |
| 3 | 14 | 42 | 40 | 12 | 14 |
| 4 | 15 | 46 | 44 | 13 | 16 |
The amount of yarn needed to knit men's or women's mittens usually does not exceed 100 g. For children's mittens, the maximum amount of yarn can be 60 g.
What yarn to knit mittens with
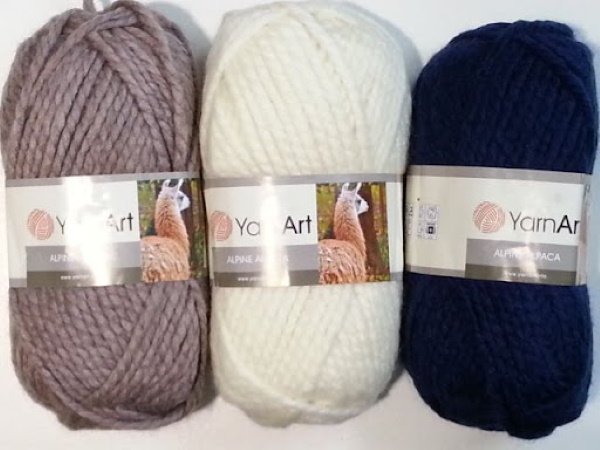
Knitting mittens with a crochet hook for beginners will not be particularly difficult. Their main properties, which you need to pay special attention to before starting work, are the strength and heat-protective properties of the yarn used. The appearance and design of the product are also important. To ensure the necessary level of heat resistance, it is recommended to use yarn made of camel or alpaca wool.
If you need to make the product more elastic, it is better to use wool yarn with a small addition of acrylic. For women's mittens, you can use plush thread, which has a pleasant softness and an unusual appearance. It should be noted that such mittens can only be used in weather with a positive outdoor temperature.
If mohair is used for knitting, it is better to knit such mittens in two layers, the outer layer of which is knitted from mohair, and the inner layer is knitted from thick wool. If you plan to stay in the cold for a long time, including constant contact with snow, then it is recommended to use Norwegian wool, which is not only warm, but also quite durable.
Even a beginner craftswoman can crochet mittens for a child. For children's mittens, it is recommended to use alpaca wool, which is quite resistant to moisture and also retains heat inside when the outside gets wet.
Symbols in knitting patterns
The following abbreviations are used in crochet:
- ССН — double crochet;
- SC - single crochet;
- v.p. - air loop;
- PSSN - half double crochet;
- ССНпв — a column with a yarn over, crocheted from above;
- PSSN2vm - half double crochet (decrease);
- ss - connecting stitch;
- ksССН — front column with yarn over;
- purl double crochet - purl double crochet;
- С2Н - relief column with two yarns;
- pp - lifting loop;
- decrease from DC - 2 DC are knitted with a common top.
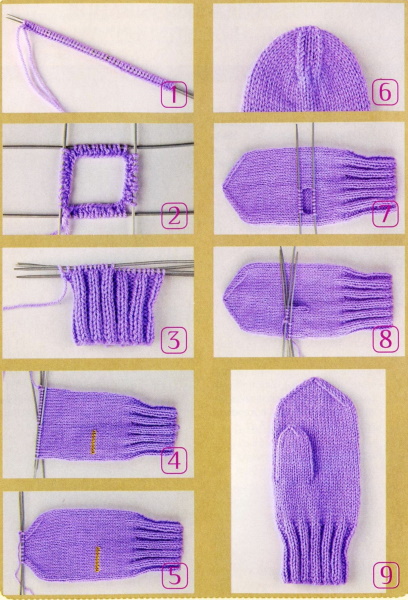
Step-by-step master class on knitting a basic model of mittens
Knitting mittens with a crochet hook for beginners will be much easier if you use special step-by-step master classes. To knit the basic model of mittens, you can use any semi-woolen yarn and a 4.5 mm hook. If you want to give the mittens a contrasting set of colors, you can use special yarn with a changing color scheme. The knitting process of the product consists of 2 stages. First, the base of the mittens is knitted, and then the finger for it.

The knitting pattern for the base of the product looks like this:
- Make an amigurumi ring.
- Knit 1 ch, then 10 hdc, then tighten tightly.
- Work 1 ch, then 2 hdc in each loop of the ring.
- Work 1 ch, then 3 hdc in each loop of the ring.
- Knit 12 circles, each consisting of 1 ch and 30 hdc.
- Work 1 ch, 1 hdc, 6 ch, then skip 2 stitches and work 28 hdc adding 6 ch (this will create a slit for the thumb).
- Knit 2 circles, each of which consists of 1 ch and 34 hdc.
- Knit 1 ch, 6 hdc, hdc2vm, 15 hdc, hdc2vm, 9 hdc.
- Knit 1 ch and HDC into 32 loops.
- Knit 1 ch, 2 hdc, hdc2vm into 24 loops.
- Knit 1 ch, 4 hdc, hdc2vm into 20 loops.
- Knit 1 ch, 4 hdc, hdc2vm into 20 loops.
- Knit 3 circles with 2 ch, 2 dc, 2 dc in 20 loops.
- Knit 1 ch, 1 sc in 20 loops.
Knitting pattern for the thumb:
- Insert the end of the yarn into the slit of the thumb using a slip stitch.
- Knit 1 ch and 12 hdc.
- Knit 3 rounds with 1 ch and 1 hdc in 12 loops.
- Knit 1 ch, dc2vm in 6 loops.
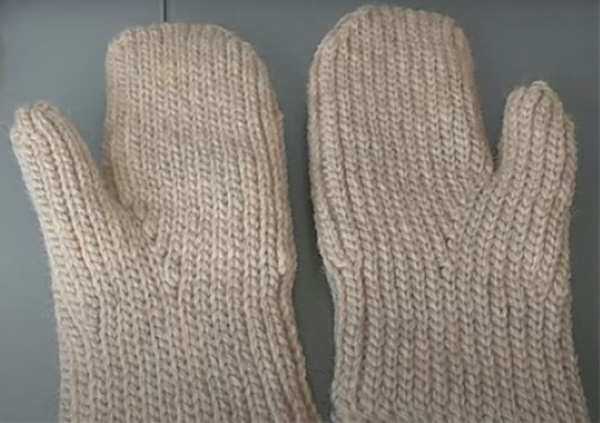
Instructions for knitting mittens with anatomical finger
You can crochet mittens for beginners in a few hours. Mittens with an anatomical thumb differ from classic ones in that the shape and relief of the thumb completely corresponds to the contour of the thumb. Due to this correspondence, the mittens sit more tightly on the hand, and the movements of the thumb are free and are not constrained by the product. Before knitting each new row, it is necessary to turn the work and make 1 ch.
The knitting pattern for such a mitten looks like this:
- 50 ch (direction downwards of the cuff edge).
- 50 cc (upward direction from the edge of the cuff to the fingertips).
- 35 cc (bottom).
- 27 cc (up).
- 42 cc (bottom).
- 44 cc (up).
- 44 cc (bottom).
- 46 cc (up).
- 46 cc (bottom).
- 48 cc (up).
- 48 cc (bottom).
- 50 cc (up).
- 50 cc (bottom).
- 50 cc (up).
- 50 cc (bottom).
- 50 cc (up).
- 35 cc (bottom).
- 35 cc (up).
- 32 cc (bottom).
- 32 cc (up).
- 30 ss (down).
- 30 cc (up).
- 28 ss (down).
- 27 cc (up).
- 25 ss (down).
- 23 cc (up).
- 22 ss (down).
- 25 cc (up).
- 50 cc (bottom).
- 26 ss (up) + 12 ch
- 38 cc (bottom).
- 37 cc (up).
- 37 cc (bottom).
- 36 cc (up).
- 36 cc (bottom).
- 35 cc (up).
- 35 cc (bottom).
- 38 cc (up).
- 25 ss (down).
- 20 ss (up).
- 33 cc (bottom).
- 38 cc (up).
- 38 cc (bottom).
- 34 cc (up).
- 34 cc (bottom).
- 35 cc (up).
- 35 cc (bottom).
- 36 cc (up).
- 36 cc (bottom).
- 38 cc (up).
- 12 ss (down) along thumb joining sides + 26 ss to end of cuff.
- 50 cc (up).
- 50 cc (bottom).
- 48 cc (up).
- 48 cc (bottom).
- 49 cc (up).
- 49 cc (bottom).
- 50 cc (up).
- 50 cc (bottom).
- 50 cc (up).
- 50 cc (bottom).
- 50 cc (up).
- 50 cc (bottom).
- 50 cc (up).
- 50 cc (bottom).
- 50 cc (up).
- 50 cc (bottom).
- 50 cc (up).
- 50 cc (bottom).
- 48 cc (up).
- 48 cc (bottom).
- 46 cc (up).
- 46 cc (bottom).
- 44 cc (up).
- 29 ss (down).
- 27 cc (up).
- 42 cc (bottom).
- 50 cc (up).
- 50 cc (bottom).
To finish the work on the wrong side, you need to stitch the side part of the mitten using SS.
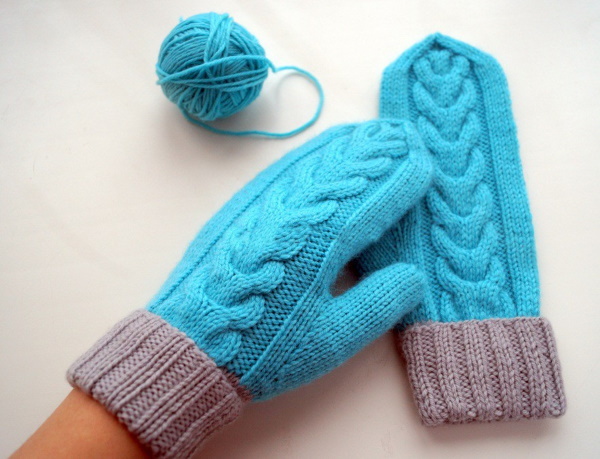
Mittens with a "Braid" pattern
You can crochet mittens for beginners using various additional patterns. The "Braid" pattern is often used when knitting not only mittens and cuffs, but also sweaters. To knit mittens with this pattern, you can use any wool yarn (120 g) and a hook (4 mm). The knitting density of the product is 10x10 cm - 22 rows x 19 sc.
Features of the mittens design:
- The mitten consists of a cuff, a main part and a thumb.
- The main part has a back side and a palm.
- Since the rows in knitting are counted from right to left, the knitting of the right and left mittens differs in the order of knitting the back side and the palm, as well as the location of the cut for the thumb relative to the center of the mitten.
- When knitting the right mitten, in the course of each row, first knit the palm, and then the back.
- When knitting the left mitten, in the direction of each row, first knit the back side, and then the palm.
- The thumb is knitted at the end with a separate thread.
Features of knitting the cuff:
- The cuff is knitted in turning rows with single crochets (SC) strictly behind the back half loop.
- At the end of each row, you need to knit 1 lifting loop. When calculating the number of columns, lifting loops are not taken into account.
- A new row begins with knitting a single crochet without indents from the lifting loop in the same column, which is the last one for the previous row.
- It is recommended to knit the last column of each row through both half loops to ensure the density of the elastic cuff edge (optional).
- The number of rows in the elastic band from sc approximately corresponds to the number of columns in the row of the main part of the mitten in a ratio of 1:1.
Description of knitting the cuff by rows:
- 1 row: chain 10 air loops, 1 lifting loop (10).
- Rows 2-35: 10 sc in back half loop, 1 pp (10), put together the first and last row of elastic, then knit together using slip stitches.
- Row 36: 10 ss (10), unfold the elastic ring, then continue knitting along the side surface of the elastic in a circle.
Features of knitting the main part of the mittens, including the “Braids” pattern:
- The main part of the mittens is knitted from the side surface of the elastic cuff to the fingertips in a spiral, without lifting loops.
- Except for the first row, all rows are knitted with relief double crochets: front and back (fddc, purlddc).
- The first row is knitted with simple double crochets (DC).
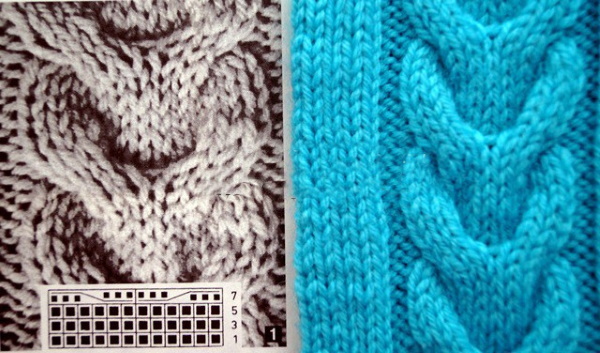
- In the center of the back side, a “Braid” is knitted, the width of which is equal to 10 columns (2 outDC, 6 frontDC, 2 outDC).
- Vertically, the "Braid" consists of repeating 4 rows.
- Every 4th row of the “Braid” has intersecting front columns with two yarns (3+3 frontC2H must be crossed).
- In the crossing row, the first three (in the direction of the hook) k2N are knitted into the last three kDC of the bottom row, and the second three k2N are knitted back into the first three kDC of the bottom row. That is: 1st k2N into the bottom 4th kDC of this "Braid", 2nd into the 5th, 3rd into the 6th, 4th into the 1st, 5th into the 2nd, 6th into the 3rd.
- The top 4 rows contain decreases (two columns with a common top).
Description of knitting the right mitten by rows:
- The beginning of the row is the palm, then the back side.
- 1 row: 3pp, 35 dc (36), along the side surface of the elastic band.
- Rows 2-3: 22 kDC, 2 outDC, 6 kDC, 2 outDC, 4 kDC (36).
- 4th row: 22 kDC, 2 outDC, 3+3 kDC cross, 2 outDC, 4 kDC (36).
- Rows 5-7: 22 kDC, 2 outDC, 6 kDC, 2 outDC, 4 kDC (36).
- Row 8: 1 kDC, 6 ch, 15 kDC, 2 outDC, 3+3 kDC cross, 2 outDC, 4 kDC (36).
- Rows 9-11: 22 kDC, 2 outDC, 6 kDC, 2 outDC, 4 kDC (36).
- Row 12: 22 kDC, 2 outDC, 3+3 kDC cross, 2 outDC, 4 kDC (36).
- Rows 13-15: 22 kDC, 2 outDC, 6 kDC, 2 outDC, 4 kDC (36)
- Row 16: 22 kDC, 2 outDC, 3+3 kDC cross, 2 outDC, 4 kDC (36).
- Rows 17-19: 22 kDC, 2 outDC, 6 kDC, 2 outDC, 4 kDC (36).
- Row 20: 22 kDC, 2 outDC, 3+3 kDC cross, 2 outDC, 4 kDC (36).
- Rows 21-22: 22 kDC, 2 outDC, 6 kDC, 2 outDC, 4 kDC (36).
- Decreases: 2 dc are worked into a common top.
- Row 23: k2dc, 1 decrease, 2 knitsdc, 1 decrease, 2 knitsdc, 1 decrease, 2 knitsdc, 1 decrease, 3 knitsdc, 1 decrease, 1 knitdc, 2 indcs, 1 knitsdc, 2 decrements, 1 knitsdc, 2 indcs, 1 knitsdc, 1 decrease, 1 personsSSN (28).
- 24 row: 1 knit dc, 1 dec, 1 knit dc, 1 dec, 2 knit dc, 1 dec, 1 k dc, 1 dec, 2 k dc, 1 dec, 2 pur dc, 2 dec, 2 pur dc, 1 dec, 1 k dc (20).
- Row 25: k1dc, 4 decreases, 1 knitsdc, 1 decrease, 2 indcs, 1 decrease, 2 indcs, 1 decrease (13).
- Row 26: 1 knit dc, 2 dec, 1 knit dc, 1 dec, 3 purdc, 1 dec (9).
Description of knitting the left mitten in rows:
- The row starts from the back side, then from the palm.
- 1 row: 3pp, 35 dc (36), along the side surface of the elastic band.
- 2-3 rows: 4 kDC, 2 outDC, 6 kDC, 2 outDC, 22 kDC (36).
- 4th row: 4 kDC, 2 outDC, 3+3 kDC cross, 2 outDC, 22 kDC (36).
- Rows 5-7: 4 kDC, 2 outDC, 6 kDC, 2 outDC, 22 kDC (36).
- Row 8: 4 kDC, 2 purlDC, 3+3 kDC cross, 2 purlDC, 15 kDC, 6 ch, 1 kDC (36).
- Rows 9-11: 4 kDC, 2 outDC, 6 kDC, 2 outDC, 22 kDC (36).
- Row 12: 4 kDC, 2 outDC, 3+3 kDC cross, 2 outDC, 22 kDC (36).
- Rows 13-15: 4 kDC, 2 outDC, 6 kDC, 2 outDC, 22 kDC (36).
- Row 16: 4 kDC, 2 outDC, 3+3 kDC cross, 2 outDC, 22 kDC (36).
- Rows 17-19: 4 kDC, 2 outDC, 6 kDC, 2 outDC, 22 kDC (36).
- Row 20: 4 kDC, 2 outDC, 3+3 kDC cross, 2 outDC, 22 kDC (36).
- Rows 21-22: 4 kDC, 2 outDC, 6 kDC, 2 outDC, 22 kDC (36).
- Decreases: 2 dc are worked into a common top.
- Row 23: K1dc, 1 dec, 1 knitdc, 2 indc, 1 k, 2 dec, 1 kdc, 2 indc, 1 kdc, 1 dec, 3 kdc, 1 dec, 2 kdc, 1 dec, 2 kdc, 1 dec, 2 kdc, 1 dec, 2 personsSSN (28).
- Row 24: K1dc, 1 decrease, 2 indc, 2 decreases, 2 indcs, 1 decrease, 2 knitsdc, 1 decrease, 1 knitsdc, 1 decrease, 2 knitsdc, 1 decrease, 1 knitdc, 1 decrease, 1 knitdc (20).
- Row 25: Dec 1, pur 2 dc, dec 1, pur dc 2, dec 1, k dc 1, dec 4, k dc 1 (13).
- Row 26: dec 1, pur 3 dc, dec 1, k 1 dc, dec 2, k 1 dc (9).
Features of knitting the thumb:
- The thumb is knitted with a separate thread for the armhole stitches in a spiral using front double crochets (fdc).
- In order to reduce the size of the holes between the posts in the end parts, you can knit 2 posts using the decrease principle so that the total number of posts in the finger corresponds to the pattern.
Description of knitting the thumb in rows:
- Having attached a new thread to the armhole of the finger using a slip stitch, begin knitting around the perimeter of the armhole.
- 1st row: 3pp, 13 knit (14).
- Rows 2-8: K14 (14).
- Row 9: 7 decreases (7) (all front DCs are doubled in pairs).
Colored mittens
Colored mittens differ from ordinary ones by the alternation of different colors.
To knit such mittens you will need a hook (4.5 mm) and the following set of yarn:
- white (No. 02);
- green (No. 416);
- lilac (No. 208);
- burgundy (No. 230);
- gray (No. 508).
When knitting mittens, it is necessary to change the color of the yarn in each row. The sequence of color changes should be as follows: lilac, white, green, burgundy, gray. The knitting pattern for these mittens looks like this:
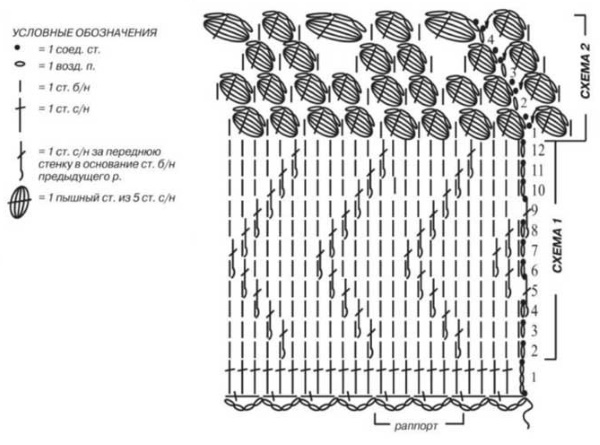
The knitting process consists of the following steps:
- Using lilac thread, crochet 4 ch, 1 dc in 1 ch (12 times).
- Join the thread into a ring using ss.
- Changing the color in each row, knit the product according to the given pattern.
- When the length reaches 10 cm, make a cut for the thumb by making 1 sl st, 6 ch, 6 sc, then insert the hook into the 7th st and tie 6 dc.
- Knit in a circle, adding 6 ch, and after the 16th row decrease in each row 6 times.
- Along the circumference of the thumb, knit 14 sc with lilac thread.
- Tighten and cut the thread.
Crocheted mittens can be a great gift for friends and family. This type of product is not difficult to master even for beginner craftswomen. Using imagination, mittens can be decorated with various types of beads and seed beads, as well as special patterns-patches.
Video on how to crochet mittens
How to crochet mittens: