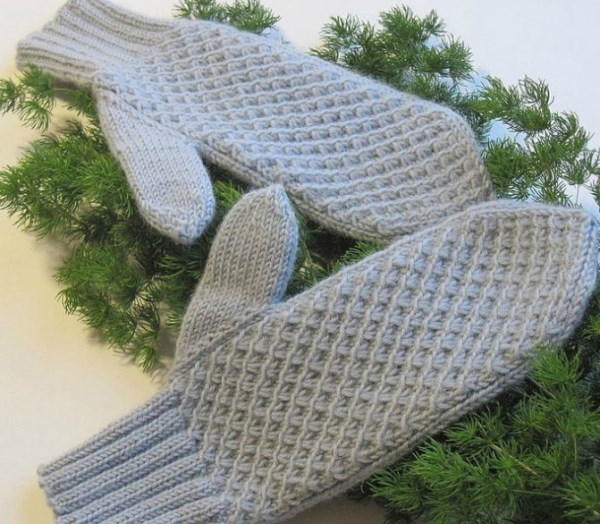
Beautifully finishing mittens with knitting needles is a whole art for beginner craftswomen. A warm and comfortable accessory is necessary in the cold season for adults and children, so skillfully decorated edges of the product always attract attention.
Mittens are traditional knitted "warmers" for hands of many peoples of northern countries, therefore scientists could not establish the exact birthplace of this element of clothing. They have been knitted in Rus', Norway and even Japan for a long time.
Necessary tools and materials
Every needlewoman should be able to finish mittens beautifully with knitting needles. Beginners get them pointed, while experienced ones can carefully shape the toe into a semicircle or triangle without a very sharp end.
Mittens or mittens are a more versatile winter accessory for hands, as fingers in them do not freeze as quickly as in gloves. This is due to the shape of the product.
Mittens have long been an integral part of the national costumes of different nations of the world. Historians have established that mittens became popular in Rus' at the beginning of the 13th century. At the same time, experts are sure that they were knitted earlier, but they were in use among the common people, and not among the rich classes.
Knitting mittens requires yarn and knitting needles. In order to choose the right threads, you need to carefully consider the process of choosing them before buying.
To do this you need:
- Decide on the material.
- Feel the selected yarn tactilely.
- Check the electrostatic characteristics of the thread.
- Assess the quality of the fibers in the yarn.
- Conduct an olfactory analysis of the skein.
- Read the characteristics on the label.
To choose the right yarn for mittens, you need to understand what season they are needed for. Mittens are usually worn in winter, so the thread will need to be warm, light and moisture-resistant.
The material suitable for knitting mittens is made from merino wool, mountain goats or alpaca llamas. Sheep hair or rabbit down is also suitable. It should be taken into account that the hands should be comfortable in the product, they should bend and straighten easily.
After choosing the yarn, it is recommended to hold it in your palms for a few minutes and press it slightly. The test will help determine how pleasant the material is to the body and how the skin reacts to it.
When buying, experts advise checking the material for electrostatic properties. It is known that in winter, there is increased static in clothing, so it is better to find out whether the gloves will "shock" before they are made, than to suffer later.
To test, take the free end of the thread and lightly fluff it, holding it between your thumb and forefinger. This manipulation will also help you understand how quickly the thread will wear out and become covered in pellets.
Before buying, you need to evaluate the quality of the fibers. To do this, the thread is stretched. A quality material has a uniform structure, and the fibers do not stand out in thickness and are not formed by bumps, where the thick part turns into a thin one.
Experienced craftsmen note that it is difficult to work with uneven threads. The fabric is uneven and this is especially noticeable when using any type of satin stitch. Also, a product made of uneven yarn will be blown through, which will reduce its quality characteristics.
Experts recommend smelling the skein of wool you like. If you detect even the slightest chemical "odor", it is better not to take the material, as it may be toxic and cause health problems in the future.
Experts always recommend that beginning needlewomen carefully read the information on the label. Here the manufacturer indicates not only the composition of the yarn fibers, but also its length and thickness. In addition, there is information about what diameter of knitting needles can be used with this thread.
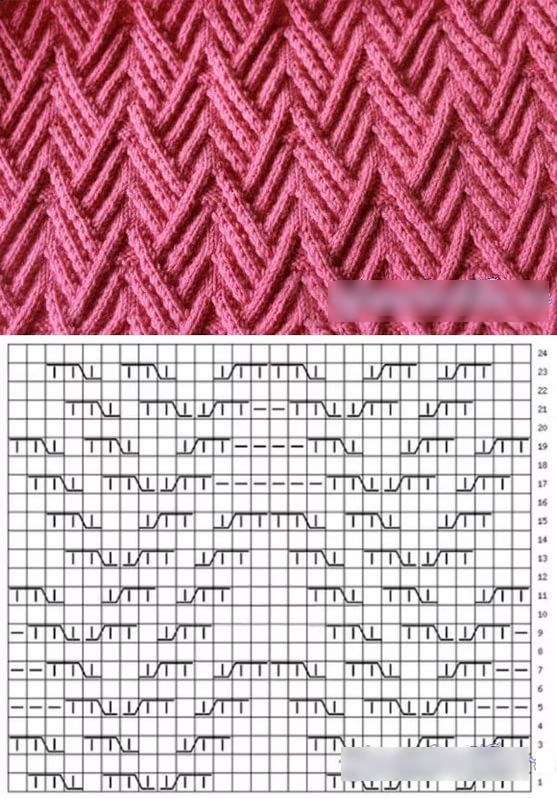
Schemes with description of works
You need to learn how to finish mittens beautifully with knitting needles at the beginning of learning the basics of knitting. Descriptions and patterns offered by experienced needlewomen to beginner colleagues will help with this.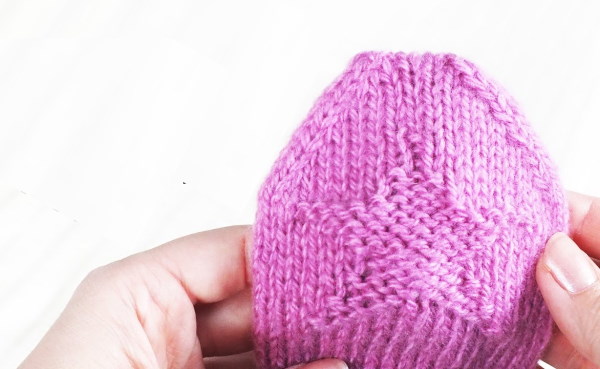
Mittens are popular among both adults and children. Mothers try to make bright and warm accessories for their children for the winter, in which their hands would not freeze and which would stay on them well.
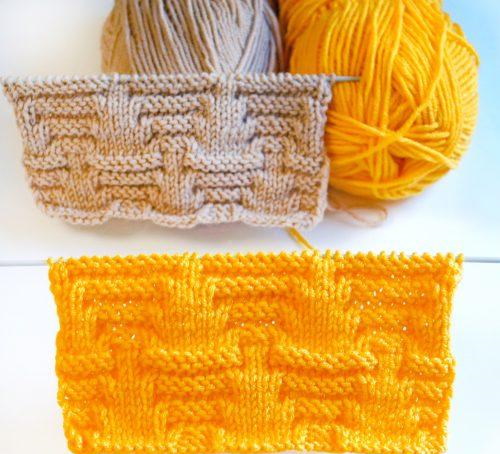
Mittens are knitted from both single-color and multi-colored yarn. They are decorated with various ornaments or hidden patterns are formed on the surface. Beads, sequins or beads are sewn onto them. They can be with a folding top or on elastic bands.
Modern needlewomen have inherited many variations of mitten knitting patterns for people of different ages from the craftswomen of the past. Historians believe that the word "mitten" comes from the combination "Varangian mitten", because initially this accessory was worn by representatives of the Varangians.
In the modern world, mittens are worn by both ordinary people and show business representatives. Angelina Jolie and Julia Roberts were spotted wearing this accessory during the cold season. Alla Pugacheva and Sergei Zverev are not shy about wearing mittens.
Among the schemes with descriptions of work, there are several popular ones, how to beautifully decorate the end of the mitten.
These include:
- "For Beginners";
- "Little House";
- "Star";
- "The Pyramid".
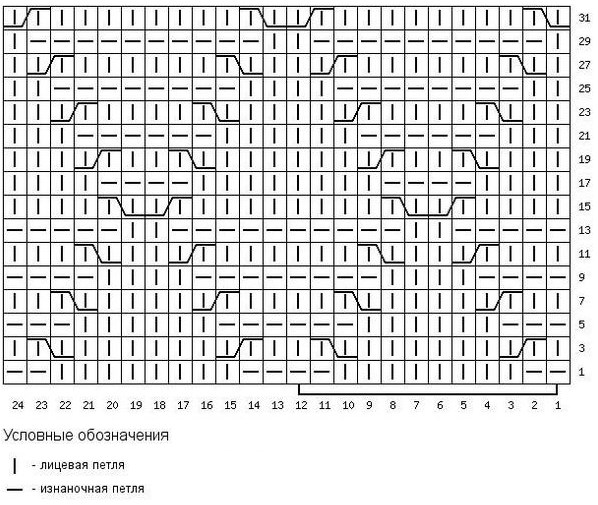
When knitting mittens, just like in other patterns, they use symbols and abbreviations that make it easier to write down recommendations and step-by-step work.
| Name | Abbreviation and designation |
| purl | izn. or ip – «-» |
| facial | persons or persons - "X", "I" or "+" |
| yarn over | nak. – "O" |
| edge | cr. – «Ո» |
| removed loop | sp or snp. – «V» |
For example, purl and face loops are the basis of any knitting, and their alternation forms patterns and other necessary details. No knitting can do without edge loops. In this case, the first loop of each row is always removed unknitted and transferred to the working one, and the last one is knitted purlwise. Some craftswomen recommend doing the last edge with the face method to get a more airy and beautiful edge.
Yarn overs are made when it is necessary to increase the number of loops, and loops are knitted together when decreasing or closing the work. When it is necessary to remove a loop in the middle of the work without knitting, then the thread in odd rows is left behind the fabric, and in even rows it is placed in front.
You can knit mittens on either 2 or 4 knitting needles. Experts recommend that beginners start making their first mittens using the latter method.
The first mitten
You can finish knitting mittens beautifully even if you are making them for the first time. You will need yarn and 5 separate knitting needles.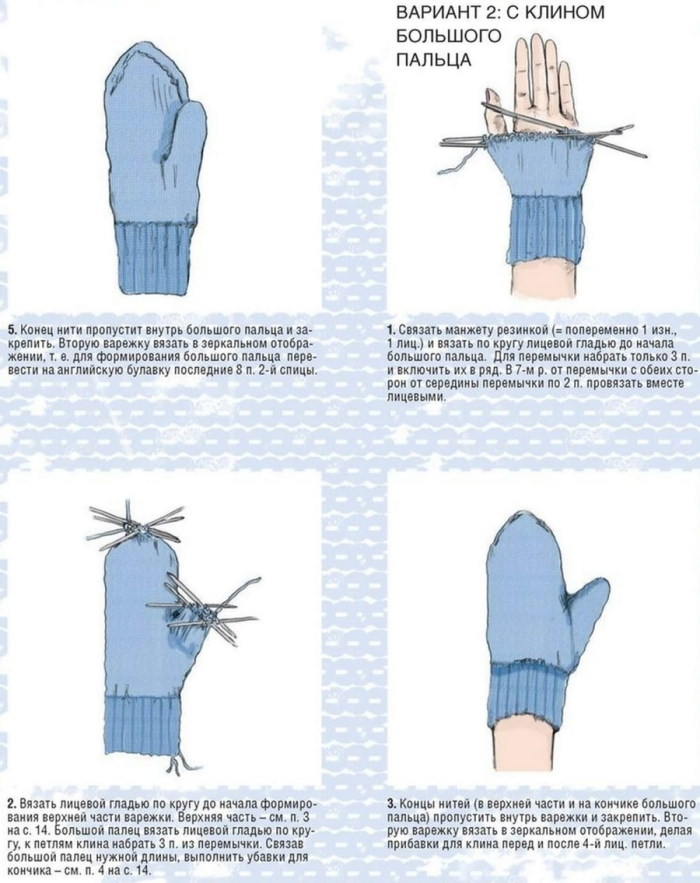
To knit mittens, a beginner craftswoman needs:
- Cast on the required number of stitches for 1 mitten, for example, 36.
- Distribute the cast-on stitches across the knitting needles so that there are 9 stitches on each of them.
- Make the initial row after casting on with knit stitches, knitting several stitches from the last knitting needle together with the beginning of the next row so that you get a single piece.
- Knit row 1 with a 1 by 1 rib pattern, where 1 front stitch alternates with 1 back stitch.
- Form row 2, following the pattern that appears on the fabric.
- Knit, alternating the repeat of rows 1 and 2 to a height of 7 cm.
- Start creating the main section of the mitten by knitting the odd rows with knit stitches and the even rows with purl stitches. Work like this until the height of the product reaches 5 cm.
- Start forming the thumb. To do this, set aside the required number of loops on a pin or spare knitting needle.
- Continue knitting the “body” of the mitten, alternating knit stitches in odd rows with purl stitches in even rows.
- Knit the product in a circle using the described method until its height is 8 cm.
- Start forming the toe of the mitten. To do this, knit the first 2 loops on needles 1 and 3 together through the back walls. Do the same with the first 2 loops on needles 2 and 4.
- Decrease 4 stitches in every 2nd round of work until each needle has half of the initial amount.
- Start decreasing 5 stitches in each round until there are 2 stitches left on the needles.
- Tighten the last loops into a knot with the working thread, secure it and finish the work.
- Knit the thumb and the remaining loops on the side.
- Close the work and pull all the thread tails to the wrong side.
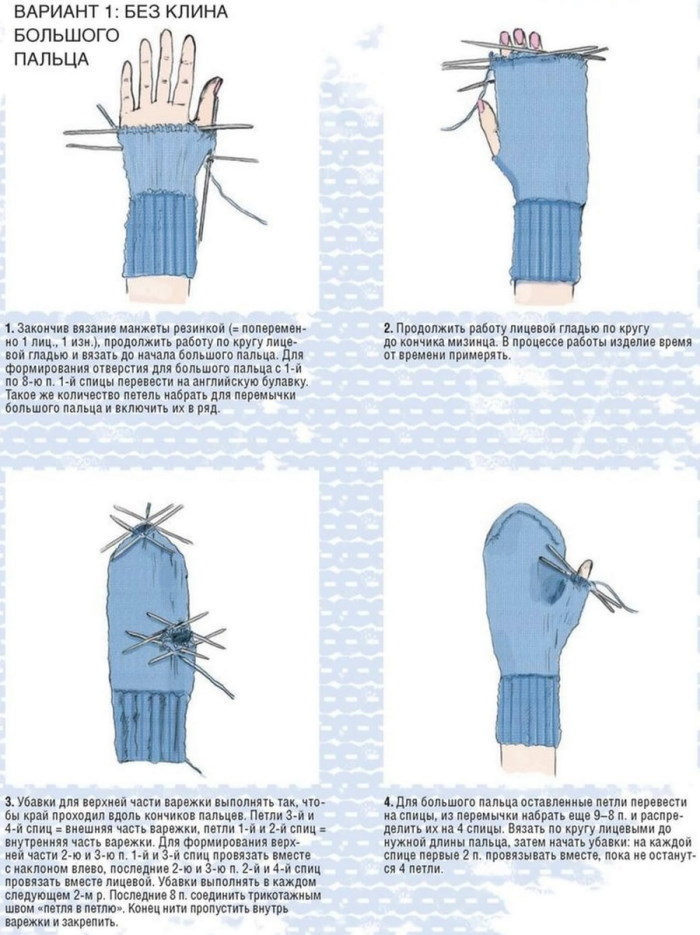
After creating the first mitten, start working on the second one. Knit according to the pattern described above.
House
The pattern for closing the toe of the mitten called "House" is easy to understand. The loops in each product are also closed from 2 sides, which leads to the complete formation of the mitten. For work you will need yarn and 5 knitting needles.
To knit mittens and close their ends with a house, you need:
- Cast on the required number of stitches on the knitting needles.
- Knit the cuff of the product in any convenient way. Usually this is done with a ribbing of different pitches.
- Form the body of the mitten.
- Leave a hole for the thumb.
- Knit the fabric with the main stitch until it completely covers the little finger.
- Start decreasing the loops to form the house. To do this, knit 2 loops together on needle 1 through the back wall, and on the 2nd, do the same with 2 loops, but do it through the front walls.
- Knit like this until there are 2 or 4 loops left on the needles.
- Break off the end of the thread.
- Thread the remaining loops onto it and tighten them, and bring the “tail” inside.
- Knit the thumb and close it with a house stitch.
Finish work on the product.
Star
You can finish knitting mittens beautifully using the "Star" technique. It will form a pattern on the toe that looks like it. In order to close the mittens beautifully, you first need to knit the product until the fabric completely covers the little finger.
Next you need to:
- Divide the total number of loops into 8 parts.
- At the beginning of every 2nd row, knit 2 loops together.
- Knit the remaining loops at the end of the work with one loop and close the fabric.
- Pass the end of the thread inside the product.
The finished mittens have a thread tail attached and can be tried on, washed and worn.
Pyramid
You can also decorate the ends of winter mittens using the "Pyramid" technique. It allows you to make the toe of the product sharper, but not as much as you get when using the house.
To close the mittens beautifully, you need:
- Cast on the calculated number of stitches on the knitting needles.
- Knit the cuff and body of the mitten.
- Start forming the toe as soon as the fabric covers the little finger. To do this, knit 1 stitch on each knitting needle at the beginning of each row, remove 1 stitch as a knit stitch, and pull the next stitch through it.
- Close the work when there are no more than 2-4 loops left on the needles.
The tail of the thread is cut and pulled to the back side of the product.
Secrets for Beginners
Knitting mittens is not difficult. To do this, you only need to master the basics of working with knitting needles and yarn. For those who can read patterns and know the symbolic designations on them, the process will bring a lot of pleasure.
Experts note that experienced needlewomen will spend several evenings creating mittens. Beginners will need up to a week to knit their first mittens. To make the product warm, high-quality and beautiful, you need to know a few secrets of knitting them.
Experienced needlewomen recommend that beginners do the following before starting work:
- Find out the model's hand size.
- Test the yarn for the quality of its dyeing.
- Check the elasticity of the thread.
- Choose the right knitting needles for the job.
Work on any knitted product begins with taking measurements.
To find out the size of the hand for which the mittens are being made, you need to:
- Measure the circumference of your hand around your thumb, using a tape measure. This will allow you to calculate the total number of stitches to work with.
- Calculate the width of your arm by dividing its girth in half.
- Knit a sample.
- Use a ruler to find out how many loops are in 1 cm.
The required number of loops will be 32, provided that 8 cm is the volume of the arm and 2 loops fit into 1 cm on the ruler. The calculation process is: 8 * 2 loops * 2.
To find out whether the selected yarn sheds, you need to wet its end and clamp it between layers of white fabric. After some time, you will see whether the thread leaves a colored trace or not.
The elasticity of the thread is checked to know how the product will behave during wear. To do this, you need to stretch the free end of the skein and see how quickly it takes its original shape. If the thread does not return to its original state for a long time, experts recommend adding another, more elastic one to it when knitting. This will allow the product to keep its shape and not stretch.
Before you start knitting a full-scale product, you need to make a sample. This will allow you to understand how a particular pattern looks on the canvas and determine the ease of working with yarn.
The choice of knitting needles is as important as the yarn. If you choose tools of the wrong diameter, the product may turn out too dense or, on the contrary, resemble a fishing net. To choose the right diameter of the tool, you need to pierce a sheet of paper with a knitting needle and pull the thread through it. If it passes freely, does not catch on the edges and does not sag, then the tool is chosen correctly.
You can finish the mittens beautifully with knitting needles in any convenient way. The main thing is not to forget to pull the end of the thread inside the product so that it does not stick out and secure it so that it does not interfere when worn.
Video about knitting mittens
Classic mittens knitted: