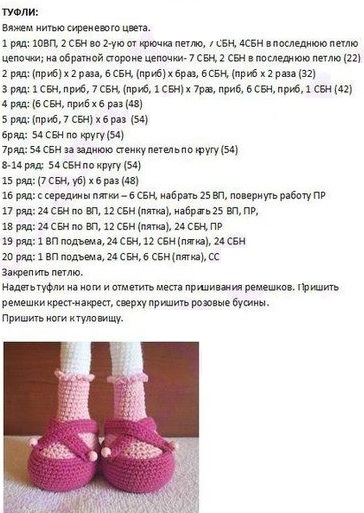
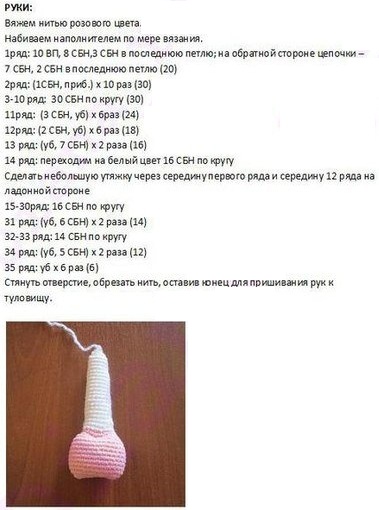
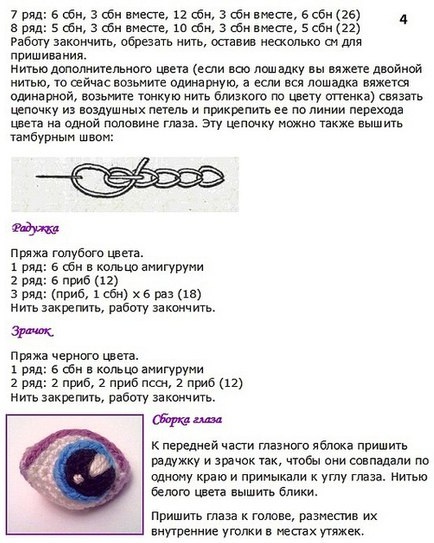
Amigurumi is a technique of crocheting small animals. It was invented in Japan. Recently, this activity has become very popular. Schemes with a description of how to crochet toys are necessary for choosing threads and creating a quality product.
What is needed for work
Scroll:
- Hook. To start the process, you need to choose the right hook and yarn. For the learning process, it is better to use a hook of at least No. 2. If you have knitting experience, then you need to choose No. 1. The product turns out miniature, as it should be. When choosing a hook, you need to pay attention to the head. It should not be sharp - you can hurt your finger, a very blunt one does not go through the loop well and stretches it too much. The head and thread guide should not be rough.
- Selection of threads. What types exist. For training, it is better to take thicker yarn - acrylic. It is popular with knitters. The yarn is soft and pleasant to the touch. An acrylic toy holds its shape well, if there is not too much stuffing. After washing, the product does not lose its shape. The color range of this yarn is huge, there is a choice. The price is quite affordable within 150 rubles per skein. An acrylic toy can be turned into a fluffy one, using a cat comb. Cotton is stiffer and more difficult to knit with. But the toys look neater, loop to loop and hold their shape well. Beginner knitters are not recommended to use cotton yarn. The color range is varied. Wool can be used for knitting, but there is a risk that after washing the toy may change shape. Such a product is suitable as a decorative one. The choice of yarn is individual, based on personal preferences. It is better not to use mohair and “grass”, since knitting is done blindly and it is difficult to unravel such a product.
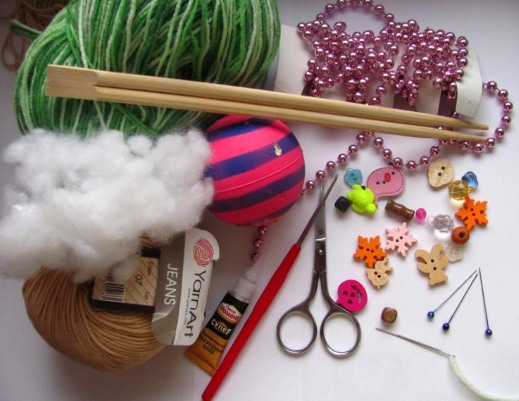
- Filler. Silicone or synthetic padding are ideal as the "insides" of the toy. You cannot use cotton wool, it absorbs moisture and becomes compacted. A toy with such a filler will be hard and will not spring. Usually the description and diagram provide for further decoration of the crocheted toy. You can show your imagination and make it to your taste.
- For the eyes it is necessary beads. Czech ones are of higher quality, they cost several times more than Korean ones. Czech beads are smooth, shiny and all the beads are the same. Korean ones need to be matched to two of the same shape and size.
- Additionally, you may need the following for registration: wire, tape, small pliers and other little things that are easy to purchase.
Some tips on how to knit amigurumi correctly
Scroll:
- The hook must be selected in a smaller size.. The fabric will look even and dense. There should be no holes, this is achieved only by selecting the hook;
- The fabric is knitted in a spiral and for both loops. Sometimes the pattern may indicate which loop to hook onto. This may be necessary for the stability of some parts. Experienced needlewomen can try knitting only one (front or back) loop. The toy turns out more elegant;
- The knitting should be quite tight., but not such that it would be impossible to stick a needle in;
- All parts of the toy are knitted separately, very rarely (usually when filler is not required) all together;
- The parts of the toy must be sewn together with the same thread.. If it is thick, then divide it. You can use dental or denim thread. The toy should be sewn tightly;
- Hide the ends of the threads in the middle of the toyThe ends should be long so that they do not stick out and spoil the appearance as they are used;
- Weights are used to fill the limbs. in the form of plastic hemispheres, ovals, and also balls;
- You can use regular cosmetics to tone your face. or acrylic paints. This must be done very carefully;
- Assembling a finished crochet toy is the most important moment. Once again, you need to carefully study the diagram and description. Before you finally sew up all the parts, you need to check the toy for stability.To do this, temporarily fasten the parts with a pin and place or sit the toy and check whether the fillers are distributed correctly for stability;
- The body of the toy should be tightly stuffed.The head should spring back, so you shouldn't stuff it too tightly;
- Clothes for the toy should be knitted with thinner threadsFor a toy less than 10 cm, you can use iris.
Beginning of knitting
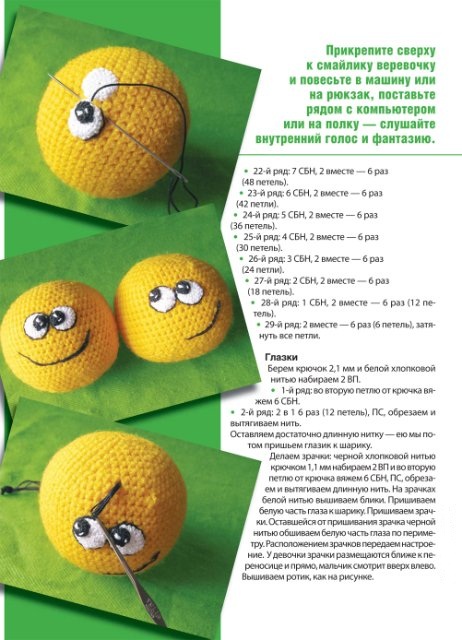
To start crocheting toys, you need to study the description and diagram.
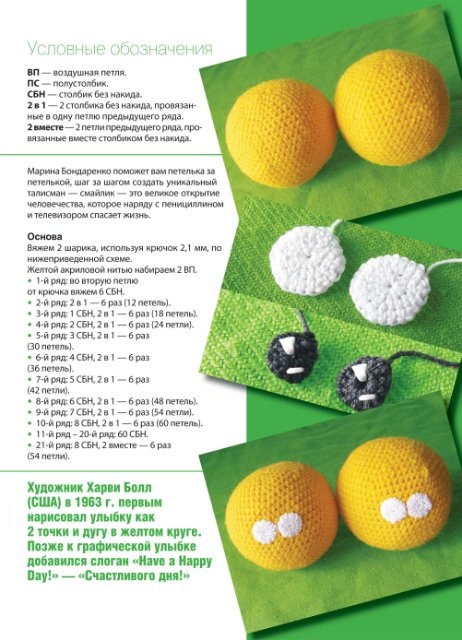
To do this, you need to know the basic symbols:
- VP – air loop;
- ss – slip stitch;
- sc – single crochet;
- ps – half-column;
- dc – double crochet;
- ss2n – double crochet;
- pr – knit 2 sc in one loop, triple – 3 sc;
- уб – make a sc in the next loop – there are 2 threads on the hook, sc again in the loop next to it – there are 3 threads on the hook. Pull the main thread through 3 loops. This way, two loops are combined.
- *2sc, inc*. Repeat *2 times (8) – two single crochets, inc in the next column. Repeat twice. There are 8 loops in total.
Some details
The amigurumi technique involves knitting for both walls. Increases and decreases are used to give the toy its shape. You cannot simply skip a loop to decrease, as a hole will form in this place. To make the toy heavier, small beads are used, which are sewn into the fabric.
When starting to crochet toys, you need to familiarize yourself with the description and diagrams in advance. All abbreviated names of loops should be clear.
Ring: diagram and description of knitting amigurumi
Usually, most models start with a circle with a hole inside. The amigurumi technique with a ring will help solve this problem.
Detailed diagram:
- At a distance of 2.5 cm make a loop, the thread is between the index and middle fingers;
- Insert hook into loop and pull through;
- Grab the working thread, pull it through the loop and tighten;
- Pass the hook under both threads (main and tail) at the same time;
- Grab the main thread with the hook (there are 2 loops on the hook) and pull it through the loops. This is the first sc of the ring;
- Knit 6-10 sc and tighten the thread of the remaining ring. You will get a semicircle of sc;
- Insert the hook into the first loop and knit sbn.
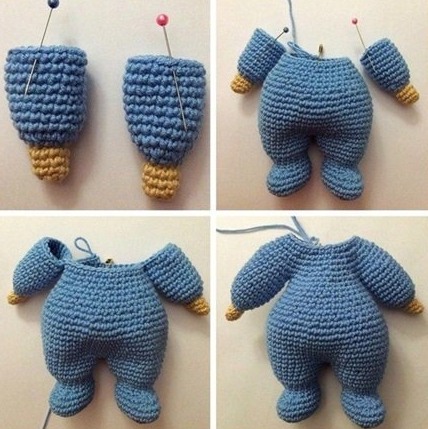
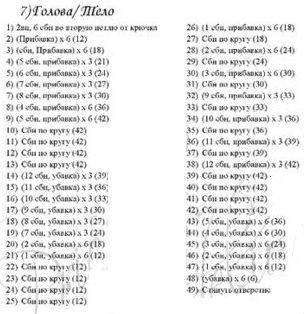
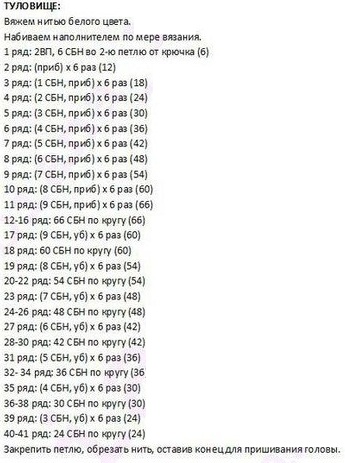
Teddy Bear - a simple diagram with a description for beginners
The height of the toy will be 8.5 cm, knit with brown and white iris, hook 1.15 (for beginners 1.0).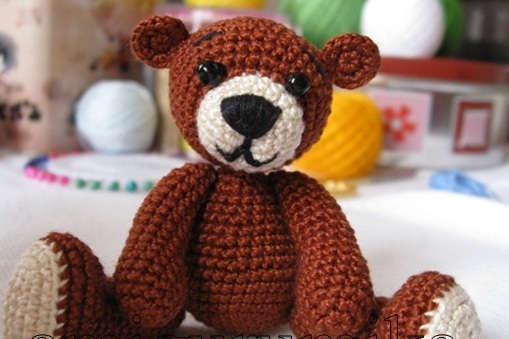
The following parts are knitted separately:
- Head
- Nose - white threads
Scheme:
- 1 row – amigurumi ring of 6 loops;
- 2nd row - *pr* repeat 6 times (12);
- Row 3 — *2 sc, inc*, repeat 4 times (16);
- Row 4 – *3 sc, inc*, repeat 4 (20);
- 5 – 7 rows as 4th (20), sc for shifting;
- Row 8 – 20 ss, knit the loops loosely.
- Take the brown thread. Row 9 - 2 sc, inc, 1 sc, inc, 1 sc, 3 increases, 2 sc, 3 increases, 1 sc, inc, 1 sc, inc, 2 sc (30);
- Rows 10–12 — * 4 sc, inc*, repeat * 6 times (36);
- 13 - 15 row - * 5 sc, inc*, repeat * 6 times (42);
- Rows 16–17 — *5 sc, dec*, repeat * 6 times (36);
- Row 18 — *4 sc, dec*, repeat * 6 times (30), sc to shift the knitting;
- Row 19 — *3 sc, dec*, repeat * 6 times (24), sc to shift the knitting;
- Row 20 — *2 sc, dec*, repeat * 6 times (18), sc to shift the knitting;
Fill this part with synthetic padding and give the head a neat shape.
Face design:With black threads (mouline or simple thread folded in several rows) embroider a triangle nose, two strips in the form of a hook to the sides. Sew on beads-eyes and embroider eyebrows.
Continue further:
- Row 21 — *sc, dec*, repeat * 6 times (12);
- Row 22 — *dec*, repeat 6 times (6). Close the opening, hide the thread and fasten.
Ears:Knit an amigurumi ring of 7 loops. Tighten the thread to close the hole. 6 times inc, 1 ss (13). Leave the thread for attaching to the head. Knit 2 ears. Choose the color of the yarn yourself (brown or white).
Torso:
- 1 row – amigurumi ring of 6 loops;
- 2nd row - *pr*, repeat 6 times (12);
- Row 3 — *sc, inc*, repeat 6 times (18);
- Row 4 — * 2 sc, inc*, repeat 6 times (24);
- Row 5 — * 3 sc, inc*, repeat 6 times (30);
- Rows 6–10 — * 4 sc, inc*, repeat 6 times (36);
- Rows 11,12 — * 4 sc, dec*, repeat 6 times (30);
- Rows 13,14 — * 3 sc, dec*, repeat 6 times (24);
- Rows 15,16,17 — *2 sc, dec*, repeat 6 times (18);
- Row 18 — *sc, dec*, repeat 6 times (12); Fill with padding polyester.
- Row 19 — *sc, dec*, repeat 6 times (12), 1 ss
Leave the thread for sewing.
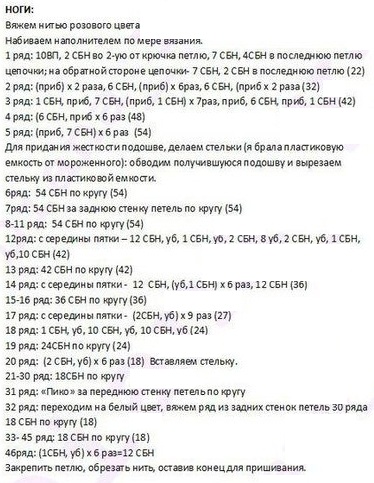
Lower legs:
- 1 row - 6 ch, 4 sc, start from the second loop, 3 sc in the last loop, 4 sc, inc in the same loop (13).
- 2nd row - inc, 3 sc, 3 increases, 4 sc, 2 increases (19).
- 3rd row and a half — inc, 5 sc, * inc, 1 sc*. Repeat * 3 times, 5 sc, * inc, 1 sc*. Repeat * 3 times, 7 sc (26). Change thread color.
- Row 4 – 26 sc behind the back wall to ensure stability of the paws.
- 5,6 rows - 9 sc, 2 increases, 4 sc, 2 increases, 9 sc (30);
- Row 7 - 9 sc, 6 decreases, 9 sc (24);
- Row 8 - 8 sc, 4 decreases, 8 sc (20), sc for shifting;
- Rows 9–16 — * 3 sc, dec*. repeat * 4 times (16);
- Sc for offset;
- Row 17 — * 2 sc, dec*. Repeat * 4 times (12).
- Fill with synthetic padding.
- Row 18 — * 1 sc, dec*. Repeat * 4 times (9).
- Row 19 — * 1 sc, dec*. Repeat * 3 times (6). Leave a thread for sewing the paws to the body. Do not stuff the top of the paws too much, otherwise the paws will stick out.
Upper legs:
- 1 row - cast on 2 ch, 6 sc in the second loop from the hook (6);
- 2nd row - *pr*. repeat * 6 times (12);
- 3 – 6 rows — * 3 sc, inc*. repeat * 3 times (15);
- 1 sc to shift the knitting;
- 7 – 15 rows – 3 decreases, 9 sc (12);
- 2 sc to shift the knitting.
- Row 16 — * 2 sc, dec*. repeat * 4 times (9);
- Row 17 — * 1 sc, dec*. repeat * 3 times. 1 sl st (6);
Leave a thread to sew the paws to the body. Do not stuff the top of the paws too much.
Tail:
- 1 row - amigurumi ring of 6 loops (6);
- 2nd row - *pr*. repeat * 6 times (12);
- Row 3 — *sc, dec*. repeat * 4 times. 1ss (8).
- Leave the thread.
Assembling the bear:Along with the description and diagrams, crocheted toys should be carefully assembled. This is not an easy stage and skill comes with experience. Pin the lower paws. Sew the paws to the 6-7 row of the body. Sew the upper paws between the last and penultimate row. Sew the tail so that it does not interfere with sitting.
Chicken - a simple diagram with a description for beginners
Use hook No. 2, yarn in yellow, orange, blue, lilac colors.
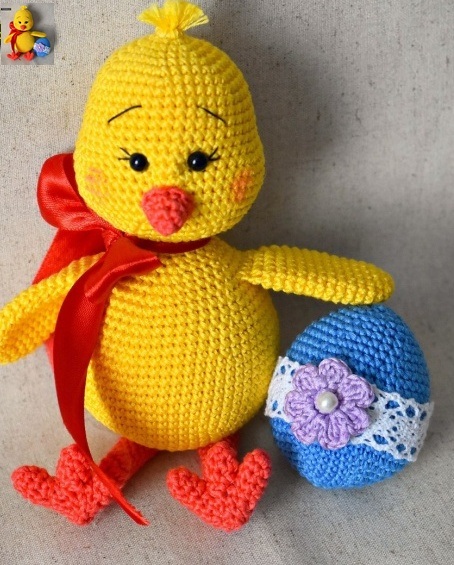
Head (yellow threads):
- 1 row – amigurumi ring of 6 loops;
- 2nd row - 6 inc (12);
- 3rd row - (1 sc, inc)*6 (18);
- 4th row - (2 sc, inc)*6 (24);
- Row 5 - (3 sc, inc)*6 (30);
- Row 6 - (4 sc, inc)*6 (36);
- Row 7 - (5 sc, inc)*6 (42);
- Rows 8-13 - 42 sc;
- Row 14 - 7 sc, (1 sc, inc)*3, 15 sc, (1 sc, inc)*3, 8 sc (48);
- Row 15 - 7 sc, (2 sc, inc)*3, 15 sc, (2 sc, inc)*3, 8 sc (54);
- Rows 16-18 - 54 sc;
- Next we will decrease, so between rows 14 and 15 sew on the button eyes;
- Row 19 - (7 sc, dec)*6 (48);
- Row 20 - (6 sc, dec)*6 (42);
- Row 21 - (5 sc, dec)*6 (36);
- Row 22 - (4 sc, dec)*6 (30);
- Row 23 - (3 sc, dec)*6 (24);
- Row 24 - (2 sc, dec)*6 (18);
- Row 25 - (2 sc, dec)*6 (12);
- Row 26 - 6 dec (6).
Stuff the body with holofiber and tighten the thread.
Beak - orange thread:
- 1 row - 5 sc in amigurumi ring;
- 2nd row - (1 sc, inc)*2, 1 sc (7);
- 3rd row - 7 sc;
- Row 4 - (2 sc, inc)*2, 1 sc (9).
Sew the beak between rows 16 and 20, fill as you sew. Embroider the eyebrows and eyelashes with black thread. Then, depending on your imagination, make a forelock and tint the cheeks.
Body - yellow thread:
- Fill with holofiber as you knit.
- 1 row - 6 sc in amigurumi ring;
- 2nd row - 6 inc (12);
- 3rd row - (1 sc, inc)*6 (18);
- 4th row - (2 sc, inc)*6 (24);
- Row 5 - (3 sc, inc)*6 (30);
- Row 6 - (4 sc, inc)*6 (36);
- Row 7 - (5 sc, inc)*6 (42);
- Row 8 - (6 sc, inc)*6 (48);
- Row 9 - (7 sc, inc)*6 (54);
- Row 10 - (8 sc, inc)*6 (60);
- Rows 11-18 - 60 sc:
- Row 19 - (8 sc, dec)*6 (54)
- Row 20-21 - 54 sc;
- Row 22 - (7 sc, dec)*6 (48)
- Row 23-24 - 48 sc;
- Row 25 - (6 sc, dec)*6 (42);
- Row 26 - (5 sc, dec)*6 (36);
- Row 27 - (4 sc, dec)*6 (30);
- Row 28 - (3 sc, dec)*6 (24);
- Row 29 - (2 sc, dec)*6 (18);
- Row 30 - 18 sc.
Leave a thread and sew the head to the body.
Tail:
- Threads are yellow, not filled
- 1 row - 4 sc in amigurumi ring;
- 2nd row - 4 inc (8);
- 3rd row - 8 sc;
- Row 4 - (1 sc, inc) * 4 (12);
- Row 5 - 12 sc;
- Row 6 - (2 sc, inc)*4 (16);
Fold and join sc. Sew to the body at the level of the 8th row.
Wings - yellow thread, do not fill:
- 1 row - 6 sc in amigurumi ring;
- 2nd row - 6 inc (12);
- 3rd row - 12 sc;
- Row 4 - (1 sc, inc)*6 (18);
- Rows 5-16 - 18 sc.
- Fold and join sc. Knit two parts. Sew at the level of the 24th row.
Legs - orange thread:
- Feet. Fill as you knit.
- 1 row - 6 sc in k.a.;
- 2-4 rows - 6 sc.
- Cut the thread. Knit three parts. You have fingers.
- To join, knit 2 sc along the first finger, knit the 3rd column of the first finger and the 1st column of the second finger together with a single crochet (i.e. decrease), 1 sc, knit the 3rd column of the second finger and the 1st column of the third finger together, 4 sc, knit the 6th column of the third finger and the 4th column of the second finger together, 1 sc, knit the 6th column of the second finger and the 4th column of the third finger together, 2 sc. You will get 14 columns.
- Row 6 - (5 sc, dec)*2 (12);
- Row 7 - (2 sc, dec)*3 (9);
- Row 8 - (1 sc, dec)*3 (6).
- Close the hole, hide the thread. Knit the two parts.
Next, knit the leg itself:
- 1 row - 6 sc in k.a.;
- 2nd row - (1 sc, inc)*3 (9);
- Rows 3-14 - 9 sc.
Fold and connect the edges of the sc. Knit two parts. Sew the foot to the leg. Sew the legs to the body with the edge that was connected with the sc.
Easter egg - blue yarn:
- 1 row - 6 sc in k.a.;
- 2nd row - 6 inc (12);
- 3rd row - (1 sc, inc)*6 (18);
- 4th row - (2 sc, inc)*6 (24);
- Row 5 - (3 sc, inc)*6 (30);
- Row 6 - (4 sc, inc)*6 (36);
- Row 7 - (5 sc, inc)*6 (42);
- Rows 8-16 - 42 sc;
- Row 17 - (5 sc, dec)*6 (36);
- Row 18 - 36 sc;
- Row 19 - (4 sc, dec)*6 (30);
- Row 20 - 30 sc;
- Row 21 - (3 sc, dec)*6 (24);
- Row 22 - 24 sc;
- Row 23 - (2 sc, dec)*6 (18);
- Row 24 - (2 sc, dec)*6 (12);
- Row 25 - 6 dec (6).
Close the hole, hide the thread. Cut the ribbon, glue it to the egg. Knit a flower. Sew a bead to the flower and glue it to the egg.
Dog - simple diagram with description for beginners
Hook No. 1, acrylic yarn orange, white.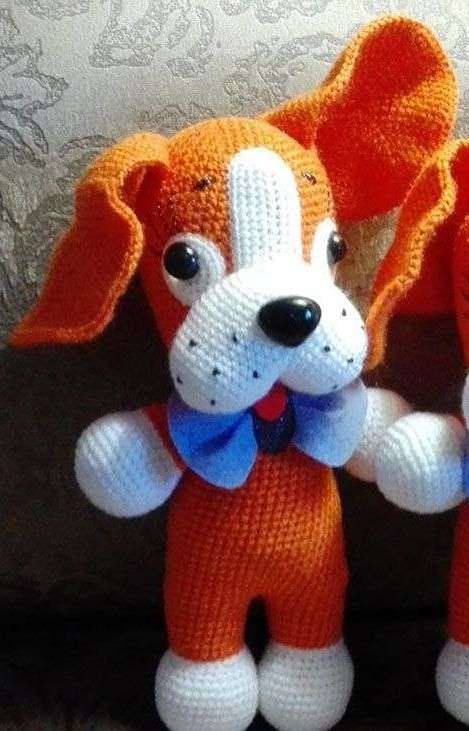
Head:
- 1st row: in 1 v.p. - 8 sc.
- 2nd row: 2 sc from 1 loop.
- 3rd row: sc
- 4th row: 2 sc from 1 loop, 1 sc
- 5th row: 2 sc from 1 loop, 2 sc
- Row 6: 2 sc from 1 loop, 3 sc
- Row 7: sc
- Row 8: 2 sc from 1 loop, 4 sc
- Row 9: sc
- Row 10: 2 sc from 1 loop, 5 sc
- Row 11: sc
- Row 12: 2 sc from 1 loop, 6 sc
- 13,14,15,16,17 rows: sc
- Row 18: from 2 loops - 1 sc (dec), 6 sc
- 19,20,21,22,23 rows: sc
- Row 24: dec, 5 sc
- 25,26,27,28,29 rows: sc
- Row 30: dec, 4 sc
- 31,32,33,34 rows: sc
- Row 35: dec, 3 sc
- Row 36: dec, 2 sc, insert eyes between rows 22 and 23, stuff with toy stuffing.
- Row 37: dec, 1 sc dec, close the knitting, tuck the thread inside.
The head is ready.
Nose. Two parts:
- 1st row: in 1 v.p. - 8 sc
- 2nd row: 2 sc from 1 loop.
- 3rd row: sc
- 4th row: 2 sc from 1 loop, 1 sc
- 5th row: 2 sc from 1 loop, 2 sc
- Rows 6,7,8,9,10,11,12: sc, cut thread.
- Place 2 pieces edge to edge, knit 12 stitches, joining 2 rows.
Upper part of the nose:
- 1,2 rows: sc, piping the outer edge.
- 3rd row: dec, 2 sc
- 4.5 rows: sc
- Row 6: Dec, 1 sc Insert nose on eye, stuff
- Row 7: decrease, knitting 1 sc from 2 loops, to the end. Sew the nose to the head.
White spot on forehead:
- 1 row: 15 ch, skip 1 ch, 3 sc in 1 loop, knit to the last loop, into which knit 4 sc
- Row 2: make 4 increases at both ends.
- 3rd row: where the increase was made, 2 sc in 1 loop, between them - 1 sc
- Row 4: p.s. throughout the row. Close the knitting.
Eye sockets:
- 1st row: in 1 v.p. - 8 sc
- 2nd row: 2 sc from 1 loop.
- 3rd row: sc
- 4th row: 2 sc from 1 loop, 1 sc
- 5th row: 2 sc from 1 loop, 2 sc
- Row 6: ps whole row
Ears:
- 1 row: 8 ch.
- 2nd row: skip 1 ch, knit sbn, knit 4 sbn (inc) into the outer loops.
- Knit subsequent rows, adding where pr is visible in the previous rows. A total of 4 increases from each edge. In the last row, you should get 9 sc
- Last row: sc without increases.
Sew the ears to the head so that one ear is raised.
Paws:
- Start knitting with white color.
- 1st row: in 1 v.p. - 8 sc
- 2nd row: 2 sc from 1 loop.
- 3rd row: sc
- 4th row: 2 sc from 1 loop, 1 sc
- 5th row: 2 sc from 1 loop, 2 sc
- Row 6: 2 sc from 1 loop, 3 sc
- Front legs - knit 4 rows of sc
- Hind legs - Knit 6 rows of sc
Next we begin to decrease (both the back and front legs):
- 1 row: dec, 3 sc
- 2nd row: dec, 2 sc
- 3rd row: sc
- Row 4: psc
The pads turned out: larger ones for the hind legs, smaller ones for the front ones.
Switch to the red thread. For the front legs: 2 rows of sc, on the 3rd row - dec, 2 sc. Next, knit 4 rows of sc. Close the knitting. For the back legs: 7 rows of sc. Stuff the paws. Connect the 2 back legs with a slip stitch, make a binding. 12 rows of sc. You should get about 49 loops.
Next:
- Row 13: dec, 5 sc
- 14,15,16,17,18 rows: sc
- Row 19: dec, 4 sc
- 20,21,22,23,24 rows: sc
- Row 25: knit the front legs from the bottom side, where the armpits are.
- Row 26: knit the paws from the top side, where the shoulders are.
- Row 27: sc. Close the knitting. Stuff and sew the body to the head.
Tail
- 1st row: in 1 v.p. - 8 sc
- 2nd row: 2 sc from 1 loop.
- Rows 3,4: sc. Close. Stuff and sew.
Embroider the mustache, eyebrows, eyelashes. The dog is ready!
Kitten - a simple diagram with a description for beginners
The threads are white and grey.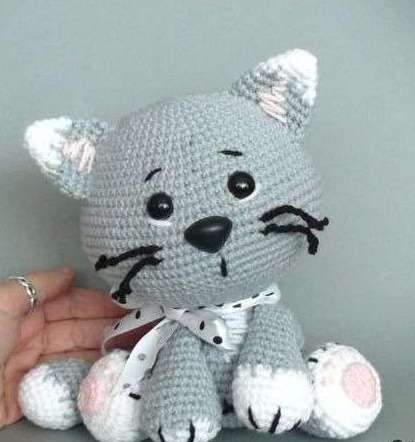
Head:
- 1 row - amigurumi ring of 6 loops;
- 2nd row – inc, (12)
- 3rd row – sc, inc (18)
- 4th row – 2sc, inc (24)
- Row 5 – 3 sc, inc (30)
- Row 6 – 4 sc, inc (36)
- Row 7 – 5 sc, inc (42)
- Row 8 – 6 sc, inc (48)
- 9 – 14 row sc (48)
- Row 15 – 6 sc, dec (42)
- Row 16 – 5 sc, dec (36)
- Row 17 – 4 sc, dec (30)
- Row 18 – 3 sc, dec (24)
- Row 19 – 2 sc, dec (18)
- Row 20 – sc, dec (12)
- Row 21 – 4 dec (6)
- Fasten the thread.
Torso:
- Row 1 - Amigurumi ring of 6 loops
- 2nd row – inc (12)
- 3rd row – sc, inc (18)
- 4th row – 2 sc, inc (24)
- 5 – 8 row sc (24)
- Row 9 – dec, 2 sc (18)
- Row 10 – dec, sc (12)
- Fasten the thread and leave for sewing.
Rear paw (2 pcs.):
- Row 1 - Amigurumi ring of 6 loops
- 2nd row – inc (12)
- 3rd row – sc, inc (18)
- 4 – 5 row – sc (18)
- Row 6 – sc, dec (12)
- Row 7 – 2sc, dec (9)
- 8-9 row - sc (9)
Fold in half, stuff and sew. Leave a thread for sewing.
Front paw (2 pcs.):
- 1 row - amigurumi ring of 6 loops
- 2nd row – inc (12)
- 3-4 row – sc (12)
- Row 5 – 6 dec (6)
- 6 – 9 row – 6 sc
Stuff and leave a thread for sewing.
Ears:
- 1 row – 5 loops amigurumi ring
- 2nd row – 5 sc
- Row 3 – inc (10)
- 4th row – 10 sc, inc (15)
- Close and leave a thread for sewing.
Tail:
- 1st row: in 1 v.p. - 6 sc
- 2nd row: 2 sc from 1 loop.
- 3,4 rows: sc. Close
The next step: sew all the parts, sew on the bead eyes, embroider the eyebrows, mustache, and claws with black thread.
Crocheting toys is not difficult if you check the description and diagram. Detailed instructions help to do the job quickly and efficiently.
Toy chicken - knitting pattern and description
Knitting details:
- The chicken measures approximately 11.5 cm in height and 6 cm in width (body volume 8 cm).
- The base consists of a head and body, wings - yellow yarn.
- Beak and paws - orange yarn.
- The whites of the eyes are white yarn.
- For the eyes you will need 2 buttons measuring 8 mm.
- Knitting time: about 4 hours.

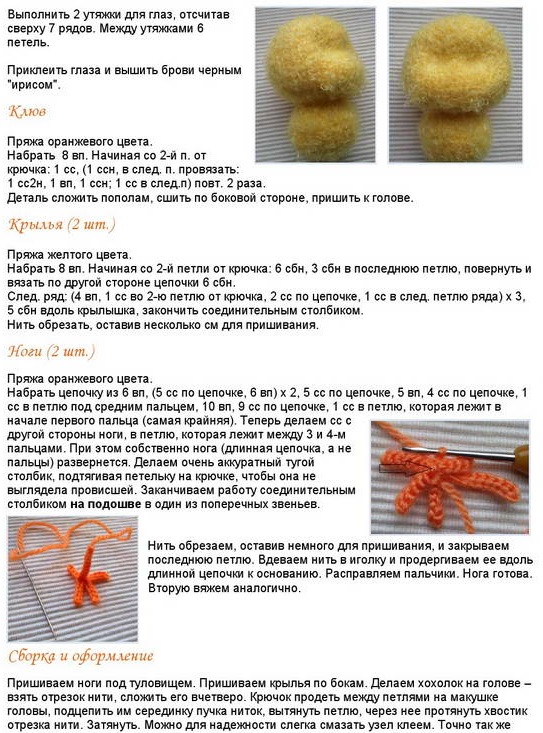
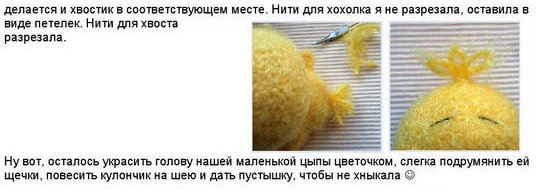
Knitting begins with making the head and body. The parts are made separately: a beak, 2 legs and 2 wings. After assembling them, the crest and tail are made. The final stage is decoration. A flower is put on the chick's head, the neck is decorated with a pendant, and the cheeks will become brighter with the help of blush.
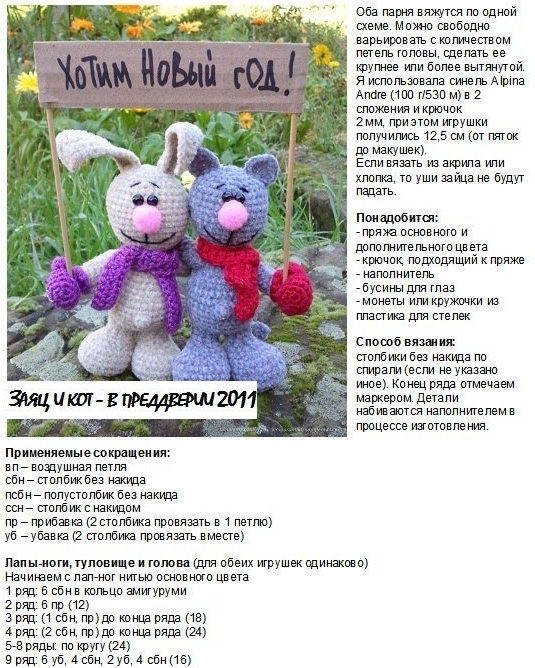
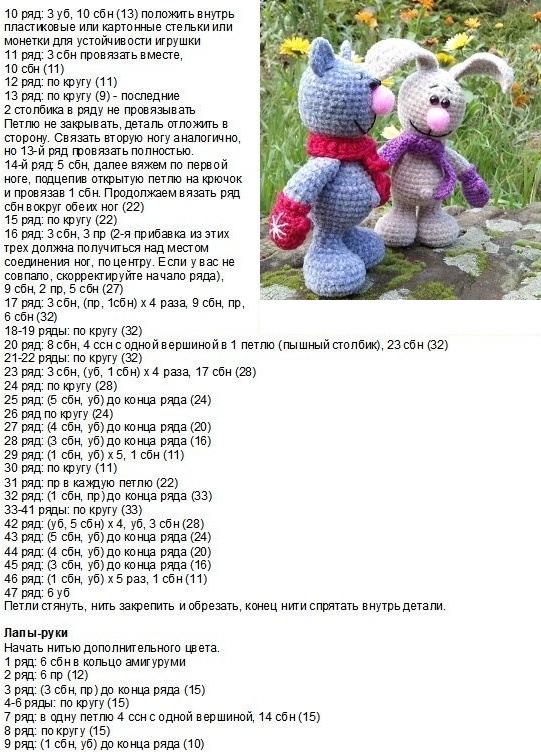
Bunny toy - knitting pattern and description
Knitting details:
- The bunny measures about 13 cm in height and 14 cm in width.
- Head - pink yarn.
- Ears - pink and white yarn.
- Cheeks, nose and mouth – burgundy yarn.
- For the eyes, you need buttons no larger than 1 cm.
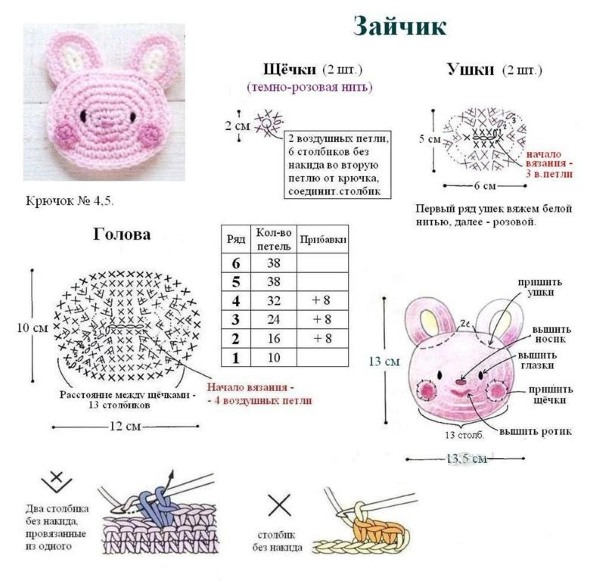
Knitting time: approximately 2-3 hours. Work on the toy should begin with making the head. Crochet toys with descriptions and patterns are easy to assemble. To get a finished bunny, ears are sewn to the head, which are made separately. Knitting is completed by sewing in eyes, cheeks, a nose and a mouth.
Toy Elephant - knitting pattern and description
Knitting details:
- The elephant's dimensions are approximately 11 cm in height and 6 cm in width (the body volume is 9 cm).
- The base of the head and body is made of grey-blue yarn.
- Ears, trunk and legs - light gray yarn.
- Bows - red yarn.
- For the eyes you will need buttons with a diameter of 0.5–0.8 cm.
- Knitting time: about 3 hours.
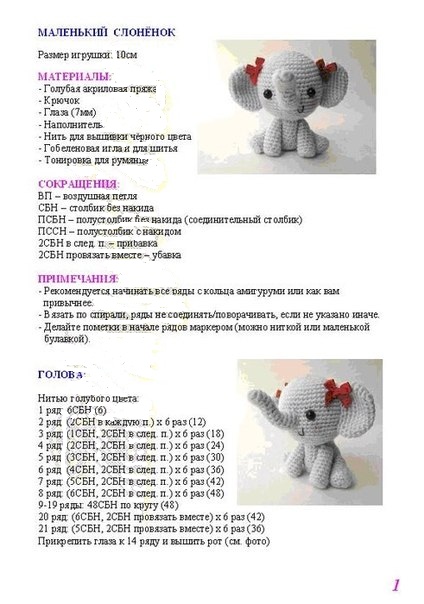
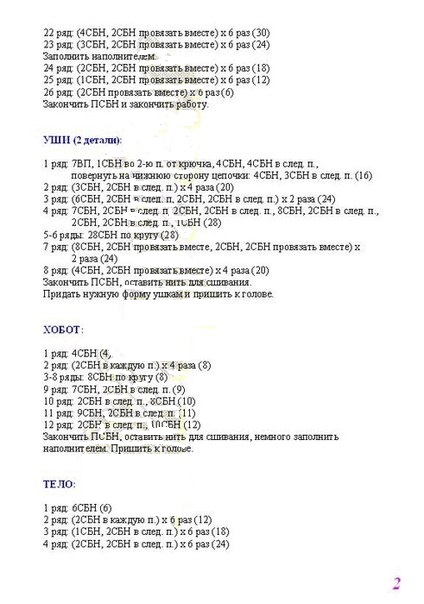

Making an elephant begins with creating the head and body. The ears, trunk and legs need to be knitted separately. All the parts are sewn to the body and head one by one. The final stage of work on the toy is sewing in the eyes, mouth and bows.
Kolobok toy - knitting pattern and description
Knitting details:
- The dimensions of the bun will be 5 cm in height and the same in width.
- Body - orange yarn.
- Hair, mouth - black yarn.
- Eyes - white and black yarn.
- Bows - pink yarn.
- Knitting time: no more than 4 hours.
You should start knitting Koloboks from the body. When the base of the toy is ready, the eyes, mouth and hair are sewn to it. Bows will be the decoration for a girl, and blush on the cheeks for a boy.
Mouse toy - knitting pattern and description
Knitting details:
- The mouse's dimensions are 15 cm in height and 9 cm in width (the body volume is 11 cm).
- The base of the head and body is made of grey yarn.
- Ears, paws, tail and tongue - pink yarn.
- For the eyes and nose you will need 3 small buttons.
- Knitting time: 3 to 4 hours.

Making a mouse begins with creating the head and body. The paws, tail and tongue are knitted separately and sewn on at the end of the work. The nose and eyes made of buttons are sewn to the head.
Toy Piglets - knitting pattern and description
Knitting details:
- The dimensions of the pigs are 18 cm in height and 11 cm in width (body volume 13 cm).
- The base of the head and body, ears, legs are made of pink yarn.
- Heel – raspberry yarn.
- Clothes and slippers - white yarn.
- For the eyes you will need 4 buttons with a diameter of about 8 mm.
- Knitting period: about 4-5 hours.
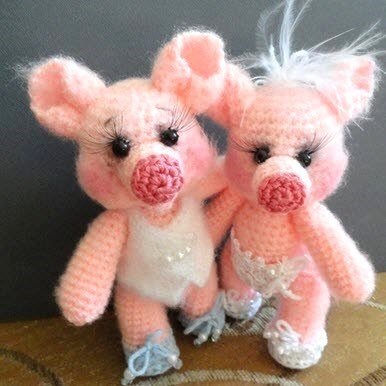
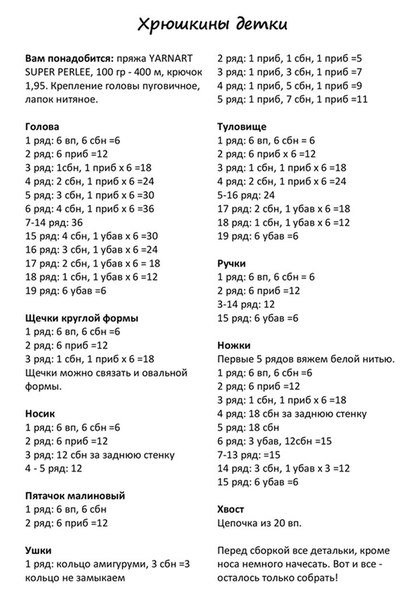
You need to start knitting pigs from the head and body. Paws, ears and heels are knitted separately. They are sewn to the finished base of the toy. The final stage of work is decoration. The pigs should have hair, eyes, funny clothes and slippers.
Toy Kitty with Bunny - knitting pattern and description
Knitting details:
- The dimensions of the Kitty and the Bunny are 13 cm in height and 4-6 cm in width (body circumference 8 cm).
- The base of the body and head, ears, paws and tail of the Kitty are made of grey yarn.
- The head, body, ears, paws and tail of the Bunny are made of beige yarn.
- Kitty's scarf and mittens - purple yarn.
- Bunny's scarf and mittens - red yarn.
- Noses - pink yarn.
- For the eyes you will need 4 small black buttons.
- Knitting time: no more than 5 hours.
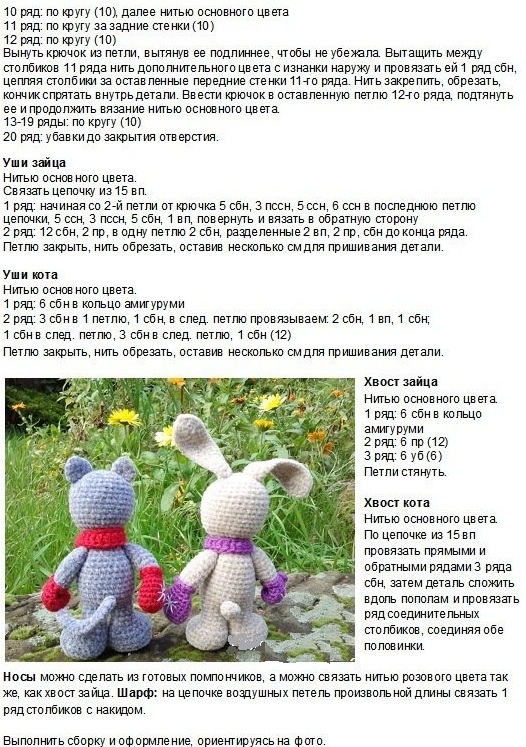
You should start making toys by knitting the head and body. With the description and diagrams, it is not difficult to assemble toys made with a crochet hook. Ears, tails, paws, scarves and mittens are created separately and then sewn to the body and head.
Toy Kitty - knitting pattern and description
Knitting details:
- The cat's height does not exceed 22 cm, and its width is 10 cm (its body volume is 14 cm).
- Head, body, paws, ears and tail - blue yarn.
- The tip of the paw and tail is made of golden yarn.
- For the eyes you will need 2 buttons with a diameter of 5 mm.
- For the nose, suede material is needed.
- The bow requires ribbon and the mustache requires wire.
- Knitting time: about 3-4 hours.
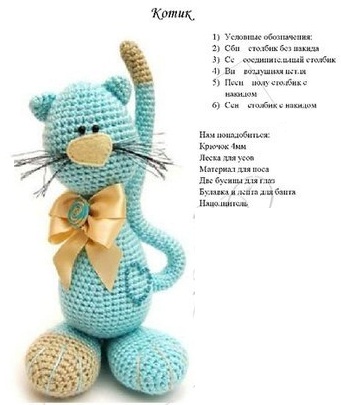
The creation of the toy begins with knitting individual elements: the head, body, paws, ears and tail. The final stage of knitting is assembling the finished elements. For decoration, a bow and wire whiskers are sewn onto the cat.
Snail toy - knitting pattern and description
Knitting details:
- The snail's height is 10 cm and its width is 5 cm (7 cm in body volume).
- The body and head are peach-colored yarn.
- Shell - orange yarn.
- Flowers - emerald colored yarn.
- For the eyes you will need 5mm beads and to decorate the shell you will need 15 pearl beads.
- Knitting time: does not exceed 3 hours.
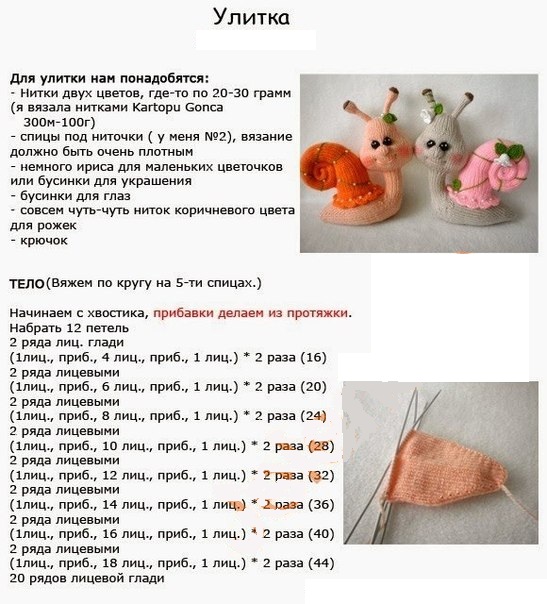
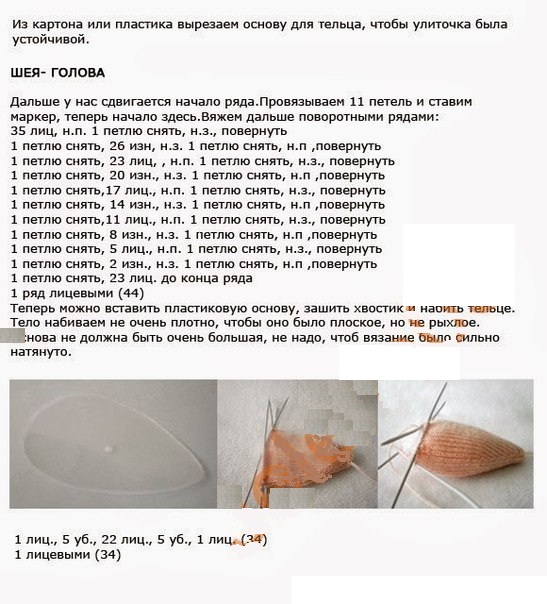
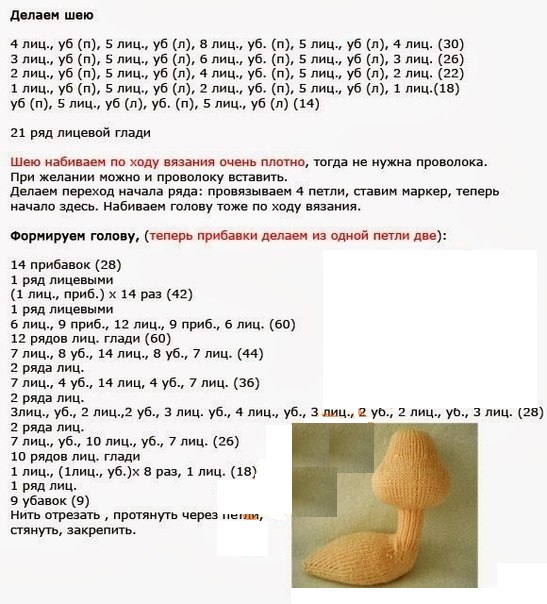
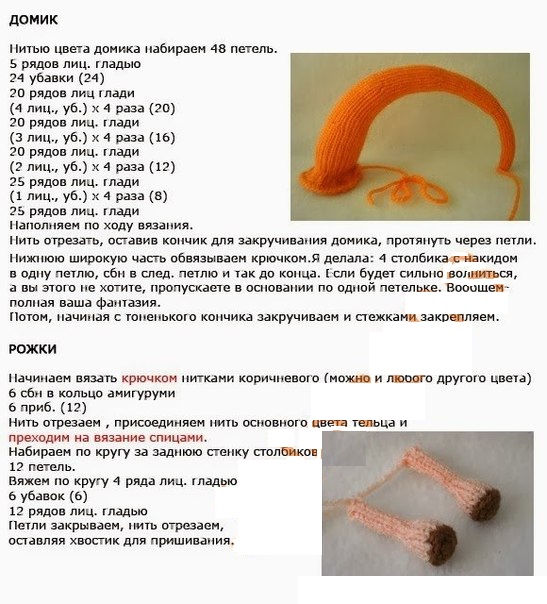
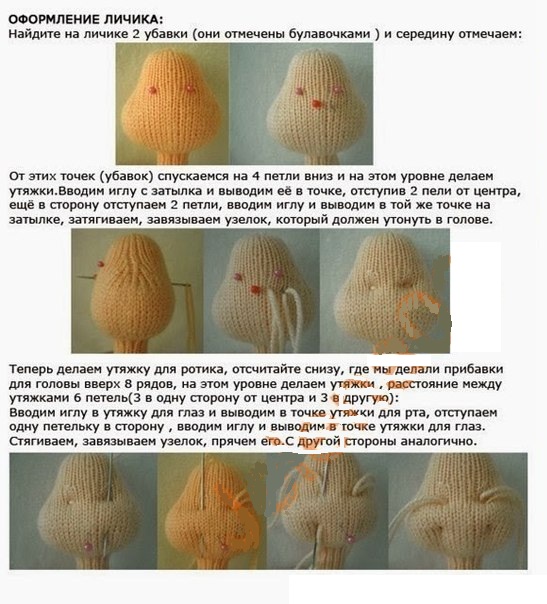
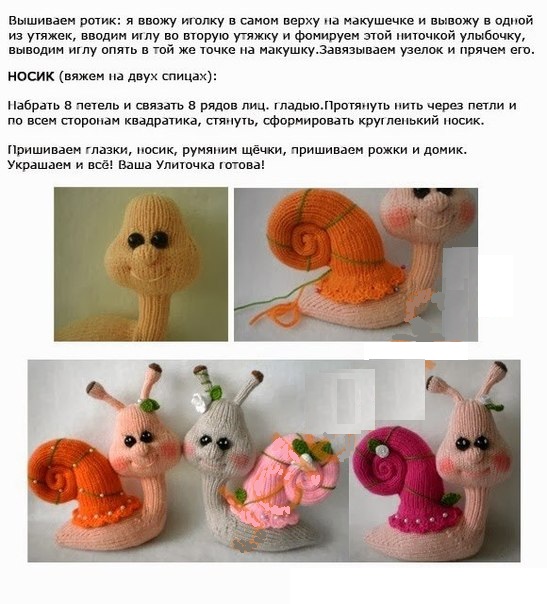
Making a snail begins with creating the body and head. When the base of the toy is ready, a separately knitted shell is sewn onto it. Then details are added: horns, flowers, beads and eyes.
Toy Elk - knitting pattern and description
Knitting details:
- The moose measures 25 cm in height and 8–10 cm in width (the body volume is 13 cm).
- The base of the head and body, arms and legs are made of light brown yarn.
- Clothes - dark brown yarn.
- Hooves, horns, nostrils - black yarn.
- Mouth - red yarn.
- For the eyes you will need black and white yarn.
- Knitting time: does not exceed 4 hours.
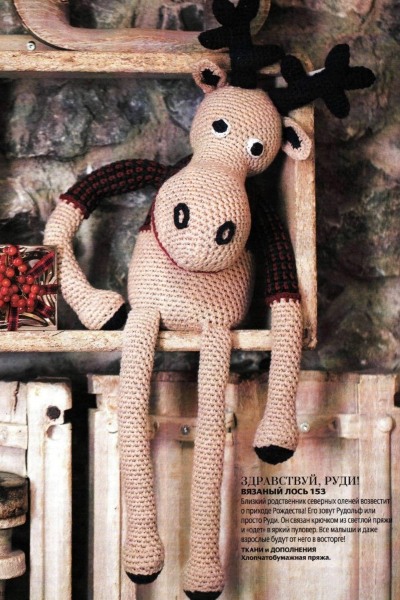
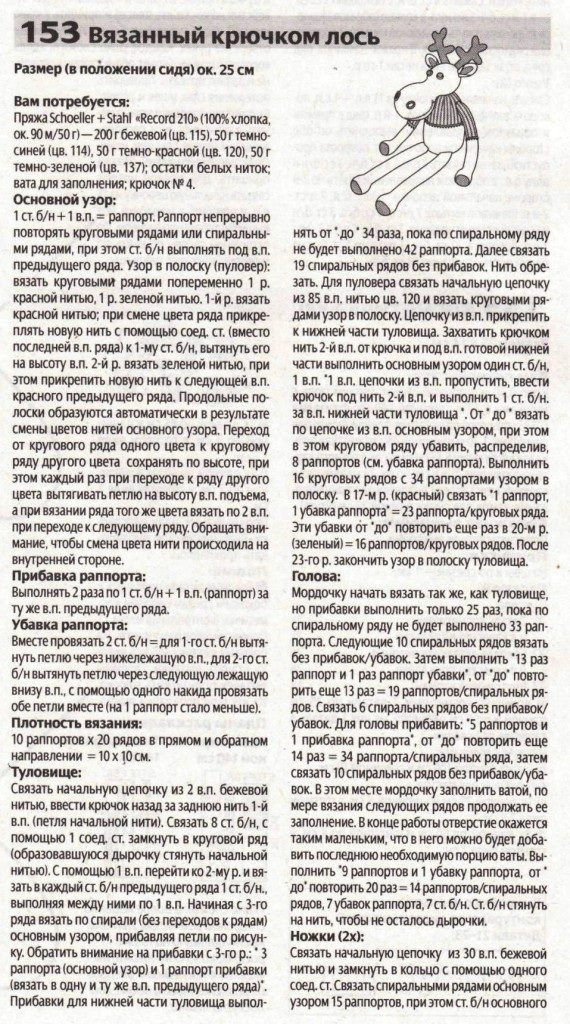
Knitting should begin with creating the base of the toy - the head and body.
The knitting is completed by assembling the finished moose. The arms and legs, horns and ears, knitted separately, are sewn to the base.
Panther toy - knitting pattern and description
Knitting details:
- The panther is 18 cm high and 8 cm wide (body volume 11 cm).
- The base of the head with a muzzle and body, paws, tail - purple yarn.
- Nose - black yarn.
- For the eyes you will need 2 buttons measuring 0.5 – 0.8 cm, and for decoration – purple sequins.
- Knitting time: up to 4 hours.
First of all, the head and body are created, which will serve as the basis of the future toy. To the finished base, it is necessary to sew the back and front paws, tail one by one. The muzzle and ears are placed on the head. All the parts for assembly are knitted separately. The panther is decorated with sequins embroidered in the shape of a heart.
Toy Sheep - knitting pattern and description
Knitting details:
- The sheep measures 15 cm in height and 5 cm in width (the body volume is 8 cm).
- Head and body - white yarn.
- Legs, hooves and fur coat - pink yarn.
- Shoes - purple yarn and pink beads.
- For the eyes you will need 2 small black beads.
- The skirt requires pink polyester.
- Knitting time: no more than 4 hours.
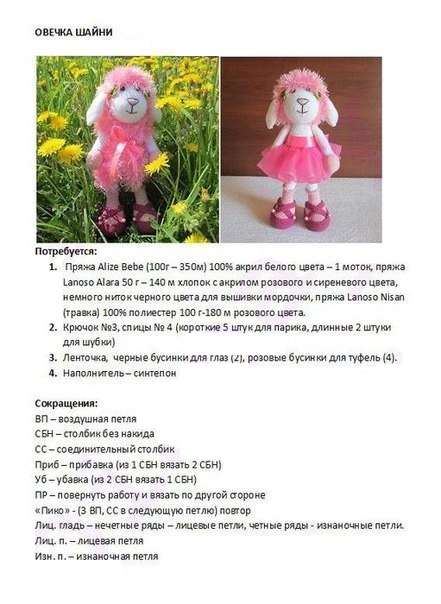
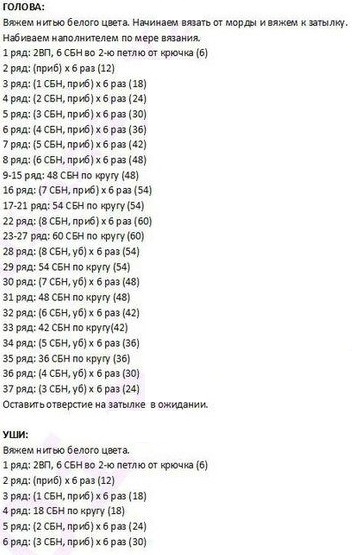
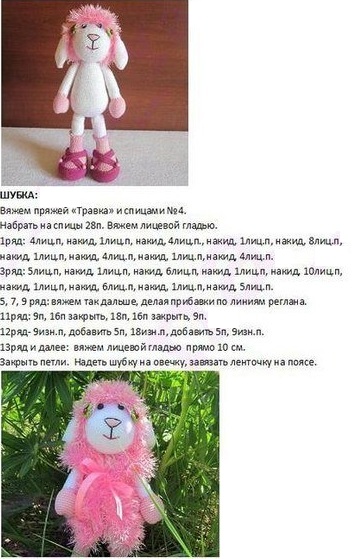
Knitting begins with the formation of the head and body. When the head and body are connected, the limbs are sewn to them. The head is decorated with eyes, a nose and a mouth. The shoes are decorated with beads. A fur coat is put on the finished toy.
Teddy Bear Toy - Knitting Pattern and Description
Knitting details:
- The dimensions of the bear are 20 cm in height and 8 cm in width (12 cm in body volume).
- Head and body - gray yarn.
- Ears, muzzle, arms – white yarn.
- Legs - grey and white yarn.
- For the eyes you will need 2 black buttons with a diameter of 1 cm.
- Knitting time: does not exceed 4 hours.
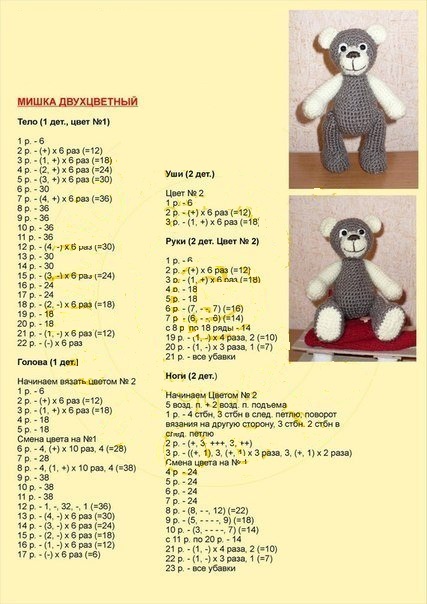
The basis of the toy will be the head and body, which are knitted at the beginning. The arms and legs, made separately, are sewn to the body. The head is decorated with ears, a muzzle and eyes.
Toy Dragon - knitting pattern and description
Knitting details:
- The size of the dragon will be 14 cm in height and 5 cm in width (the body volume is 9 cm).
- The base consists of a head with a body, ears, legs, and a tail – light green yarn.
- Wings and comb - dark green yarn.
- For the eyes you will need 2 small black beads.
- Knitting time: about 2-3 hours.
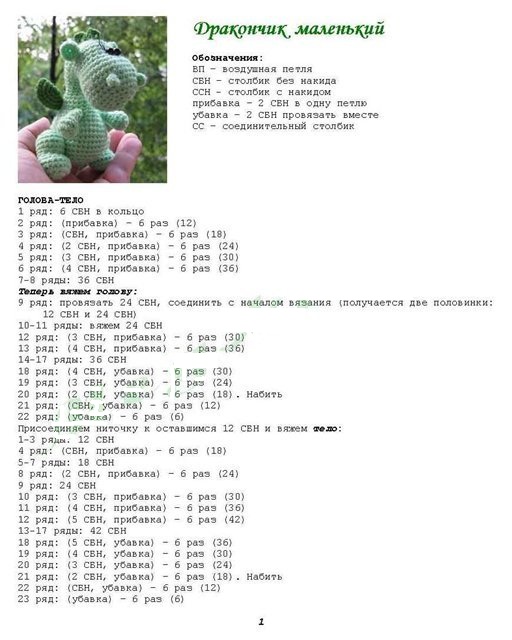
Knitting begins with the formation of the head. The body is formed after it. With the description and diagrams, it will not be difficult to assemble a ready-made crocheted toy from many parts. Arms and legs, a comb, wings are attached to the body using rope. The head is formed with nostrils, eyes and ears.
Pony toy - knitting pattern and description
Knitting details:
- The pony is 33 cm high and 11 cm wide (body circumference 14 cm).
- The base of the head and body, ears and legs are made of purple yarn.
- Hooves, crest, tail - lilac yarn.
- Muzzle - pink yarn.
- For the eyes you will need black, white and blue yarn.
- Knitting time: no more than 4 – 5 hours.
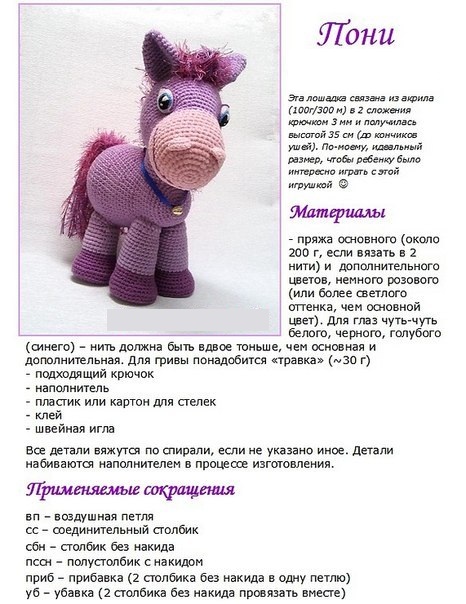
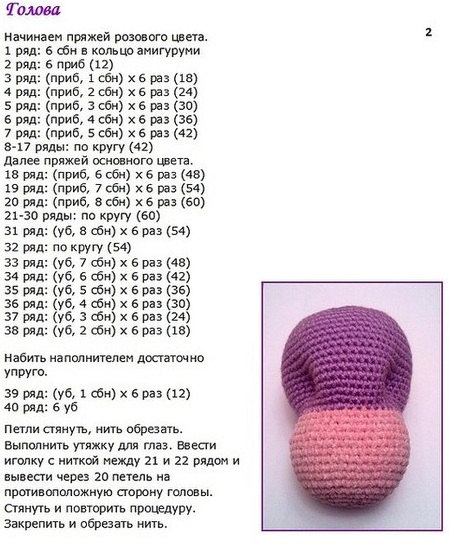
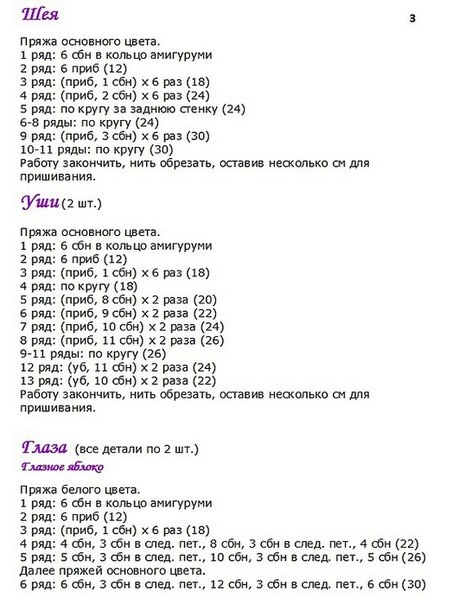
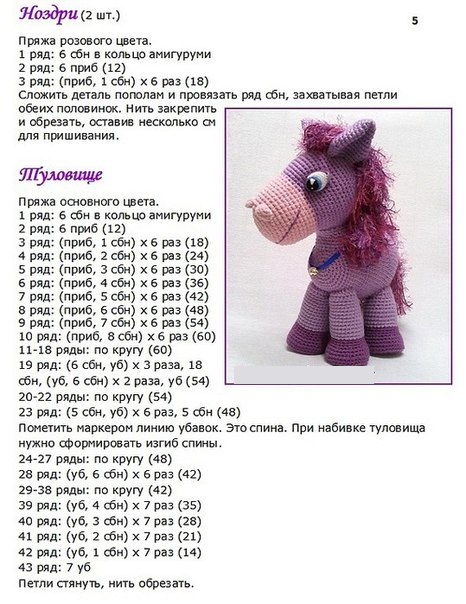
Knitting should begin with creating the head and neck. Then the body is formed, as well as the legs one by one. Assembly completes the knitting. The head is decorated with ears, eyes, nostrils and a mouth. It is attached to the body with the help of a neck filled with filler. The legs and decorative elements are sewn on: the mane and tail.
Toy Doll - knitting pattern and description
Knitting details:
- The doll's dimensions are 24 cm in height and 10 cm in width (body volume 13 cm).
- The base consists of a head with a body, arms and legs - white yarn.
- Dress and shoes - blue yarn.
- Hair - dark brown yarn.
- For the eyes you will need 2 small black buttons.
- Knitting time: about 3-4 hours.
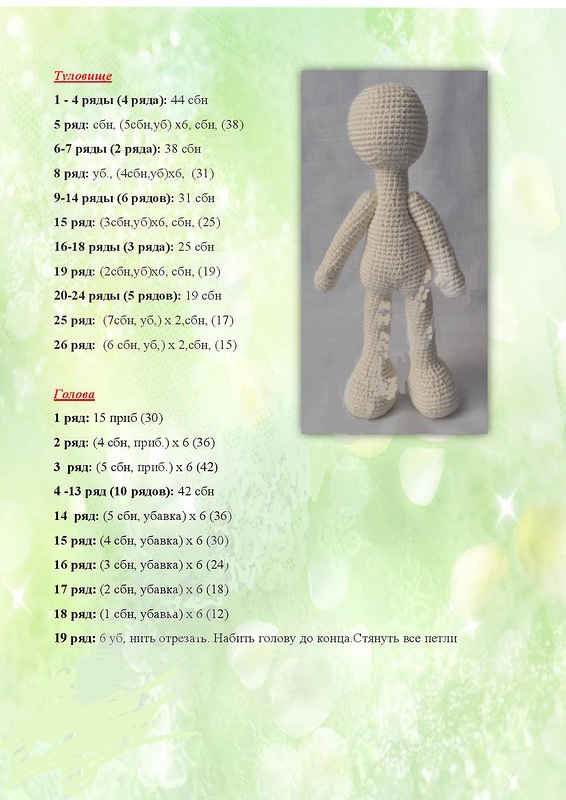
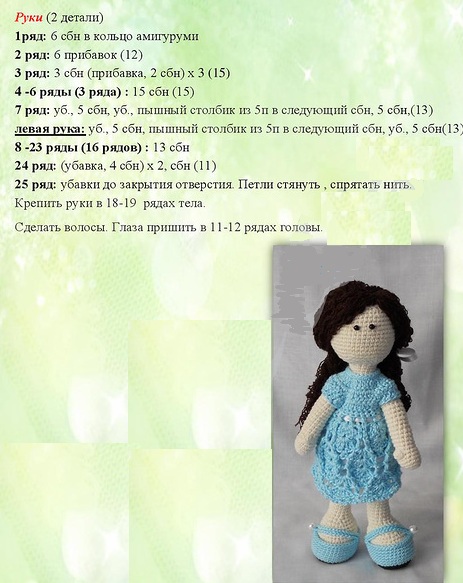
Knitting begins with creating the basis for the future toy: head, body and legs. The arms are knitted separately and attached with a thread fastening. The final stage is decorating the doll with hair, dress and shoes.
Amigurumi Kitten Toy - Knitting Pattern and Description
Knitting details:
- The kitten's dimensions are 15 cm in height and 6 cm in width (body volume 11 cm).
- The base of the head and body, legs and tail are made of white yarn.
- Ears - pink yarn.
- Whiskers, mouth, nose and claws - black yarn.
- For the eyes you will need 2 medium sized buttons.
- Knitting time: about 3-4 hours.
Knitting should start with the head and neck. Then the body of the toy is created. The work is completed by assembling small parts: legs, tail and ears. The finished kitten can be decorated with a bow.
Toy Duckling - diagram and description of knitting
Knitting details:
- The duckling's dimensions are 23 cm in height and 12 cm in width (15 cm in body volume).
- Head, body, wings, tail – white yarn.
- Paws, beak, clothes - yellow yarn.
- For the eyes you will need black yarn.
- To decorate the straps you will need 2 medium yellow buttons.
- Knitting time: 3-4 hours.
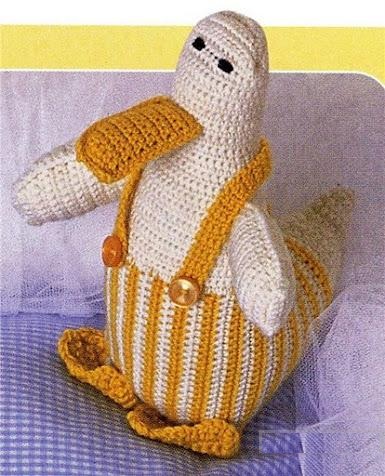
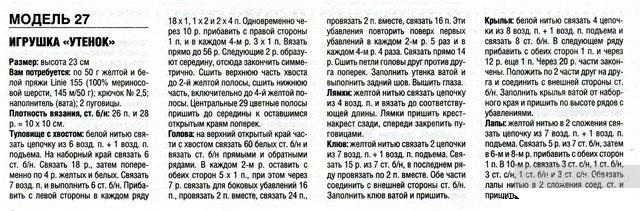
Knitting begins with creating the head and body with a tail. Wings, paws, straps and a beak are sewn onto the finished base of the toy. The work is completed by decorating the straps with buttons. When crocheting toys, it is important to rely on patterns. With their help, the toy will exactly match the description.
Video: Crochet toys with descriptions and diagrams
How to crochet a bunny, watch the video:
Crochet toys, patterns in video:
https://www.youtube.com/watch?v=YgPKDXOA4G8
Thank you for the useful and interesting article!
The process of making amigurumi is capturing the hearts of more and more needlewomen around the world.
Thank you for the useful and interesting article!
Amigurumi, as a separate art form, is quite new in our region. However, the number of its fans is rapidly growing.
Thank you, everything is very interesting. My hobby is knitting, but toys are for the soul.
Wonderful toys! Thanks for the patterns. I was especially captivated by the donkey. I will definitely knit it.
Thank you very much for the very detailed explanations. I learned a lot of useful information for myself.
Thank you very much! I learned a lot of useful and interesting things from your lessons. Very interesting toys with detailed descriptions. I started knitting them for the first time and got interested
How good that you suggested it and I knit toys from the remains of yarn. It is fascinating and I get funny mice, kittens and puppies.
Thank you very much. For a beginner this is a super description.
Thanks a lot
Thank you for the patterns, but I have a problem with the ears, I don't understand at all how to knit them, dial 8 air loops and what next? You write that we start knitting from the second loop and jumped to the end of knitting, 4 increases, it is not clear, I ask you to describe in more detail, 1 row is clear, but the 2nd and the following ones are not clear, judging by the photo, the dog's ears are quite large and beautiful, what should I do with this problem?
I got into toys not long ago. I really liked your descriptions. I have already knitted many of your descriptions. My grandchildren, despite the abundance of toys, really like knitted ones. Now I knitted an orange dog, and I also have a problem with the ears, sorry, I don’t understand at all and asked my friends who also knit toys to help, but none of my friends could figure it out. If it’s not too much trouble, please tell me the ears in detail for each row. The toy is already knitted and I don’t want to change it for other ears.
I learned to knit toys using this master class and I succeeded the first time.