Machine knitting allows you to knit quickly and efficiently make fashionable clothes with your own hands. Beginners should know how to take measurements correctly and calculate yarn consumption, and also familiarize themselves with the description of simple models of knitted items.
Advantages of Machine Knitting
Machine knitting differs from hand knitting and has a number of advantages:
- Speed of work. On average, experienced needlewomen spend about 72 hours manually to create 1 women's sweater of size 42. On a machine, a novice craftswoman can knit a similar model in 5-10 hours.
- Quality and accuracy. The equipment works precisely, without skipping or stretching of loops.
- Possibility of recycling. The old product can be unraveled and the threads can be used again more than 3 times.
- Convenience in working with blocks. When knitting patchwork bedspreads, blankets or tablecloths, you need to create many identical patches. It is difficult to achieve identity by hand, and the same type of work quickly becomes boring. On a machine, blocks are obtained quickly, beautifully and evenly.
- Development of the master's imaginationSince the machine work is faster than manual work, you can experiment with different patterns and color combinations, creating exclusive items.
Another important advantage of machine knitting is that it is easy to master for those who have never knitted before.
Taking measurements
For knitted items, the method of taking measurements is no different from that usually used for sewing. You just need to add 3-5 cm, taking into account the elasticity of the threads.
The table shows the basic measurements that will be needed for knitting sweaters, cardigans and outerwear:
| Measure | Reduction | How to shoot |
| Neck circumference | Osh | The tape measure is wrapped around the neck. Its end should remain in front, between the collarbones. |
| Chest circumference | Ogre | The tape is placed under the shoulder blades and passed through the highest point of the chest. |
| Waist circumference | From | You need to wrap the tape around your stomach, placing it horizontally 2 cm above the navel. |
| Hip circumference | About | Measure the circumference at the widest points of the buttocks and the widest areas of the legs. |
| Upper arm circumference | Or. in | The tape is wrapped around the arm, in the armpit area. |
| Wrist circumference | Or. n | Wrap the tape around your wrist. If you plan to have a 3/4 sleeve, then take measurements at the edge. |
| Front width | Shp | The tape is drawn from the left armpit to the right. |
| Back width | Shsp | Measure as before, but place the tape under the shoulder blades. |
| Shoulder width | Shpl | The end of the tape is placed at a high point near the neck and extended to the protruding shoulder bone. |
| Sleeve length | Dr. | From the protruding bone on the shoulder to the wrist. The arm should be slightly bent at the elbow. |
| Chest height | Vg | Place the end of the tape at the base of the neck and measure the distance to the highest point on the chest. |
| Front length | Dp | From the fullest point of the chest to the waist line. |
| Back length to waist | Dsp. d. t | From the base of the neck at the back to the waist line. The tape should not be pulled, it should be lightly pressed against the spine, observing the natural curve. |
| Back length with shoulder | chipboard | The tape is placed from the highest point of the shoulder to the waist, passing it through the bulge on the shoulder blade. |
To knit a hat, you need to measure the circumference of your head. Place the tape measure above your eyebrows and run it along the most convex part of the back of your head. You will also need to measure the distance from the crown to the front edge of the hat.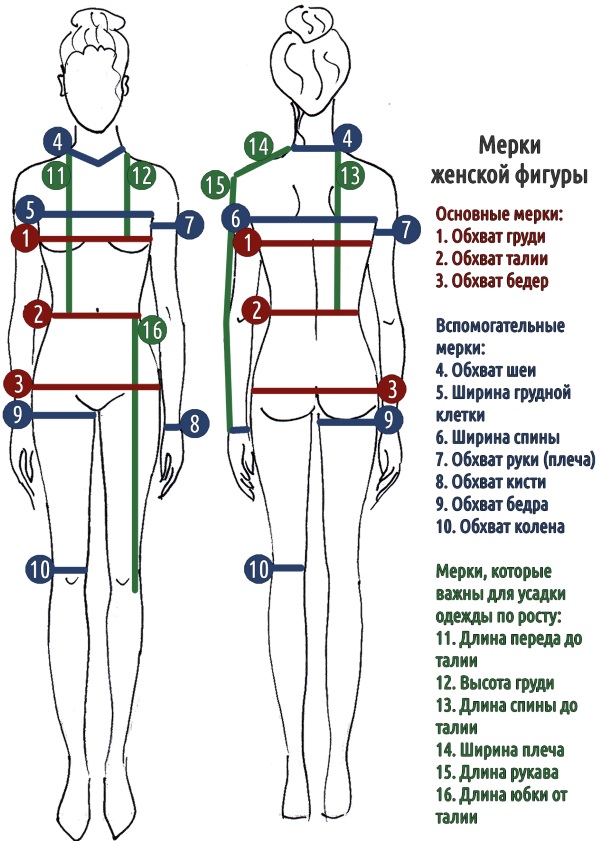
Depending on the style of the future product, the edge can be located above the eyebrows or slightly higher. To knit socks or booties, you will need to know the length and width of the foot, as well as the approximate height of the elastic.
Knitting calculation
To correctly calculate the yarn consumption, you need to knit a small sample with the same weave as planned for the finished product. You will have to spend time on its creation, but this is necessary, otherwise there is a risk of making incorrect calculations and when assembling all the parts into a single whole, such errors will no longer be possible to correct.
When making a sample, you need to leave color marks, knitting bright threads 1-2 loops at a time. This will be needed for further calculations. The marks should be placed in the middle of the fabric. Example: 25 loops on 1 side, mark, 25 loops on the other side.
After the sample is knitted and washed (since knitwear shrinks after washing and ironing), the loop test calculation begins. The indicators can be divided into 2 types: horizontal and vertical.
In horizontal lines, you need to count how many loops fit into 1 cm of fabric, and in vertical lines, how many rows fit into 1 cm. Sometimes the values may differ, depending on the area of the sample where the measurements were taken. As a result, you need to take the average values. This is a description of the calculation of average values with approximate indicators. You need to substitute your numbers.
Horizontal:
- Distance between marks – 36 loops = 12.5 cm.
- Product width: 54 loops = 17.5 cm.
- Total number of loops in cm – 14 cm = 46 loops.
Vertical:
- From the beginning of knitting to the edge of the product (preferably in 2 places) – 39 rows = 7.9 cm and 39 rows = 7.1 cm.
- How many loops are in a 5 cm column – 24 loops.
How to calculate average values:
| Width (horizontal density) | |||
| Method of measurement | Measurement result | Calculation | Conclusion |
| Distance between marks | 36 loops = 12.5 cm | 36/12.5 | 2.88 p/cm |
| Product width | 54 loops = 17.5 cm | 54/17.5 | 3.085 p/cm |
| Loop columns | 46 loops = 14 cm | 46/14 | 3.28 p/cm |
| Average value | (2.88 + 3.085 + 3.28) : 3 | 3.08 p/cm | |
| Height (vertical density) | |||
| Method of measurement | Measurement result | Calculation | Conclusion |
| 1 height indicator from the beginning to the edge | 39 rows = 7.9 cm | 39/7.5 | 4, 93 p/cm |
| 2 height indicator from the beginning to the edge | 39 rows = 7.1 cm | 39/7.1 | 5.59 p/cm |
| Loop column | 24 loops = 5 cm | 24/5 | 4.8 p/cm |
| Average value | (4.93 + 5.59 + 4.8) : 3 | 5.1 p/cm | |
Now, using calculations, you can create clothing patterns.
Models with descriptions, patterns for beginners
Machine knitting (models with a description of their production are presented later in the article) allows you to knit various items, including outerwear, hats, socks and accessories.
Children's clothing
Models of children's things are considered simple, and experienced craftsmen recommend that beginners use such descriptions for their first full-fledged works.
After taking measurements, you need to make calculations and make a pattern to clearly imagine how the item should look in the end, and also think about where the buttons or zippers with elastic bands will be placed. After that, you can start knitting on the machine.
Baby overalls
For knitting you will need yarn consisting of 40% wool, 60% acrylic:
- Knitting starts from the bottom, from the elastic bands on the legs, so you need to pull out 48 needles, starting from number 10, and then push in 1 through 2. The thread is wound onto the remaining needles. Pull them up and knit 1 row.
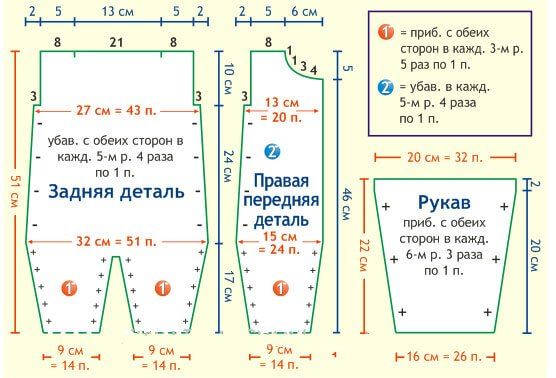
- The resulting row is hung with weights and 9 more rows are knitted. In places where loops were skipped, they will have to be knitted manually. The weights are removed.
- The needles are returned to their place and work continues with the usual knitting, making increases of 1 loop on both sides in every 2nd row. The last increase is on the 22nd row.
- Now you need to knit 55 regular rows.
- 2 pant legs are knitted similarly. Then the fabrics are connected into 1, knitting 2 rows with the levers lowered.
- Weights are attached to both legs and 63 rows are knitted.
- Now all the needles are put into the non-working position and 24 pieces are pulled out, starting with No. 29.
- On the machine, turn on the partial knitting mode and knit 33 rows.
- The left shelf is now complete, the right one is knitted in the same way.
- All the needles are put back in the non-working position, the middle is determined, from the beginning of each opening for the arms, only these needles are put into work. Knit 33 rows.
- The knitting must be closed by hand knitting 2 loops using a decker. The finished product is sewn together.
- To knit a sleeve, you need to pull out 20 needles from 0 to the left and 25 to the right. Put the thread on the needles and knit 20 rows.
- Now you need to decrease 1 loop every 5 rows, up to row 50.
- The next 15 rows are done as usual, without decreases.
- At the end of the sleeve you need an elastic band, so using a deckler you need to unravel every 3 loop column into 5 loops and knit by hand.
It remains to knit the 2nd sleeve and sew the product. This item is suitable for babies, height 51-55 cm. To create a larger jumpsuit, you need to take measurements and make calculations.
Booties
Machine knitting (models with descriptions can be changed in design at your discretion) allows you to quickly and efficiently knit booties for babies. You will need Vita Beby yarn 100g/400m, set the density to 7 on the machine.
- From 0, cast on 30 loops in both directions and knit 2 rows.
- Take the main thread and make 8 more rows.
- Then from the 2nd row below, pick up the needles and knit another 10 rows. You can use punch cards to create a pattern.
- 25 loops are transferred to the additional thread on each side. The remaining ones are used to knit a sock.
- 1 row is knitted from the back side of the carriage, 1 loop is hooked from the half on the side and the row is knitted again. In this way, you need to knit until you get 16 loops on the sides.
- The parts are connected by putting all the loops on the needles. Knit as many rows as necessary to get the desired length. Close the last row.
- Similarly to knitting the sock, you need to knit the sole. At the back, after closing, the booties are sewn together.
This product is suitable for a child with a foot length of 7-9 cm.
Poncho
The simplest children's poncho is made from 2 parts, starting from the back.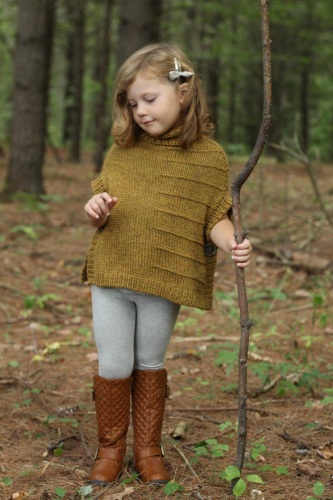
- Using an additional thread, cast on 80 loops and knit 10 rows.
- Then the thread is changed to the main one and 5 rows are knitted.
- Next you need to knit alternating rows of regular and stockinette stitch.
- To give the edges a rounded shape, you need to make decreases by skipping the 8th loop in the middle.
- The front part is knitted similarly, but at the neck itself you need to divide the fabric into 2 and knit 7-10 rows separately. Then sew on the laces.
The bottom of the poncho can be decorated with tassels.
Scarf
One of the easiest things to do.
- The needles are loaded with enough loops to obtain the approximate width of the scarf.
- After knitting 2 rows, you need to secure the weights and knit with a regular garter stitch until the desired length is reached.
- Carefully close the knitting and remove from the needles.
To make the work more interesting, you can use multi-colored threads and decorate the edges of the scarf with pompoms. If you need a denser scarf, then the width of the fabric should be knitted 2 times larger, and after closing, fold, sew and steam.
Children's costume
A set of a sweater and pants. The elastic is knitted 1x1, and a "ribbed" pattern is also used: alternating 4 rows of garter stitch and 4 rows of face stitch, then 2 garter stitch and 4 face stitches.
- Knitting starts from the bottom, from the back. Cast on 74 stitches and knit regular rows until the fabric reaches 22 cm in length.
- Start knitting with a pattern. When another 6 cm of knitting is added, you need to move on to knitting the neck.
- The left and right stripes are knitted in the same way, making decreases in the sleeve area every 5 rows.
- The sleeves are knitted separately, casting on 50 loops, 25 in each direction from 0.
- After closing the knitting, the parts are assembled into a finished product and a zipper is inserted.
- The pants are knitted in the same way as the beginning of knitting the overalls, starting from the bottom of the legs.
- 10 cm before the elastic band, you need to knit with a pattern.
The elastic can be knitted on a machine, leaving a hole for the laces. Another option is to knit a drawstring and insert a wide elastic band.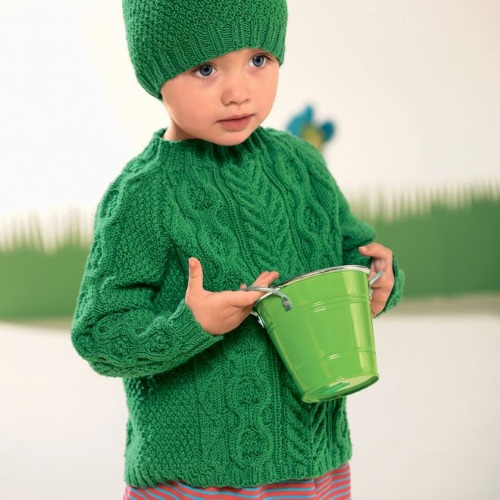
Sweater
A sweater for a child can be knitted in the same way as the jacket from the previous set. If you want to create a thing without buttons and zippers, then knitting begins from the back.
- The first 10 rows are knitted with an elastic band, then the back is knitted up to the armpit line with a simple satin stitch, in rows without increases.
- In the area of the sleeves, you need to make several decreases, every 5 rows.
- The front part is knitted in the same way.
- The sleeves and neck should be knitted separately. To make a high turtleneck collar, you need to knit a wide band with an elastic band.
The sweater can be supplemented with a wide pocket for both hands in the front. Knit a rectangle and sew it on when assembling the product.
Hat with ties
The hat can be knitted in the round or with a seam. Option 2 is suitable for beginners.
- You will need to take measurements and calculate the number of loops for 1 row. For example, for a child 2-3 years old, 78 loops will be suitable, from which you need to knit 100 rows.
- The hat is divided into 4 wedges and knitted with decreases.
- Separately, you need to knit the parts that will cover the ears.
- The wedges are connected together at the top and the product is sewn together.
- The laces are sewn separately to the inside of the ears.
If you need a warm hat, you can knit the lining separately, similar to the top part.
Baby blanket
It is easy to knit a baby blanket consisting of square blocks. You will need to knit several squares, dialing 75 loops on each side from 0. Knit with a simple satin stitch. You need to make so many rows that the bottom side coincides with the side. Knitting of each square is closed as usual. The products are assembled by sewing the blocks with a thread or crocheting.
Women's clothing
Machine knitting (models with descriptions are presented further in the article) allows you to create a fashionable sweater with your own hands in 4-6 hours. To knit unusual women's clothing, you will need to study some patterns and practice before work, creating samples with a beautiful ornament.
Multicolored button down jacket
You will need yarn in the following colors: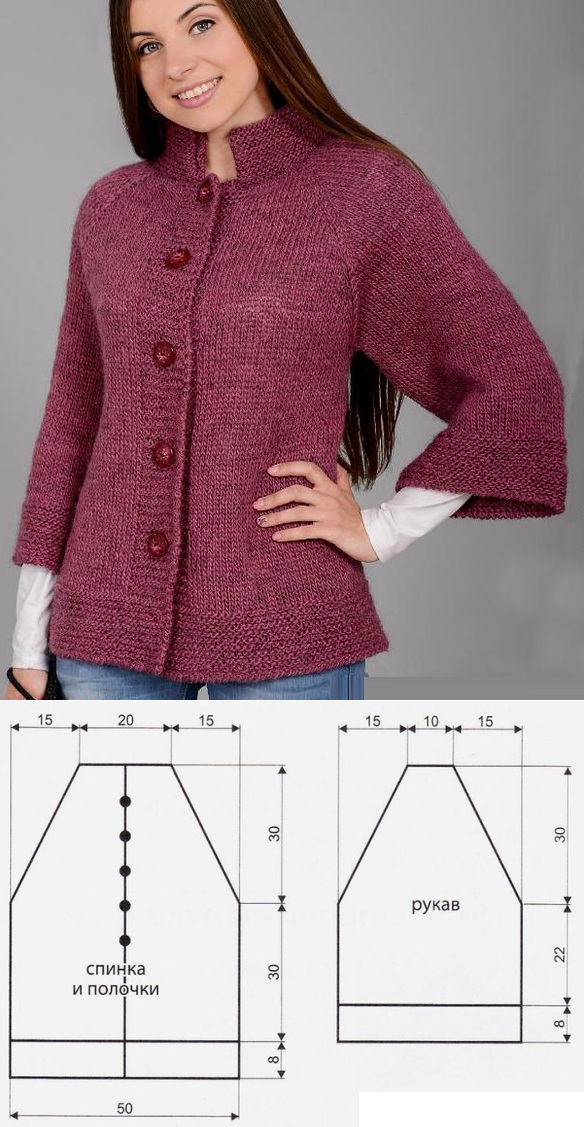
- blue;
- blue;
- beige;
- white.
Knitting starts from the back. Approximate jacket size 44.
- Using beige thread, cast on 60 stitches and knit with an elastic band (1 front, 1 back, 2 front).
- After 8 cm of knitting, you need to change the thread to blue and knit 40 cm. Then close the edges and make decreases in the sleeve area. The height of the armhole should be about 22 cm.
- To knit the right part, cast on 35 loops and 7 cm with beige thread. Then change the thread to blue again and knit to the end, making decreases in the sleeve area.
- The left part is knitted in the same way.
- The sleeves are started with beige thread, and after 7 cm of the elastic band, the thread is changed to blue. After 55 cm, you need to make decreases according to the shape of the sleeves.
The product is assembled, and 2 pockets are knitted from white yarn and sewn on the sides.
Classic two-piece: jacket and sleeveless jacket
The sleeveless jacket is easy to knit. You need to knit the back with a simple satin stitch, starting with the elastic. The armholes should have a raglan shape. The left and right sides are also knitted with an elastic band, and decreases are made in the sleeve area.
To knit a jacket, you will need to set the knitting density on the machine to 8.
- To knit the back of a size 40 jacket, you need to cast on 110 stitches. The lower part is knitted at a density of 5, then returned to 8 again, the row counter is reset.
- After 155 rows, start decreasing 1 loop on both sides to form openings for raglan sleeves. You need to decrease every 4th row. You need to knit about 250 rows in total until the end of the back.
- The right part begins to be knitted by casting on 55 loops, and after 70 rows, decreases begin.
- The left part is knitted in mirror image.
- It remains to knit the sleeves, having cast on 60 loops. On the 116th row, decreases begin.
The product is assembled. It can be supplemented with pockets.
Knitted swimsuit Pink Panther
Knitting starts from the back.
- Cast on 100 stitches and knit 10 rows.
- After 4 rows, every 5th loop is transferred to the needle next to it using a decker and 37 rows are knitted with decreases of 1 loop on each side.
- Next come 32 even rows, and then 27 rows with increases on each side.
- 10 rows are knitted straight again, and then every 5th loop is again transferred to the adjacent needles.

- Then knit 20 rows with decreases on every 2nd row of 1 loop on both sides.
- Next, knit 20 straight rows, and then 30 with increases of 1 on each side.
- Knit 10 straight rows and switch to partial knitting mode.
- First you need to knit the left cup of the bodice, then the right one. 1 cup consists of 50 loops, which need to be gradually reduced.
At the end, the entire swimsuit needs to be tied and the laces secured, which can be knitted on 3 needles.
Melange Dress Autumn Leaves
At first glance, this thing seems difficult to make, but in fact, this dress is easy to make.
- On the machine you need to knit 2 pieces of approximately 56 x 113 cm. You can use a 4-ply thread.
- The back and front parts of the dress are cut out from the resulting rectangles. They are identical. The patterns are placed diagonally.
- Before cutting the canvas, you need to sweep the parts with threads and steam them.
- The seams are well stitched and processed on an overlock machine; you can crochet them.
Leftover fabric can be used to decorate the dress by tying the pieces and sewing them to the hem and top of the dress.
Coat
A simple straight coat is knitted in the same way as a jacket. For warmth, you can add a lining of thinner yarn. You will also need to knit a belt and loops for it. During assembly, a zipper is sewn between the left and right front parts.
Top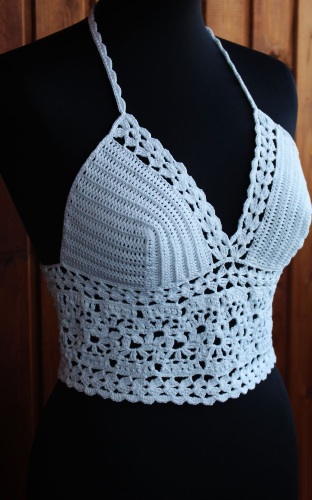
Tops consist of 2 parts: back and front. Knitting starts from the bottom of the back, the front part is created separately, the knitting is closed and the product is sewn on the sides and shoulders.
To create different patterns you will need punch cards. Experienced craftsmen recommend knitting tops from thin yarn.
Stole
As an example, a description of a stole made of semi-woolen yarn No. 32/2, with a pressed pattern, is provided.
- Cast on 128 stitches and knit 12 cm in stocking stitch.
- Next they move on to knitting with a pattern.
- The resulting fabric should be about 180 cm long.
At the end, you must knit 12 cm in stockinette stitch, as at the beginning of the work.
Clothes for plus size women
Machine knitting (models with descriptions are presented in the article as an example, but they can be modified by adding new details to the style) allows you to quickly knit clothes of any size. Women with voluminous forms sometimes cannot find things in stores, but having a knitting machine always has the opportunity to wear outfits that you like.
Summer blouse
Thin sweater made of kid-mohair yarn - 30%, PA - 30%, acrylic - 40%, 2-ply thread. Size 50-54.
- Knitting starts from the back. Cast on 168 stitches and knit 14 rows, setting the density to 8.
- Then the hem is formed and the row counter is reset.
- Then knit 136 straight rows, and then begin to decrease stitches to achieve a narrowing for raglan sleeves.
- The front part is knitted in the same way.
- For the sleeves, cast on 120 stitches and knit 14 rows, creating a deflection. The counter is reset again.
- As you knit, you need to add loops to get 124 pieces.
- After 176 loops, the sleeve begins to narrow with decreases.
The product is assembled. The neck can be crocheted or the collar can be knitted separately.
Summer dress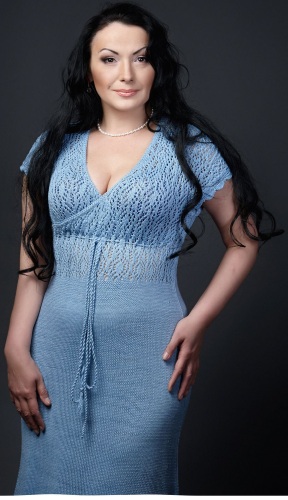
A summer straight dress can be made with or without patterns. The easiest way is to knit the product with a satin stitch. You will need to make 2 parts: the back and the front. 160-199 loops are cast on the needles, depending on the size of the dress.
The back and front are knitted the same way, in the form of rectangles, changing only the neck area. The neckline on the front should be deeper.
The product is sewn on the sides and the armholes are crocheted. The dress is put on over the head, to mark the waist, you will need a wide and elastic belt of a suitable color.
Pullover
Product size: 50-54. It is recommended to knit from merino yarn Tollegno Harmony 48/2, folded in 7 threads. The density of the product itself is 8, the elastic band is 3\3, and the patterns are 8\6.
- Knitting begins with a set of 154 loops. 32 rows should be knitted with a rib pattern, alternating front and back through 2.
- Next, knit 180 rows, increasing 1 loop on each side every 30 rows.
- On row 197, start knitting the armhole, then knit straight for another 96 rows.
- Then follow rows with increases in every tenth row, you need to knit up to row 280 and design the shoulder section (37 loops) and the neck.
- If you plan to have a pattern at the front, you need to add 4 loops on each side when casting on.
- Knit 30 rows with an elastic band, then select a pattern or knit the front part in the same way as the back.
- For the sleeves, you need to cast on 74 stitches, and make 30 rows with a rib pattern. On the 41st row, you start making increases every 10 rows, 1 stitch at a time.
- Starting from row 230, you need to decrease the loops every 8 rows. Knitting of the sleeves ends at row 290.
- To knit a collar, cast on 170 stitches and knit 60 rows with an elastic band.
Next, the product is assembled and all seams are steamed.
Cardigan
The simplest cardigan can consist of 1 rectangular part. You will need to knit a 60x90 cm piece of fabric with a satin stitch, which will make a cardigan of size 48-52. After closing the loops, the fabric is folded in half and stitched, leaving armholes of about 20-30 cm. They are additionally crocheted.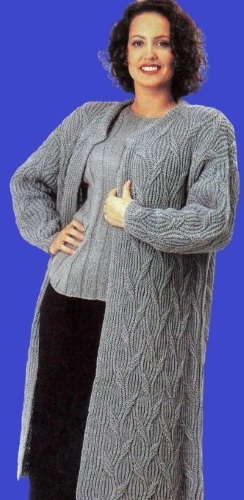
If you want to knit long sleeves, you need to make them separately and sew them to the product during the assembly process. The cardigan is put on like this: the top part is thrown over the neck from behind, the arms are put through the sleeves, and the bottom part is straightened.
Tunic
Light summer tunic, size 50-54. It is recommended to use Sport&Strumpf wolle Marathon yarn.
- On the machine, cast on 96 loops through 1 needle. After wrapping, the removed needles are returned. The density on the carriage is set to 5/3. After knitting 1 row, hang the weight and knit another 19 straight rows. The weight is removed.
- The drawstrings that were obtained from below need to be hooked onto the needles using a decker. The load is hung again. 2 connecting rows are knitted.
- To get a pattern in the form of diagonal holes. You need to throw every 5th loop onto the adjacent needle. Knit a row, then throw every 4th loop. Similarly, make a pattern across the entire fabric. Knit the pattern up to row 160.
- Knit the armholes and neckline.
- The shoulder loops are transferred to an additional knitting needle.
- The back is knitted similarly to the front, but without a neckline.
- Connect the shoulder seams, close the knitting and gather the tunic.
The neck and sleeves need to be crocheted.
Beret
The product is assembled from 6 wedges, which are made by partial sequential knitting.
- Cast on 64 stitches and knit 5-6 rows.
- Change the thread to the working one and knit short rows, pushing the machine in PNP 18 times on the left with 1 needle and 10 times with 2. On the right, knit 36 regular rows.
- The remaining short rows are performed in the same way, pushing out 1 needle 3 times and 2 needles 7 times. There will be 9 needles left in the working position.
- The needles are returned to their place and 5 straight rows are knitted.
- To knit a headband, you need to cast on 160 stitches and knit 30 rows.
Then each piece is steamed and sewn together. The headband ribbon is folded lengthwise, ironed and sewn to the beret.
Machine knitting is not difficult. The main thing is to learn the basic principles of work: take measurements correctly, knit samples and calculate yarn consumption. Then it will be easier to work with descriptions. Over time, the knitting skill will be honed, and the novice master will be able to create exclusive models with his own hands.
Article formatting: Vladimir the Great
Machine knitting video
Machine knitting for beginners:
Dear Galina! You are great, of course, but the threads need to be wound on special winding equipment before knitting on the machine, so that there is no distortion of the density. The thread should go freely.
THANK YOU, WELL DONE
It is better to sew with a knitted stitch, and not on a sewing machine!