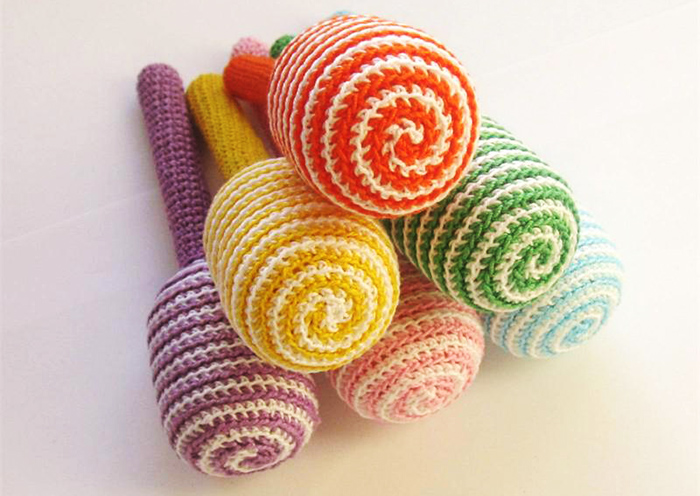
After the child opens the Kinder egg and gets a surprise, there is a container in which it was hidden. Many throw them away, but in vain. You can make many useful and interesting things from them. Crafts from Kinder eggs are a great opportunity to have fun with your baby and make your own decoration or a toy for kindergarten.
What materials are needed to make crafts from Kinder eggs
DIY Kinder Egg crafts for kindergarten are made from containers of any color. The main working material is a plastic capsule in which the toy is hidden.
In addition, you may also need:
| Tools | Materials |
|
|
You can use almost any small items at hand.
Making unusual crafts for kindergarten from plastic containers from Kinder eggs
From the capsules in which the surprise was hidden, you can make a lot of simple and complex crafts: accessories for dolls, funny animals, toys, Christmas tree decorations and other useful things. The simplest craft is animals.
The head and body of the product are made from an oblong container, and the remaining parts are made from plasticine and attached to the base. A large selection of step-by-step master classes will allow you to make many original decorations and toys with children of any age.
Garland of plastic containers
Crafts from Kinder eggs are a great way to make a bright, colorful garland for a kindergarten. Children will be very happy to take part in decorating the Christmas tree, especially if you use handmade decorations for this.
Necessary tools and materials:
- an awl or a thick needle;
- Kinder containers;
- foil or paper for gift wrapping in different colors;
- rain;
- strong thread;
- scissors;
- scotch.
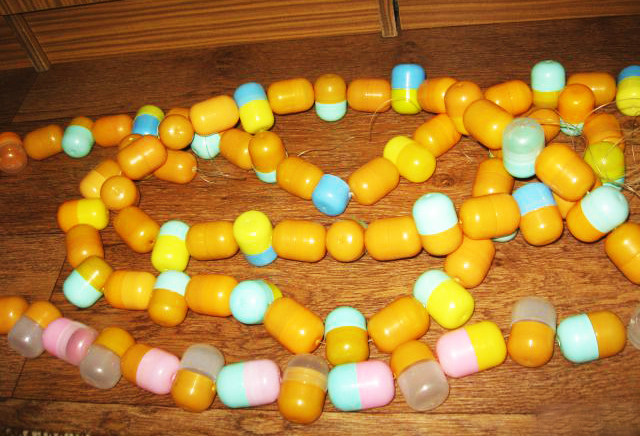
Step by step production:
- Using an awl or thick needle, make holes in opposite ends of each capsule.
- String the containers on a strong thread. Distribute them at equal distances from each other.
- Cut the gift paper or foil into squares of the same size.
- Place the capsule, without removing it from the thread, in the middle of the square, wrap it in paper, fix it with a thin strip of tape so that it does not unfold. Tie the edges with tinsel. It should look like a candy.
- Decorate the remaining containers in this manner. Wrap the thread between them with foil so that they do not connect to each other. Tie the ends of the garland into a bow.
You can make it glow by placing LEDs inside. This craft can be done with older kids.
Craft "Firefly"
Children will be happy to take part in making cute fireflies, which will be fun to play with on the lawn near the house or on the playground.
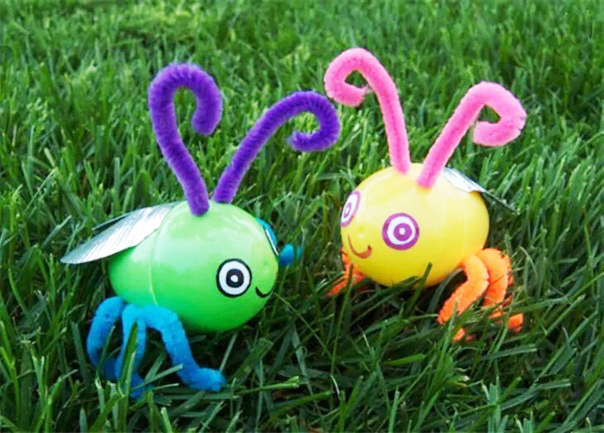
Necessary tools and materials:
- empty kinder surprise containers;
- an awl or a thick needle;
- small battery powered LED;
- cotton swab;
- small eyes;
- marker;
- wire and fluffy yarn;
- foil.
Step-by-step instructions for making a firefly:
- Use a needle or an awl to make a hole in one of the container lids.
- Insert the LED into the lid with the hole.
- Fill the other half of the egg with a cotton swab so that the light from the LED does not scatter throughout the entire container, but illuminates only the back of the craft.
- Make three holes on each side at the back. Insert the wire into them and bend the ends inside to secure it. Shape the paws. Wrap with fluffy yarn.
- Cut two wings out of foil and attach them to the top of the body.
- Attach the eyes to the front part. Use a marker to draw the nose and mouth. If there are no blank eyes, you can draw them too.
- Make whiskers out of wire and attach them to the top.
- Turn on the LED and connect the parts of the container.
The craft will look especially interesting in the dark. Making a firefly is not only a good way to develop a child's fine motor skills, but also to broaden his horizons.
Rattle for the little ones
Kinder egg containers are a great base for a rattle for a newborn. Use natural materials as a filler. Such a toy will be appreciated by the pupils of the nursery group of the kindergarten.
Necessary tools and materials:
- plastic containers;
- coffee beans, dry beans (as a filler);
- wooden skewer (for the handle);
- bright threads made from natural fibers;
- crochet hook.
Step-by-step master class:
- Place the chosen filling material into a plastic container and close it tightly. To prevent it from opening over time, apply a thin layer of glue to the edge of one half or secure it with thin tape. The volume and sound of the rattle depend on the chosen filling, so you need to choose one that your child will like in advance.
- Attach the prepared base to a wooden skewer.
- To make the rattle bright and interesting, tie the base with threads using a hook. If you don’t have knitting skills, you can wrap the capsule with threads, pressing them tightly to the plastic. Fix the ends of the thread with glue.
It is worth remembering that babies love to put everything in their mouth, so before making a rattle, it is advisable to check the yarn for shedding. For the same reason, mohair and wool are not suitable for the toy. Ideally, use viscose, linen or cotton.
Craft "Little Bear"
DIY Kinder Egg crafts for kindergarten in the form of animals are the most accessible way to keep a child busy. The plastic capsule will be both the body and the head of the animal. This simple toy can be made even with the smallest children.
Materials required:
- chocolate egg container;
- brown, black, red, white plasticine.
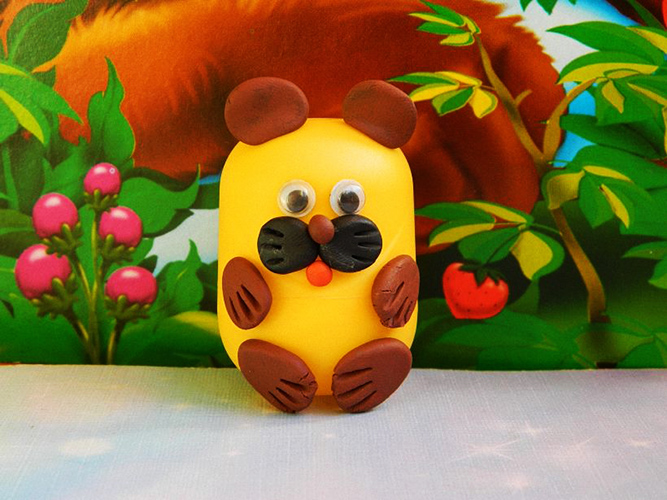
Step by step production:
- From black plasticine, mold a barrel-shaped nose. From white, make two flat, round small bases for the eyes. Attach dots of black plasticine to the center of each blank. From red, make a tongue. From brown plasticine, form two round ears. Attach the muzzle parts to the part of the capsule where the head will be. The correct placement of the eyes, ears, and nose is the key to making a neat and interesting craft.
- Make two tubes from brown plasticine so that one end is slightly wider than the other. Bend slightly. These will be the front paws.
- From the same material, form the lower limbs in the form of two large ovals. The details should securely hold the craft in a vertical position. You can use a stack to draw the claws.
- Attach the body elements to the capsule.
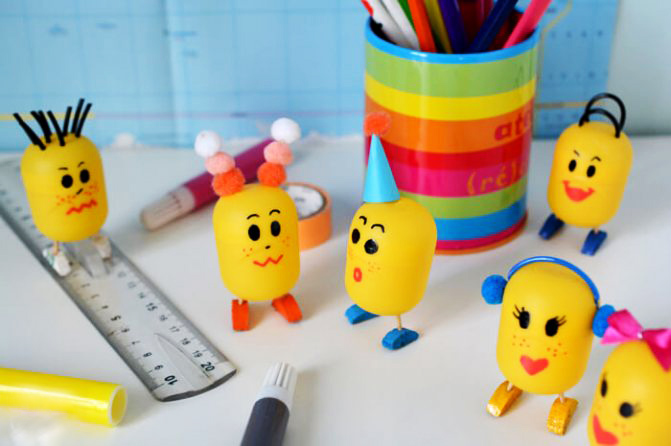
Craft "Minion"
Children will be incredibly interested in watching how cartoon characters come to life in their hands. The playful and funny Minions will cheer up the kids, and they will play with them with great pleasure.
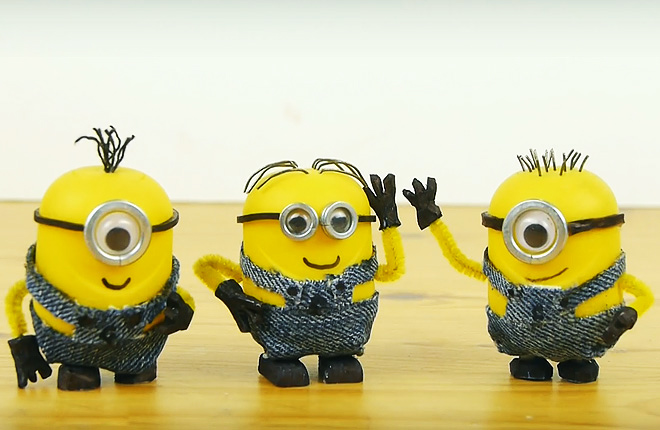
Necessary materials and tools:
- Kinder Surprise capsules;
- paints;
- thin wire;
- an awl or a thick needle;
- black beads;
- PVA glue;
- transparent blister of small tablets;
- brush;
- plasticine.
Step-by-step master class:
- Make several holes in the upper part of the capsule with an awl. Thread the wire through the holes. This will be the hair of the cartoon character.
- Cut two circles out of the blister. Place a bead in each and glue them to the intended location of the eyes on the capsule. If there is no blister, they can be molded from plasticine.
- Use a brush and paint to draw a mouth.
- Make clothes from plasticine and “put” them on the capsule. Form plasticine limbs. Assemble the toy.
For older kids, you can sew a jumpsuit for the minion from a piece of denim.
Craft "Little Pig"
One of the simplest crafts that even toddlers can handle.
To work you will need:
- plastic capsule;
- self-hardening or regular white, orange and black plasticine;
- button.

Step-by-step master class:
- From orange plasticine, mold two ears with pointed tips, like leaves.
- A small round button will act as a nickel.
- From white plasticine, mold small round eyes. Place black plasticine beads in the center of each.
- Attach the blanks to the plastic capsule. Due to the rough surface, the plasticine adheres perfectly to the base of the craft.
- Make four barrels of the same size. Use a stack to form hooves.
- Make a thin curl out of plasticine - a tail.
- Attach the limbs and tail to the base – the craft is ready.
Honeycomb
Crafts from Kinder eggs with your own hands for kindergarten can be made the basis for an interactive game. From the cases in which the toys were hidden in chocolate treats, you can make honeycombs with bees and clearly explain to the child how honey is obtained.
Necessary materials and tools:
- cardboard roll from paper towels or toilet paper;
- felt-tip pens;
- Kinder Surprise capsules;
- clear plastic folder;
- strong black threads;
- PVA glue;
- black beads;
- sheet of paper.

Step-by-step master class:
- The chocolate egg cases will serve as the basis for making bees. Use a felt-tip pen to draw the eyes and mouth of the bee on one end of the capsule. Glue the bead eyes onto the capsule. Use black thread to make stripes, tightly winding them onto the case and gluing them on. If desired, you can use fluffy yarn or thin black tape. To make the craft even easier, you can simply draw the stripes with paints or a felt-tip pen.
- Cut out small wings from a transparent plastic folder. They can be glued to the base, or thin slits can be made and inserted.
- Making honeycombs. Cut the core into rings of equal width. Make a circle of 5 pieces in the center, place a row of 4 rings each at the top and bottom. Glue with PVA or staple. Paint the resulting structure yellow.
- Place the bees in the honeycombs.
If you want, you can make paper flowers to visually explain to your child how insects collect pollen for honey. It will be an interesting game.
Christmas tree decoration
A wide variety of materials are used to make Christmas tree decorations. Kinder Surprise capsules are also suitable for this craft.
Tools and materials:
- container from a large Kinder Surprise;
- self-adhesive rhinestones;
- an awl or a thick needle;
- corrugated, soft paper of bright colors;
- rope;
- ribbon of any color;
- scissors.
Step by step production:
- Make a hole in the egg capsule with a thick needle or awl. Thread a rope through it, form a loop. Tie a knot on the inside to secure it.
- Wrap the blank in corrugated paper. Tie it on top with a colored ribbon.
- Decorate the craft with self-adhesive rhinestones.
Cockerel from Kinder
Another version of a simple toy from Kinder egg capsules, which will be fun to make with your baby.
Necessary tools and materials:
- plastic capsule;
- multi-colored plasticine;
- lid from a sour cream glass.
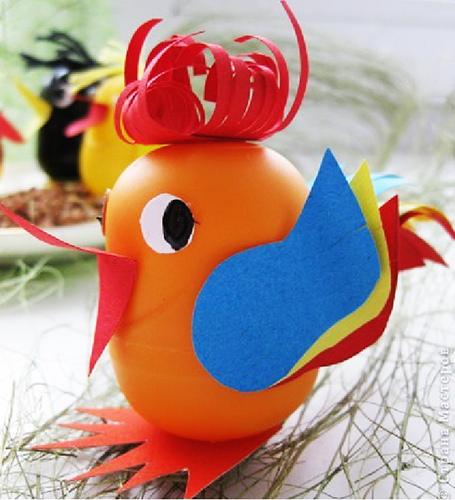
Step-by-step master class:
- For a closed beak, form a ball out of plasticine and then give it a teardrop shape; for an open beak, use a stack to divide it into two halves in the center. Attach to the base.
- For the eyes, roll two white balls of plasticine and tiny ones of black. Flatten the first ones and attach them to a plastic base. Insert black plasticine beads into the center of each circle.
- Comb. Form three red balls from plasticine, each of which should be slightly smaller than the previous one. Attach one after another to the capsule.
- Make a red ball out of plasticine, stretch it slightly on one side, flatten it, attach it under the beak. This will be the bird's beard.
- Form wings from plasticine of any color. To do this, make two identical balls, stretch them slightly on one side, press them with your finger and attach them to the base. You can draw feathers using a stack.
- Roll three multi-colored sausages out of plasticine for the tail. Attach to the base.
- Make paws from plasticine by forming three thin sausages and connecting them at one end. Glue to the container.
The craft is ready. You can leave it as is, or create a whole composition by making a clearing out of the plastic lid, having previously covered it with green grass and plasticine flowers. Place the rooster on it.
Snowman
It is better to make DIY Kinder egg crafts for kindergarten together with your child. You can decorate the Christmas tree with it or make it part of a New Year's composition.
Necessary tools and materials:
- transparent or white capsules from Kinder eggs;
- PVA glue;
- an awl or a thick needle;
- ribbon;
- white and orange plasticine.

Step-by-step master class:
- Glue three containers together, placing them one on top of the other. Fill the transparent capsules with cotton wool beforehand.
- Use an awl or a thick needle to make a hole in the top egg and thread a ribbon through it.
- From white plasticine, form circles that will play the role of legs and arms. Attach them to the snowman's body.
- Make a carrot out of orange plasticine and attach it to the place where the nose should be. Form black plasticine eyes and attach them to the base.
Penguin from Kinder and plasticine
Crafts from Kinder eggs with your own hands for kindergarten during creation allow to develop fine motor skills of hands, modeling skills and creative imagination. Such activities with children cultivate accuracy and perseverance, and as a reward the child receives a toy.
Materials required:
- plastic container;
- decorative eyes;
- white, orange and black plasticine.
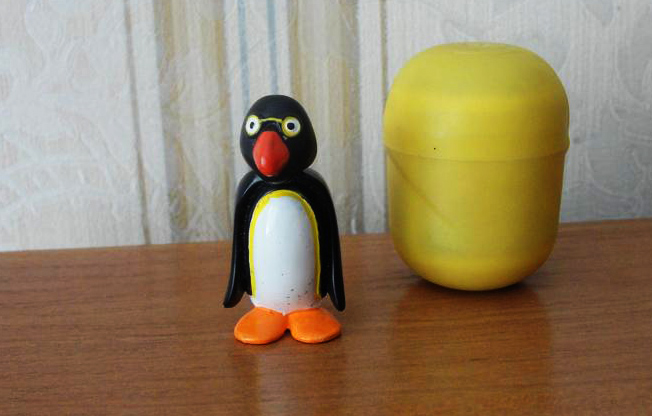
Step by step production:
- The place where the two halves of the container meet serves as a guide for where the penguin's tummy will be. For kids, this line can be marked with a felt-tip pen.
- Cover the entire surface of the capsule with black plasticine, except for the highlighted area. Fill it with white, forming the tummy.
- For the wings, roll 2 tubes from black plasticine, flatten with your fingers. Form 2 balls from orange, press lightly to make paws. Make a beak from plasticine of the same color.
- Attach all the blanks to the container base.
Containers from sweet surprises are a great basis for making a craft from Kinder eggs, a toy or a holiday decoration for a kindergarten with your own hands. This will help develop the child's creativity and a good reason to spend time with him usefully.
Video about crafts
Crafts from Kinder eggs and plasticine: