A graphic still life is easier to make than with paints. However, to create a beautiful drawing, you will need to practice your pencil skills and hatching. The examples for copying, discussed below, show the most important rules for constructing a composition, maintaining proportions, applying light and shade, and mixing colors.
Simple Still Life for Little Kids
For children of primary school age, drawing a still life in an academic style with respect to proportions and light and shade is a difficult task. This master class offers the simplest version in a primitive technique for children from 3 years old in a primitive technique.
The still life will depict a flower pot. For this work you will need colored pencils or markers and a sheet of paper.
The step-by-step process for creating such a simplified drawing is as follows:
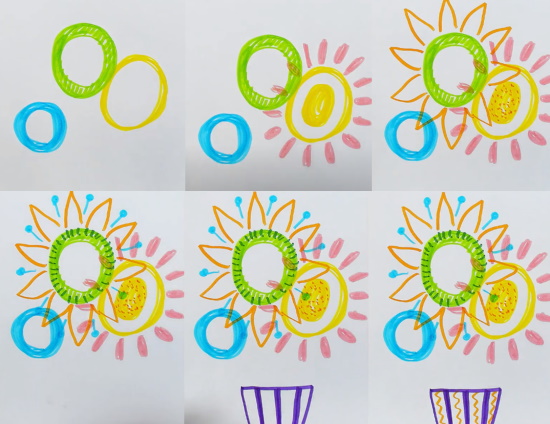
- Draw 3 large circles in different colors, tracing them several times along the contour. You will get rings. You can choose your own colors, not those in the picture below.
- In the center of the right ring, draw and color a yellow oval, and on the outside, along the contour, draw simplified pink petals, also oval in shape.
- Along the edge of the second flower, use an orange pencil to draw petals resembling a sunflower, and on the first flower, use dots to show orange stamens.
- On the second flower, draw strokes with a dark green pencil and blue "stamens" on the outside. You can use any other figures, without limiting the child's imagination.
- At the bottom of the sheet, draw a trapezoid with wide stripes. This will be a flower pot.
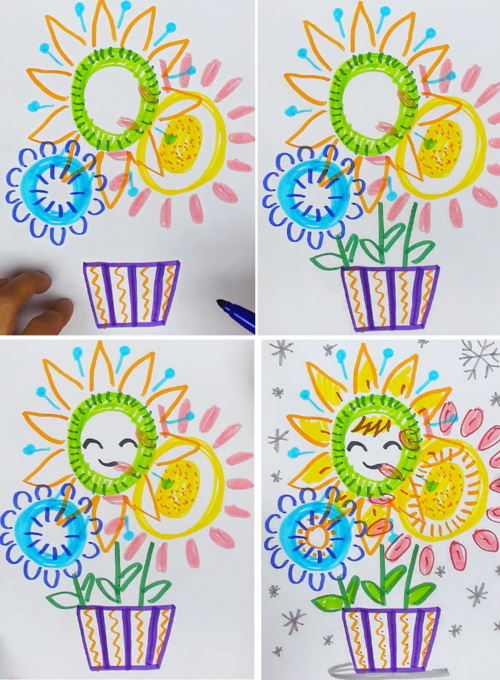
- Add orange stripes or create your own original pattern on the pot.
- Along the edge of the third flower, depict petals in the form of semicircles, as well as stripes radiating from the center.
- Draw the stems and leaves with a green pencil.
- On the middle flower, draw eyes and a mouth using arcs.
- You can add other details as shown below:
Still life with a jug and an apple, simple pencil
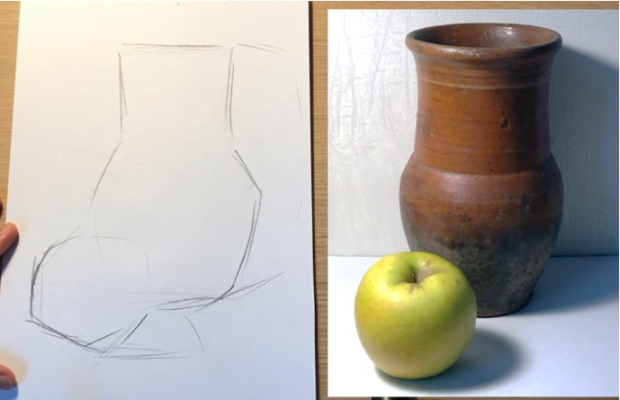
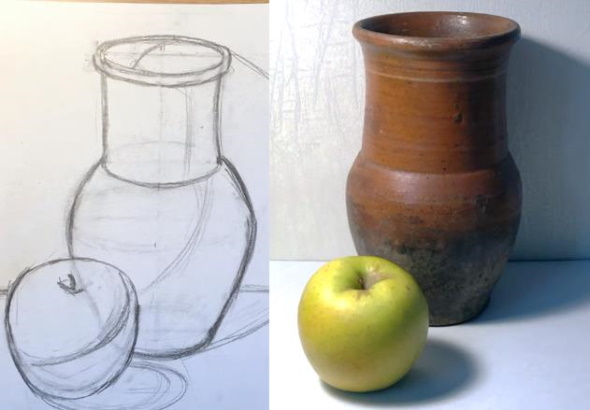
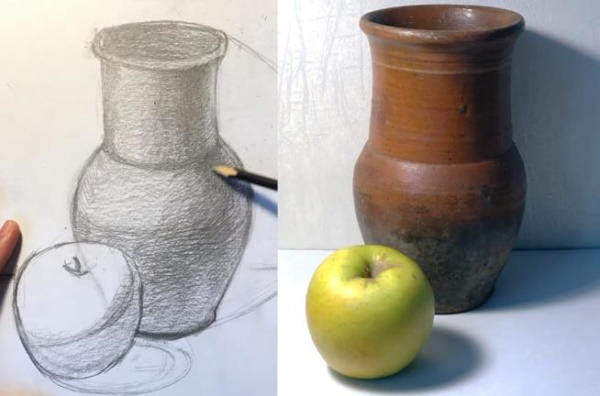
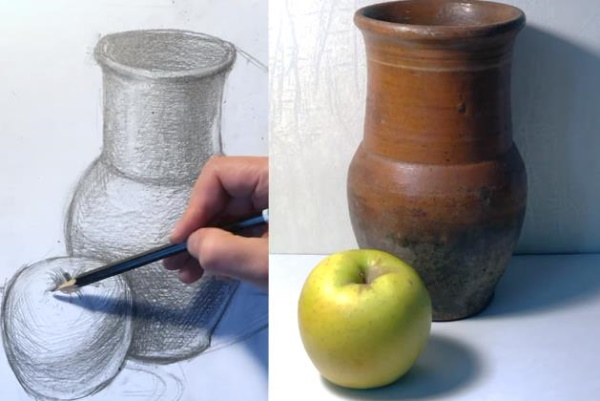
The still life in pencil for copying in this example consists of two simple objects - a jug (a milk jug) and an apple. To draw any still life, you first need to analyze it.
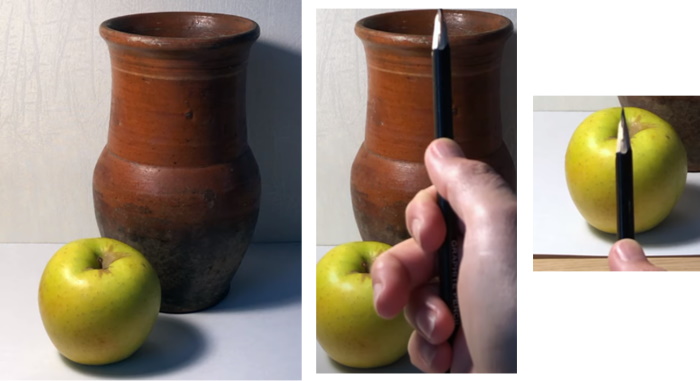
The jug consists of two elementary geometric bodies - a cylinder at the top and a rounded shape at the bottom, resembling a ball. The apple is also a simplified version of a ball.
On the left, these objects show brighter light and highlights (light spots), and on the right, their own shadows. The transition from the illuminated area to the darker one is not sharp, but smooth, in the form of half-shadows.
After the shadow on the right, you can see a light part - a reflex, on the apple and on the jug. It is reflected light from the paper on the table.
Shadows also fall on the table from the apple and the jug. They also have uneven shading. Directly under the object, the shadows are darker. The further the shadow moves away from the object, the lighter it becomes.
And the farthest edge of the shadow is completely unclear and dissipates. Analysis of light and shadow is necessary for the correct application of shading. For work you will need 4 simple graphite pencils of different hardness: TM (or HB according to foreign standards), 2M (2B), 6M (6B), a sheet of A4 paper (landscape sheet) and an eraser.
The step-by-step process for drawing such a still life is as follows:
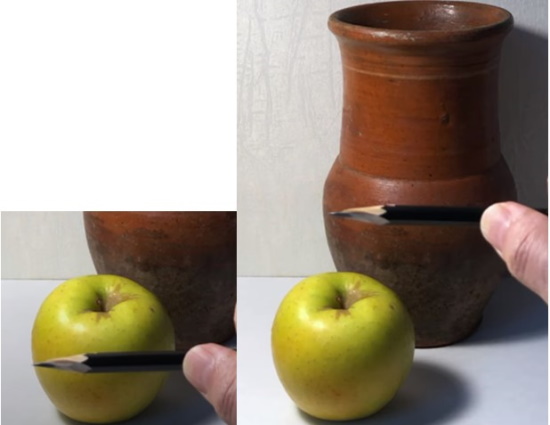
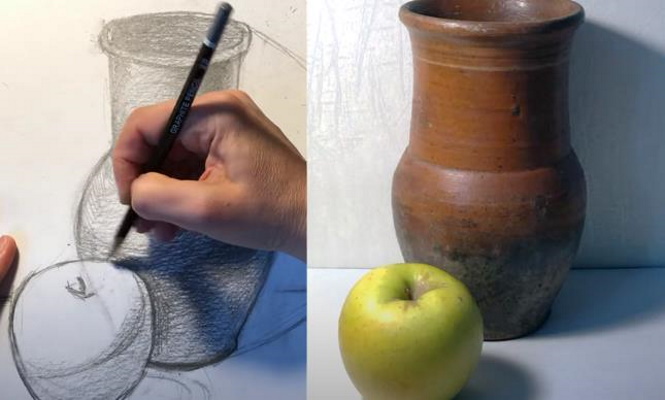
- The construction of any graphic drawing begins with the creation of geometric shapes. Measure the height of the apple, as shown in the photo below. Without bending your arm, at the same distance from your eyes, count how many times the apple fits in the jug by height. Then measure these values horizontally.
- On a sheet of paper, draw the outlines of the jug and the apple, as well as their shadows on the table. The jug should not be located directly in the center of the sheet, but slightly shifted to the right.
When drawing, it is necessary to take into account the relationship of the proportions of these two objects, determined earlier with a pencil. The objects should not be too large - otherwise their shadows will not fit, and too small, when there is a lot of empty space around.
Drawing outlines as line segments rather than smooth lines makes it easier to arrange objects.
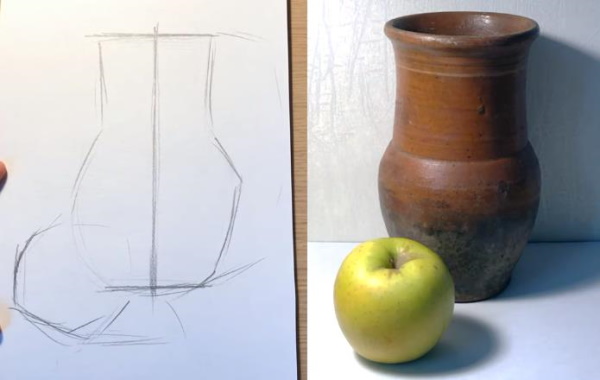
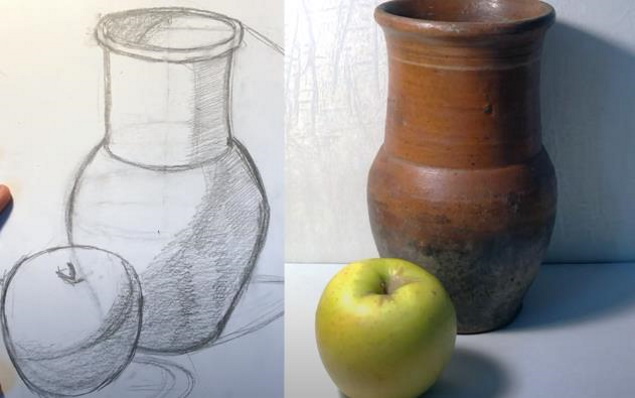
- Draw a vertical line - the axis of symmetry of the jug. To check the symmetry, you can use this technique: turn the drawing over and then it will be easier to see that it is drawn crooked.
- From the top edge, measure the same distance to the left and right. Mark a trapezoid with a pencil, and make an ellipse inside it. Its sides should be rounded.
- At the bottom of the cylindrical neck of the jug, draw a horizontal axis and another ellipse. It should be wider than the top one, as it is located lower vertically. The artist's eyes look at it as if from above, so it looks wider.
- At the bottom of the jug, perform similar actions and show an even wider ellipse.
- Draw another ellipse at the widest part of the jug.
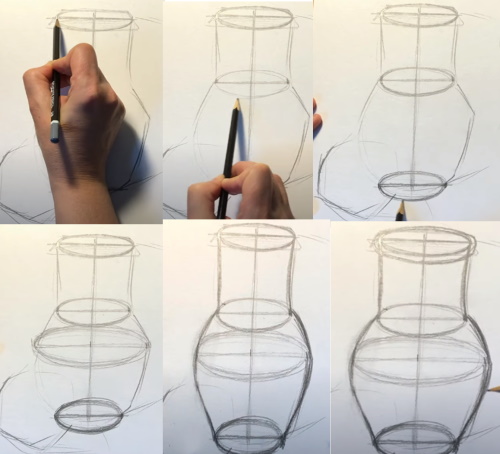

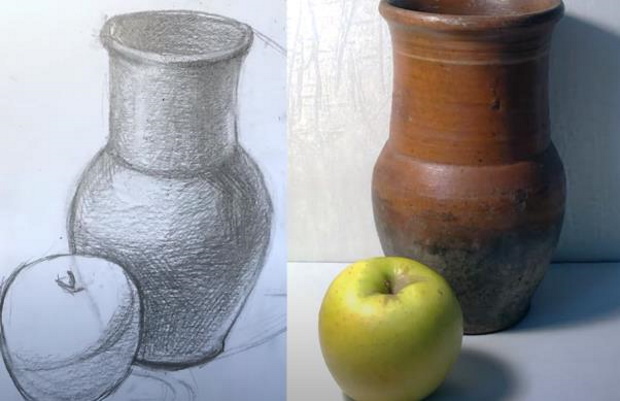
- Draw the side lines of the jug more clearly. They should be slightly concave at the top, spherical in the middle, and slightly curved at the bottom.
- Check the drawing for symmetry and correct the lines. Draw an ellipse-shaped rim at the top of the jug. It should taper towards the background.
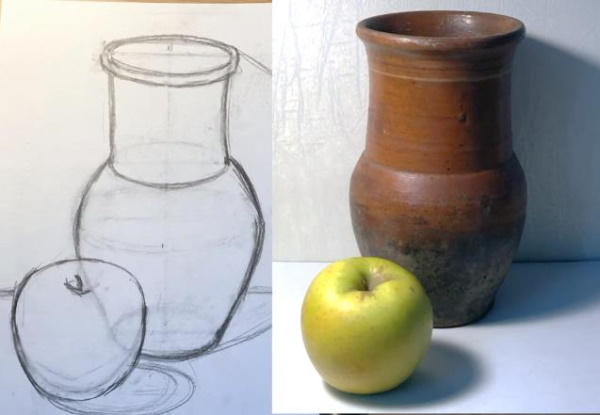
- Draw the contours of the apple - round them, show the upper part of the apple a little wider, and the lower part - narrower.
- Add a hole – a depression and a branch in it – at the top of the apple.
- Draw a horizontal line for the table.
- Erase the lines that should not be visible, horizontal and vertical axes.
- Draw the shadows falling from the jug and the apple onto the table.
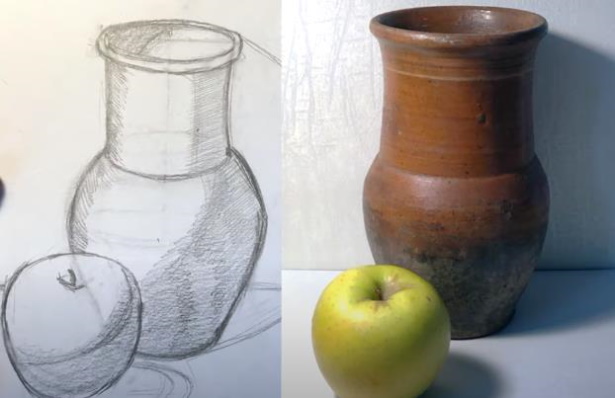
- Draw lines on objects that show their own shadows. On the spherical part of the jug and the apple, they are arranged in a circle.
- Apply the general tone of shadows as shown in the picture. The strokes should be applied in one direction.
- Make a half-shadow on the other side of the jug.
- Shade the jug. It should be darker than the apple.
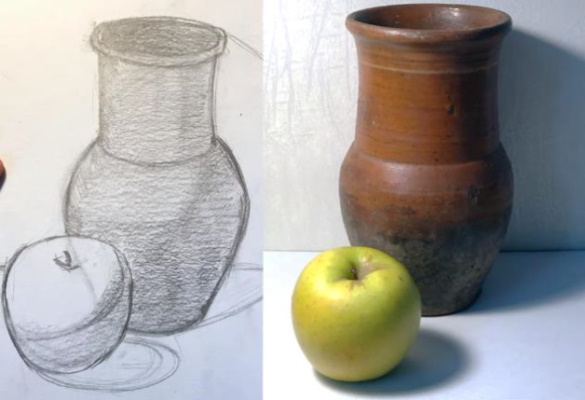
- Strengthen the shadows on the jug. In order to get smooth transitions between the shadows, they are painted with short strokes. On the right, you need to leave a lighter area - the reflex, which was mentioned above. If it turned out to be too dark, you can erase it with an eraser.
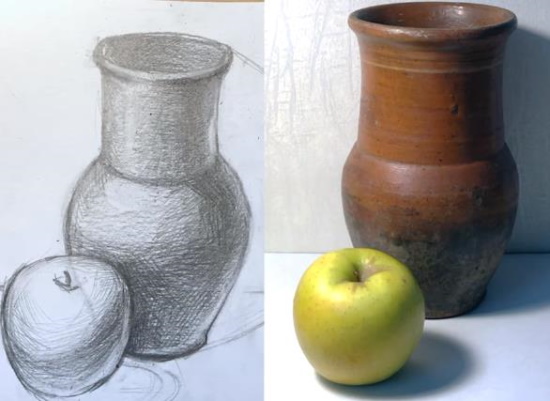
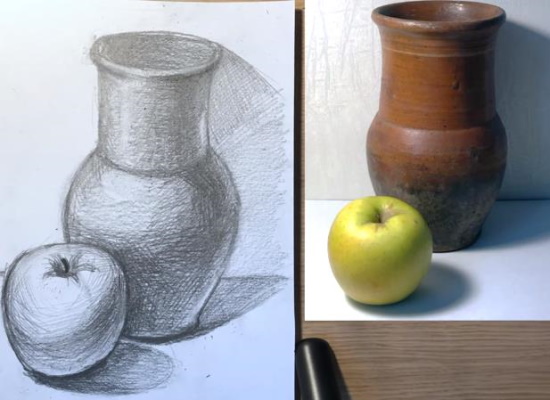
- To make the apple appear in the foreground, cast a small shadow from it onto the jug.
- Darken the edge of the bottle neck with hatching, and, on the contrary, lighten the highlights with an eraser.
- Apply shading to the apple, pressing lightly on the pencil. Lighten the reflection along the right edge.
- Darken the hole in the apple with short radial strokes. Draw the branch more clearly.
- Shade the shadows falling on the table and the wall. On the table, they should be depicted with horizontal strokes.
- Make a light shading to show the wall.
Still life with a pencil for copying requires a realistic depiction of objects.
In order to make the construction of figures in the drawing more symmetrical, the length of the segments is checked with a pencil, as shown in the first steps of drawing. In this example, the contours of objects are depicted with a soft graphite pencil for clarity.
But when drawing, they need to be made thinner and less noticeable, without pressing too hard, then when erasing extra lines, the drawing will not be so dirty.
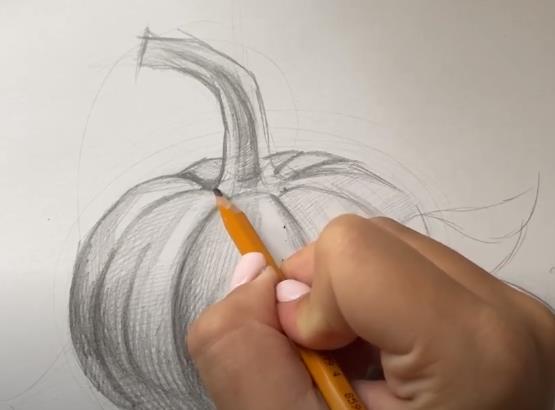
Before shading, pencils need to be sharpened to a greater depth so that their cylindrical part does not interfere. Such sharpening can be done with a knife.Adults should sharpen children's pencils so that they don't hurt their hands.
For ease of shading, the little finger of the hand should rest against the album sheet. In this case, only the wrist joint works, and not the whole hand. The technique of drawing a still life, discussed in this master class, is basic and can be used to create other drawings.
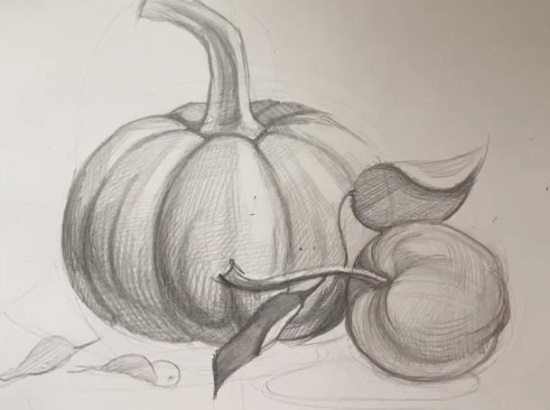
Pumpkin and apple
The still life considered in this master class is also made with a simple graphite pencil. The principles of its creation are the same as in the previous example for copying, but the shading is made more detailed.

For work you will need 3 simple pencils of hardness 2H, 2B and 4B, an eraser and a sheet of paper. Soft pencils should be sharpened to a height of about 1.5 cm.
Step by step drawing process:
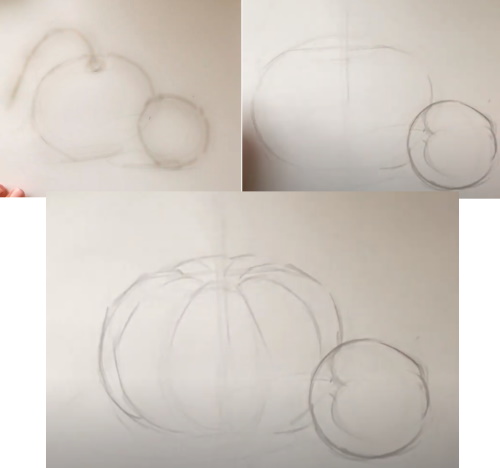
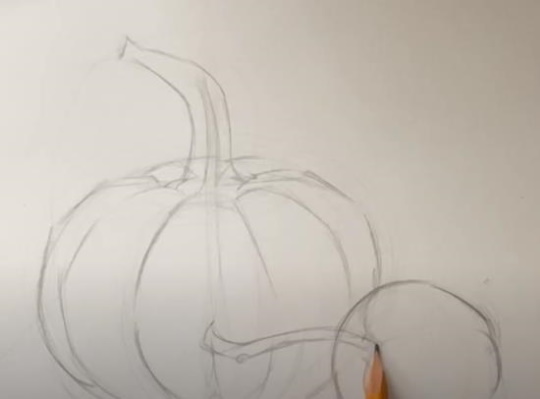
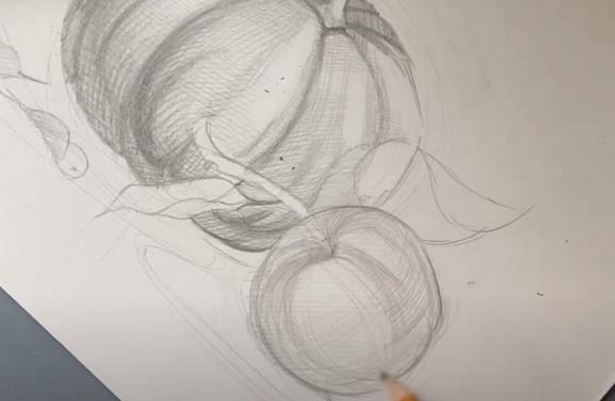
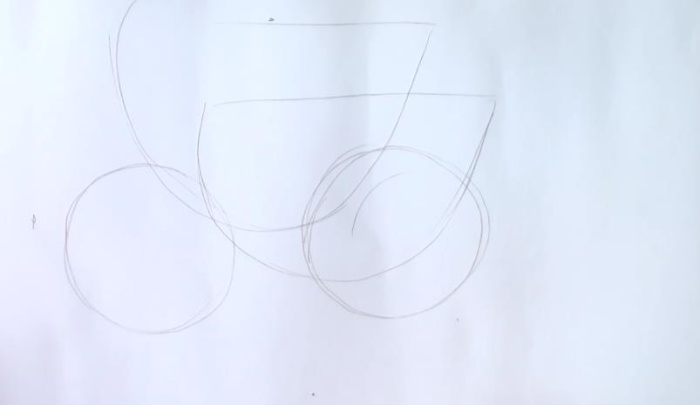
- Sketch the location of the pumpkin and apple with a hard pencil. Move the pumpkin slightly to the left of the center of the sheet.
- Draw the outline of the depression at the top of the pumpkin and its branch.
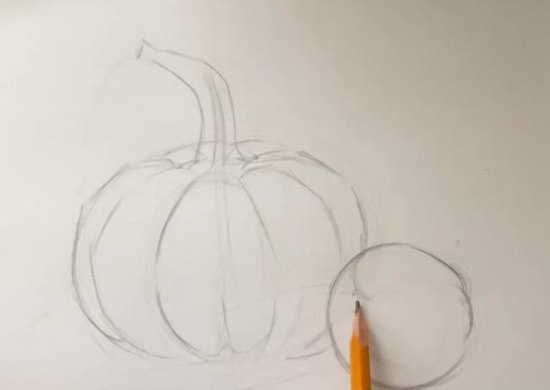
- Use a 2B pencil to show the roughness of the apple's surface.
- Draw the vertical axis of the pumpkin, and make the top and bottom of the vegetable more flattened.
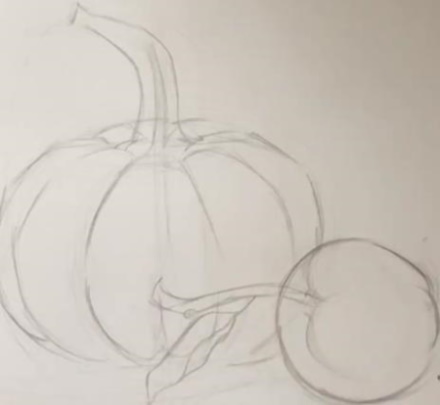
- Sketch out the wedges on the surface of the pumpkin, which show its volume. This is easier to do with straight strokes, which are then rounded.
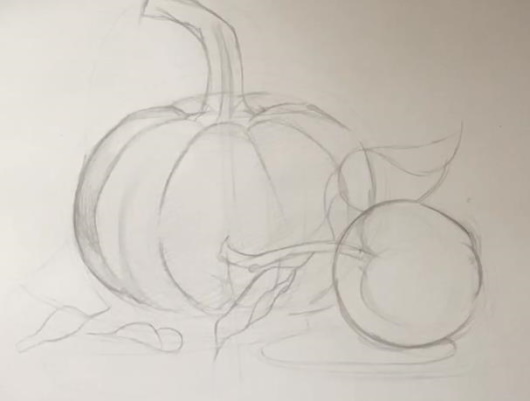
- Draw the pumpkin branch more clearly, showing its bifurcation at the base.
- Draw a curved apple branch.
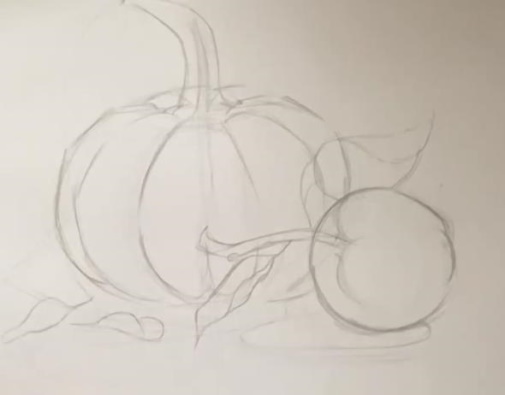
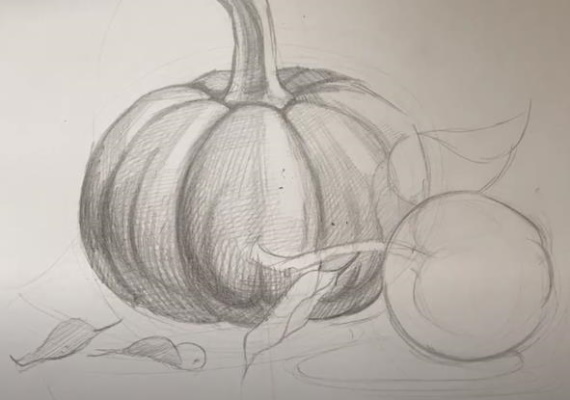
- To the left of the branch, draw a narrow, half-dried leaf in the form of an elongated figure with wavy edges.
- To the right of the branch, draw a leaf that is a little wider and more open.
- Add an oval shadow under the apple, and draw two more leaf outlines under the pumpkin.
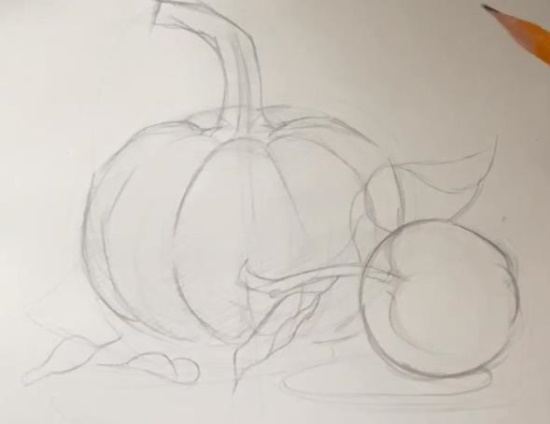
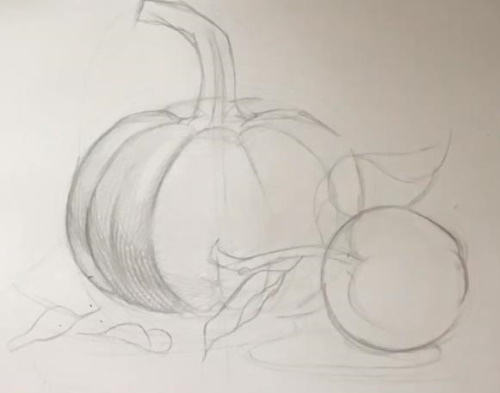
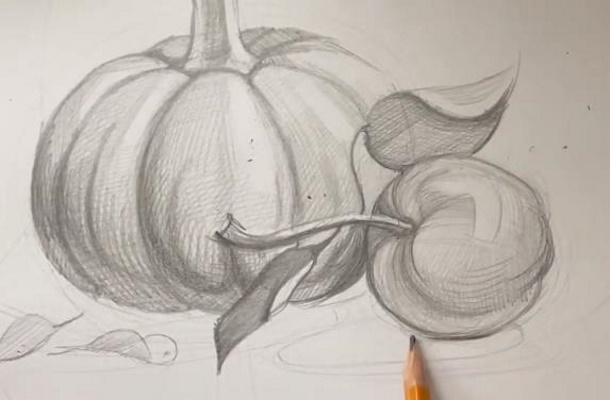
- Apply light shading to the lobes with the same pencil without pressing hard. The lighting will be shown on the right. For more even shading, you can rub the surface with your finger or a piece of paper.
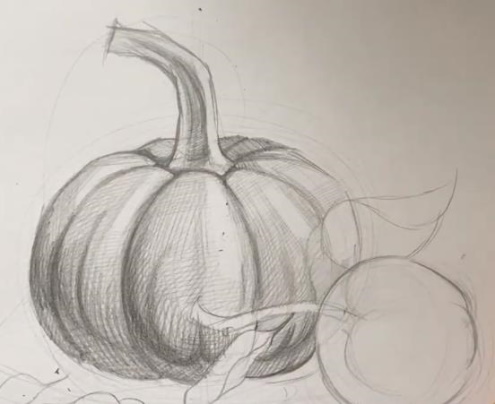
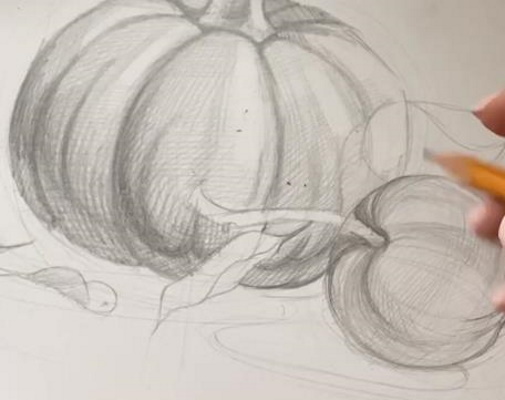
- Shade the left slice of the pumpkin darker. It should be lighter on top.
- “Divide” the next pumpkin slice into two parts down the middle.
- Apply your own shadow to this slice, not forgetting about the reflex at the bottom. From above, erase the highlight on the right half of the slice with an eraser. In the lower part of the slice, the hatching can be applied crosswise.
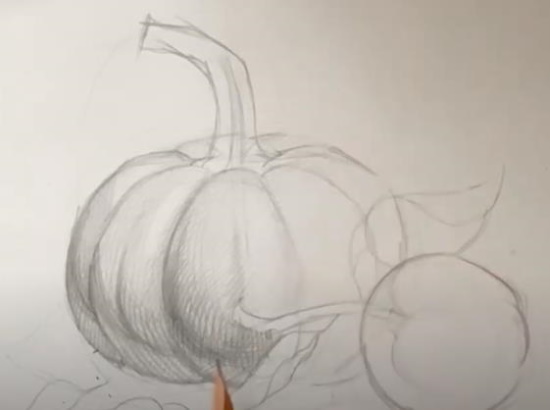
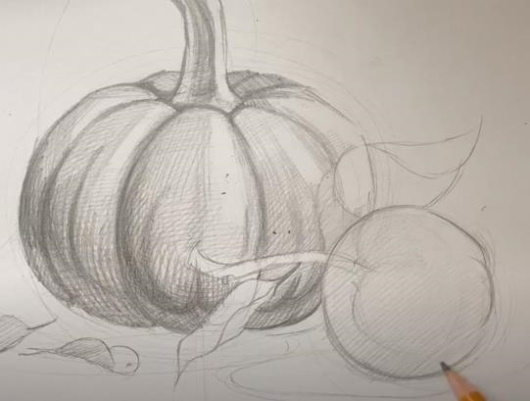
- Shade the next pumpkin slice in the same way. Where the outline is rounded more strongly (at the bottom), also apply the shading in arcs. Strengthen the shadows on the first two slices.
- Darken the remaining slices, simultaneously working on the previous ones. Lighten the highlights on the right edges of the slices with an eraser. Make the back slices darker.
- Shade the pumpkin branch, first with light pressure, then show additional details. Make it darker in the middle.
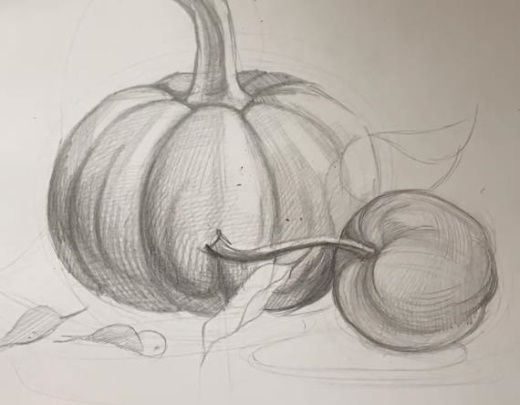
- Make the place where the branch meets the pumpkin darker, and lighten the highlight on the right side of the branch using an eraser.
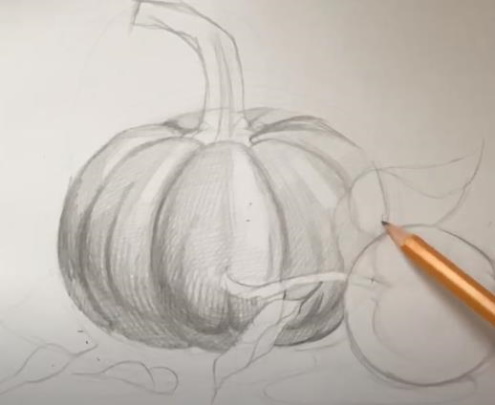
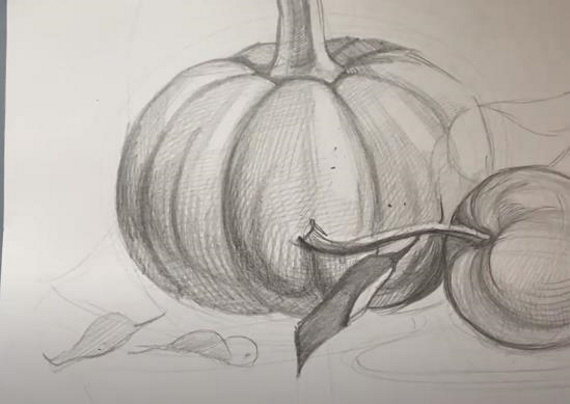
- Shade the leaves to the left of the pumpkin with a pencil. Draw them darker at the bottom.
- Make light shading at an angle on the apple.
- For ease of drawing, turn the sheet and cover the hatching with lines drawn in the shape of an apple (arcs).
- Strengthen the shading on the apple with a soft pencil in the area where the branch emerges from the fruit, as well as along the edges.
- Darken the shadow of the apple branch on the pumpkin. On the branch itself, depict your own shadow on its lower part.
- Shade the apple leaf on the left side with a dark color. Since the leaf is turned away from the light, there is a shadow inside it. Leave the right side of the leaf light.
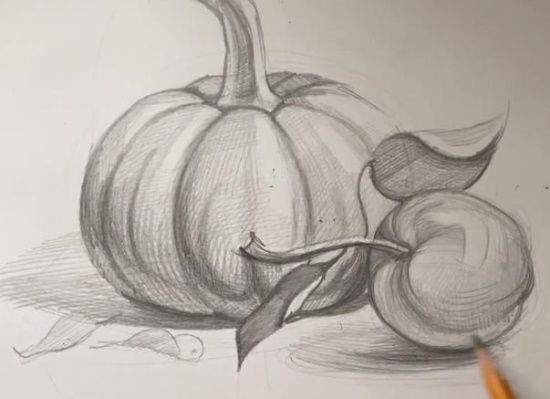
- Shade the second apple leaf in the same way. Apply a darker color to its left side.
- On this sheet and on the apple, lighten the highlights with an eraser and emphasize them with a pencil.
- Shade the falling shadows under the apple and pumpkin. Directly under the objects, such shadows should be darker, and when moving away from them – lighter. The drawing is ready.
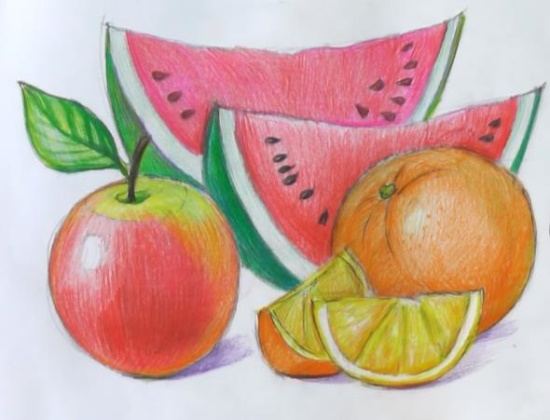
Fruits with colored pencils
The still life with a pencil for copying in the example described below is done in color. To create a preliminary sketch, you will also need a simple graphite pencil and an eraser.
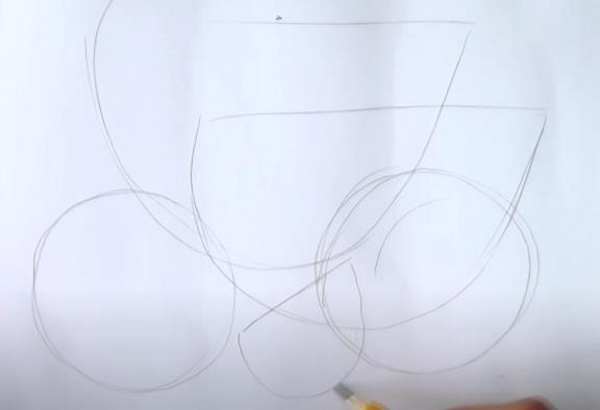
The technique of drawing a still life with fruits consists of the following steps:
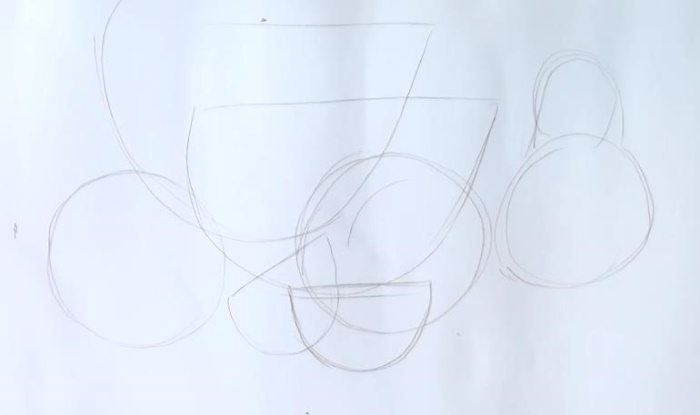
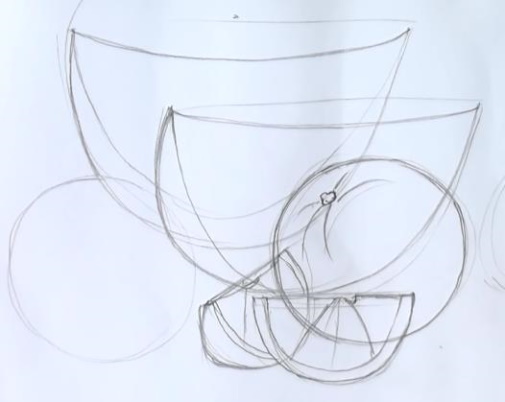
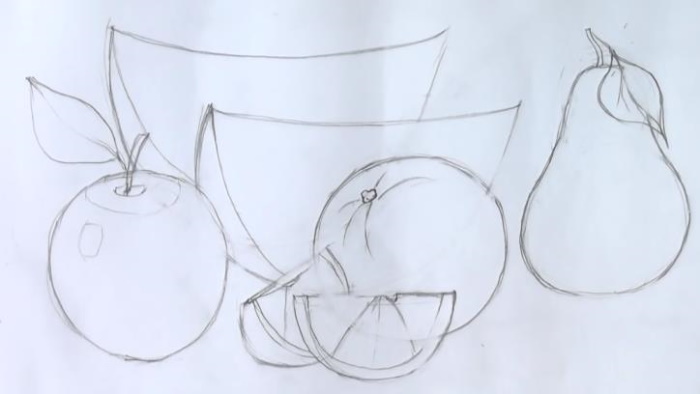
- A little to the left of the center of the sheet, draw two semicircles with a simple pencil – watermelon slices.
- To the left of them, at the bottom of the drawing, add a circle – the outline of an apple.
- In the center of the sheet, next to the watermelon slice, draw a circle of approximately the same size – the outline of an orange.
- To the right of the apple, draw a cut off orange slice, with the straight edge drawn at an angle.
- In the foreground, draw a second orange slice with a horizontal edge.
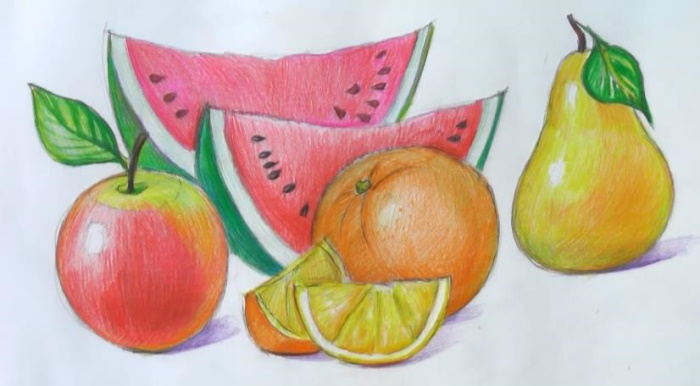
- Draw the outline of the pear in the form of two circles – large and small.
- Draw the first slice of the watermelon more clearly, and round off the top edge a little.
- Work on the second slice in the same way. Draw the peel only on the left, as the slice will be slightly turned. On the orange, draw a small oval with uneven edges - the place where the stalk is attached, from which draw several diverging arcs.
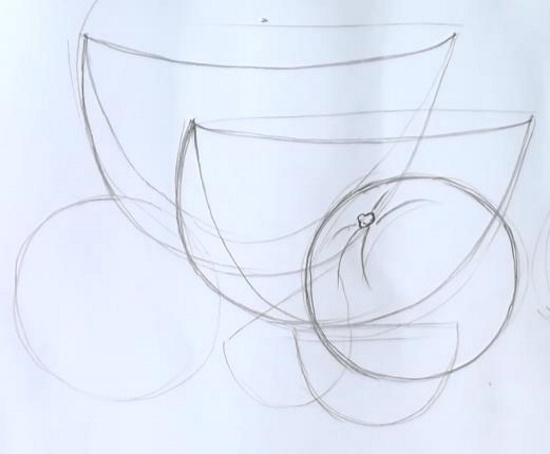
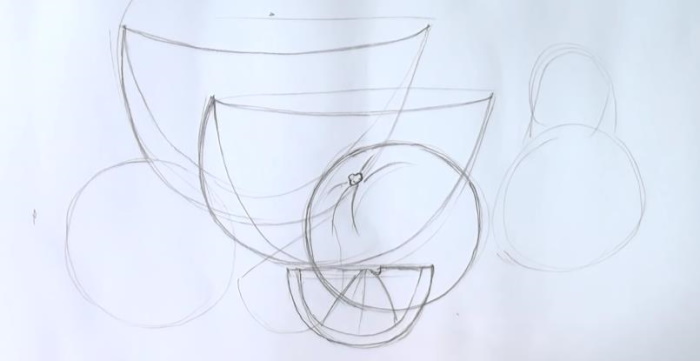
- On the orange slice in the foreground, draw the peel - an arc repeating the outer contour, as well as the segments of the fruit.
- Show the peel of the second orange slice in the front part of the wider one.
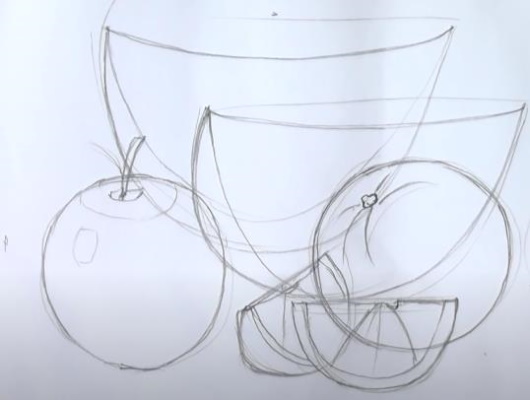
- On the apple, at the top of the fruit, draw a small oval - the place where the stalk is attached, and a larger oval, which will show the border of the transition from one color to another. Also add a curved branch and a highlight on the left.
- Draw a leaf on the branch using curved arcs and mark its vein in the middle.
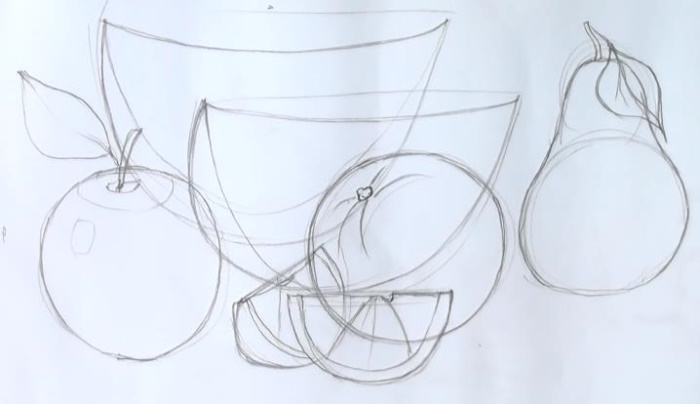
- Refine the outline of the pear.
- Add a twig and a leaf tilted downwards on top.
- Erase auxiliary contours and lines that should be invisible with an eraser.
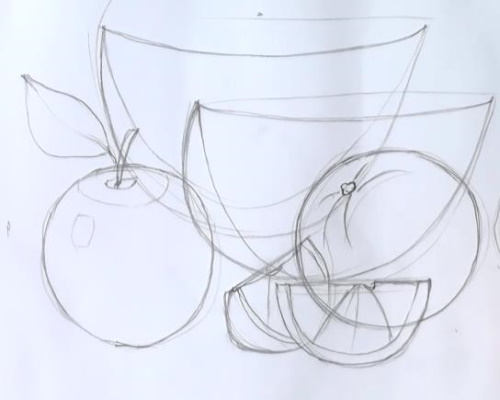
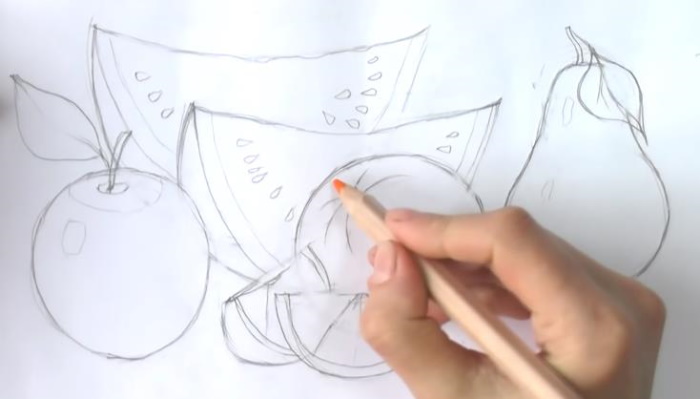
- Draw teardrop-shaped seeds on the watermelon slices.
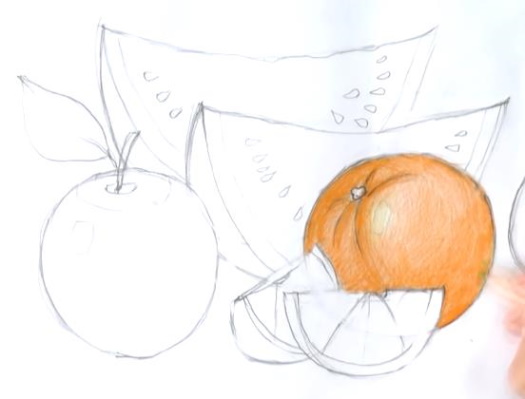
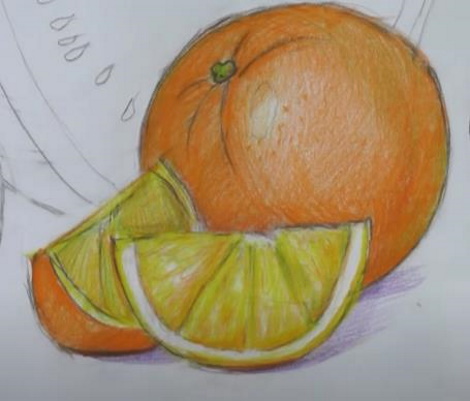
- Color the orange with an orange pencil, a darker shade on the left, leaving a highlight at the top.
- Make shadows with the same pencil on the orange in the background near the stem and at its bottom.
- Paint the orange stem green and add a few strokes in the shaded areas.
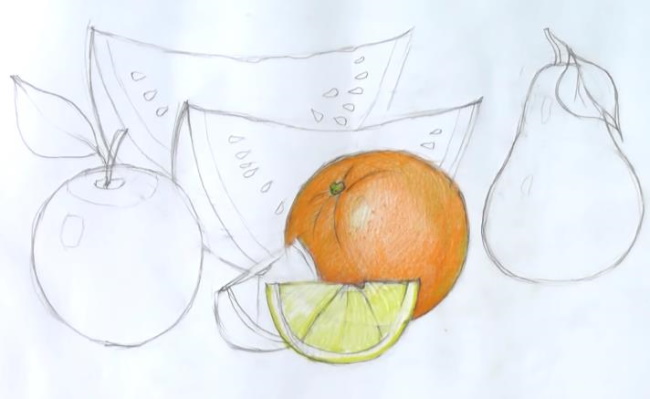
- Shade the orange slice with a light yellow pencil. The strokes should be applied according to the shape - where the pulp is, they are made in the direction from the center to the edges.
- Shade the edges of the segments with an orange pencil. Also apply orange strokes to the pulp, remembering to leave light veins - highlights. Leave the strip of peel in its central part light.
- Paint the peel of the second orange slice a brighter orange color, since its outer surface is visible in the picture. Shade the pulp light yellow.
- Use an orange pencil to apply a shadow from the first slice.
- Add touches of green to the veins.
- Use a purple pencil to apply falling shadows from the slices and orange.
- Colour the watermelon slice on the left with a grassy green pencil.
- Then apply a second layer of shading with a green pencil of an emerald shade. With the same pencil, without pressing, color the thickness of the peel.
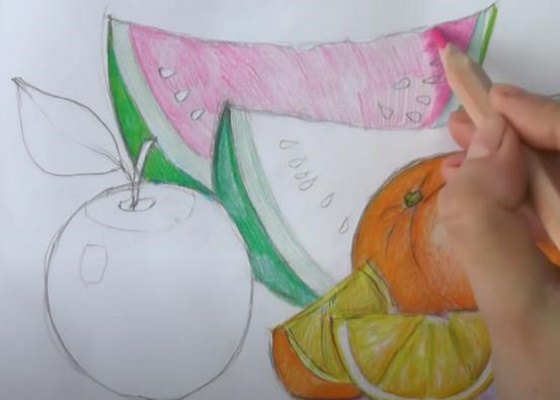
- Similarly, paint the rind of the second watermelon slice. Shade the watermelon pulp in 2 layers with a pink pencil.
- Apply another layer of red shading on top.
- Color the seeds with a dark brown pencil.
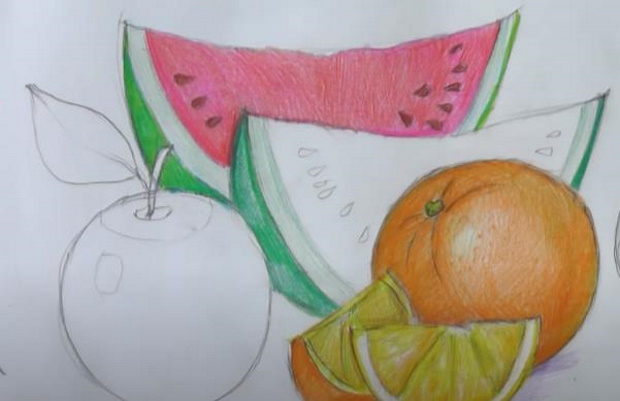
- Color the second watermelon slice in the same way. Add some pencil strokes to its lower part to create a shadow.
- Paint the apple's surface on the top and right with a light green, grassy color. Add an emerald shade under the branch.
- Color the right edge of the apple orange.
- Paint the left side of the apple with a red pencil in 2 layers, leaving a highlight. The red strokes should partially overlap the green areas to create a smooth color transition.

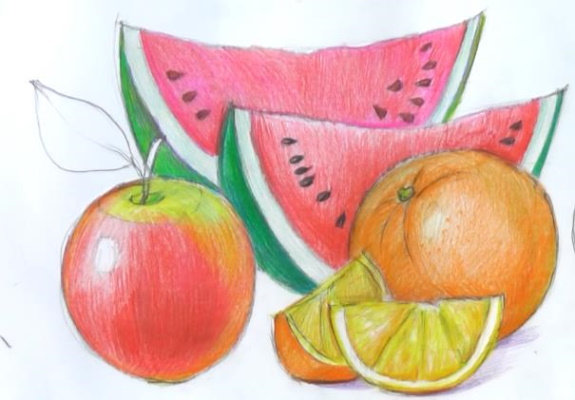
- Color the apple branch with a black pencil. Apply several layers to the sheet - first grassy green, then emerald. Draw the veins on it.
- Add purple shading to the shadows under the fruits.
- Color the pear with a yellow-green pencil, leaving two highlights. If you don't have a pencil of this color, you can first apply yellow shading, and then with a grass-colored pencil.
- Shade the pear with an orange pencil, intensifying the color on its right side. Try to apply the strokes in such a way as to emphasize the shape of the fruit.
- Paint the pear branch black, the leaf emerald, adding grassy strokes along the veins.
- Add the finishing touch - a purple shadow under the pear.
A still life drawn with a pencil for sketching will turn out more realistic if you use glazing - layered application of several colors.
As a result, you can achieve many new shades from a minimal set of 12 pencils. You can also use a pencil blender to mix colors on paper.
To create a still life with a pencil, you can suggest compositions from other objects - books, cups, geometric objects.
It is best to start with simple options for copying., gradually moving on to more complex ones, with curvilinear forms and color gradients - vegetables, fruits, flowers, glassware. The principles of their drawing are the same as in the basic examples discussed in this article.
Video about drawing
Still life with a pencil for copying:
You are taking a very beautiful risk, but there is one thing, but you did not draw the apple jug correctly, your jug turned out too high, in reality it is wider and longer at the top, and flattened at the bottom and looks more like a coffee mug.
I won't even mention the apple, in reality it is round, but for some reason you stretched it out from above, take a closer look, your drawing is not similar at all. I agree it is very beautiful, but either you were in a hurry and it turned out that way, or you need to learn to measure proportions:(