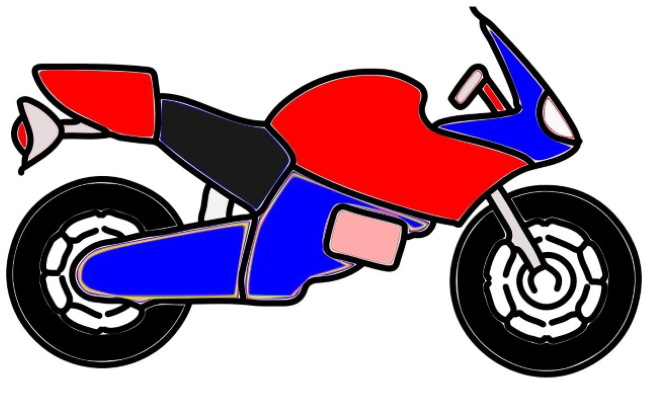
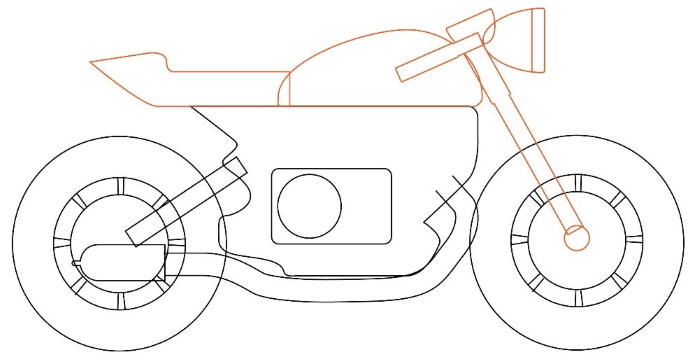
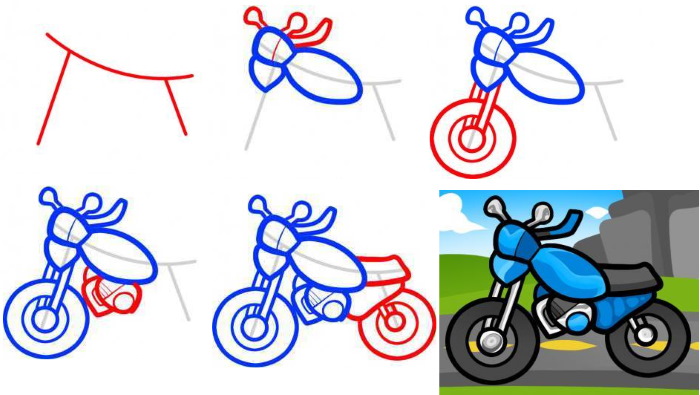
A motorcycle is a two-wheeled vehicle equipped with a mechanical engine. It is quite easy to draw if you use a step-by-step process to complete the work. Simplified drawings are more suitable for children.
The most iconic brand of motorcycles is Harley-Davidson. Keanu Reeves also contributed to this popularity. The actor spent part of the proceeds from the film "The Matrix" on motorcycles of this brand for all the stuntmen who took part in the filming of the movie.
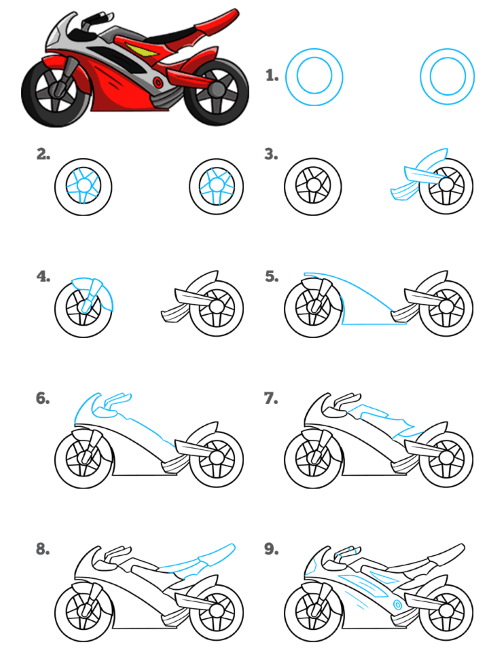
Pencil drawing
A motorcycle (a drawing for younger children can be created using geometric shapes) is a complex vehicle that often appears in cartoons and movies. You can see it in old episodes of "Well, Just You Wait!", the 1987 full-length anime "The Legend of Motorcycles".
To draw a motorcycle, you will need the following tools:
- simple pencil;
- eraser;
- sharpener;
- sheet of paper;
- compass;
- ruler.
To prevent the child from getting hurt by the tip of the compass while doing the work, you can use various round objects.
The step-by-step process of doing the job is simple:
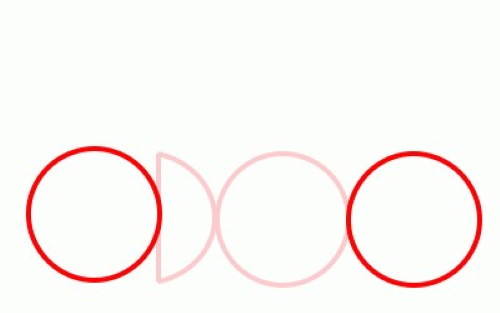
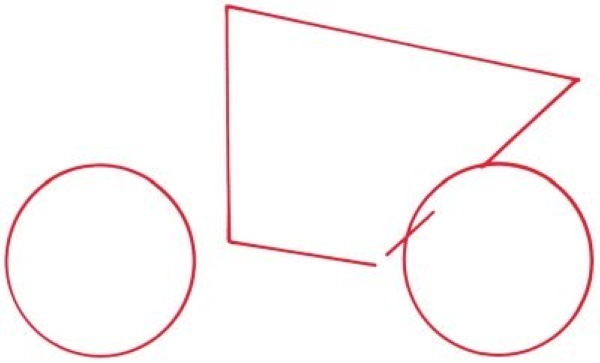
- On a clean sheet of paper, you need to draw 2 circles. The distance between them should be 1.5 of their original size.
- For accuracy, you need to draw 2 circles next to each other, and then draw another semicircle. Then you need to draw the final circle.
- The figures that are in the middle must be removed using an eraser.
- To make the process easier, you only need to press lightly on the pencil while drawing lines.
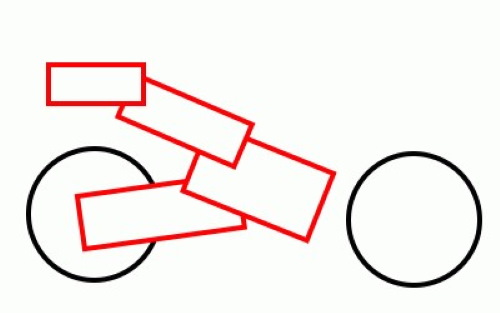
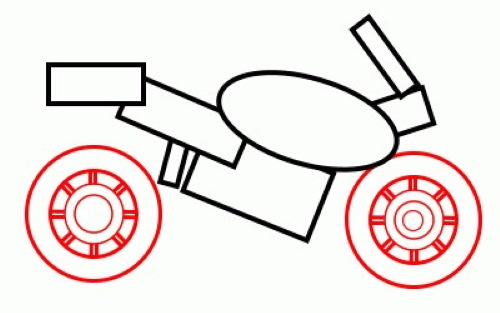
- Using a ruler, you need to draw 4 rectangles (as shown in the picture). They will create the body of the motorcycle. It is important to follow the proportions and rules for the arrangement of geometric figures.
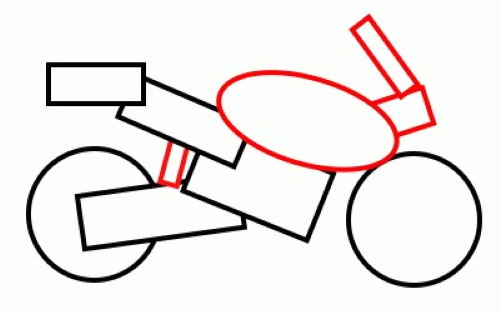
- At the top of the drawing, you need to draw an oval. It should touch the circle line and also touch 2 rectangles.
- From the side of the oval, you need to draw 2 rectangles that form the control panel. You also need to draw a small rectangle between the previously drawn figures - on the left side of the drawing.
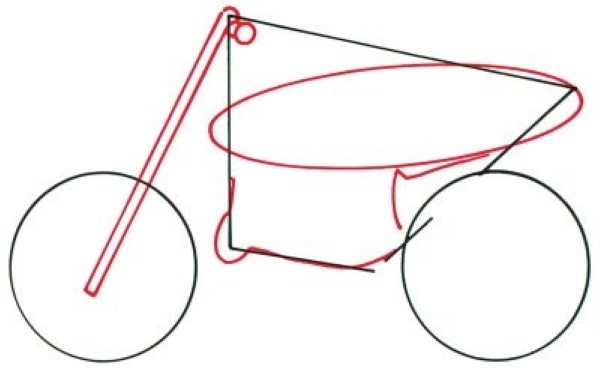
- When the basic shape is ready, it is necessary to proceed to detailing the drawing. Inside each wheel, it is necessary to draw several circles of different diameters. It is necessary to depict the texture of the disks and rims of the wheel with broken lines.
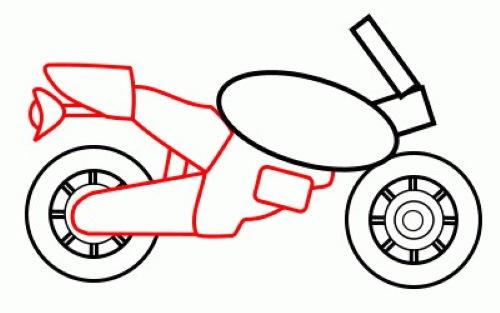
- A more detailed motorcycle body needs to be drawn over the prepared wheels. The lines need to be made smoother and more proportional.
- You also need to add the taillight and suspension - as shown in the picture. For this, simple lines are used, which are easy for a child to draw.
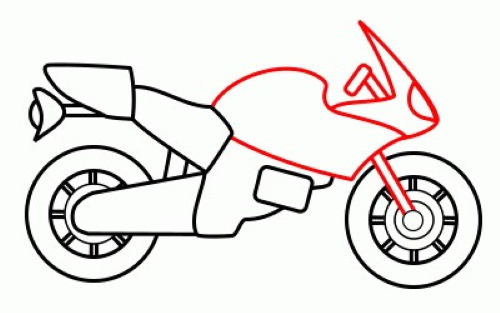
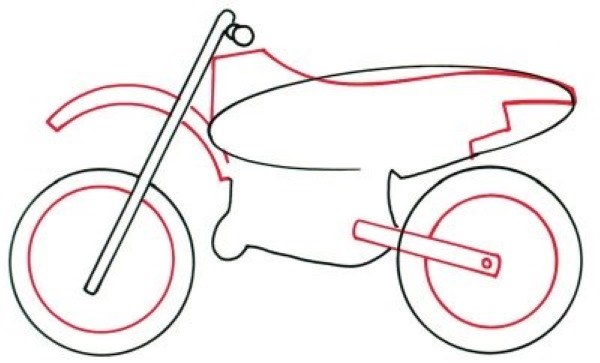
- The prepared motorcycle body also needs to be worked out: the gas tank and the dashboard need to be detailed. The lines of the gas tank are smoother and rounder, and the dashboard has sharp angles and rectangular shapes.
Once the drawing is ready, you can give it any color, or outline the lines with a black marker or gel pen - for greater accuracy. You can also use various hatching techniques to indicate light and shadow on the resulting image. All unnecessary parts of the motorcycle must be erased with an eraser to achieve clarity of the image.
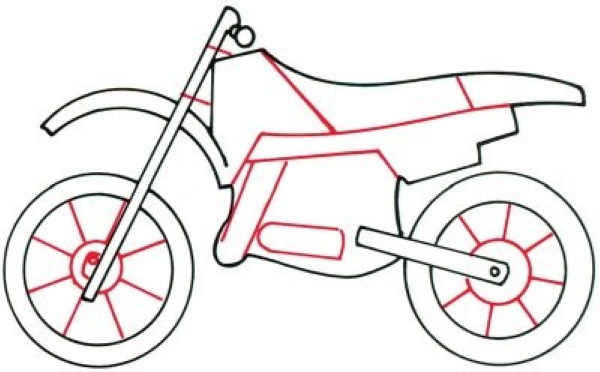
Older children can also draw a sports motorcycle. For them, the work will be more difficult, but the effect will look natural.
Stages of work execution:
| Stages | Description of the stage | Image |
| 1 | First, you need to draw the body of the vehicle. It looks like a curved boomerang or the outline of a large bird. In the process, it is important to work using jagged lines. There is no need to press on the pencil, as later you will need to remove excess elements with an eraser. |  |
| 2 | The lower part of the motorcycle must be applied to the prepared drawing. It is also important to use only light strokes. You need to draw the motorcycle wheels and the steering wheel outlines manually. To create a circle, you need to use short lines. Later, you can connect them into a regular figure. | 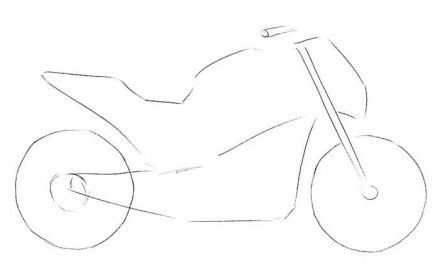 |
| 3 | The basic shape of the vehicle is ready, so you can add detail to the drawing. First, you need to make the lines of the steering wheel and the front panel of the motorcycle more obvious and clear. You can use a ruler or any materials at hand. |  |
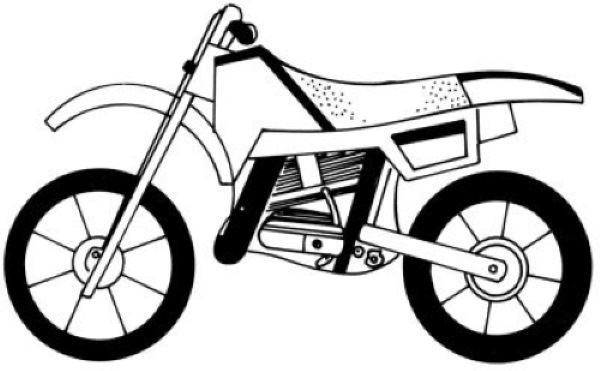
| 4 | The main body of the motorcycle needs to be detailed by adding diamond-shaped and rectangular parts. The elements also need to be more actively highlighted with a simple pencil.
If there are any extra details or strokes, you need to remove them with an eraser. | 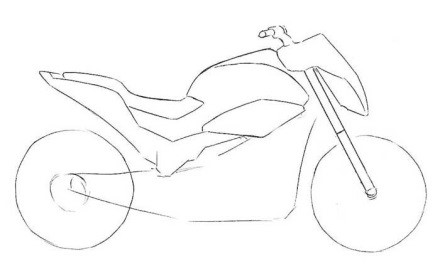 |
| 5 | The lower part of the drawing also needs to be supplemented with elements. To draw a circle, you need to use a compass - this way the element will be clearer.
The main elements should be outlined in pencil in advance to mark the area to be worked on. | 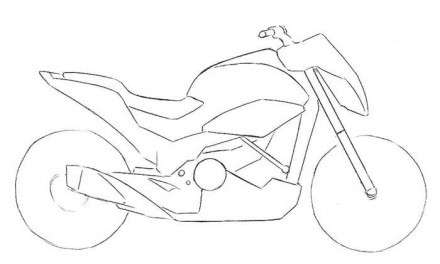 |
| 6 | Using a compass, you need to make the wheels more round and neat. You can first visually mark the middle of the circle to get a point for the compass.
Inside each wheel, you also need to draw another circle. As you can see, the circle is slightly larger near the rear wheel. It is necessary to add elements to the resulting wheels. It is important to draw a wing to the front wheel, add disks and rims. | 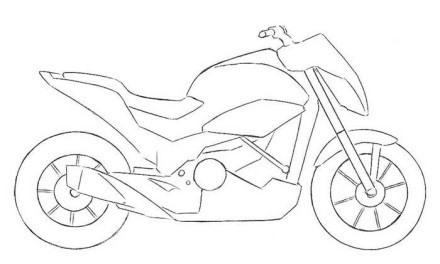 |
| 7 | Visually, it is necessary to mark the places of light and shadow. They are located depending on the environment in which the motorcycle is located. If the drawing does not have any context or additional elements, then you can use the proposed scheme for the placement of shadows. | 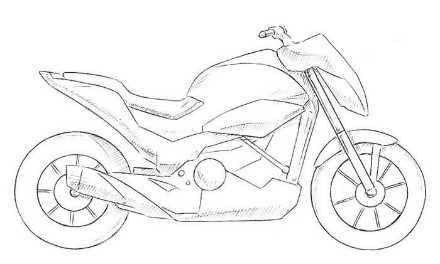 |
The resulting drawing can be colored with colored pencils, paints or markers.
With colored pencils
The motorcycle (color pencil drawing for kids) first appeared in Germany. Gottlieb Deimer invented the vehicle in 1885, it was very unsafe and hardly suitable for transportation.
To complete the work you will need:
- set of colored pencils;
- simple pencil;
- thick sheet of paper;
- eraser;
- sharpener.
You can also use additional accessories such as a compass or rulers.
Stages of work execution:
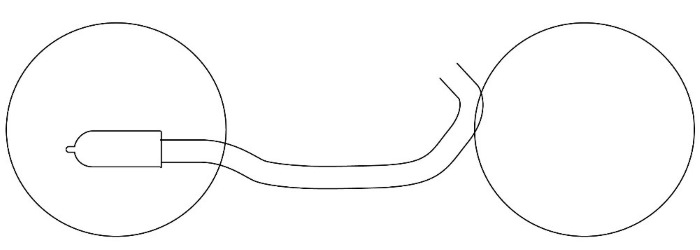
- Visually, you need to draw a horizontal line on a clean sheet of paper. On this line, you need to draw 2 circles. You can use a compass for this. The figures must be equal in size.
- The wheels need to be connected with an exhaust pipe. Its shape and location can be seen in the figure.
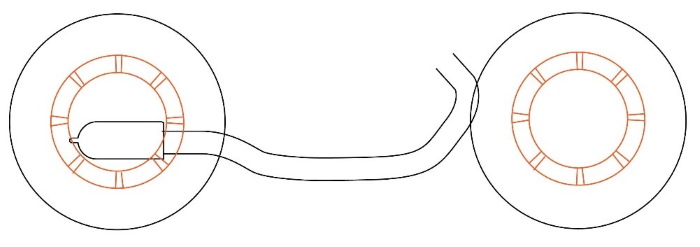
- Inside each wheel, you need to draw 2 circles of different sizes. They will form the wheel disks. Between the prepared circles, you need to draw the spokes.
- Using the upper right side of the rear wheel as a guide, you need to draw the motorcycle engine.
- At the designated point you need to place a long narrow rectangle.
- Working from the rectangle, you need to form the basic shape of the engine - as shown in the picture.
- Inside the resulting engine (at the bottom) you need to draw a rectangle. The corners need to be smoothed.
- On the left side of the rectangle you need to place a circle. You can use a compass to draw it.
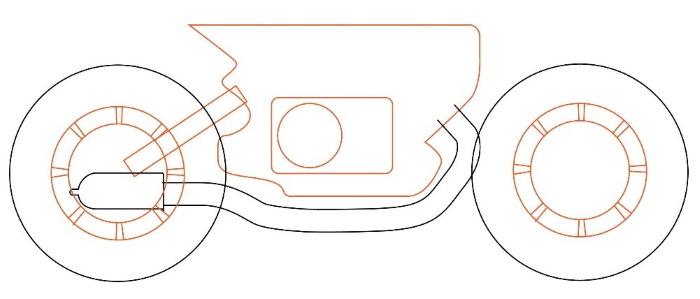

- Using the top edge of the engine, you need to depict the seat and gas tank of the motorcycle.
- The seat is like a rectangle with a triangle at the end. The gas tank is more like an oval with a flat bottom.
- Inside the front wheel, you need to draw a small circle. From it, you need to draw a long rectangle and form the steering wheel of the motorcycle.
- You also need to draw a lantern. It looks like half an oval.
- The resulting elements must be outlined with a pencil. Excess parts must be removed.
- Using a black pencil, you need to paint over the area of the engine and the motorcycle tires.
- The seat can be painted in any color.
- Applying light pressure to the pencil, fill the wheels and spokes, steering wheel and internal engine components with a greyish tint.
- The motorcycle's gas tank needs to be painted with a red pencil.
To get a more vivid result, you can use felt-tip pens to highlight the outline.
Gouache
The motorcycle (a drawing for children in gouache) can be depicted less massive and more detailed. Due to the creamy consistency of gouache, the child will be able to draw details with paint without fear of the paint spreading throughout the drawing.
To draw a motorcycle, you will need the following set of tools:
- a thick sheet of white paper;
- simple pencil;
- ruler;
- compass;
- gouache set;
- palette;
- brushes and a cup.
To remove unnecessary details, you will need an eraser. To sharpen the pencil periodically, you need to prepare a sharpener.
Step-by-step process of completing the work:
- On a sheet of paper, you need to visually measure a vertical line. On one side, you need to draw a small circle using a compass. Having retreated some free space, you need to add another circle, observing the location of the geometric figures.
- Focusing on the right circle, it is necessary to draw a trapezoid, which will slightly overlap the previously drawn geometric figure. The resulting image is the basis for applying further elements.
- On the left side, you need to draw the fork that attaches the steering wheel to the wheel. It looks like a long tube or a narrow rectangle.
- In the middle of the resulting drawing, you need to mark an oval (as shown in the picture). It is also necessary to form the main parts of the engine, using the elements already applied.
- Using an eraser, remove the extra outlines of the motorcycle. Inside each wheel, add another circle of different diameters.
- On the left side, you need to add an arched element that will form the front wing.
- Using thin rectangles, you need to attach the resulting right wheel to the motorcycle engine.
- By eliminating the extra trapezoidal elements, you need to form the remaining part of the motorcycle at the top of the image.
- On the previously drawn wheels, you need to add a few circles and draw spokes.
- Then you need to detail the engine with several elements - as shown in the picture.
- The excess parts of the seat must be removed, and the seat itself must be divided into several parts using slightly inclined lines.
- Optionally, you can add some elements to give the bike more detail. These include a small black square at the top of the cable, as well as the L-shaped shapes at the front of the image.
Once the drawing is ready, you can start coloring the resulting image.
Stages:
- On a palette, you need to mix gouache with a small amount of water until you get a characteristic consistency.
- The motorcycle tires need to be painted black, as well as the spokes and some engine parts.
- The steering wheel and decorative elements of the seats also need to be filled with black paint.
- The main part of the motorcycle needs to be filled with yellow paint, the wing and the elements connecting the motorcycle to the wheels.
- The seat needs to be painted brown.
To draw small details, you can use a black marker or felt-tip pen.
Watercolor
Motorcycle (watercolor drawing for children) can be drawn in a cartoon style. Such a vehicle is suitable for drawing children from 4 to 6 years old.
To complete the work you will need:
- a thick sheet of white paper;
- simple pencil;
- sharpener;
- eraser;
- watercolor paints;
- brushes and tools for working with paint;
- palette.
To make it easier for the child to work with the drawing, you can use an easel or other stands. Such a device allows the child to work more carefully with materials, as well as correctly place the shadow and light on the image.
Stages of work execution:
- First, you need to draw a curved long line, the left part of which will be slightly higher than the right. Having retreated a small distance from the beginning of the line (on the left side), you need to draw an inclined straight line. The same machinations must be carried out on the other side - as shown in the picture.
- On the resulting template, you need to depict 3 ovals of different shapes - as shown in the picture. They will form the gas tank and the body of the motorcycle.
- At the top of the motorcycle, you need to draw a curved shape, as well as 2 elements that look like drumsticks. The front panel of the motorcycle needs to be divided into 2 parts using a curved line.
- From the lower oval, you need to draw 2 rectangles, approximately the same size, which are connected at the bottom in a small circle. Then you need to add 2 more circles of different diameters, which will form a wheel. Excess elements and lines must be erased to get the effect as in the image.
- Using different elements, ovals, circles and rectangles, you need to draw a motorcycle engine under the gas tank.
- From the gas tank you need to draw a rectangle, then add the bottom part of the motorcycle and draw the wheel.
- When the drawing is ready, you can start coloring the resulting image.
- In a palette, you need to mix a small amount of blue paint and some water. Using a brush, apply the resulting mass to the lower part of the motorcycle, paint the gas tank, part of the steering wheel and the front panel of the vehicle.
- While the paint is soaking in, you need to mix white and black paint to get a silver shade. With the finished color, you need to paint over the engine parts, the motorcycle mirrors, and the parts that connect the main part of the motorcycle and the wheels.
- It is necessary to fill the engine elements with black color, add black paint to the seat and tires of the motorcycle.
- Using a small amount of paint, you need to mark the places of light and shadow on the motorcycle. To do this, you need to apply paint along the edges of the elements so that there is a lightened space in the middle.
To get a clearer drawing, you must first outline the drawn image with a black marker or felt-tip pen.
A motorcycle is a popular means of transport that looks more like a bicycle. Its features include a larger size, powerful wheels, and a massive body. It is quite difficult to draw such a device, since a motorcycle has an engine consisting of many elements.
For children, a simplified version is more suitable, which includes drawing the main elements and light detailing. In this way, you can write off the transport device in the context of any drawing.
Video about drawing
Motorcycle drawing for kids: