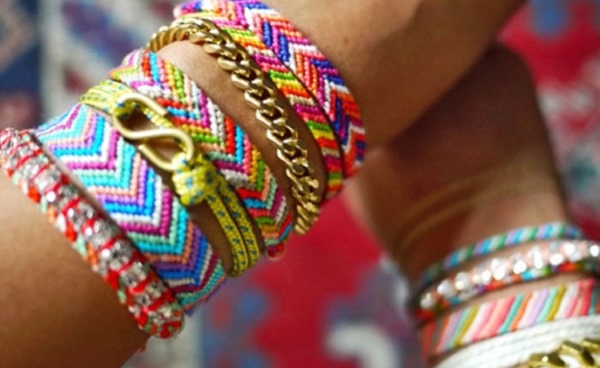
Bright, eye-catching with intricate patterns, inscriptions and drawings, woven bracelets made of threads, leather, beads, ribbons and cords have a deep history. In ancient times, such decorations were used to protect against the machinations of evil forces, presented as a gift to the gods, and exchanged as a sign of strengthening alliances.
In 1953, the hippie movement gave baubles a second life. Today, from a ritual amulet with a deep symbolic meaning, they have turned into an ordinary decoration made of threads, which anyone can weave.
What do you need to weave baubles?
To make braided bracelets you will need a well-lit work area and a list of simple tools and materials.
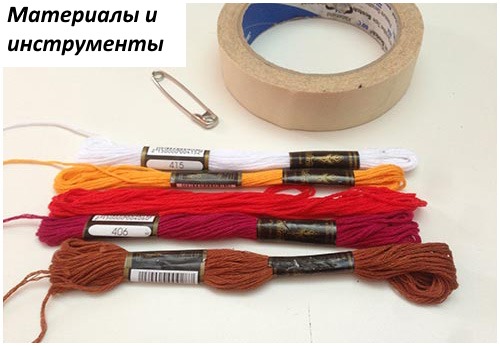
The set for a master bauble weaver includes:
- threads of different colors ("Mouline", "Iris", "Chamomile");
- scissors;
- pillow for fixing the weaving;
- safety pins with balls on the ends, or a large pin with a clasp;
- PVA glue or BF-6;
- lighter (when using synthetic threads);
- ruler.
A special pillow for weaving can be replaced with a small, thick sofa cushion, a stationery tablet with a strong, even clip, or a piece of tape to secure the threads to the table.
How to secure the threads correctly
Depending on the chosen model and weaving method, the initial fastening of the threads to the base is performed differently.
Securing threads (method No. 1)
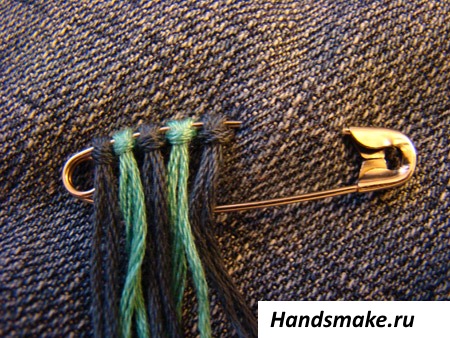
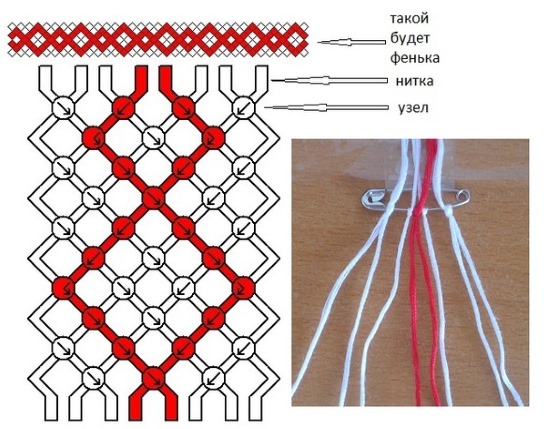
If a loop or clasp is planned on the edge of the bracelet, then weaving begins as follows:
- Cut the required number of threads to the desired length and fold in half.
- Fasten the pin to the pillow so that there is enough free space left in the center of the needle for weaving. To do this, grab 2-3 mm of fabric, then make a free indentation sufficient for the width of the bracelet and hook another 2-3 mm. Then fasten the pin.
- The first row of knots is collected at the indentation point. The loop formed by folding the thread in half is thrown over the needle of the pin and placed on the pillow. The remaining "tail" of the strand is threaded through it and the knot is tightened.
- One thread remains at the bottom, and the other is thrown to the top.
- In the same way, all the threads are attached sequentially according to the weaving pattern.
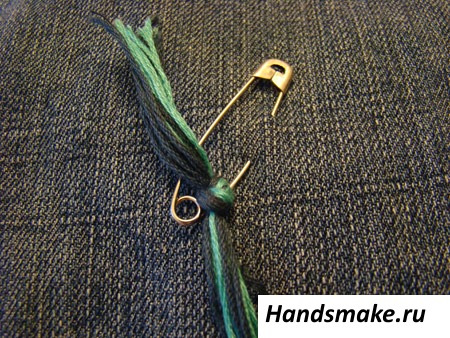
Baubles from threads can be woven with two types of fasteners when starting work like this: "loop" and "tie". When weaving a "tie", the threads are not folded in half, but set aside 7-8 cm from the edge. And the "loop" is woven first on the upper threads, forming the eye of the fastener, and then the fastening of the threads to the same pin is repeated, according to the sketch, but already using method No. 2.
Securing the threads (method No. 2)
This option for securing threads is suitable for working on a pin, or in the case where one of the strands is the basis of the weave.
It is done like this:
- The required length and number of threads are cut.
- Using safety pins, the main thread is secured horizontally to the base pillow.
- Take one thread, step back from the edge 8-10 cm and bend it in this place over the base from the bottom up. So that the smaller end is on top of the base. This will be the working thread.
- Place the short strand behind the long one. Without pulling, pass it behind the base, throw it over it and pull it through the loop formed by the working thread.
- Tighten the knot.
- Move the working thread to the top.
- Repeat securing using this method for all other threads, according to the sketch.
- After collecting all the strands that were put aside on top, make a loose knot and secure with a safety pin.
- Remove the pins that secure the base and move them close to the threads that have been picked up.
Securing the threads (method No. 3)
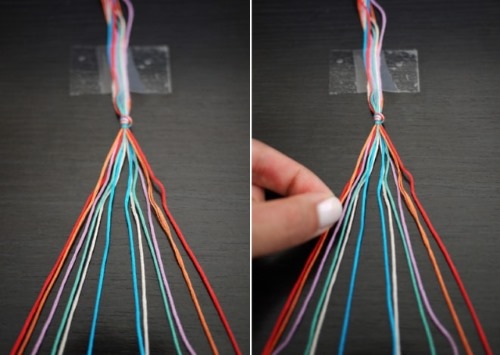
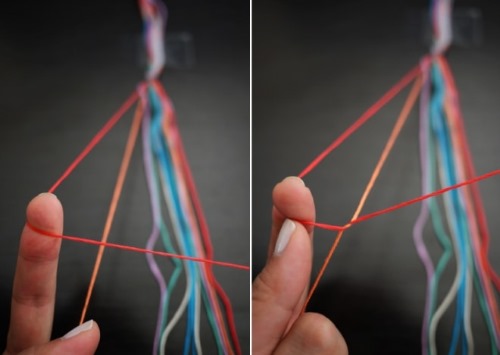
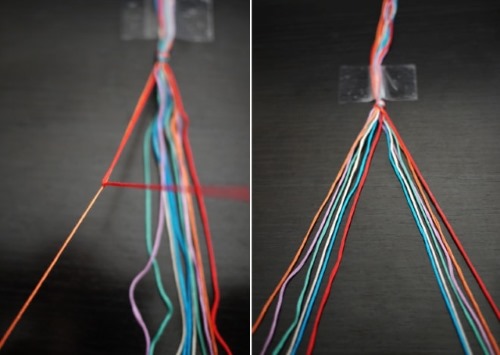
To secure the threads using tape and a paper clip, the most common method of “free placement” is suitable:
- Measure and cut the required number of strands.
- Lay out the threads on the table (stationery tablet) by color according to the weaving pattern.
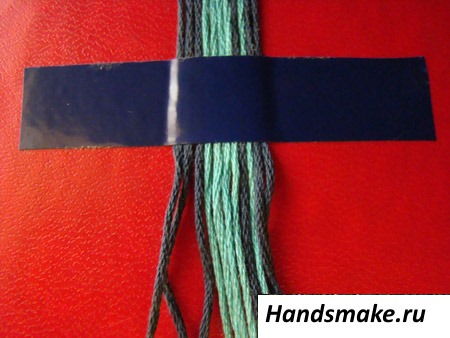
- At a distance of 10 cm from the edge of the threads, fix them with tape (clip), gluing them to the table.
- Tie all the threads into a loose knot close to the tape line (clamp) so that they do not slip out when tying knots.
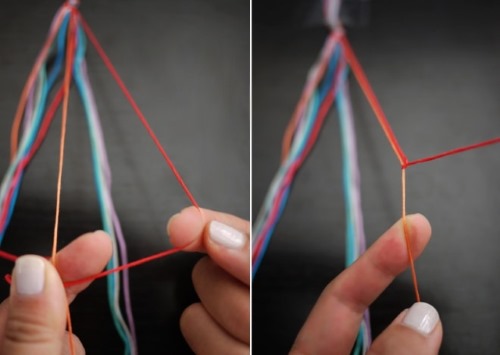
Despite the apparent simplicity of this method of attaching threads, it has a couple of significant drawbacks, especially for beginners:
- The lack of rigid fastening creates difficulties for even weaving of the first rows.
- Scotch tape holds floss and natural threads well, but synthetic and waxed threads easily slip out from under this type of fastening.
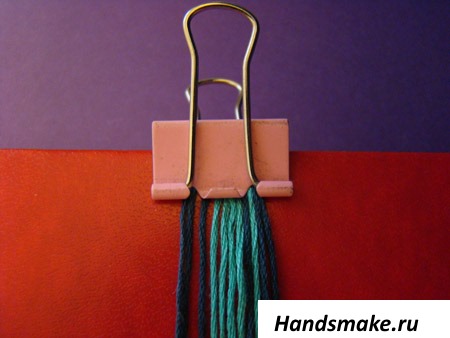
- A paper clip does not cope well with holding any threads. A wooden ruler placed between the clip and the threads can improve this situation a little.
Main nodes
There are 3 main types of knots used to weave baubles: rep, tatting and square. The rules for knitting are the same for all knots. All knots when weaving baubles are double, and the first knot is pulled slightly tighter than the fixing one.
Each of the main weaving techniques, in turn, can be right- or left-handed. In this aspect, it is especially important to understand for weaving bracelets according to the patterns. Figure No. 1 shows the patterns for weaving rep knots and tatting, as well as the symbols with which they are designated in the patterns.
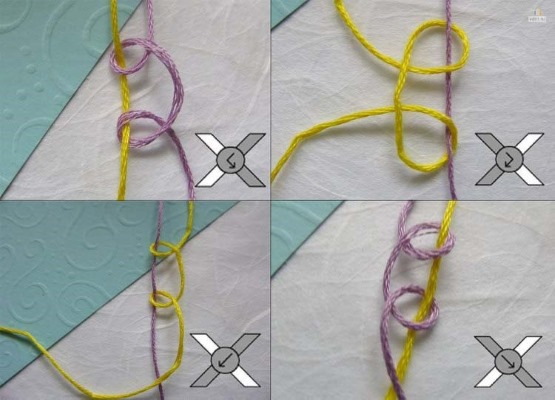
The top 2 images are right- and left-hand tatting. They are indicated on the diagrams by circles with arrows showing the direction of the working thread - right-left, or left-right.
Right-hand tatting is done like this:
- the weaving thread (the one that ties the knots) is brought in to the right of the base, looped over it, comes out from below and is pulled through the loop formed by the working thread;
- the first knot is tightened and pulled towards the base;
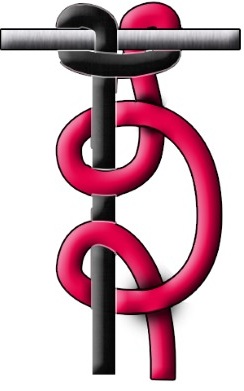
- the second knot is formed in the same way, but the working thread comes in from below, goes around the base from above and comes out through the loop down;
- the knot is tightened, but not as much as the first one. This technique makes the knots more voluminous and prominent.
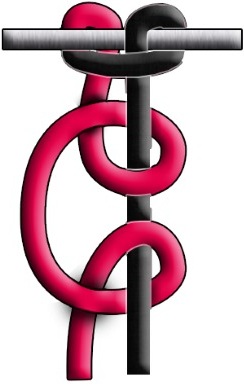
Left-hand tatting is distinguished by the fact that the weaving thread is inserted from the left and mirrors the weaving of the right-hand version. It is necessary to adhere to the specified directions when making bracelets using this technique so that the colored threads that make up the pattern go exactly to the place where they will be needed in the next row.
The two lower images in Figure 1 also show the weaving of the rep knot in two directions. It is indicated on the sketches by circles with arrows pointing left or right.
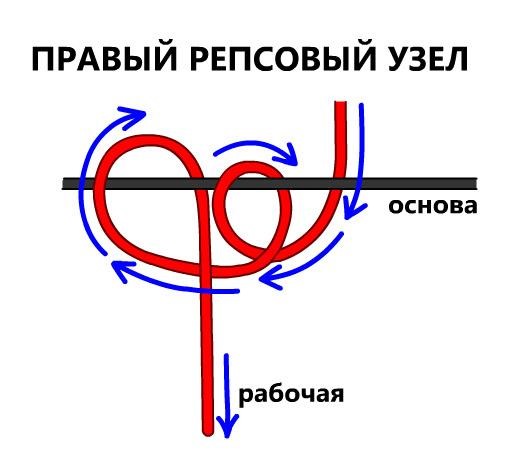
The right-hand rep knot is constructed as follows:
- the working thread comes in from the right, is wrapped over the base, comes out from below and is pulled over itself;
- the first knot is tightened;
- the second knot is exactly the same as the first;
- the knot is tightened slightly looser than the first.
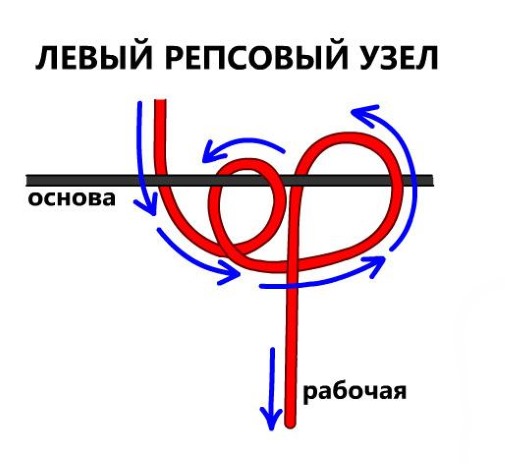
The left-hand rep knot is a mirror image of the right-hand knot. You can start weaving simple circular baubles by mastering only one rep knot. If you do not change the direction of weaving and braid the base threads with a constant repetition of a left-hand or right-hand rep knot, you will get a bracelet in the form of a volumetric spiral.
Methods of weaving baubles
Having figured out how to weave knots and practiced on four threads, you can begin to master the techniques of creating thread bracelets. There are only 2 of them - "oblique" and "straight". To begin with, you should not take on patterns that use a large number of colors, working threads and changes in direction. One- or two-color baubles with 8-10 threads will be the best option for beginners.
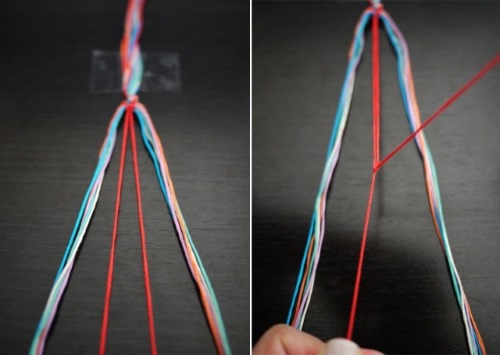
Oblique weaving of baubles
The simplest, but undoubtedly the most effective is the "oblique" weaving of baubles. It mixes various knots and weaving directions, and the result is bracelets with knotted patterns, drawings, and inscriptions. To understand the principle of making bracelets in this technique, you need to weave a two-color model of a bauble with oblique stripes. It is woven only with rep knots and always in one direction.
Weaving:
- Cut 4 yellow threads and 4 blue threads, 0.70 m each.
- Secure to the base using method No. 2, alternating colors according to the diagram in figure No. 2.
- With the leftmost thread (blue), tie a left-hand rep knot, using the yellow thread following it as a base. It is necessary to tighten it tightly to the base (pin) so that the rows are even.
- Set these 2 threads aside and make the same knot with the adjacent yellow thread, using the blue thread as a base.
- Set aside. Knit the remaining threads in the row in the same way.
- Go to the next row. Leave the left yellow thread free and knit the blue threads following it together with a left-hand rep knot. Tighten as close as possible to the knots of the previous row.
- Weave the next pairs of threads to the end of the row, leaving the far right yellow thread free.
- The third row begins with a knot with a yellow thread, using the blue one as a base. Continue weaving until the end of the desired length of the bauble.
- Braid the remaining ends of the threads on both sides and secure with knots and glue.
You can learn more about the options for "oblique" weaving and its possibilities in the video.
Straight weaving of baubles
The technique of “direct” weaving will help you weave baubles from threads, creating complex multi-colored patterns. It allows you to create a pattern of any complexity. It uses the same double-sided rep knot, but the weaving is horizontal, not staggered.
The main thread (leading) should be 5 times longer than the rest (auxiliary and background). For ease of weaving, the leading thread is wound on spools or twisted into balls. The background threads are the colors most used in the pattern, and the auxiliary threads are those that appear in it occasionally and are then cut off.
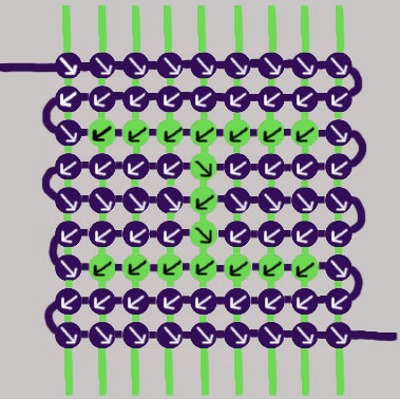
The weaving patterns in this technique are similar to the patterns for knitting patterns with knitting needles or cross stitching. You can use them to weave bracelets. In order to weave a simple two-color bauble using "straight" weaving, you need to choose which color will be the main one (the longest thread) and which one will be the auxiliary one (all other strands).
Weaving:
- Use any convenient method to secure the threads to the weaving base. The main thread (5 m) should go first on the left. Then all the others (0.70 m each). How many there should be depends on the number of knots used in the pattern, plus 5 threads on each side.
- Using the main thread, knit a row of right-hand rep knots on each of the auxiliary strands.
- Using a ruler, align the row relative to the thread attachment, pulling the knots closer to it.
- Having finished the row, turn the main thread to the left and continue to knit left-hand knots with it from right to left.
- Continue weaving the base in a 5 cm “snake” pattern.
- The inclusion of a pattern, which is woven according to the selected scheme, begins with a new row. Having reached the point of color change, auxiliary threads become the main ones. The required number of knots are knitted with auxiliary threads along the warp thread, but in the opposite direction.
For example: the pattern starts with two knots of the second color. If the working thread moves from the left and is carried by left-hand rep knots, then the new color should be woven along the main thread by right-hand ones. Each auxiliary thread weaves one double knot. The main thread continues in its direction, according to the sketch.
- In this way, the pattern is woven to the end.
Multi-colored patterns are woven in the same way. Additional threads are placed and knitted as needed, and then cut and glued to the back of the bracelet.
Square knot for friendship bracelet
The easiest way to weave baubles from threads is using a square knot. The famous Shamballa bracelet is based on a square knot. It is woven on four threads, where the two central ones are the base, and 1 and 4 are working. A straight flat row is formed by changing left- and right-hand knots. Unlike other types of weaving, the straight one is tightened evenly, both the first and second knots.
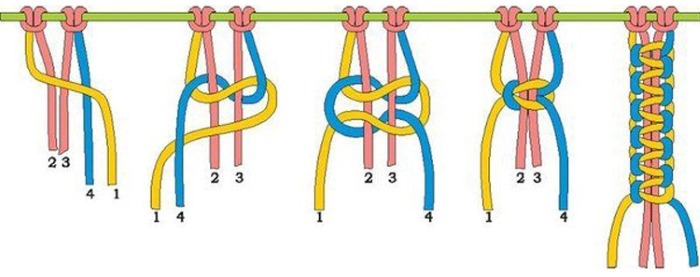
Weaving:
- The left thread is thrown over 2 strands of the base.
- The far right one is placed on the left one, goes around the bottom of the base and is pulled through the loop formed by the left thread upward.
- It's dragging on.
- The left thread repeats its path in reverse order through the bottom, and the right thread passes under it, goes around the base from above and is passed through the loop of the left, returning to its side.
- It's dragging on.
- Now the weaving starts from the right in a mirror image.
Large beads and crystals are woven into these bracelets. They are strung on the warp threads and tied with several rows of square knots. Or small beads (large beads) are strung on the working threads before weaving. In this version, they remain in the side parts of the knot.
Macrame knots in baubles
Baubles made of threads are woven using not only the already listed macrame knots. Using additional techniques of one of the most ancient types of needlework, allows baubles to create airy and unusually beautiful decorations. For example, using air loops combined with tatting knots, you can create an openwork bracelet made of threads.
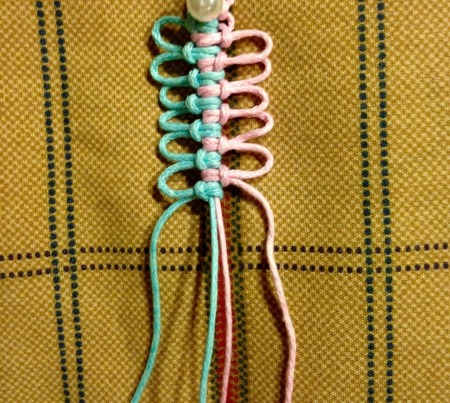
Weaving:
- Cut 2 threads of 50 cm and 2 threads of 1 m.
- Fix to the base.
- Work left-hand tatting on left thread.
- Repeat with the right thread using the right-hand technique.
- At an equal distance from the warp threads, use pins to secure loops of the same size on each side.
- Work left-hand tatting, securing the chain stitch.
- Repeat on the right side on the right thread.
- Remove pins and transfer to form air loops in the next row.
- Continue weaving, alternating sides until the end of the bracelet.
Beaded Thread Bracelet
A large number of options are given by weaving bracelets from threads using beads and small beads. In order to create such a bauble, it is necessary to first string the beads with a needle on the threads with which the weaving will be carried out.
Beads are inserted either in the center of the bracelet, or in air loops, or by replacing knots (if the sizes match) in “oblique” weaving, or by alternating beads and knots.
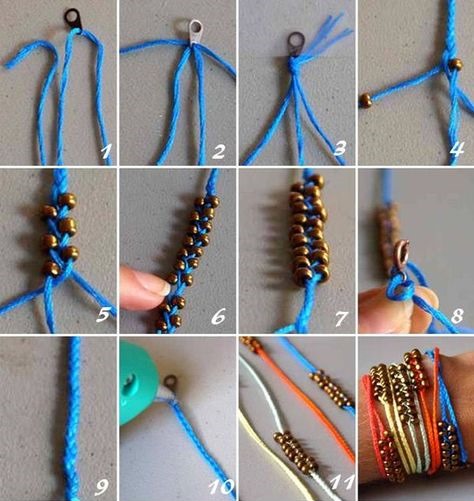
One of the simplest versions of such bracelets is a braid with beads, and it is made as follows:
- Cut 3 threads of 50 cm each.
- String 8-10 small beads onto each of them.
- Secure all 3 threads to the bracelet mounting hardware.
- Fix the ends of the threads with glue.
- Braid a 5 cm thick braid from all three threads without using beads.
- Continue braiding the braid, placing the beads on the side edges of the bauble.
- Finish the bracelet with a braid and locking hardware.
With rhinestones and stones
To create a bauble with rhinestones and stones you will need:
- ready-made bauble;
- a chain of rhinestones fastened together, or stones inserted into a sewn-on hardware base;
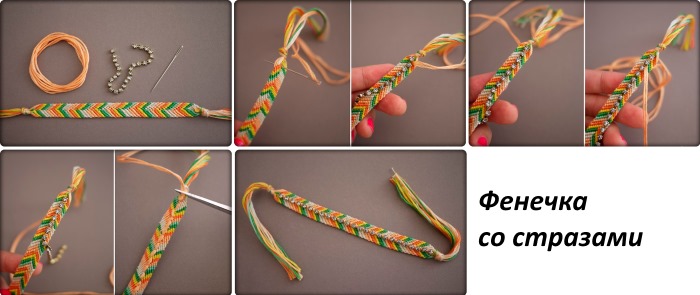
- a needle and thread to match the bracelet;
- scissors;
- glue for gluing threads.
Using a needle and thread, a strip of rhinestones or stones is carefully sewn into the center of the finished bauble using small stitches.
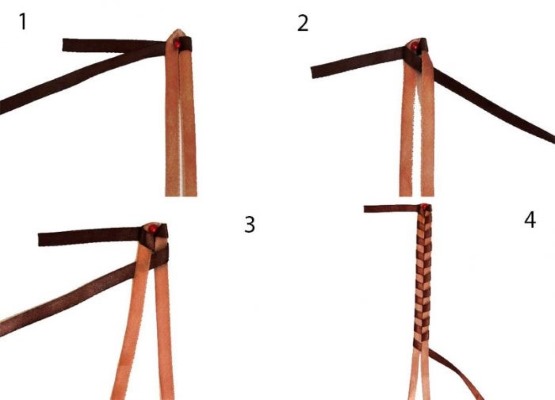
With a chain
Weaving baubles with the inclusion of chains with large links is performed using two different technologies. In the first case, the chain is sewn into the finished bauble from the side using floss threads passed through each link.
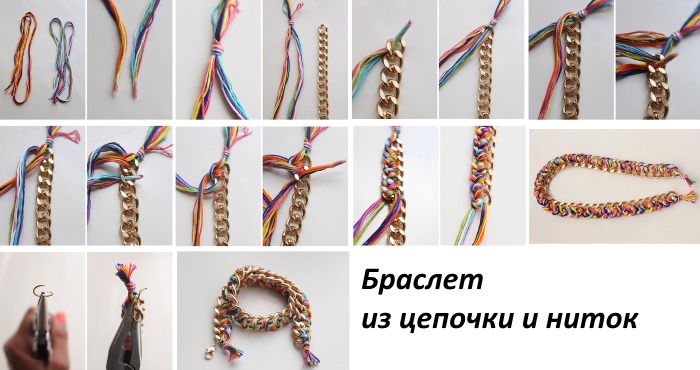
In the second case, the threads are woven into a kind of “braid” with a chain, by intertwining with each other and with decorative links.
From satin ribbons
Baubles are woven from satin ribbons using the same techniques as from threads, but the knots are not tightened, but are freely positioned., without creasing the ribbons. For example, a flat two-color bauble is woven as shown in Figure 6.
Weaving:
- Cut 80 cm of light ribbon (0.5-1 cm wide) and 2 m of contrasting ribbon (0.5-1 cm wide).
- Fold the light ribbon in half and tie the dark one to it, leaving 10 cm free for tying.
- Alternately, without tightening, but laying out the ribbon, braid both halves of the light ribbon with the dark one.
- Tie all 3 ribbons into a knot.
- Cut off the remaining light ribbon and melt the ends with fire.
- Leaving 10 cm, process the cuts of the dark ribbon for ties with fire.
With nuts
Baubles made of threads can be woven and decorated with the most unexpected materials. For example, nuts.
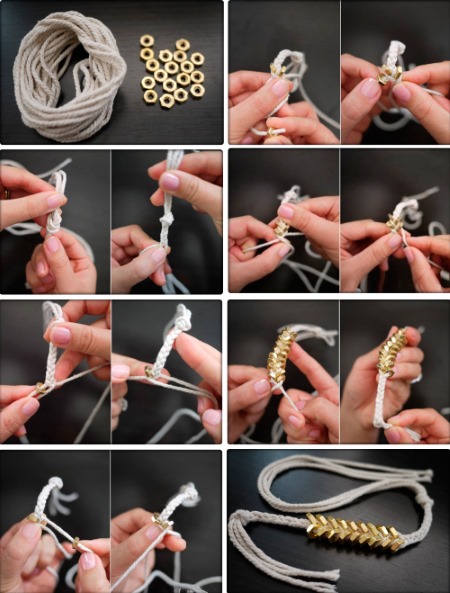
The technology of making such a bracelet is identical to the inclusion of Shamballa beads in a bracelet tied with square knots., or a braided braid with beads. Only in this version, instead of threads, you will need a rope.
How to make a friendship necklace
An original decoration - a friendship necklace, presented as a gift, like a bauble, symbolizing strong friendly feelings.
To make it you will need:
- cotton rope 0.5-1 cm thick;
- floss threads of various colors;
- scissors;
- flat wooden beads with a large hole, nuts, washers.
The technology for making such a necklace is incredibly simple. You need to braid a simple loop (wrap it around the base and bring the working thread out through its own loop) around the entire rope of the length needed for the necklace. Place the knots close to each other so that the base does not show through.
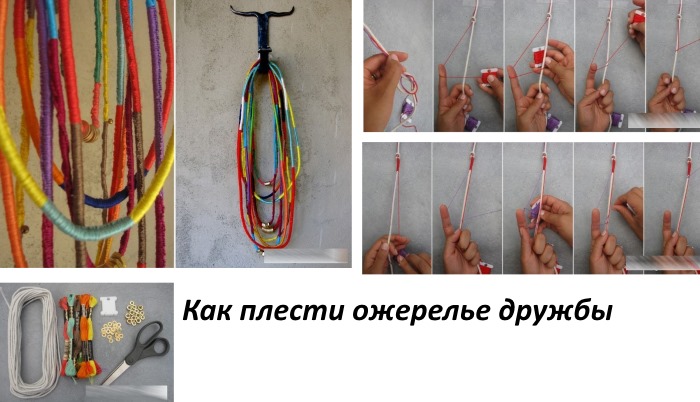
It is customary to add various metal or wooden decor to the center of such decoration, and change the colors based on your own considerations, whenever and wherever you want. To change the color, the thread is cut 2 cm below the place of replacement and glued to the base with PVA glue. A new thread is glued to the same point. Having raised it to the place where the previous color ends, weaving continues with a new color.
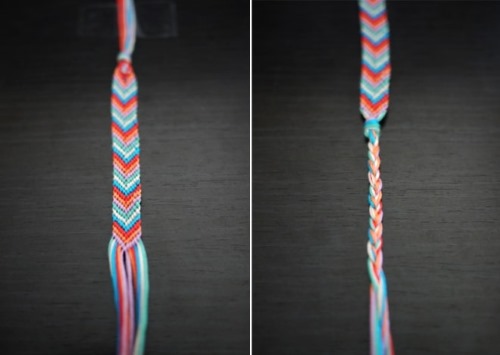
Clasps for braided bracelets
Weaving baubles from threads is only part of the job. You need to think about and create a clasp for them to wear on your hand. You can buy sets of jewelry locks in the store, or you can weave ties for your thread masterpiece yourself.
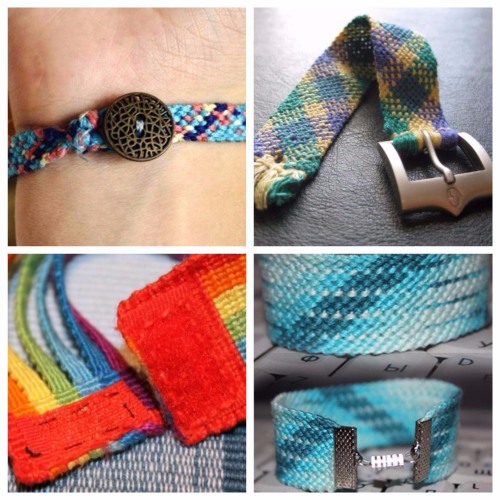
This can be a "loop-button" fastener, "double loop-tie" or simply "tie". For example: "fish tail". It is braided like a regular braid, but from a larger number of threads. The threads are taken one by one from each side and braided into one braid. This tie ends with a common knot. The ends of the threads are aligned.
What to do if you run out of thread
If the thread runs out, there are several ways to attach an additional piece:
- carefully glue the ends of the threads (old and new) using PVA or BF6 glue;
- apply a new thread to the back and continue weaving. In the finished product, the ends of such threads are cut and glued;
- When working with thin threads, you can tie an additional thread on the back side.
How to further decorate baubles
Baubles made of threads can be decorated with anything you wish. This creative process is limited only by the imagination and taste of the person who made them.
Each such inclusion in the design of the decoration will require its own weaving technology and careful selection of threads to combine with them. The most suitable combination of threads and additional materials is indicated in the table.
| Material for weaving | Decorations |
| Coarse threads from natural materials (flax, jute, sisal) |
|
| Leather cords |
|
| Mouline threads |
|
| Household ropes of various thicknesses and textures (from 0.1 cm to 1 cm) |
|
| Threads for knitting and sewing (natural and synthetic) |
|
| Grass |
|
Baubles made of threads are a fascinating and multifaceted form of creativity accessible to everyone. They can be woven from many materials (threads, strips of leather, grass, ropes). And besides, this is a wonderful symbolic gift made with your own hands for a loved one.
Article formatting:Natalie Podolskaya
Video about making baubles
Baubles made of threads: