Creative people do not tend to limit their imagination. Especially when it comes to quilling crafts for beginners. To make flowers, you will need a minimum number of tools and materials. The main advantage of quilling is considered to be its simplicity. Paper flowers open up great opportunities for creative people, where everyone can choose their favorite motif.
How to make beautiful flowers in quilling style
Quilling crafts for beginners (flowers) should be started only after the idea of such decor has been thought out. Only after that can you start creating a sketch.
The sequence of steps for making a beautiful paper flower is as follows:
- Selecting a flower, accompanied by studying its structure and searching for photographs of the original. It is worth carefully counting the number of leaves and petals, as well as finding the size of the stem.
- Preparing the necessary tools and materials. For a beginner, it is important to buy a special stencil that will help to get even figures for the flower.
- Preparing the work area. Care should be taken to prevent glue from getting on the base or paper tapes.
- Preparing an exact quantity of parts.
Regarding the last point, it is important not to rush and do everything in advance. Quilling should allow the master to enjoy the process, and not irritate the person over trifles.
Materials and tools
Quilling crafts for beginners (flowers) involve the use of the following materials and tools: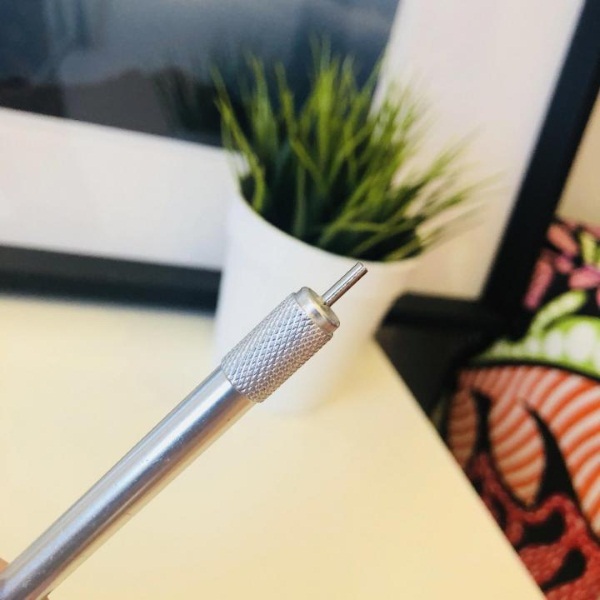
| Special quilling tool | These devices can be purchased at a stationery store or a specialized department. In appearance, the tool resembles a long ballpoint pen with a forked metal tip located at the end. |
| Paper strips | This material can be purchased or made by yourself. It is important to remember that the process will require paper of different widths - from 3 to 10 mm. |
| PVA glue | You can buy the simplest option. You don't need a huge amount of glue to work. Therefore, at the initial stage it is worth taking a small tube |
| Stencil ruler or backing | The tool is a simple ruler with cutouts of different diameters in the form of circles. The stencil helps novice craftsmen cut out elements of the same dimensions. |
| Safety pins with multi-colored eyes | They are used when decorating a large flower arrangement. |
| Cork base for gluing parts | Paper elements will not stick to such a base, and the master does not have to worry about the risk of ruining his work. |
| Sharp scissors for cutting fine fringe | |
| Tweezers for compositions with a large number of small parts |
All the listed quilling components can be purchased in a set. This will allow the master to save time in searching for missing parts and reduce the cost of the quilling set.
Simple flower
To work on making a regular flower using the quilling technique, the master will need to arm himself with the following materials:
- Double-sided colored stripes, 0.5 cm wide.
- Special device for twisting.
- PVA.
- Cardboard, pencil, sharp scissors.
Quilling fakes for beginners (flowers) are made in the following sequence:
- A colored square sheet of paper with approximate parameters of 10x10 cm is prepared.
- A spiral appears in the middle of the sheet.
- Using sharp scissors, the drawing is cut out along the drawn lines.
- The cut spiral is twisted using a special device or an awl.
Using this method, the master will be able to make a simple rose. Then you can make 4 more flowers and create a beautiful composition.
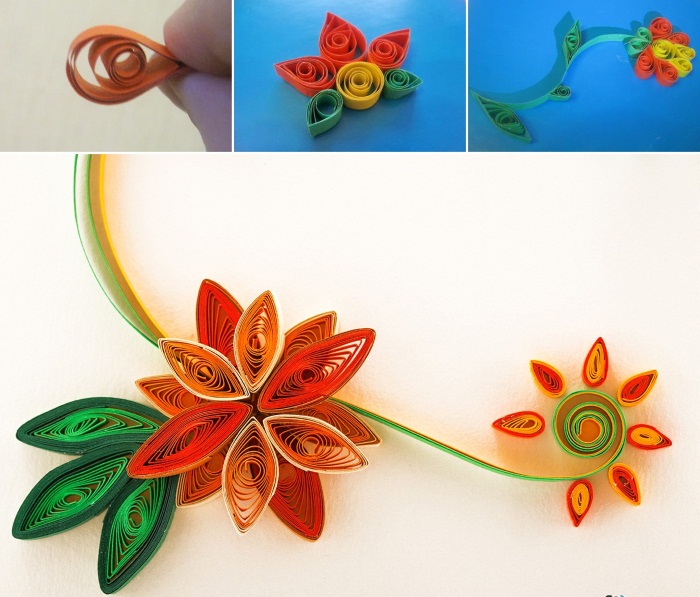
Volumetric flower
For a voluminous flower you will need:
- 22 paper strips at least 65 cm long.
- Special tool.
- PVA.
- Sharp scissors.
- Colored paper.
First of all, the master chooses the color of the future flower. It is even possible to make a two-color composition. In this case, paper strips of several colors should be used (11 pieces of each color).
The work process itself looks like this:
- Pre-prepared paper strips are rolled into tight rolls using a special tool.
- Each roll is fluffed up to a diameter of 2 cm.
- Circles are cut out of colored paper (if you don’t have enough quilling skills, you can use a stencil).
- A rhombus is made from round parts. To do this, the element is flattened on both sides and then stretched.
The connection of the resulting parts will allow the master to create a large number of beautiful three-dimensional flowers.
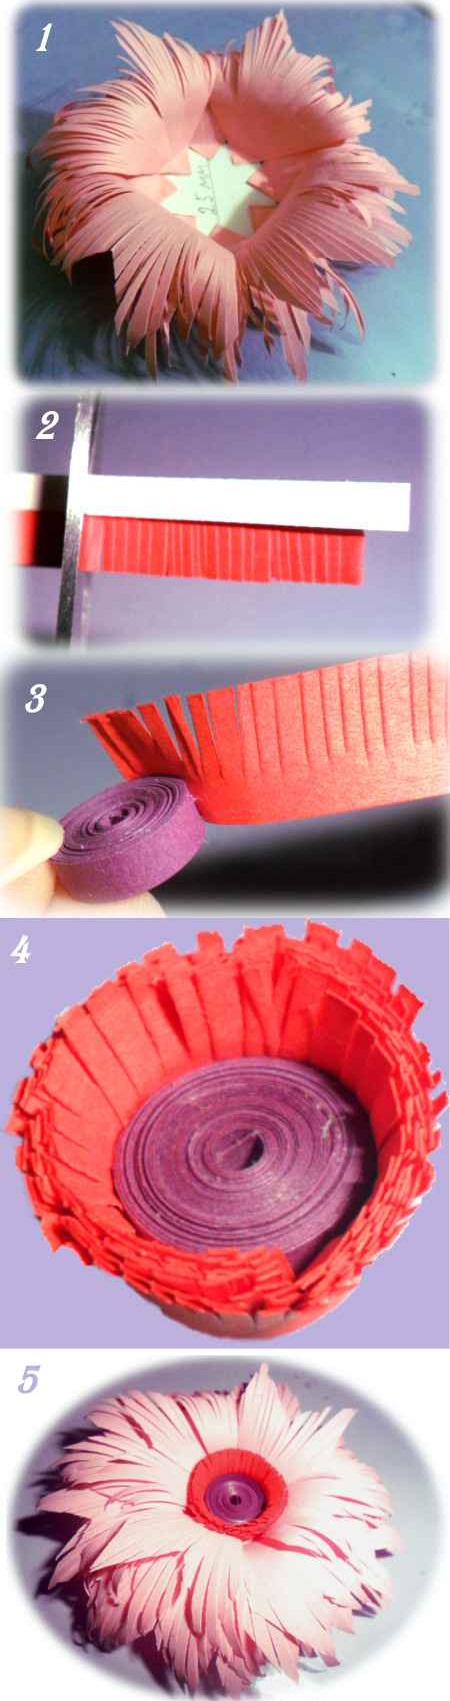
Carnations
A quilling craft for beginners, such as carnation flowers, can be made using the following tools:
- With a wide red stripe.
- With green paper.
- With a cutting tool.
- With toothpicks.
- With glue.

The sequence of work looks like this:
- On the red strip, cuts are made in the vertical direction.
- The toothpick is wrapped in green paper and secured with PVA.
- The beginning of the red strip is glued to the finished stem. Then it needs to be twisted and the end secured with glue.
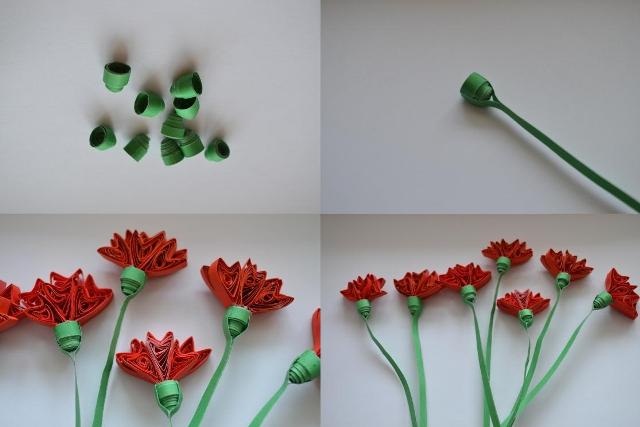
The final step is to straighten the finished flower.
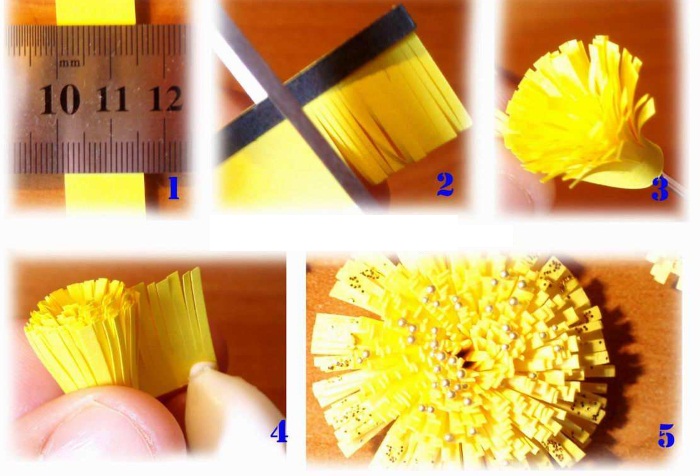
Dandelions
To get started, you should prepare:
- Dense yellow stripes.
- Green stripes (used for leaves).
- Crumpled paper from which the bud and stem are made.
- Sharp scissors.
- Tweezers.
- PVA.
 To make a dandelion, the width of any blank is taken at the rate of 3.5 cm. For 1 flower, several strips will be needed, the length of which will be equal to a sheet of landscape format.
The manufacturing process itself is carried out in the following sequence:
- 3 strips are prepared for subsequent cutting of petals. Each blank is folded in the middle, and petals are cut, the size of which is 0.5 mm.
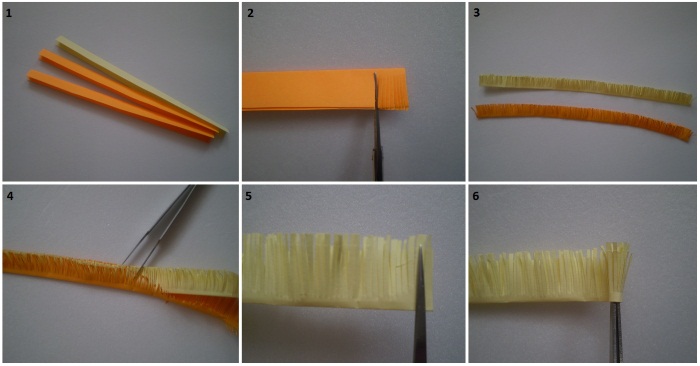
- Using a special tool, one yellow strip is twisted and its end is secured with PVA. Then, orange strips are twisted onto the yellow strip, previously glued into one long strip.
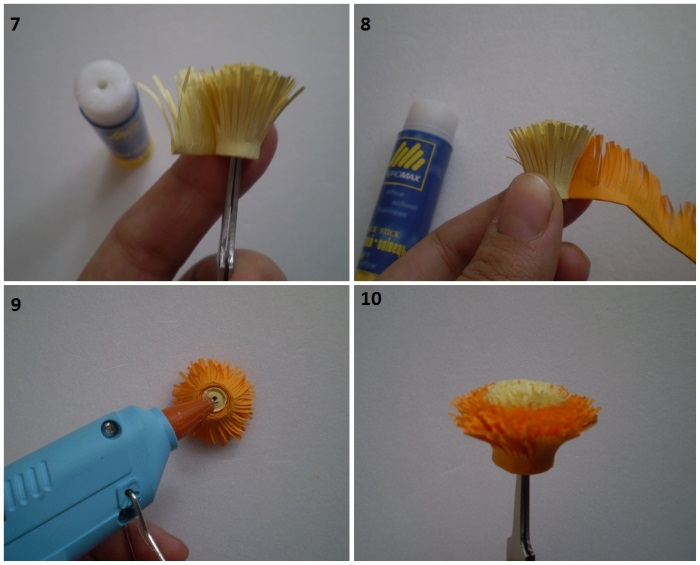
- The petals are carefully unbent.
- For the leaves, a green paper rectangle is prepared. This piece is folded in the middle and a leaf is cut out.
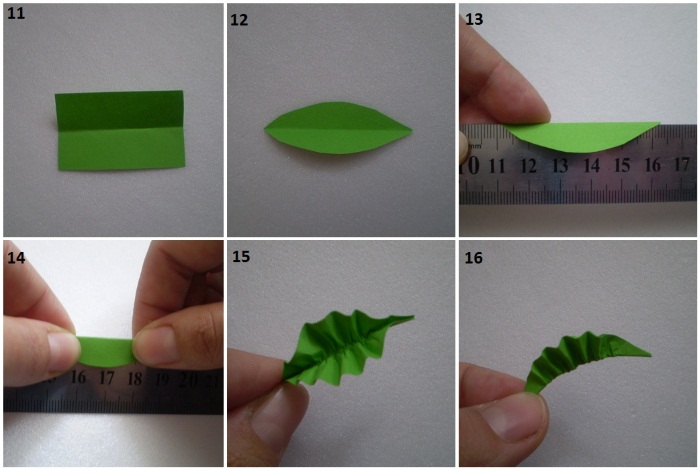
- The resulting fragment is compressed into an accordion to give it a more realistic look.
- Bud. For this, you need to prepare 1/3 of the strip and cut the petals. Then roll the strip into a roll and secure it with PVA.
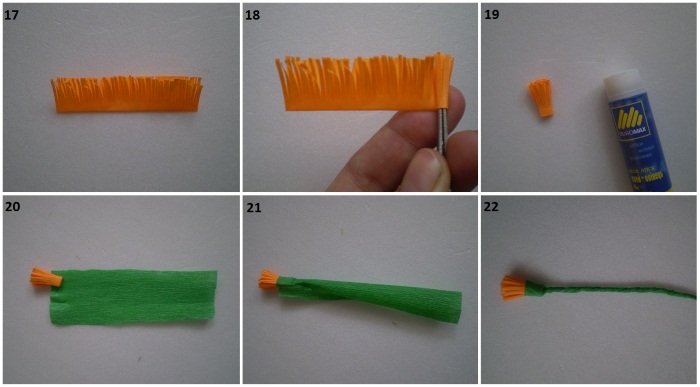
It remains to cut a strip of 2 cm wide from the reaper. The edges of the part are glued, the bud is placed and wrapped in paper. The remaining part of the stem is twisted.
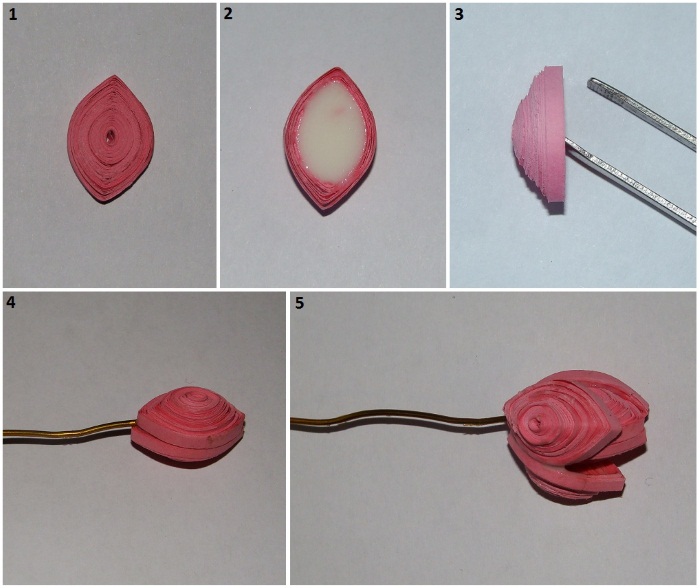
Roses
Quilling crafts for beginners (rose flowers) will require the master to have standard tools and materials:
- paper;
- stencil;
- PVA;
- wax paper;
- safety pins.
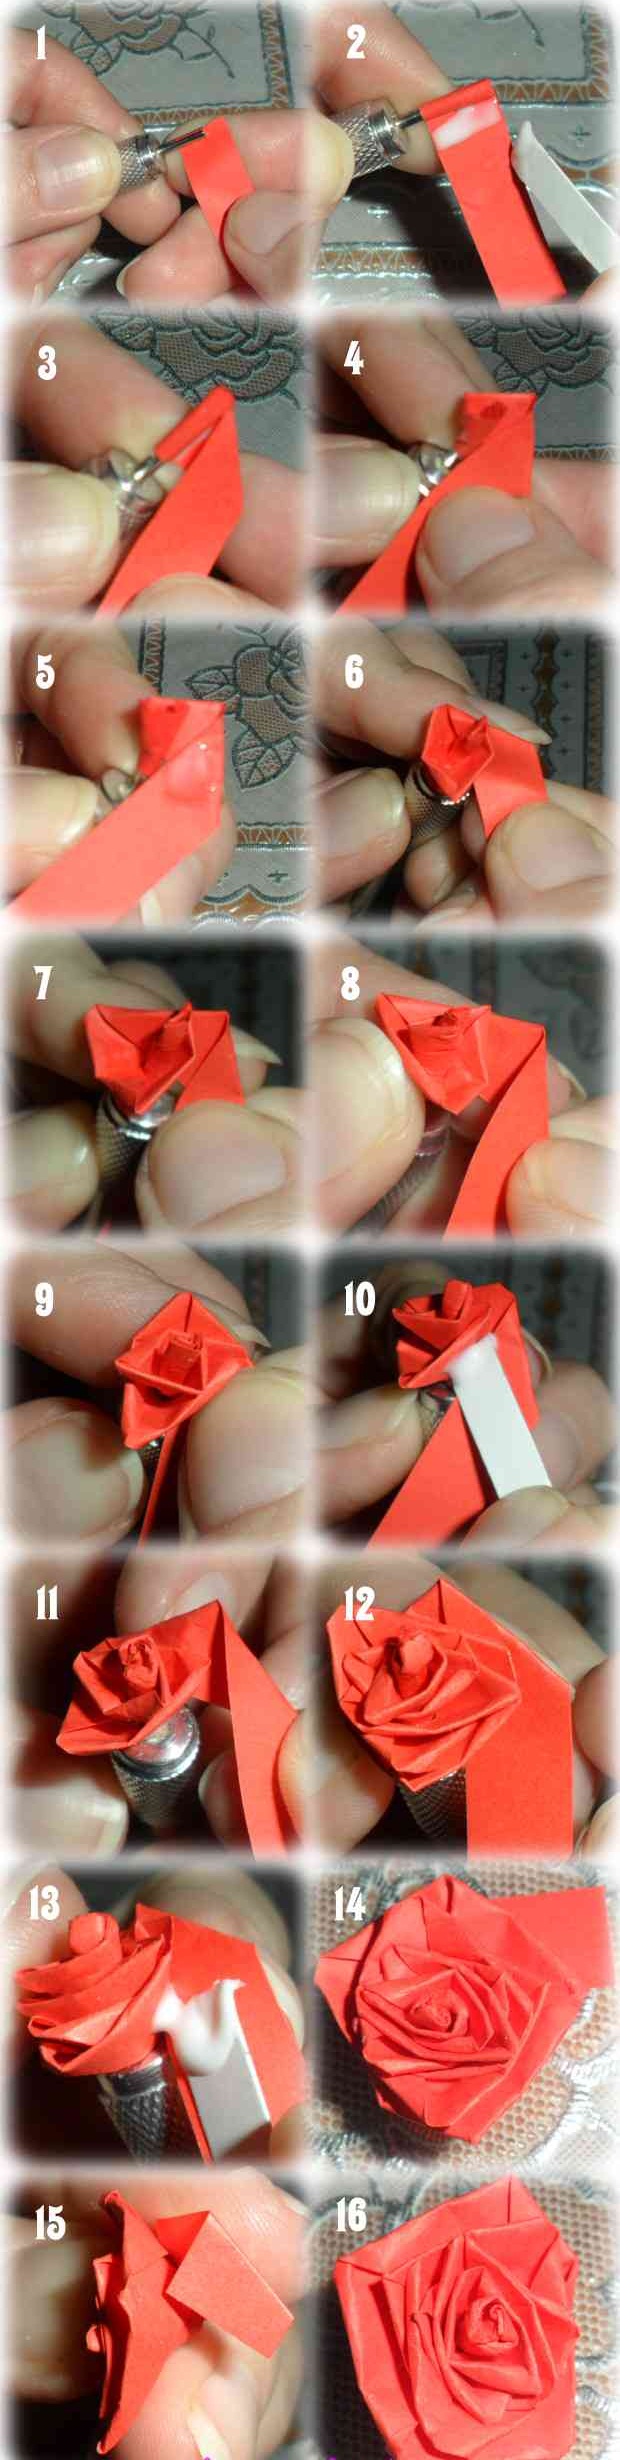
Rose Flower is a simple quilling craft for beginners
The manufacturing sequence includes the following steps:
- First of all, a bud of the future flower is made in a teardrop shape from a pre-prepared blank.
- For the flower itself, you need to glue 5 petals together.
- The second layer is an identical flower, but with smaller petals. You can get them by gently twisting the paper.
- For the flower stems, take green and yellow stripes and fold them into an accordion shape.
- The stems are glued onto a composite base.
All that remains is to assemble all the details into a composition.
Asters
For work, the master should prepare:
- colored paper (double-sided);
- sharp scissors;
- 20 rhinestones;
- a special quilling tool for twisting paper strips;
- PVA.
Astra is made using quilling technology as follows:
- A paper strip is cut out with a length of 30 cm and a width of 3 cm. The piece is folded in half lengthwise.
- Using sharp scissors, make several small cuts on the workpiece.
- Using a tool or an awl, the strip is twisted.
- On the finished roll, the fringe should be turned back from the outside.
To make flowers of different sizes, you should vary the parameters of the paper strips.
Chamomile
To work you will need:
- White stripes 2mm wide.
- Light green and yellow stripes, 7 mm wide.
- PVA.
- A sharp cutting tool.
- Special device for twisting.
The flower is made in several stages.
Petals
To make petals, you should use white paper strips.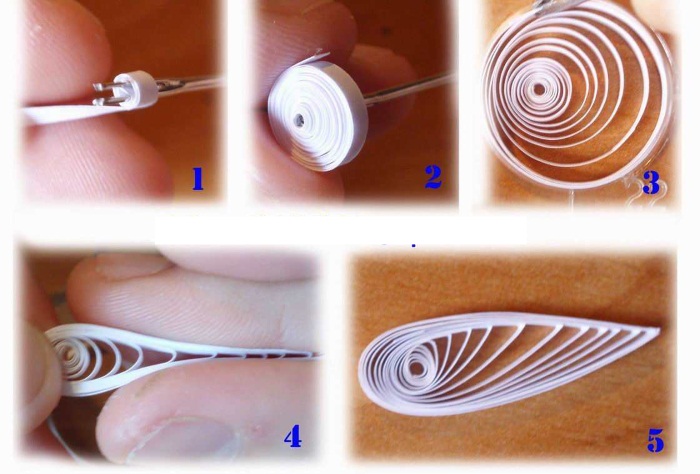
The process then looks like this:
- Take 1 blank and make several windings with the tool. The device is removed, and a strip with a twisted end remains.
- The part is brought to the state of a finished roll.
- The element is carefully unscrewed. It is important to hold the part with two fingers of the right hand. Then, with the left hand, the middle is stretched to the sides. On the opposite edge, the spiral is compressed. Such manipulations are performed along the entire length.
- PVA is applied to the end of the strip and the part is glued. The size of the resulting droplet cannot exceed 1.5-1.7 cm.
The number of petals depends on the volume of the finished flower. Often, at least 15 petals are required for one flower.
The core of the flower
When making the chamomile core, the craftsman must follow this sequence of actions:
- Prepare light green and yellow stripes. They are cut into fringes. The thinner the cutting, the more beautiful the flower will be. To avoid a through cut, it is worth applying a cardboard limiter.
- Each finished element is cut into 2 equal halves.
- Next, you need to glue the strips of different colors together. To do this, make an indent of about 1 cm on the yellow piece and apply PVA (you can use a toothpick). Glue the light green strip on top.
- The resulting two-color pair is twisted several times using a quilling tool.
- Then the strip is twisted manually until it becomes a tight roll. It is important to twist it tightly, otherwise the part will become unsuitable for subsequent use during bending.
- At the very end of the twist, you need to cut off the end of the light green strip, making its length shorter than the yellow one.
- PVA is applied to the cut edges and fixed.
- The roll is bent outward and coated with glue.
All that remains is to wait for the parts to dry (you can tell by the appearance of a transparent layer resembling a glass film) and bend the fringe along the edges. If you don't wait for the drying time, the part will flatten.
Chamomile collection
This process involves a certain sequence of actions. It looks like this:
- A small amount of glue is applied to the sharp end of the petal and the element is fixed to the core of the chamomile.
- Each subsequent petal is glued in the same way. It is worth remembering that to add individuality, you can place the petals at an angle, or one above the other.
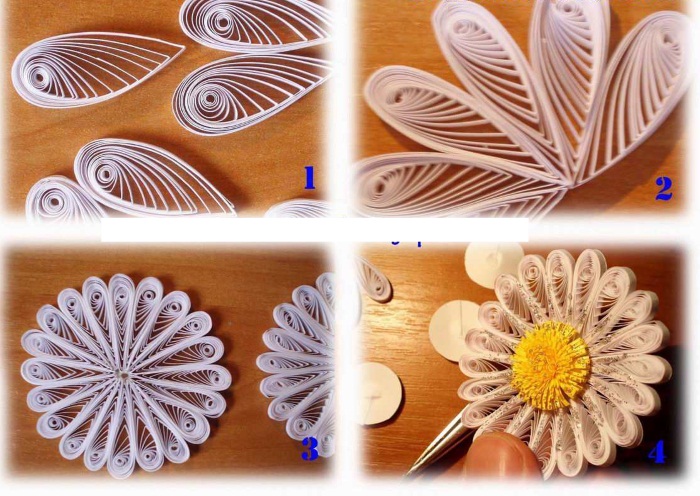
The main thing is to achieve a result that will please the master himself. And it is important not to forget that after the glue dries, glue threads may remain in the core. They spoil the appearance of the chamomile. Therefore, they should be removed.
Tulips
To make tulips using the quilling technique you will need:
- A straight wooden stick or a special fork (instead of a fork, you can use a manicure stick).
- White sheet of paper and gray cardboard.
- Green and pink paper for stripes.
- Zigzag scissors.
- PVA.
The process of making a tulip takes place in the following sequence:
- The end of one pink strip is wound around a stick until a ring shape appears.
- An indent is made from the folded edge. The element is folded in half.
- Next, you should twist the bend in the opposite direction from the bent tip. At the end, the master should get a figure similar to the letter "S".
- The strip is twisted further at the bend in both directions. Several figures should be made in this way and put aside.
- Next, take 3 more pink strips and turn them into drop shapes by gluing the ends together.
- On a white sheet of paper used as a base, the edges are cut with scissors. In the middle of the paper, drops are fixed with glue, and S-shaped curls are attached to them.
- Two drops are glued together, and the third one is fixed on them.
- The remaining petal is filled with an S-shaped element. The flower head is ready.
- A light green stripe is attached to the tulip head, symbolizing the stem.
- Several green stripes are glued and become curls. Depending on the master's imagination, the curls can be shaped into rings, pointed at both ends, and glued one into the other. The finished tulip leaf is glued to the stem.
- Another 3-4 strips are turned into S-shaped blanks, placed inside the sheet.
To create a complete picture of the flower, it is worth making more leaves in an identical manner.
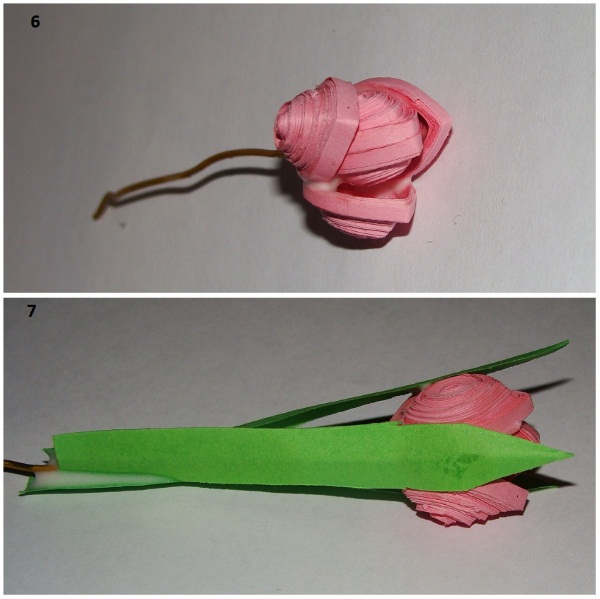
Lilies
To make a lily, the craftsman should arm himself with:
- a set of stripes in pink, white, yellow and black;
- diagram or sketch;
- PVA;
- with a special tool for twisting strips;
- a tube of acrylic glossy varnish;
- with earwires;
- rings with a diameter of 0.7 cm for connection;
- a base for rings that can be expanded to any diameter;
- transparent glue.
The list of actions looks like this:
- First of all, you need to make earrings and a pendant.
- Next, take pink strips with a width of 3 mm, a length of 95 mm and glue them to white strips with an identical width, but the length will be 100 mm longer. The edges are glued. In total, 18 strips will need to be made for the flower.
- Paper strips are wound on a special quilling tool or a toothpick to form spirals. You should start with pink so that these strips are in the middle of the flower.
- The rolls are stretched to form an oval shape and folded at the ends on each side.
- Then the flower is formed by gluing 6 petals together.
- To form the core of the lily, you need to take black and yellow stripes, 0.15 cm wide and 40 mm long, and twist them into tight spirals (6 yellow and 3 black).
- 1 dark and 2 light spirals are glued together to form the middle of the flower. It should be glued to the center of the future lily.
Using the listed actions, you can make a flower on a ring. The difference will be the size of the stripes. So, the pink ones will be only 40 mm, and the white ones - 95 mm. For the middle, you need to use smaller spirals (the length of the black and yellow stripes will be reduced to 30 mm.).
To make jewelry with flowers, all the resulting lilies are coated on both sides with acrylic varnish, and the flower is put aside until completely dry. A smaller flower is fixed to the ring base with polymer glue.
When making earrings, you need to take earwires and, using a connecting ring, attach 2 large flowers to them.
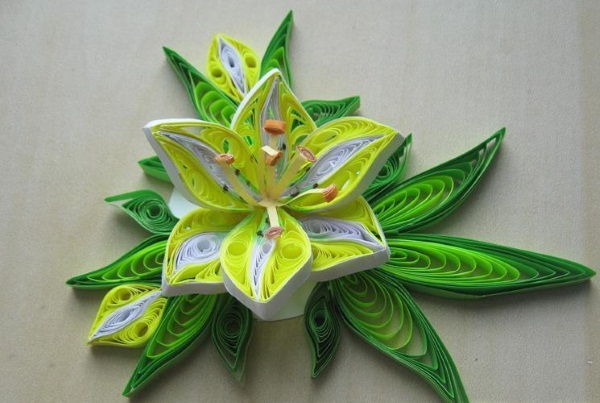
Daffodils
When making a daffodil using the quilling technique, it is important to have the following tools and materials:
- Paper strips 3 and 7 mm wide and 20 cm long.
- Wire for working with the stem.
- Glue gun and glue sticks for it.
It is worth remembering that stripes will be needed for both the flower and the leaves. Therefore, the color palette of stripes must necessarily include green.
The sequence of actions is as follows:
- For the petals of the future flower, you need to roll up a roll using a narrow strip. When unraveled, the roll diameter will be 1.2 cm. For precise measurements, you can use a special stencil with cut holes. The edge of the tape is fixed with glue.
- Next, you should pinch the roll with your fingers. To make one petal, the craftsman should make 3 similar parts. They will all be connected to each other using a glue gun. One daffodil needs at least 6 petals. It is worth connecting the petals into a finished daffodil so that a small diameter hole remains in the center.
- Using yellow stripes, make a cup with a diameter of no more than 1 cm and fill it with glue from the inside.
- Fringe is made along the edges of the wide ribbon and wound around the cup. The ribbon must be fixed with glue.
- The finished flower core is inserted into the center and secured. A green strip is wound onto the wire coated with glue.
- Another cup is made from green ribbons and glued to the stem. The base of the daffodil will be glued to this part.
- The leaves are formed using a comb and are secured to the base using a glue gun.
It will take the master no more than 1 hour to make a real bouquet of daffodils using this technology.
Making quilling crafts for beginners, especially bright, beautiful and delicate flowers, will bring pleasure and will help to make a real miracle from the world of art from ordinary paper.
Article formatting: Vladimir the Great
Video about quilling
Basic elements of quilling: