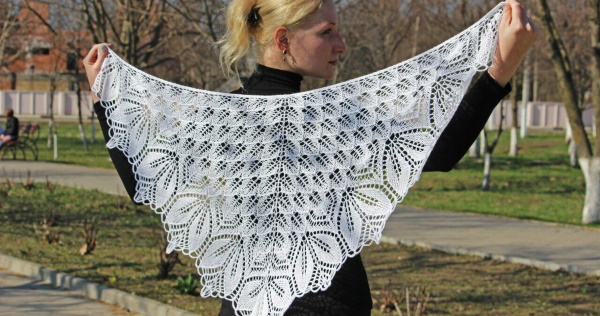
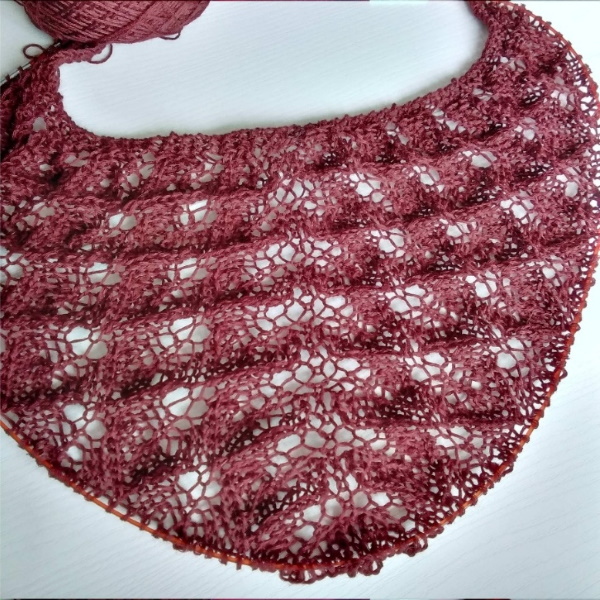
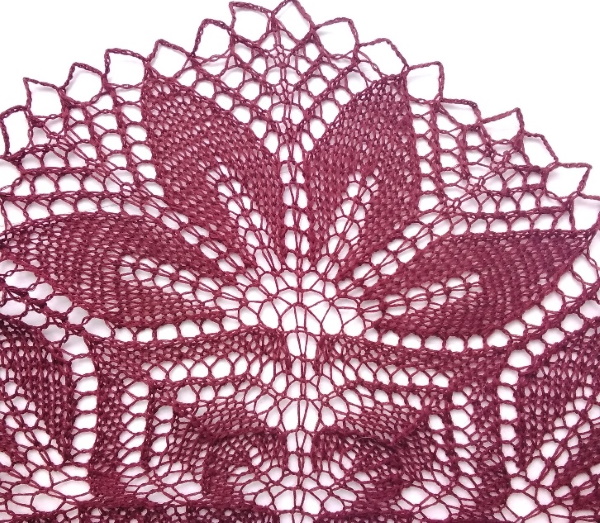
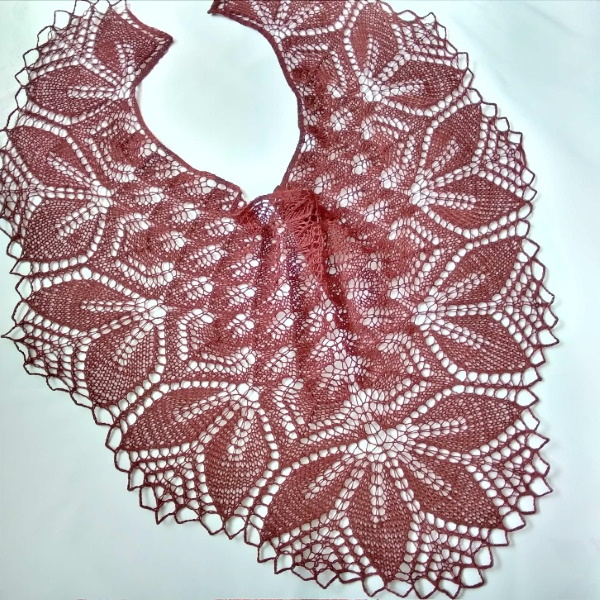
Hand knitted shawl Haruni will become a unique and universal accessory or a great gift, and will take a special place in every woman's wardrobe. Simple patterns form an elegant lace, emphasizing the natural femininity and lightness of the image.
The list of necessary skills for creating this shawl is minimal: the ability to knit and patience when studying patterns. The work will take no more than 3 free evenings, and the finished product will be a reason to be proud.
The Haruni shawl with knitting needles, the pattern and description of which was created by Emily Ross, is a harmony of an easy knitting process and an incredibly beautiful result. The combination of these qualities makes the shawl the most popular among beginner craftsmen.
The original description and knitting pattern for the product appeared in December 2009. To date, there have already been 9 versions of the Haruni shawl in its classic form, many of which have been officially translated into 6 different languages. The Russian version exists thanks to the initiative of the masters and free access to the author's MK.
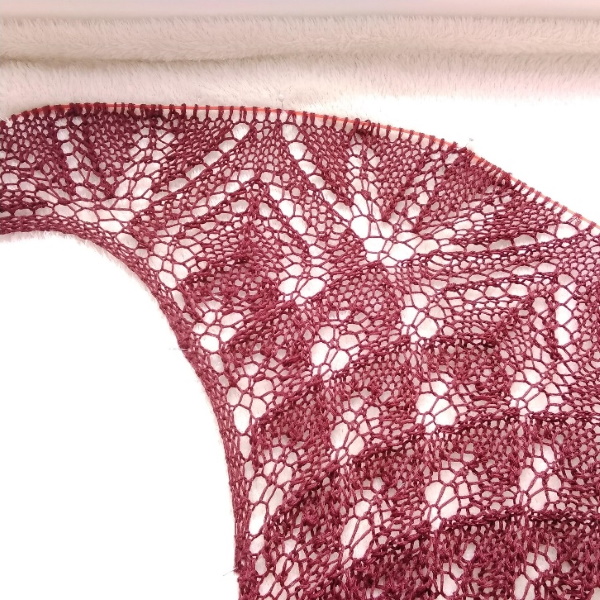
The unusual name of the product is taken from the fictional language of Tolkien's works and means "grandmother". The Haruni shawl has an interesting shape: it is crescent-shaped on the inner edge (which gives an ideal fit on the shoulders) and conditionally triangular on the outer side, which is so popular with adherents of the classics.
Materials and tools
In the original description, the author uses 1 skein of Jill Draper Makes Stuff, Ecopus 457m/100g (100% merino) and 3.5mm circular needles with a 60cm line length.
When choosing alternative options, it is important to pay special attention to the composition of the yarn. Natural yarn with a minimum content or absence of synthetic additives is suitable for a shawl. Yarn with a large meterage will save the craftsman from having to connect the ends of the skeins and tuck in the ends of the threads. The seasonality of the finished product plays an important role: linen and cotton are an excellent option for a cool summer, and for a warm shawl it is better to take wool or mohair.
Examples of the most popular yarns:
- Kauni;
- Dundaga;
- Haapsalu;
- Siulas;
- kid mohair on silk;
- bobbin yarn in several strands of thread.
The knitting needles are selected based on the thickness of the yarn and the comfortable knitting density: usually 3.5 mm, less often 3 mm. You will also need stitch markers to clearly highlight the central part of the shawl, waste yarn and a crochet hook to cast on and close the stitches.
Shawl Haruni knitting. Pattern and step-by-step description
The original Haruni shawl is knitted from the middle of the edge tape down to the border. The width of the shawl is achieved by regular and uniform increases on both sides of the central loop. Increases along the edges of the front rows give the finished product a crescent shape. An interesting feature of the pattern is the ability to independently adjust the size of the future shawl, while maintaining both the openwork pattern and its rhythm.
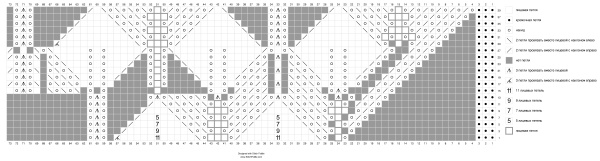
Knitting principle, diagram with description
According to the latest version of the description, the pattern is divided into 3 parts: the beginning, the main part and the border. The pattern and sequence of work have not changed, but it is much more convenient to work with this version than with previous versions. Two patterns are presented for comparison and selection: the most common, with color marking, consisting of 2 parts (3rd edition) and a new one, divided into 3 blocks (9th edition).
Scheme A (3rd edition)

Scheme B (3rd edition)
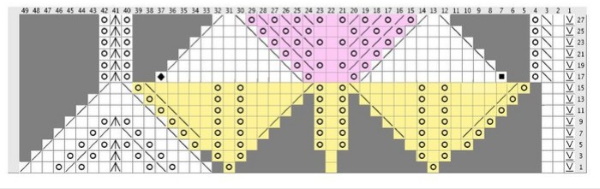
Scheme A
There are 7 loops not marked on the diagram: 3 edge loops at the beginning of each row, 1 center loop, 3 edge loops at the end of each row. After the 9th row, all subsequent rows should be started with loops before the rapport. Then, one after another, the full rapport of the pattern is knitted the required number of times. Next, you should knit the loops marked in the diagram after the red frame. This is the right half of the shawl knitted.
It is necessary to knit the central loop not marked in the diagram. For convenience, it can be separated from the other loops with markers.
The left half of the rows are knitted in mirror image to the right. In other words, after the central loop, the pattern is read from left to right.
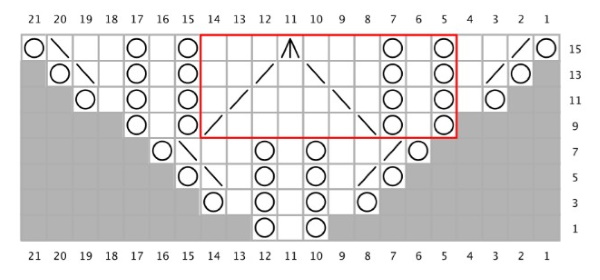
Scheme B
The diagram is read in the same way as diagram A, knitted once.

Scheme C (right side)
The arrows on the diagram indicate the boundaries of the pattern repeat and the central loop.

The edge loops are marked and, starting from the 2nd row, are partially included in the main pattern.
Scheme C (left side)
For convenience, the table shows the symbols used in the diagrams.

 | face loop; |
 | no loop (indicated for easier perception of the diagram as a whole); |
| yarn over; | |
 | 2 stitches knitted together as if to knit (left slanted); |
 | 2 stitches knitted together as if to knit (tilted to the right); |
 | 3 stitches knitted together as if to knit; |
 | 1st loop of the row (the edge loop, which is loose, is removed without being knitted); |
 | The full pattern repeat is highlighted in red. |
Set of loops
The loops for the shawl are cast on using the open method:
- It is necessary to crochet a chain of 4 air loops from the waste thread. Pull the thread out of the last (4th) loop and tighten moderately.
- Insert the hook into the outer loop of the chain, pick up the working thread of the yarn (from which the shawl will be knitted) and pull it back together with the working thread, leaving a free end of yarn of at least 10 cm.
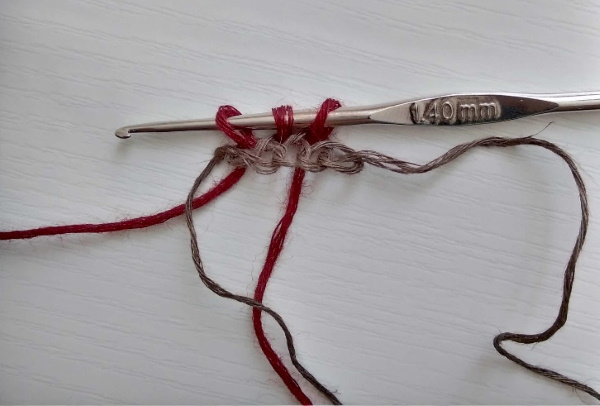
- Insert the hook into the next chain stitch, pick up the working yarn and pull it back. There are 2 loops of working yarn on the hook.
- Raise the last loop in the same way.
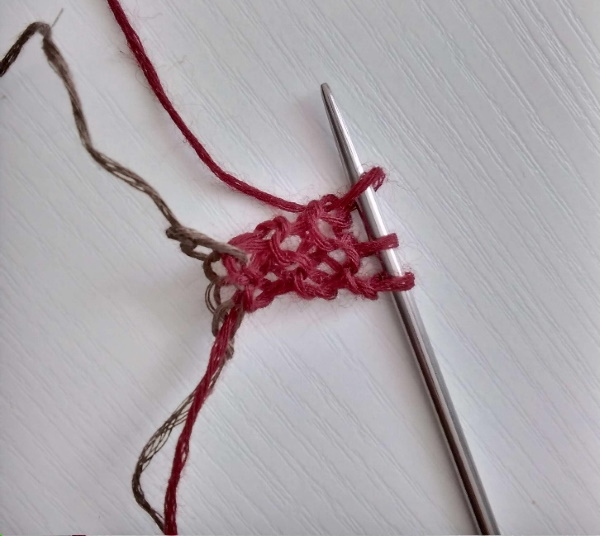
- Then transfer all 3 loops from the hook to the working knitting needle.
- Knit 6 rows with face loops. In this case, the first loop of each row is removed without knitting, and the last loop in each row is knitted as a face loop and very loosely.
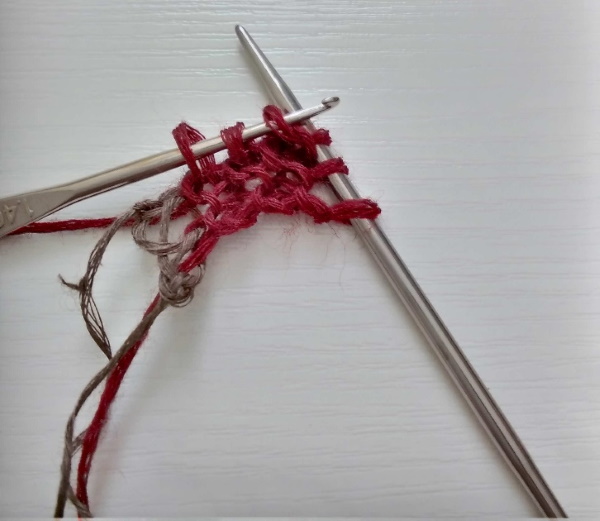
- Having knitted the 6th row, without turning the work, use the crochet hook to pick up 3 loops from the edge loops along the vertical side of the knitting.
- Then carefully remove the waste thread, and transfer the remaining open loops to the left knitting needle and knit as front loops.
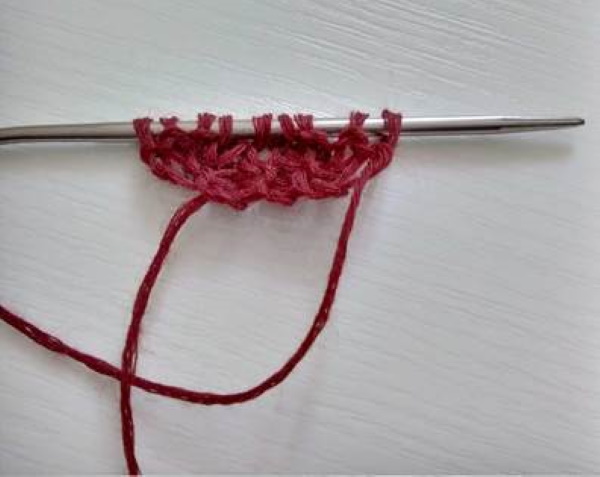
As a result, there are 9 loops on the knitting needle: 3 edge loops, 3 loops of the main pattern, 3 edge loops. Turn the work and knit as follows: loosely remove 1 loop, 2 loops of the front, 3 loops of the back, 3 loops of the front. The first and last 3 loops form the edge band of the future shawl, which will be formed between them. They are not used in the patterns and are knitted with front loops in all rows.
Shawl body, working with the pattern
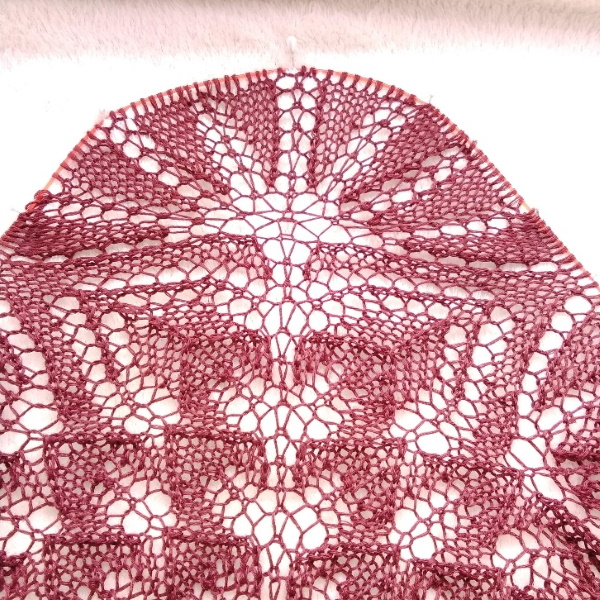
The body of the shawl consists of 2 symmetrical parts, divided by a central loop. A pair of repeating leaf elements is knitted from the yarns on both sides of this loop. Haruni shawl with knitting needles, the diagram and description in this case will increase accordingly, can be adjusted in height and width by the number of knitted pairs of leaves along the central line. Due to the checkerboard arrangement of the elements between themselves, the rhythm of the pattern will not be disturbed, no matter how many additions are made.
Departing from the original description, it is important to take into account two rules: increases (new leaf elements) should be made symmetrically on both sides of the central loop; the final number of loops on the needles should remain a multiple of 40+9.
Legend:
| 3KR | Edge tape loops. At the beginning of each row: slip 1 st; knit 2 sts. At the end of each row: 3 sts. |
| L1 | Front loop. The number indicates the number of front loops in a row. |
| N | Yarn over |
| 2LVL | 2 loops together knitwise with a right tilt |
| 2LVL | 2 loops together knitwise with a left tilt |
| 3LV | 3 loops together knitwise |
| ()×2 | The number of repetitions of the section of loops indicated in brackets |
Scheme A
The description begins with edge loops and ends with them.
The number of loops on the working needle after each row is indicated in brackets:
- 1 row: 3KR, (N, L1)×3, N, 3KR. (13 loops)
- 2nd row (and all even): 3K, purl to last 3 loops, 3K.
- 3rd row: 3KR, (N, L1)×7, N, L3. (21 loops)
- Row 5: 3KR, H, 2LVL, (L1, H)×2, K1, 2LVL, H, K1, H, 2LVL, (L1, H)×2, K1, 2LVL, H, 3KR. (25 loops)
- Row 7: 3KR, H, 2LVL, L2, H, L1, H, L2, 2LVL, H, L1, H, 2LVL, L2, H, L1, H, L2, 2LVL, H, 3KR. (29 loops)
- From 9 to 16 rows a complete pattern rapport is formed, which is marked with an “*” in the description.
- Row 9: 3KR, *N, L1, N, 2LVL, L5, 2LVP*, (N, L1)×2, *N, L1, N, 2LVL, L5, 2LVL*, N, L1, N, 3KR. (33 loops)
- Row 11: 3KR, N, L1, *(N, L1)×2, 2LVL, L3 2LVP, L1* (N, L1)×4, *(N, L1)×2, 2LVL, L3, 2LVP, L1,* (N, L1)×2, N, 3KR. (41 loops)
- Row 13: 3KR, H, 2LVL, L1, *H, L1, H, L2, 2LVL, L1, 2LVP, L2*, (H, L1)×2, 2LVL, H, L1, H, 2LVP, L1, *H, L1, H, L2, 2LVL, L1, 2LVP, L2*, (H, L1)×2, 2LVL, H, 3KR. (45 loops)
- Row 15: 3KR, N, 2LVP, L2, *N, L1, N, L3, 3LV, L3*, N, L1, N, L2, 2LVL, N, L1, N, 2LVL, L2, *N, L1, N, L3, 3LV, L3*, N, L1, N, L2, 2LVL, N, 3KR. (49 loops)
Next, you need to knit rows 9-16 another 10 times. There are 249 loops on the needles.
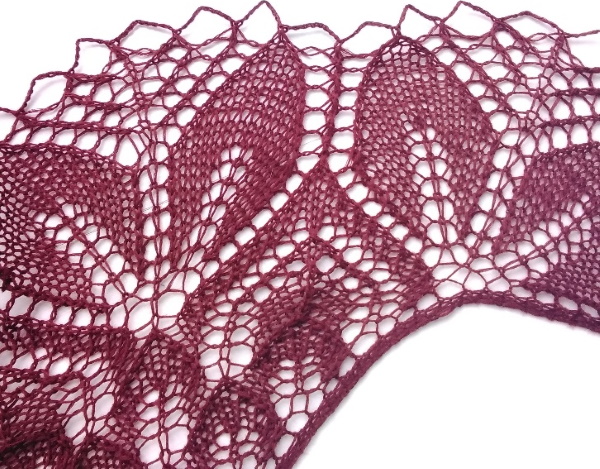
How to make the edge of the product, working on the border
When starting to knit the border, you should take into account that you will need the same amount of yarn as has already been used for the body of the shawl.
Scheme B
Creation continues.
Peculiarities:
- 1 row: 3KR, *N, L1, N, 2LVL, L2, N, 2LVL, N, L2, 3LV, L2, N, 2LVL, N, L2, 2LVL*×6, (N, L1)×2, *N, L1, N, 2LVL, L2, N, 2LVL, N, L2, 3LVL, L2, N, 2LVP, N, L2, 2LVP*×6, N, L1, N, 3KR. (253 loops)
- 2nd row and all even: 3KR, purl stitches to the last 3 stitches, 3KR.
- 3rd row: 3KR, *(N, K1)×3, N, 2LVL, K2, N, 2LVL, N, K1, 3LV, K1, N, 2LVP, N, K2, 2LVP*×6, (N, K1)×4, *(N, K1)×3, N, 2LVL, K2, N, 2LVL, N, K1, 3LV, K1, N, 2LVP, N, K2, 2LVP*×6, (N, K1)×3, N, 3KR. (285 loops)
- Row 5: 3KR, *(N, L1)×7, N, 2LVL, L2, N, 2LVL, N, 3LV, N, 2LVL, N, L2, 2LVL*×6, (N, L1)×8, *(N, L1)×7, N, 2LVL, L2, N, 2LVL, N, 3LVL, N, 2LVP, N, L2, 2LVP*6, (N, L1)×7, N, 3KR. (373 loops)
- Row 7: 3KR, *N, 2LVL, (L1, N)×2, L1, 2LVL, N, L1, N, 2LVL, (L1, N)×2, L1, 2LVL, N, 2LVL, L2, N, 2LVL, L1, 2LVL, N, L2, 2LVL* ×6, (N, 2LVP, (L1, N)×2, L1, 2LVL, N, L1)×2, *N, 2LVL, (L1, N)×2, L1, 2LVL, N, L1, N, 2LVL, (L1, N)×2, L1, 2LVL, N, 2LVL, L2, N, 2LVL, L1, 2LVP, N, L2, 2LVP*×6, N, 2LVP, (L1, N)×2, L1, 2LVL, N, L1, N, 2LVP, (L1, N)×2, L1, 2LVL, N, 3KR. (405 loops)
- Row 9: 3KR, *N, 2LVL, L2, N, L1, N, L2, 2LVL, N, L1, N, 2LVL, L2, N, L1, N, L2, 2LVL, N, 2LVL, L2, N, 3LVL, N, L2, 2LVP*×6, (N, 2LVL, L2, N, L1, N, L2, 2LVL, N, L1)×2, *N, 2LVL, L2, N, L1, N, L2, 2LVL, N, L1, N, 2LVL, L2, N, L1, N, L2, 2LVL, N, 2LVL, L2, N, 3LV, N, L2, 2LVL*×6, N, 2LVP, L2, N, L1, N, L2, 2LVL, N, L1, N, 2LVL, L2, N, L1, N, L2, 2LVL, N, 3CR. (437 loops)
- Row 11: 3KR, *N, 2LVL, L3, N, L1, N, L3, 2LVL, N, L1, N, 2LVL, L3, N, L1, N, L3, 2LVL, N, 2LVL, L5, 2LVL*×6, (N, 2LVL, L3, N, L1, N, L3, 2LVL, N, L1)×2, *N, 2LVL, L3, N, L1, N, L3, 2LVL, N, L1, N, 2LVL, L3, N, L1, N, L3, 2LVL, N, 2LVL, L5, 2LVL*×6, N, 2LVL, L3, N, L1, N, L3, 2LVL, N, L1, N, 2LVL, L3, N, L1, N, L3, 2LVL, N, 3CR. (469 loops)
- Row 13: 3KR, *N, 2LVL, L4, N, L1, N, L4, 2LVL, N, L1, N, 2LVL, L4, N, L1, N, L4, 2LVL, N, 2LVL, L3, 2LVL*×6, (N, 2LVL, L4, N, L1, N, L4, 2LVL, N, L1)×2, *N, 2LVL, L4, N, L1, N, L4, 2LVL, N, L1, N, 2LVL, L4, N L1, N, L4, 2LVL, N, 2LVL, L3, 2LVL*×6, N, 2LVL, L4, N, L1, N, L4, 2LVL, N, L1, N, 2LVL, L4, H, L1, H, L4, 2LVL, H, 3KR. (501 loop)
- Row 15: 3KR, *N, 2LVL, L5, N, L1, N, L5, 2LVL, N, L1, N, 2LVL, L5, N, L1, N, L5, 2LVL, N, 2LVL, L1, 2LVL*×6, (N, 2LVL, L5, N, L1, N, L5, 2LVL, N, L1)×2, *N, 2LVL, L5, N, L1, N, L5, 2LVL, N, L1, N, 2LVL, L5, N, L1, N, L5, 2LVL, N, 2LVL, L1, 2LVL*×6, N, 2LVL, L5, N, L1, N, K5, 2LVL, N, L1, N, 2LVL, L5, N, L1, N, L5, 2LVL, N, 3CR. (533 loops)
Scheme C
Creation continues.
Peculiarities:
- 1 row: 3KR, N, *3LV, R11, 2LVL, N, 3, N, 2LVL, R11, (3LV, N)×2*×6, 3LV, (R11, 2LVL, N, R3, N, 2LVL)×3, R11, 3LV, *(H, 3LV)×2, R11, 2LVL, N, L3, N, 2LVL, L11, 3LV*×6, N, 3CR. (483 loops)
- 2nd row (and all even): 3K, purl to last 3 loops, 3K.
- 3rd row: 2KR, 2LVL, N, *2LVL, L9, (2LVL, N)×2, L1, (N, 2LVL)×2, L9, 2LVL, N, 3LVL, N*×6, (2LVL, L9, (2LVL, N)×2, L1, N, 2LVL, N)×3, 2LVL, L9, 2LVL, *N, 3LVL, N, 2LVL, L9, (2LVL, N)×2, L1, (H, 2LVL)×2, L9, 2LVL*×6, N, 2LVL, 2CR. (457 loops)
- Row 5: 2KR, 2LVL, N, *2LVL, L7, (2LVL, N)×2, L3, (N, 2LVL)×2, L7, 2LVL, N, 3LVL, N*×6, (2LVL, L7, (2LVL, N)×2, L3, N, 2LVL, N)×3, 2LVL, L7, 2LVL, *N, 3LVL, N, 2LVL, L7, (2LVL, N)×2, L3, (H, 2LVL)×2, L7, 2LVL*×6, N, 2LVL, 2CR. (431 loops)
- Row 7: 2KR, 2LVL, N, *2LVL, L5, (2LVL, N)×3, L1, (N, 2LVL)×3, L5, 2LVL, N, 3LVL, N*×6, (2LVL, L5, (2LVL, N)×3, L1, (N, 2LVL)×2, N)×3, 2LVL, L5, 2LVL, *N, 3LVL, N, 2LVL, L5 (2LVL, N)×3, L1, (N, 2LVL)×2, N, 2LVL, L5, 2LVL*×6, N, 2LVL, L2. (405 loops)
- Row 9: 2KR, 2LVL, N, *2LVL, L3, (2LVL, N)×3, L3, (N, 2LVL)×3, L3, 2LVL, N, 3LVL, N*×6, (2LVL, L3, (2LVL, N)×3, L3, (N, 2LVL)×2, N)×3, 2LVL, L3, 2LVL, *H, 3LVL, N, 2LVL, L3, (2LVL, N)×3, L3, (H, 2LVL)×3, L3, 2LVL*×6, N, 2LVL, L2. (379 sts)
- Row 11: 2KR, 2LVL, N, *2LVL, L1, (2LVL, N)×4, L1, (N, 2LVL)×4, L1, 2LVL, N, 3LVL, N*×6, (2LVL, L1, (2LVL, N)×4, L1, (N, 2LVL)×3, N)×3, 2LVL, L1, 2LVL, *N, 3LVL, N, 2LVL, L1, (2LVL, N)×4, L1, x 3, 2LVL*×6, N, 2LVL, 2CR. (353 loops)
Closing the loops
The Haruni shawl with knitting needles (the diagram and description of the closing of loops are given below) is not very convenient to close due to the large number of air arches framing the border. The hook will speed up the work and allow better control of the process. Too tight closing of loops can tighten the edge, which will negatively affect the appearance of the finished product.
The loops are closed on the front side of the shawl. The first 4 loops are knitted together, as if they were knitted. *Then you need to knit a chain of 8 air loops. On the left knitting needle, knit 3 loops together, as if they were knitted, and pull it through the loop already on the hook from the air chain.* Then you need to repeat the alternation until the last 4 loops.
In the process, you should carefully ensure that 3 loops, knitted together, complete each leaf of the border.
Knit the last 4 stitches together as if they were knit stitches. Fasten off and cut the yarn. Use a knitting needle to hide the ends of the yarn.
Stretching the finished product
Stretching or blocking is necessary for the shawl to open up and expand in size.
The tension smoothes the fabric and fixes it in this form until the next wash:
- First of all, the finished shawl must be carefully washed with a special detergent for delicate materials.
- Rinse and carefully squeeze out excess water without wringing.
- Lay the shawl out on a flat surface that can accommodate safety pins. Shape it into a crescent.
- Secure the shawl with pins, spreading it out and stretching it well. It is important to ensure symmetry and the correct direction of the patterns on the product. Particular attention should be paid to the border and the numerous arches with which it ends.
- If necessary, the position of the previously fixed needles can be adjusted during the stretching process. A well-blocked shawl should be left until completely dry.
Features of knitting a shawl with a double border
The Haruni shawl with knitting needles, the diagram and description of which are quite easy to change slightly, can be connected with a double border. This is a deviation from the canons of the original model, thanks to which it is possible to increase the size of the product.
Knitting of the Haruni shawl according to the schemes A and B is carried out without changes. The scheme C will require corrections, where according to the pattern the leaves of the first border will gradually be completed and, at the same time, the space for the second border will be formed.
In this case, the edge tape remains the same width (3 loops) until the very end of knitting the shawl. The additional diagram C1 shows the right half of the rows up to the central loop. The left part is knitted in mirror image. The step-by-step description discusses in detail the key points of knitting a double border.
Scheme C1
Table:
| Row number | Start of row/end of row | Rapport | Central Motif |
| 1 row | 3KR, N, L1, N, 2LVL, L11, 2LVL, N, L3, N, 2LVL, L11, 3LVL; | *N, 3LVL, N, 3LVL, L11, 2LVL, N, L3, N, 2LVL, L11, 2LVL* | H, L1, CP |
| 3rd row | 3KR, N, L1, N, 2LVL, N, 2LVL, L9, (2LVL, N)×2, L1, (N, 2LVL)×2, L9, 2LVL; | *N, 3LVL, N, 2LVL, L9, (2LVL, N)×2, L1, (N, 2LVL)×2, N, 2LVL, L9, 2LVL* | H, 2LVP, H, CP |
| Row 5 | 3KR, N, 2LVL, N, L1, N, 2LVL, N, 2LVL, L7, 2LVL, N, 2LVL, N, L3, N, 2LVL, N, 2LVL, L7, 2LVL; | *N, 3LV, N, 2LVL, L7, 2LVP, N, 2LVP, N, L3, N, 2LVL, N, 2LVL, L7, 2LVP* | H, 2LVP, H, L1, CP |
| Row 7 | 3KR, N, 2LVL, N, L1, (N, 2LVL)×3, L5, (2LVL, N)×3, L1, (H, 2LVL)×3, L5, 2LVL; | *N, 3LVL, N, 2LVL, L5, (2LVL, N)×3, L1, (N, 2LVL)×3, L5, 2LVL* | N, 2LVP, N, 2LVP, N, CP |
| Row 9 | 3KR, N, 2LVL, N, L3, (N, 2LVL)×3, L3, (2LVL, N)×3, L3, (H, 2LVL)×3, L3, 2LVL; | *N, 3LVL, N, 2LVL, L3, (2LVL, N)×3, L3, (N, 2LVL)×3, L3, 2LVL* | N, 2LVP, N, 2LVP, N, L1, CP |
| Row 11 | 3KR, (H, 2LVL)×2, N, L1, (H, 2LVL)×4, L1, (2LVL, N)×4, L1, (H, 2LVL)×4, L1, 2LVL; | *N, 3LVL, N, 2LVL, L1, 2LVL, (N, 2LVL)×3, N, L1, (N, 2LVL)×4, L1, 2LVL* | (N, 2LVP)×3, N, CP |
| Row 13 | 3KR, (N, 2LVL)×2, N, 3LVL, (N, 2LVL)×3, N, 3LVL, N, (2LVL, N)×3, 3LVL, (N, 2LVL)×3, N, 3LVL; | *N, 3LV, N, 3LV, (N, 2LV)×3, N, 3LV, N, (2LVL, N)×3, 3LV* | (N, 2LVP)×3, N, L1, N, CP |
| The 2nd border begins | |||
| Row 15 | 3KR, (N, 2LVL)×2, N, 33LVL, N, (2LVL, N)×2, 2LVL, L1 (2LVL, N)×3, (N, L1)×3, N, (2LVL)×3, L1; | *N, 3LV, N
L1, (2LVP, N)×3, (N, L1)×3, (N, 2LVL)×3, L1* | (2LVP, N)×3, (L1, N)×3, CPU |
| Row 17 | 3KR, (N, 2LVP)×2, (N, L1)×3, N, (2LVL, N)×2, 3LV, N (2LVL, N)×2, (L1, N)×7, (2LVL, N)×2, 2LVL; | *N, L3, N
(2LVL, N)×2, (L1, N)×7, (2LVL, N)×2, 3LV* | (N,2LVP)×2, (N, L1)×7, N, CPU |
| Row 19 | 3KR, (H, 2LVP)×3, (L1, N)×2, L1, (2LVL, N)×2, 2LVL, L1
(2LVP, N)×2, 2LVP, (L1, N)×2, L1, 2LVL, N, L1, N, 2LVP, (L1, N)×2, L1, (2LVL, N)×2, 2LVL, L1; | *N, 3LV, N
(2LVP, N)×2, 2LVP, (L1, N)×2, L1, 2LVL, N, L1, N, 2LVP, (L1, N)×2, L1, (2LVL, N)×2, 2LVL, L1* | (N, 2LVP)×2, (L1, N)×2, L1, 2LVL, N, L1, N, 2LVP, (L1, N)×2, L1, 2LVL, N, CP |
| Row 21 | 3KR, (N, 2LVP)×3, L1, (L1, N)×2, L2, (2LVL, N)×2, 3LV, N
2LVP, N, 2LVP, L1, (L1, N)×2, L2, 2LVL, N, L1, N, 2LVP, L1, (L1, N)×2, L2, (2LVL, N)×2, 2LVL; | *N, 3LV, N
(2LVP, N)×2, 2DVP, L1, (L1, N)×2, L2, 2LVL, N, L1, N, 2LVP, L1, (L1, N)×2, L2, (2LVL, N)×2* | 3LV, (N, 2LVP)×2, L1, (L1, N)×2, L2, 2LVL, N, L1, N, 2LVP, L1, (L1, N)×2, L2, 2LVL, N, CP |
| Row 23 | 3KR, (N, 2LVL)×3, L2, (L1, N)×2, L3, 2LVL, N, 2LVL, L1
2LVP, N, 2LVL, L2, (L1, N)×2, L3, 2LVL, N, 2LVL, L1; | *N, 3LV, N
L1, 2LVP, N, 2LVP, L2, (L1, N)×2, L3, 2LVL, N, L1, N, 2LVL, L2, (L1, N)×2, L3, 2LVL, N, 2LVL, N, 2LVL, L1* | 2LVP, N, 2LVP, L2, (L1, N)×2, L3, 2LVL, N, L1, N, 2LVP, L2, (L1, N)×2, L3, 2LVL, N, CN |
| Row 25 | 3KR, (N, 2LVP)×3, L4, N, L1, N, L4, 2LVL, N, ZLV
N, 2LVP, L4, N, L1, N, L4, 2LVL, N, L1, N, 2LVL, L4, N, L1, N, L4, 2LVL, N, 2LVL | *N, 3LV, N
2LVP, N, 2LVP, L4, N, L1, N, L4, 2LVL, N, L1, N, 2LVP, L4, N, L1, N, L4, 2LVL, N, 3LV | N, 2LVP, L4, N, L1, N, L4, 2LVL, N, L1, N, 2LVP, L4, N, L1, N, L4, 2LVL, N, CP |
| Row 27 | 3KR, (N, 2LVP)×3, L5, N, L1, N, L5, 2LVL, N, L1,
N, 2LVP, L5, N, L1, N, L5, 2LVL, N, L1, N, 2LVP, L5, N, L1, N, L5, 2LVL, | *N, 2LVL, L1, 2LVL, N
2LVP, L5, N, L1, N, L5, 2LVL, N, L1, N, 2LVP, L5, N, L1, N, L5, 2LVL* | H, L1, H
2LVP, L5, N, L1, N, L5, 2LVL, N, L1, N, 2LVP, L5, N, L1, N, L5, 2LVL, N, CP |
After row 28, pattern C of the classic version of the Haruni shawl is duplicated, with adjustments to the beginning and end of each row, where only one sheet of a pair is knitted. The sequence of closing the loops and blocking the finished product is similar to those described above for a shawl with a regular border.
Important nuances in knitting a shawl
For a better understanding of the process and to avoid possible mistakes when knitting the Haruni shawl, it is recommended to use the diagrams and the loop description at the same time. In cases where it is not possible to control the first loop of the row, it can be knitted in each row as a front loop.
Stitch markers will delimit the full pattern repeats, highlight the central stitch, save time when counting stitches and help avoid unnoticed mistakes. If possible, it is better to choose a color of knitting needles that contrasts with the yarn. This will reduce the strain on the eyes and make it easier to perceive the knitted pattern.
Video about knitting a shawl Haruni with knitting needles
How to start knitting the Haruni shawl:
Thank you very much for the description. I have been knitting for over 35 years, but I have never knitted a shawl with knitting needles. I can easily read patterns, but when I saw the pattern of the shawl, I did not understand how to knit it at all. I read your description, took the knitting needles and everything knitted perfectly. A wonderful description, understandable even for beginners in knitting a shawl. Once again, thank you very much!