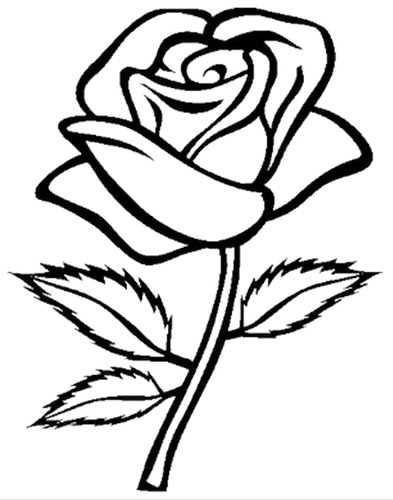
The rose combines beauty, royal grandeur and nobility. To admire it, it is not necessary to grow it in a garden plot. A beginner or an experienced artist just needs to take paper, a pencil and step by step draw a flowerSuch a rose will not smell as sweet as a living one, but it will be able to please with its appearance all year round.
Drawing tools
To create a sketch you will need:
- paper;
- simple pencil;
- an eraser that can be used to remove extra lines;
- colored pencils or paints to color the drawing.
Often the work is done with paints alone, without using a simple pencil.
Paper
There are many experiments that can be done with paper for painting. Companies produce materials of different quality and properties. Particular attention should be paid to the ability of the paper to absorb and retain water. Only by experimentation can you find a material suitable for a particular style.
For drawing, both various school albums and special paper intended for working with watercolor paints are well suited. The latter includes products of the Gosznak brand. It is pure cellulose, its density is 200 g per sq. m.

The thicker the paper, the easier it is to paint on it, because it retains moisture well. For example, a canvas with a density of 300, 400 or 500 g per sq. m. However, if you plan to draw only with a pencil, there is no need to look for thick paper on the shelves. For such drawings, 160 g per sq. m. will be enough.
Pencils
A beginner artist does not need to buy many pencils of different hardness to draw a rose step by step. At first, 1 HB pencil will be enough. Then, as needed, you can add new tools.
When choosing simple pencils, you need to pay attention to the letters and numbers. When combined, these symbols indicate the hardness of the lead.
Two letters are used for marking:
- "H" - indicates that the lead is hard;
- "B" - tells the buyer and the artist that the lead is soft. With the help of such pencils it is convenient to create dark dense strokes on paper.
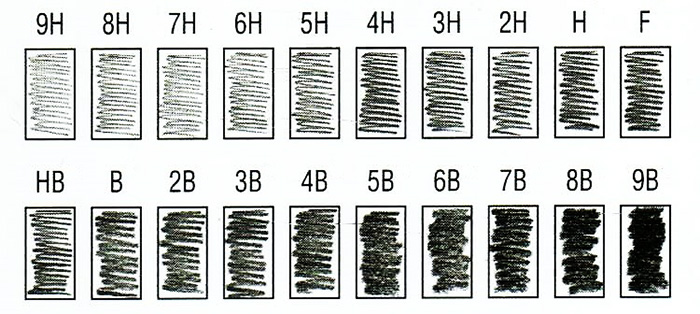
If both letters are used at the same time, then this is a medium-soft pencil. It is considered universal and is recommended for use by beginning artists.
Instead of the letters "H" and "B" "T" and "M" can be used. These are Russian letters that are present on pencils of domestic production.
Their meaning is similar to the English letters:
- Russian "T" corresponds to English "H" (hardness);
- Russian "M" is the equivalent of the English "B" (softness);
- "TM" – corresponds to a universal pencil.

The mark a pencil leaves on paper depends on its sharpening. You can experiment by sharpening the pencil in different ways or trying to press the pencil differently to get different strokes and effects.
Paints
Almost any watercolor will do for training. You can buy paints in tubes or in cuvettes. For a low price, you can buy watercolors from the Luch company, produced especially for schoolchildren. Tubes of paints from the Nevskaya Palitra company will also be a good choice, but you will have to pay more for the purchase.
It is not necessary to buy many tubes, trying to collect the entire color palette. It is enough to buy 3 colors, from which, when mixed, you can easily get any other.
Primary colors:
- red;
- yellow;
- blue.
For example, if they mix:
- red and yellow will make orange paint;
- yellow with blue, green is formed;
- red and blue - purple color.
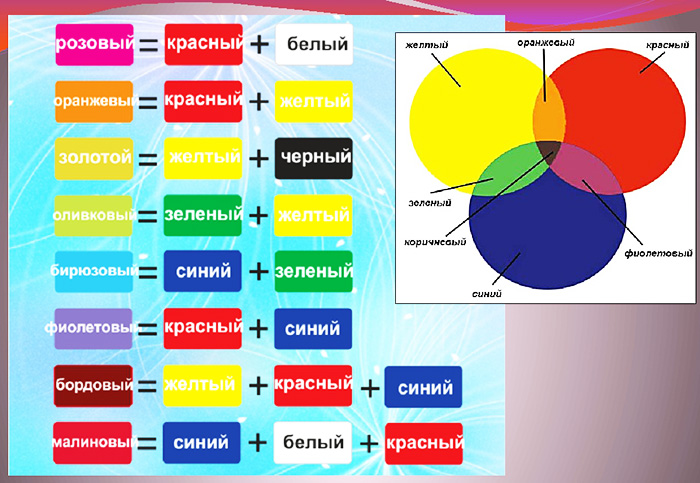
The shades of colors can be adjusted by changing the proportions of the mixed paints.
Paint applied to paper does not always look the same as it did before application, while it was stored in a tube or tray. Therefore, it is better to first take a separate sheet and check how the watercolor applied to it will look. The sheet can be pre-wetted to obtain different transitions and shades.
The sheet with the applied paints can be stored directly in the box. In the future, it will greatly simplify the work, because you will not have to spend a long time choosing the right shade for the drawing.
Brushes
Brushes come in different shapes and sizes and are made from different materials.
For example:
- When it comes to painting with watercolor paint, a squirrel brush is usually used. It is soft and has the ability to absorb a large amount of water. It is well suited for filling a large area;
- For drawing small details, a brush with a thin tip should be used. However, it should be borne in mind that it is too soft and loose, so it is not capable of creating a thick color;
- To add density to the drawing, as well as to draw large details, it is better to use elastic kolinsky hair.
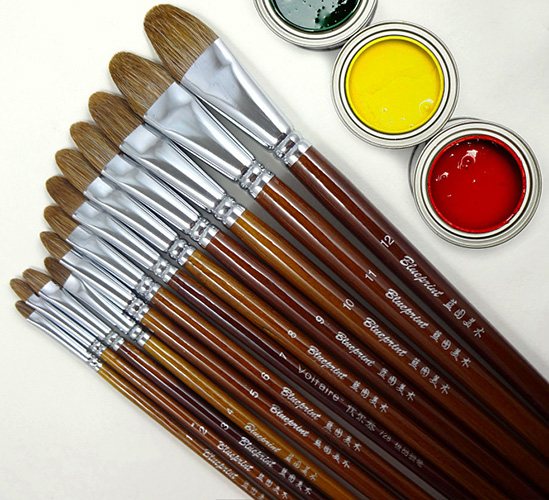
The bristles of synthetic brushes are elastic and hard. They do not absorb much water and do not release it well. But they retain their shape well, and the hairs do not fall out. It is noteworthy that 1 such brush can become universal when drawing.
The large bristles can be used for filling, and the thin brush can be used for drawing small details.
Master classes
You can draw a rose with a pencil step by step for beginners only after preparing all the materials and tools. For those who have just begun to master the basics of painting, it is recommended to start with a simple method.
Simple pencil drawing
One of the easiest ways to draw a rose is with a pencil.
The work takes place in the following 5 stages:
- Without pressing hard on the pencil, make a sketch of the flower. It should consist of an oval and a couple of lines. The oval will become the prototype of the bud, and the 2 parallel lines extending from it will be the stem.
- In the center of the oval bud, draw spiral lines to form rose petals.
- Clearly draw each flower petal, not forgetting about the bends and folds.
- Make the necessary thickenings, while highlighting the main lines both on the flower itself and on its stem.
- Work with shadows. There should be strokes in the shaded areas. Most of them will be on the petals. Hatching is important because in this case the rose will acquire volume and realism.
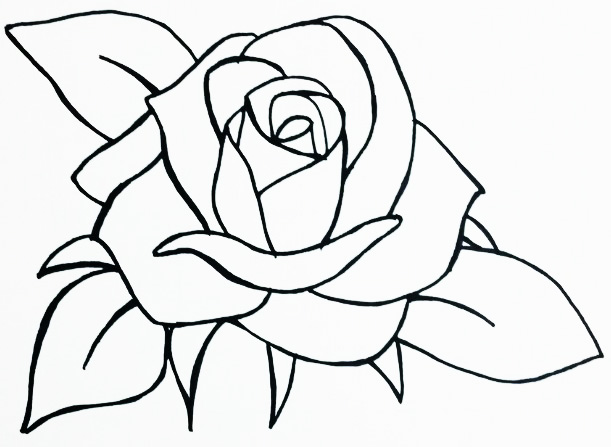
This is where the work on drawing the flower ends. You can leave everything as is and start admiring the drawing, or you can color the image. For this, you will need red (if you decided to make the petals exactly like this) and green colors.
Bouquet of roses
You can draw a rose with a pencil step by step for beginners, not only one, but a whole bouquet.
The work will take place in the following stages:
| No. | Stage | Description |
| 1 | Make a general sketch | It consists of 3 elements:
|
| 2 | Make sketches of buds | Each of them is represented by an oval. Their number can be any, for example, 11 flowers, 13, 15. From each bud a line extends downwards, which will be the stem. At this stage, you need to round off the bottom of the vessel, and draw a luxurious bow between it and the flowers. |
| 3 | Give the buds the desired shapes | There should be another line along each stem. This will make the stems thicker.
The bow also needs to be detailed. Draw petals in buds, remembering about sepals |
| 4 | Add leaves to the stems | They need to be drawn more, because there are many flowers in the bouquet. |
| 5 | Decorate the vessel | You can draw several vertical lines on its surface.
Apply shading in the necessary places |
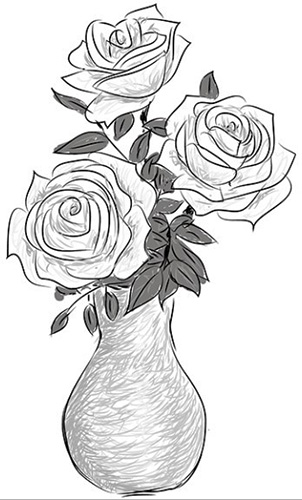
The resulting luxurious bouquet can be colored with colored pencils.
Drawing with a simple pencil and coloring with colors
You can draw a rose with a pencil step by step (for beginners, the options are not limited to just a simple pencil), both in color and without.

The work is carried out in the following stages:
- Create a schematic image. To do this, draw a vertical line in the middle of the paper sheet, which will become the stem. This line should not be just vertical, but slightly inclined and slightly wavy.
- Draw an oval at the top of the stem. This will be the rosebud.
- Draw 2 branches at the bottom of the stem, at an angle in different directions: one to the left, the other to the right, both of which are directed upwards. For now, they can be depicted with simple lines.
- Draw a couple more lines from one of the branches. These will also be branches. They will make the rose drawing more saturated.
- In the oval, which is the basis of the bud, draw 2 lines that cross each other. They will become the lower petals of the flower. Then add the next pair of crossing lines above them in the bud. They should be located approximately in the center of the flower.
- In the place where the stem ends and the bud begins, draw several lines in different directions to indicate the sepals.
- At the end of each lower branch (there should be 4 of them in total: 1 on one side of the stem, and 3 on the other side), draw small ovals that will become leaves.
- Make the stem thicker. It should be represented not by 1 line, but by 2. Next to the main line, draw another 1 at a distance of several mm.
- Draw the leaves using smooth lines. Each of them should be smoothly connected to the corresponding branch.
- To design the ends of the leaves, use curved lines with small teeth.
- Return to work on the flower itself. Extend the petal lines beyond the oval and round them.
- At the top of the bud, depict the bends of the petals downwards. The lower petals should be thicker and have a protrusion in the middle in the form of an acute angle.
- Add the same sharp angles to the sepals located under the bud.
- Remove unnecessary details that were used only to simplify the work on creating the drawing. To do this, use an eraser.
- Start working with colored pencils. First apply emerald color to the leaves and pink color to the petals.
- Using more saturated colors, do the shading. A light green pencil is best for the leaves, and a light pink one for the bud. The colors should become more saturated toward the bottom. It is worth remembering that the upper edges of the petals, which are bent back, should be lighter.
- Use a burgundy-lilac pencil to make the drawing more saturated. Use this tone to color the lower part of the bud and the edges of the petals.
- Draw the outlines of the leaves, highlighting the stems and sepals. A dark green pencil is used for this.
Watercolor drawing
Flowers painted with watercolors look sophisticated and elegant. Artists usually use professional watercolors, but simple paints that can be purchased at your local art supply store will do just fine.
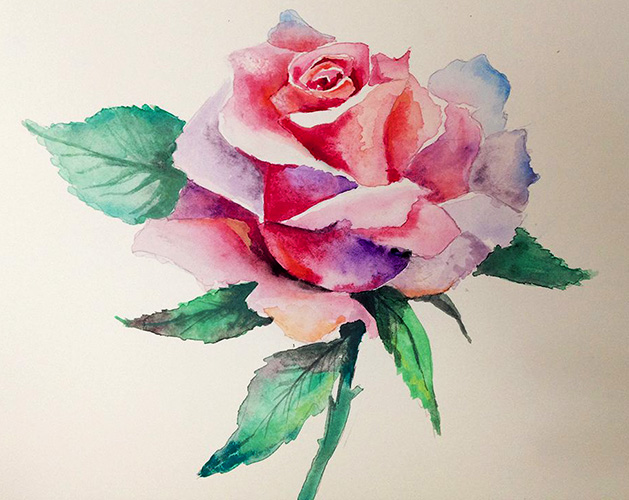
Once you have prepared the paper and paints, you can begin creating your drawing.
The work takes place in the following stages:
| No. | Stage | Description |
| 1 | Create a sketch | To do this, select a suitable image and make a barely noticeable sketch. If you can't do it yourself, you can use this technique: in clear weather, place the selected image on the window and transfer it to blank paper. |
| 2 | Apply 1st layer of watercolor | Each rose petal should be painted separately. Before you start painting the next petal, you need to wait a little until the layer of paint on the previous one dries well. Otherwise, the watercolor will flow. At this stage, 2 colors are used - pink and orange. The guidelines to follow when mixing paints are as follows:
If you follow these simple rules, the colors will mix harmoniously. |
| 3 | Application of new shades | In addition to pink and orange flowers, there should be:
This will give the drawing more saturation. |
| 4 | Working on the background | In this case it is very important, because it is not just a drawing, but a colorful picture.
The background will be colored spots. Before applying paint, the paper must be moistened with water |
| 5 | Create shadows on the drawing | They are performed only after all layers of watercolor have dried.
The following shades are used for this:
Thanks to this, the drawing will become more beautiful and expressive. |
| 6 | Add depth to the background | To do this, a fresh layer of paint is applied to the dried layer. But when applying, it is important to ensure that the background paint does not get on the roses themselves. In addition, it is necessary to ensure that the surroundings are darker than the flowers. Otherwise, the picture will not look very good. |
| 7 | Detailing | It is necessary to draw veins and shadows on the petals. |
Gouache drawing
Beginner artists and children can try painting a rose using an interesting technique called finger painting.
To work you will need::
- thick paper – A4 cardboard;
- gouache;
- vessel with water;
- several napkins;
- some plasticine;
- tassels.
The cardboard should be smooth so that your fingers can slide better over the surface. The paint should be diluted in water in advance.
It is recommended to first look at similar works of artists and photographs of roses.
Then you can begin the drawing process:
- Draw a small red circle with your finger.
- Place several arced lines around it.
- Add a small amount of white paint. This is also done with your fingers.
- Make the center of the rose dark.
- Draw another one, in the form of a drop, near the blossoming lush flower. It will be on another stem.
- To draw a teardrop flower, dip your finger in red paint and then leave a mark of the desired shape on the surface of smooth cardboard.
- Proceed to drawing the petals. You can't do this with your fingers, so brushes will come to the rescue. A large, open rose should be on a thick stem. And for an unopened teardrop-shaped bud, the stem should be made thinner. At the same time, add green to the lower part of the bud with your finger.
- To draw leaves you will need plasticine, or rather figures molded from it. The leaf must be molded in advance and on one side of it you need to make cuts with a stack that will imitate veins.
- The finished plasticine leaf should be dipped in gouache and then used to make prints on the surface of the cardboard.
- Young artists can use a brush to apply gouache to a plasticine stamp.
- Having depicted the required number of leaves, you can begin drawing the petals. For this, thin brushes are used.
This concludes the work on drawing the rose. The painting, done with gouache, is ready.
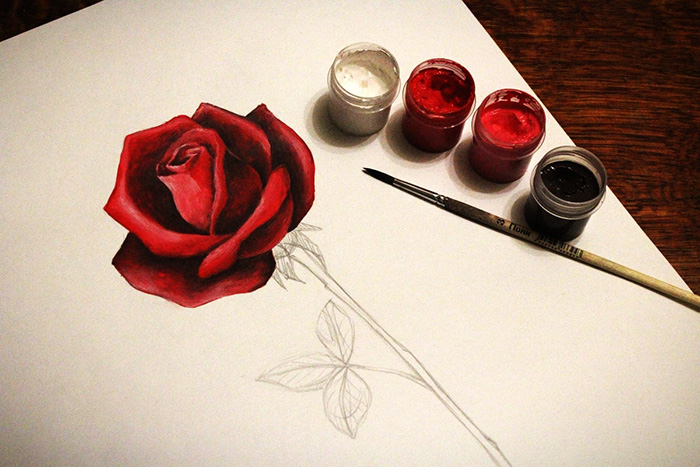
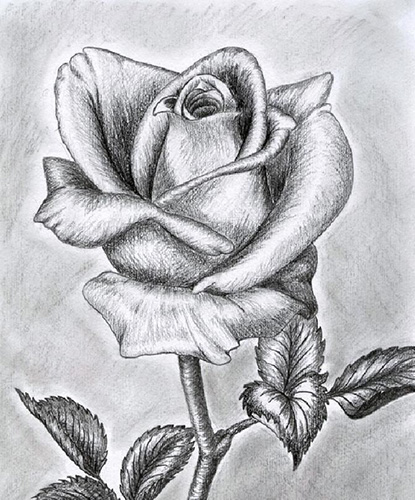
Complex pencil drawing
You can draw a rose with a pencil step by step for beginners not only in a simple version, but also in a complex one. This option is suitable for those who have experience in painting.
The drawing process takes place in the following stages:
- Draw a long arced line on a sheet of paper. This will be the stem.
- Mark the borders of the bud at the top and bottom. In addition, its center should be defined.
- Start drawing the middle of the bud. Its components are a large number of leaves pressed tightly against each other.
- Gradually add other petals to the flower. It is important to remember that the shapes should be strict and geometric. The result should look like a rose. However, the flower does not yet have a full-fledged stem or leaves.
- Draw a stem and then several leaves extending from it.
- Start working with shadows. This will give the rose visual volume.
- Areas that are not exposed to light should be shaded with a pencil. It is best to choose a softer pencil for this. It is most convenient to do shading with it.
- When there are shadows on the surface of the flower, you can add penumbra. It should be remembered that petals that curl outward necessarily have highlights and darken closer to the edges.
- Add detail to the leaves. Use the same shading to add some shadows.
This completes the work on creating the rose.
Beginner artists may think that drawing a rose is difficult, because it has many twisting petals. However, in reality, there is nothing difficult here. The main thing is to understand the labyrinth of petals and draw the sketch with a pencil gradually.
In the central part there are several petals rolled into a tube. The remaining petals seem to embrace the bud. It is important to remember that each flower has its own slope and its own number of petals.
Video about rose drawing
Master class on drawing a simple rose: