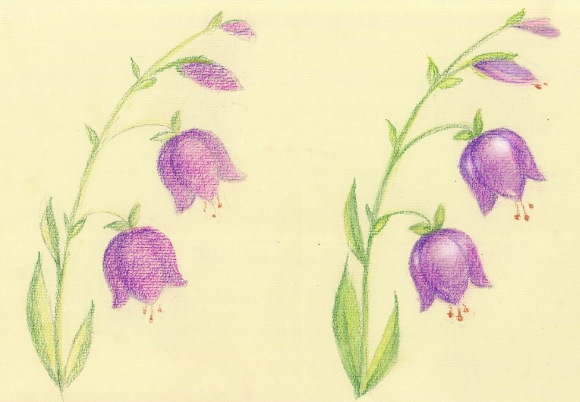
Drawing skills are essential for children's development. This will help expand their creative vision of the surrounding space, instill a sense of beauty and responsibility for preserving the environment. It is best to start with simple things, such as bell flowers. Once the technique of drawing them is mastered, you can move on to complex objects.
Step-by-step description of the master class
Learn to draw well It is not easy, but if you work on developing your skills, improving your technique and carefully studying the theory, you can achieve a lot. To learn how to draw a bell, you will need patience and perseverance. Some actions will have to be repeated many times, step by step moving towards the intended goal.
To work you will need the following tools:
- a simple pencil of medium softness;
- a box of colored pencils;
- soft eraser;
- album sheet for drawing;
- watercolor paints and palette;
- squirrel brushes of different sizes;
- water container;
- adhesive tape;
- napkins.
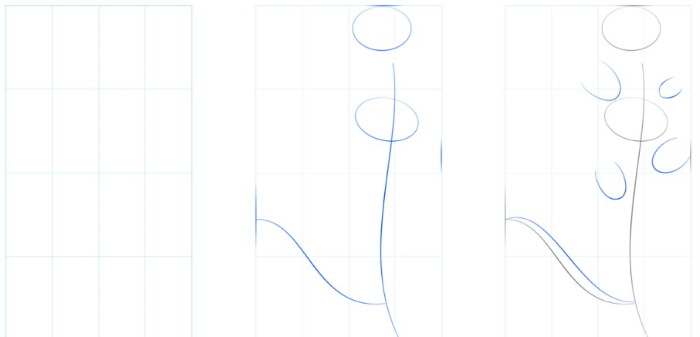
The steps for drawing a bell are as follows:
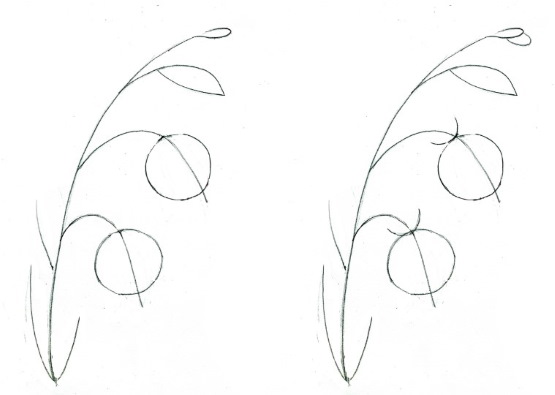
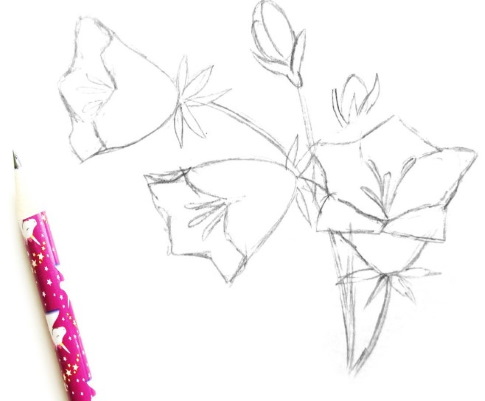
- Use a simple pencil to outline the stem of the plant.
- Draw 3 branches from the stem to the sides.
- Decorate the branches with flowers. To do this, draw a small branch-stem near each of them, on which there will be a bud.
- At the top of the stem, mark the boundaries of the side petals.
- Draw the outlines of the petals more clearly. There are 3 of them, each will have sharp edges.
- Draw small sepals at the base of the bud being created.
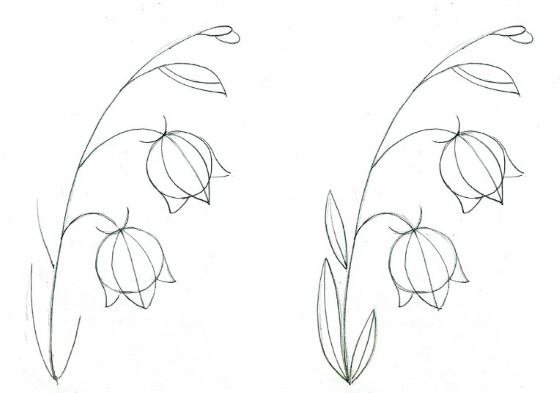
- To make the drawing look realistic, highlight the place where the flower is attached to the stem.
- Make the stem thicker so that it has visual volume. From the base, draw another long and thin leaf.
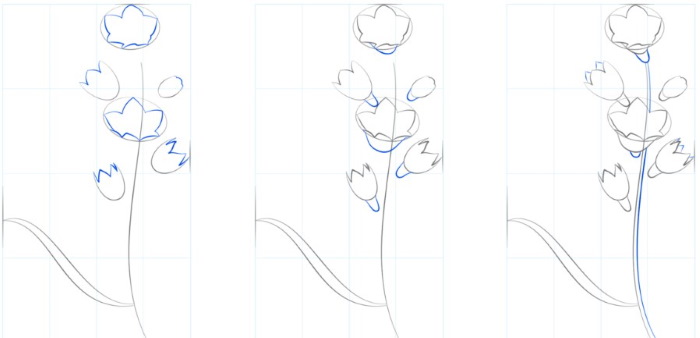
- Use straight dashed lines to mark the middle of each petal.
- Draw a few more leaves at the base of the stem, and add a firefly or ladybug to the trunk.
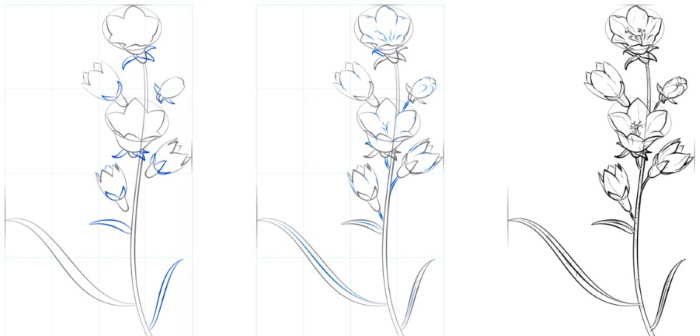
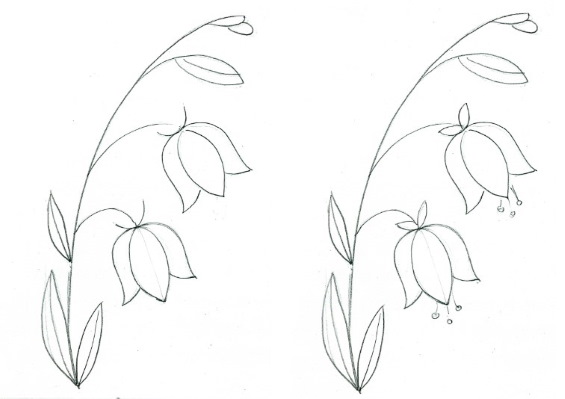
- To get a three-dimensional image, shade the drawing correctly. To do this, make some places darker, creating a penumbra effect.
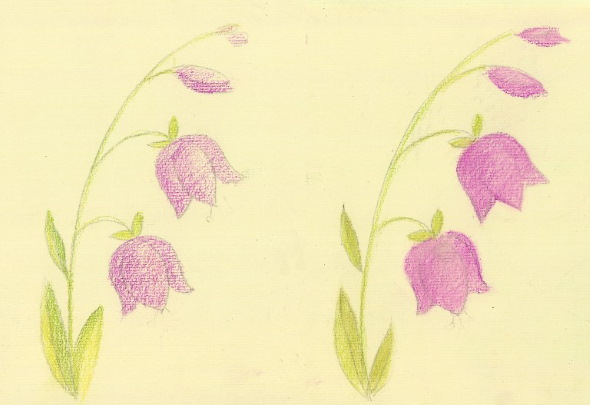
After finishing the work, hang the creation on the wall or give it to a loved one.
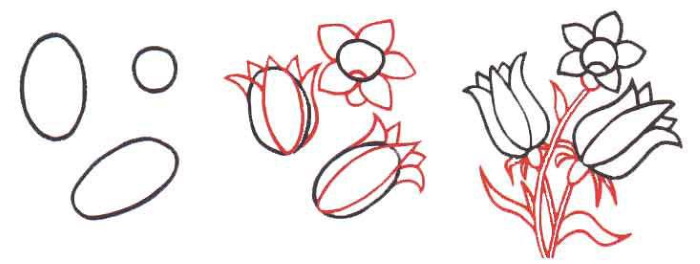
How to draw easily with a pencil
The bell (it is better to create a drawing for children following step-by-step instructions) is drawn with pencils as follows:
- Draw triangles that will become flowers.
- Draw blossoming flower buds onto the triangles.
- Each flower is worked out in detail with a pencil.
- Colour the resulting still life with purple and green pencils.
The base can be made in the form of 3 ovals of different sizes. It is better to draw the petals from the picture, and then finish drawing the stems and leaves. Small children will be able to create a simple drawing of a bell, which requires a minimum of abilities for such creativity. Gradually, the skills will develop, and you can move on to more complex options.
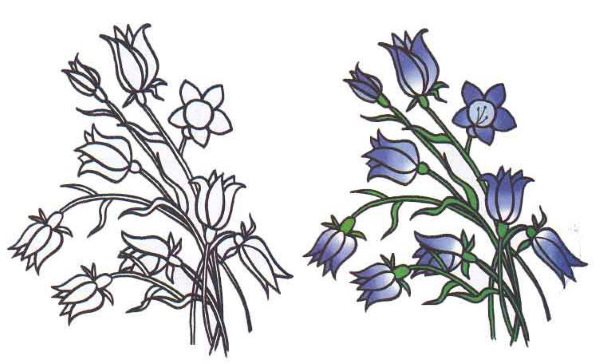
How to draw a beautiful bouquet with a pencil
Having mastered the technique of drawing one flower, you can move on to creating compositions. For example, a bouquet of bells according to a familiar, proven scheme can be created quickly.
Namely:
- Having drawn 1 flower, move on to the 2nd, drawing its stem next to it.
- To create a bud, make an oval with a light movement of the pencil. It has a shape that is not too elongated. At the top, divide the circle into segments to get petals.
- Remove extra strokes with an eraser. To make it neat, you need to choose a pencil that is not too soft and a high-quality eraser.
- The petals being created should be slightly pointed at the top, like those of the bellflower growing in the meadows.
- Draw lines down from the flowers. They will be the stems of the plants. To make a bouquet, connect the lines at one point.
- Draw the created sketch in more detail, making the stem thicker. To do this, you need to outline it several times with a pencil, using the softest one.
- Draw the leaves, trying to arrange them on the paper evenly from each other.
- When the base of the bouquet is ready, color it with colored pencils or paints.
The developed technique will help to create a beautiful bouquet, but to get a picture, you need to use your imagination.
For example, you can:
- depict that the flowers have been recently picked and are lying on a white table, which will be the sheet of paper used;
- finish drawing the vase and then it is almost a finished picture. If the child knows how to use paints, you can take them. Such a picture will look more advantageous.
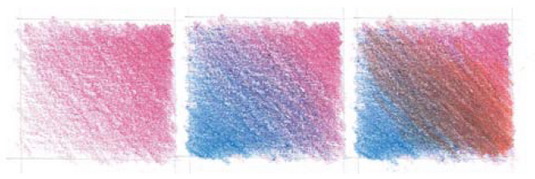
When choosing pencils for coloring flowers, you need to understand that you can’t always find the appropriate color in their palette. To get the right shade, you need the skill of color composition. To do this, one tone is superimposed on another and a new shade is formed.
To master the technique of layered shading, you need to choose rough paper and, when applying strokes, do not press too hard on the pencil so that the pigment adheres more firmly to it.
The bell (the drawing for children in the execution technique should not be too complicated and bulky) can be painted in the following tones:
- sky blue;
- yellow;
- purple.
If only a black pencil is used, the picture will look unnatural, it is better to paint the flowers in different shades of shadow. For example, it can be green and mangent or yellow and purple with blue. To determine the shade of shadow, it is recommended to focus on the color wheel. The combination of colors can give a muted shadow in a brown or gray tone.
The technique of creating a stroke affects not only the quality of the drawing, but also the speed of its creation. To get a certain result, you need to choose the appropriate hatching option.
For example:
| Type of hatching | Description |
| Light, small, circular strokes | Suitable for creating an even coating. At the same time, the pencil lead practically does not crumble and it is easier to mix colors. This method is long and requires perseverance.
|
| Scribble technique | Quick to execute, but not very precise. For a better result, you will need to make small movements. The texture looks interesting on the finished drawing.
|
| Linear hatching | It is done quickly, the strokes are drawn parallel to each other at a slight angle. The hand should move measuredly, and the pressure should be controlled by the artist so that no stripes are formed.
|
| Crosshatch | This is a technique of using many intersecting lines. To obtain a smoother structure, you need to apply many layers. Each of them will hide the unevenness created by the previous hatching.
The same color can be used for crosshatching as for deepening the tone. However, if you need to change the tone, you can use a different color pigment. |


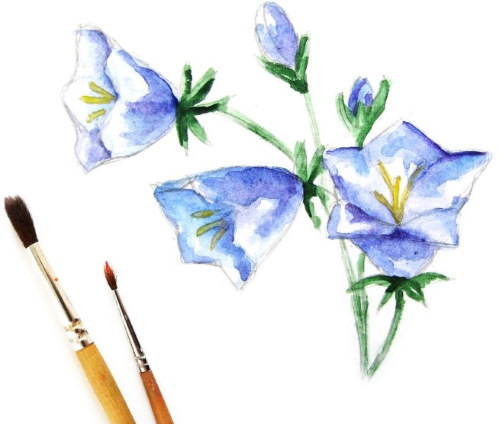
How to paint a flower with paints
Children love to draw bells and meadow flowers, and to help make their paintings interesting, you should teach them to use the paints and techniques that great artists choose for their creations. Even if the child is not able to use them to the fullest extent at first, gradually curiosity and the desire to master complex work will give results.
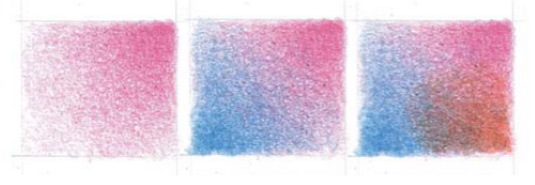
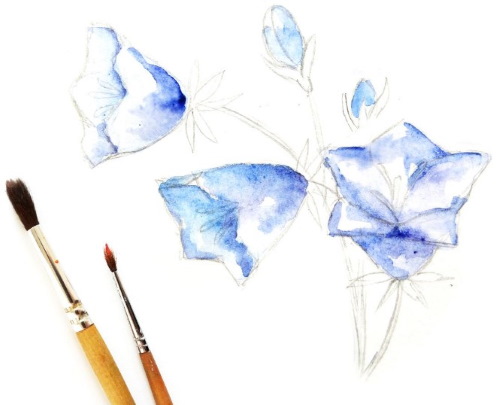
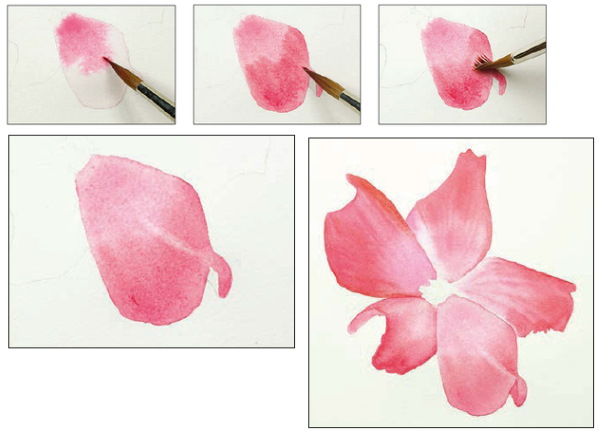
Watercolor painting is one of the simple techniques in which flower bouquets look attractive. Flowers are delicate and weightless. This method, in turn, is divided into subtypes of varying complexity. Only after mastering the simplest coloring of a picture, you can study more complex options.
Wet on wet
To make the picture soft and the color washed out, the sheet must be pre-moistened. However, do not hold it under running water: just run a wet sponge over the surface.

This will give:
- the ability for the paint to flow naturally;
- time for the transition of one shade to another and the creation of beautiful highlights before the moment when the paint begins to be absorbed into the canvas.
Professional artists call this process color stretching. The moistening process must be done correctly.
To do this:
- hand movements start from the middle of the sheet to its edges;
- the procedure is repeated several times so that the paper is well moistened and the edges do not dry out too quickly;
- After the process is completed, it is necessary to check that there are no puddles on the sheet.
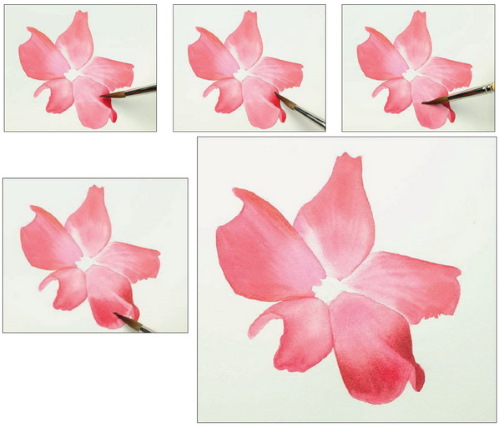
The process of coloring using this technique consists of the following stages:
- Fill the brush with water and run it over the petal to be painted. The canvas should have a uniform wet shine.
- Apply paint immediately so that the paper does not dry out.
- Distribute the color pigment from the center to the edges of the drawing, trying to make small movements with the brush.
- By spreading paint over the surface of the drawing, you will get an even and beautiful outline.
- Before the wash dries completely, lightly blot it again to highlight certain areas.
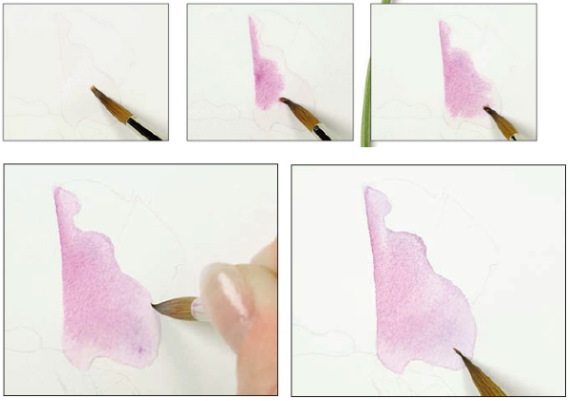
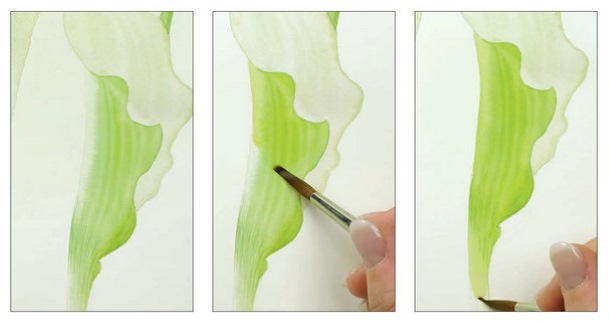
Color stretching
When several colors are used to paint an element, the color stretching technique is used. It allows you not to do additional washing, but to immediately create the desired structure using several color pigments.
The bell (a drawing for children can be done in any technique) in watercolor using the color stretching method is based on the following order of actions:
- After moistening the selected petal or other part of the design, apply the paint selected for the 1st layer.
- Before the surface dries, place another color next to it.
- Flatten the brush head to distribute the paint, making the transition between shades less pronounced and smooth.
- Work quickly so that the paint doesn't have time to dry and there are no streaks left on the painting.
- Blot the surface to remove glare and create veins on the leaf. A smooth transition can be used to emphasize the direction of light.
- Paint the remaining parts of the drawing in the same way. To prevent wet areas from being adjacent, make gaps and apply color to the removed segments, returning to the missed ones as they dry.
Textured blotting
This technique is suitable for painting complex petals with an uneven surface.
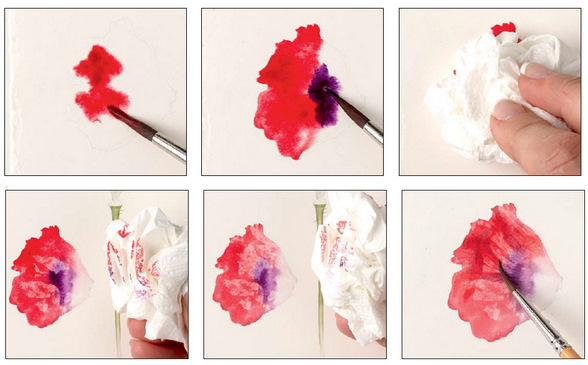
It is performed as follows:
- Moisten the sheet in the required area and immediately apply the rich paint.
- While the surface is still wet, add a dark color to blend it with the previous layer.
- Using a napkin or paper towel, blot the paint once.
- Repeat the procedure several times using a new napkin.
- Highlight the highlights in the desired places with a brush after drying.
Dry brush painting
The technique allows you to achieve a soft texture and deep color of the drawing, without the need to wet the sheet. However, it is complex and will require training to fully master it.
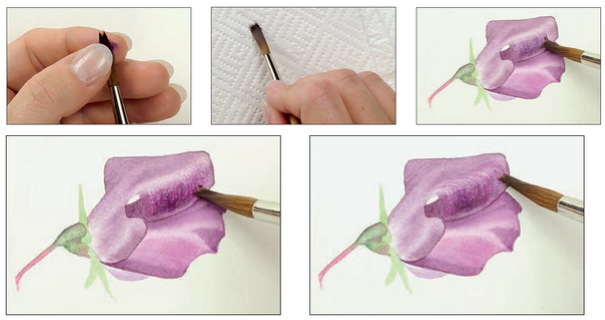
To do this you need:
- Squeeze the tip of the brush between your fingers until it flattens and the hairs separate.
- After loading the brush with paint, remove the excess with a napkin or cloth.
- Apply color to a design, adding depth and complexity to the texture.
- To make the surface velvety, go over it again with a brush of a darker or brighter shade, at the artist’s choice.
- Apply paint to all the curves of the petal, completely drawing its shape. After each applied layer, take a break to let the paint dry completely.
- Finally, emphasize the beauty of the design by highlighting the veins and creating light spots.
Drawing on dry paint
This technique is good for deepening the color. It is difficult to apply a new layer of wash on top of what has already been done, but if the previous painting was done correctly and the paint is completely dry, you can work on top of it.
It is important to remember: apply strokes carefully so as not to destroy the created layer. The edges of the new wash should not go beyond the created drawing.
The stages of the technique are as follows:
- Apply paint to a dry surface.
- Use a damp brush to smooth out the edges, and distribute the tone within the segment.
- Wet the edges of the part of the painting to be painted.
- Apply paint under the dampened edges.
- Repeat the steps until you achieve the desired result.
Glazing technique
If the painting is dry and the paint color does not match the artist's vision, it can be changed using transparent wash.
To do this, simply mix the desired paint and apply it to the painting with sharp strokes from top to bottom. To avoid looking rough, do not go over the same spot twice.
The paper should not be pre-moistened, and the paint should be diluted to a pale shade by diluting it with water. Use the entire brush head for application. When choosing a color, you need to understand what the painting lacks. If you need to add brightness, then the paint tone will be several tones lighter than what has already been applied.
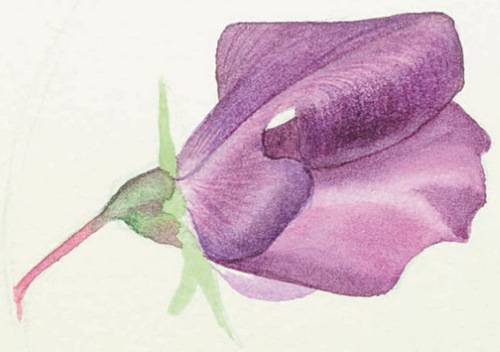
In a vase
A bell (a drawing for children must be created by carefully and thoroughly thinking through its scheme) in a vase begins with preliminary marking of the location of individual parts.
First you need to draw the flower itself, and to do this:
- Create a cone with strokes. At the base, mark the location of the petals with light dots.
- Connect the dots to the top of the cone with thin lines. This will give the petals the desired tilt and position.
- The sepals cover the place where the petals are attached, so they need to be drawn first.
- Mark the petals according to the existing dots and lines. The tips of the petals are usually asymmetrical in nature. One edge is always longer than the other. In addition, it is slightly narrowed towards the edge.
- Visually direct the petals in the background to the center, and hide their base behind those in the foreground. Draw stamens in the center.
Once you have created the flower, you can move on to the vase it will stand in. The vase should be drawn so that the stem is inside.
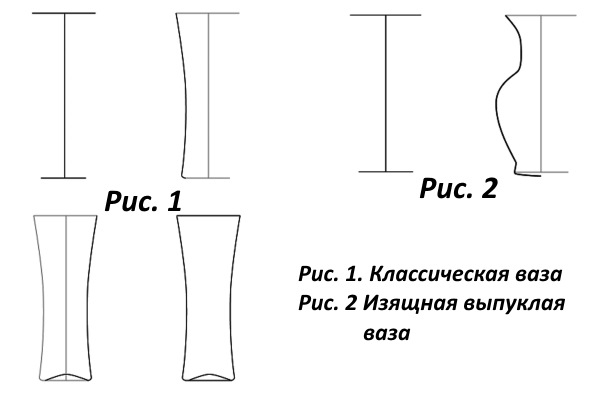
There are several ways to do this:
| Vase type | Description |
| Classical | This is a vase in the form of a rectangle tapering at the bottom. First, the basis of the drawing is created by drawing a vertical line and 2 parallel lines at the ends. They are shorter than the vertical line. The drawing steps are as follows:
|
| Graceful convex | The first steps are identical to the method for depicting a classic vase, then you need to:
|
This is a simple way to construct a picture, but even great artists started with simple drawings.
Every child can master a simple drawing technique. Bells are the most commonly used flowers for training. The main thing for children and their parents is to choose the right good pattern, which is provided with detailed instructions. By consistently performing the actions, the child will gradually develop drawing skills and will be able to move on to more complex paintings.
Video about drawing flowers
Bell - drawing for children: