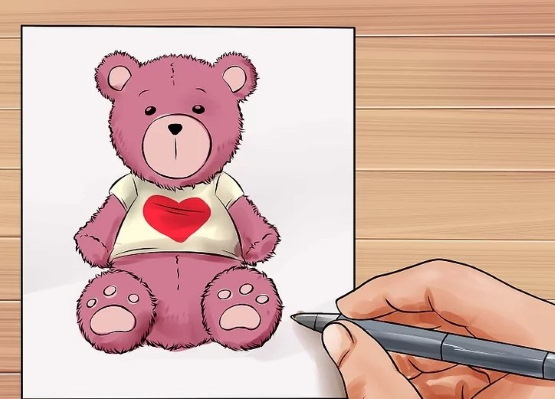
You can captivate a restless child with the help of drawing. This activity helps develop his memory, thinking and creativity. To make learning enjoyable, you can start with pencil drawings funny teddy bear.
How to draw a teddy bear with a pencil step by step
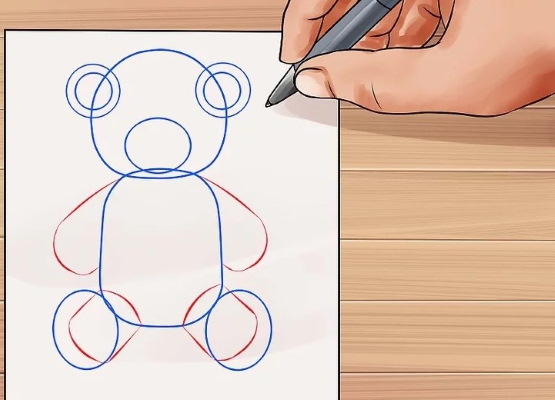
A full-length teddy bear without additional objects is drawn in the following 10 steps:
| No. | Drawing stage | Description |
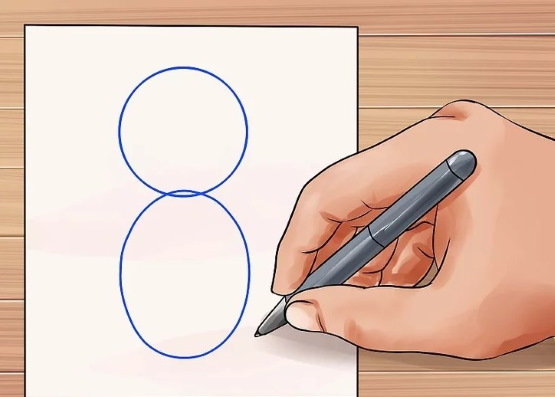
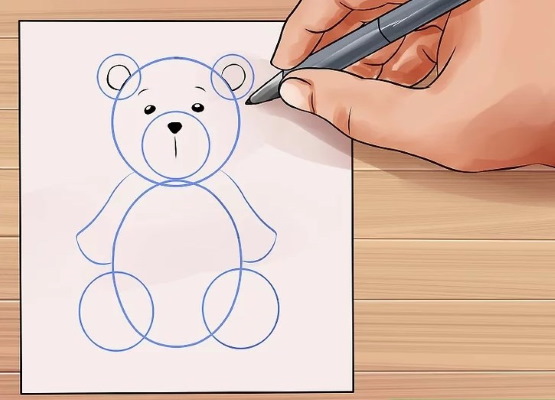
| 1 | Head | It has a round shape, so you need to draw a medium-sized circle on paper with a simple pencil. It should be located slightly above the center of the sheet of paper. It is important to remember this, otherwise the drawing will be disproportionate. |
| 2 | Torso | This is an elongated oval, similar to an egg. It is located slightly below the oval. The top of the oval should be superimposed on the bottom of the circle. |
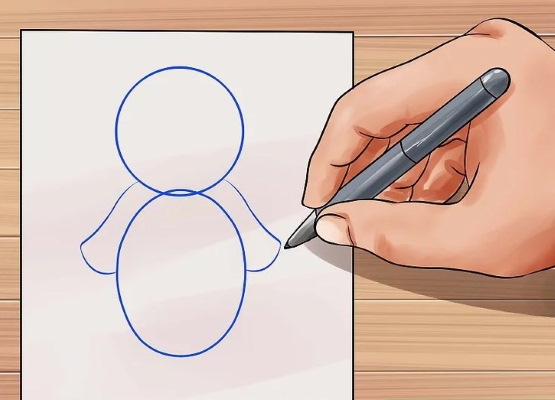
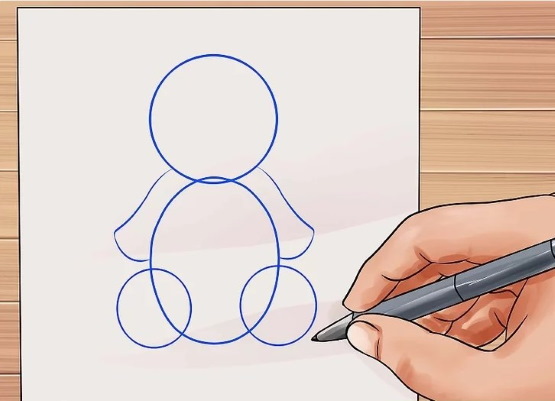
| 3 | Lower limbs | Teddy is clubfooted. His paws should be wide but short. At the bottom they end in thick feet. |
| 4 | Upper limbs | The bear's arms are also short but thick. They look like mittens. |
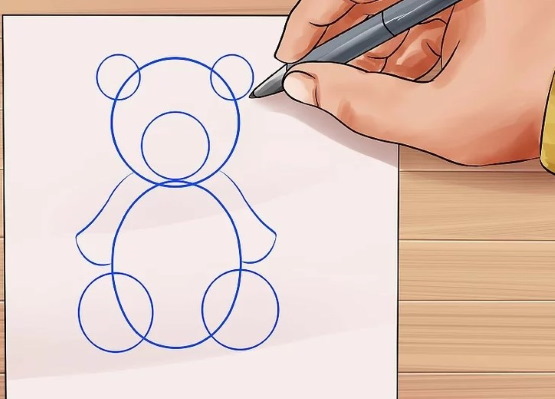
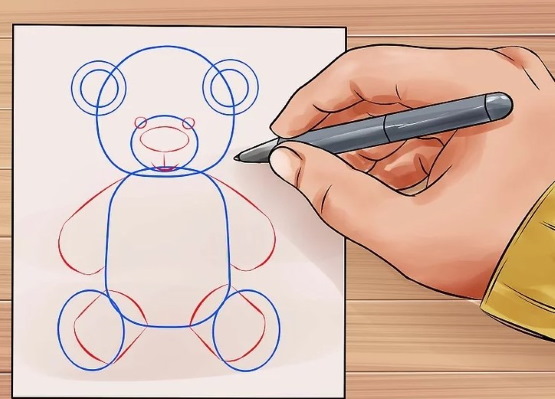
| 5 | Ears | They are located on both sides of the top of the head. Each of them should be represented by 2 semicircles.
First, you need to draw 1 large semicircle, and then inside it, draw a 2nd smaller semicircle with a thin line. The 2nd ear is drawn similarly on the other side of the head. |
| 6 | Muzzle | If you look at the bear cub from the side, you can see that its muzzle is slightly elongated.
To convey this in the drawing, you need to depict a small inverted heart at the bottom of the head, the end of which should be oval. |
| 7 | Nose | It looks like a small potato and should be depicted at the top of the muzzle. |
| 8 | Eyes and eyebrows | The eyes are located above the muzzle. Each of them is depicted as a simple dot. The distance between the eyes is small, it should not exceed the width of the nose. At the top of the head, eyebrows are drawn with thin, short lines. |
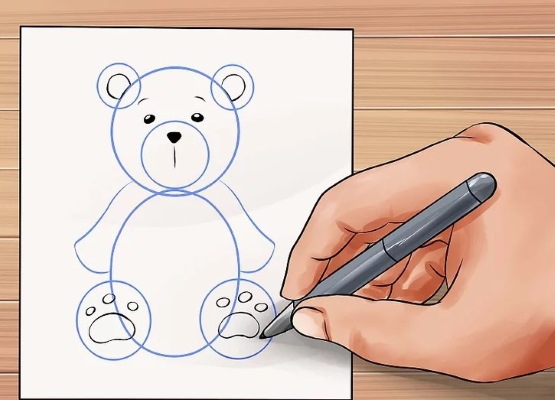
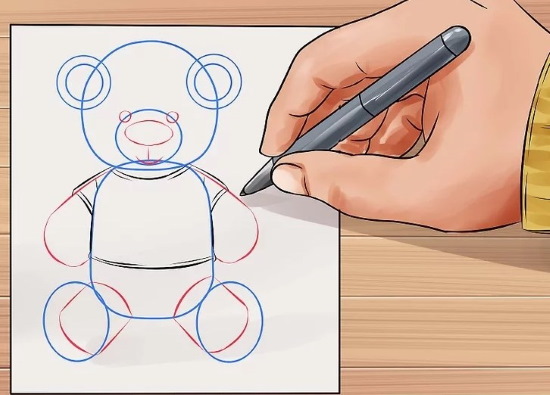
| 9 | Patches and seams | Seams can be represented by a straight line, and patches by a circle or a diamond.
Can:
When drawing seams and patches, it is necessary to imitate threads. To do this, it is enough to draw several short lines at each seam and at each patch. The threads should be perpendicular to the seam lines. If the seam is a straight line, the threads should be across it. |
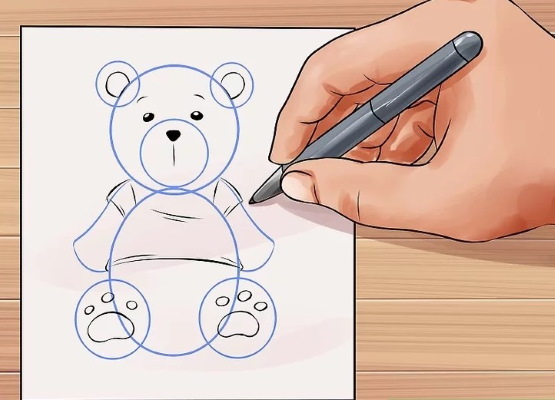
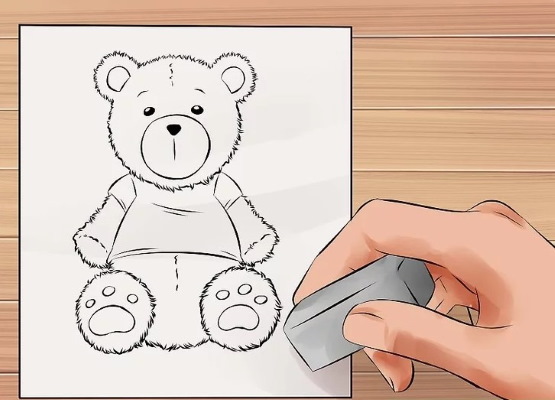
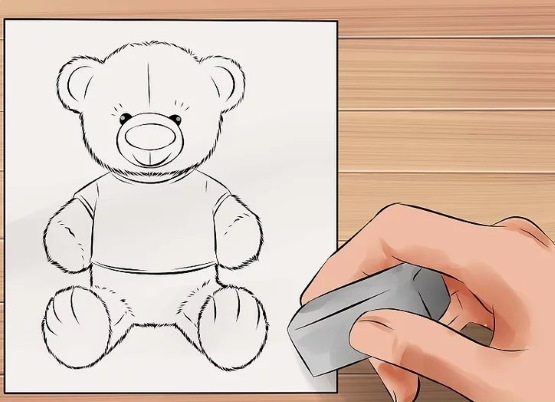
| 10 | Coloring | The body of the Teddy bear needs to be covered with villi. To do this, you need to make many strokes.
Coloring with pencils is usually as follows:
|

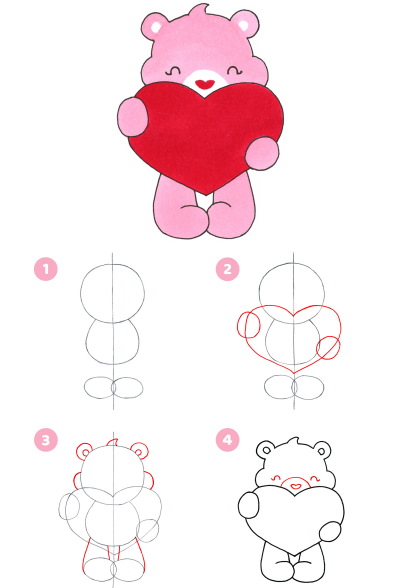
How to draw a teddy bear with a heart
Teddy bear (pencil drawing with a heart) can be prepared for Valentine's Day or March 8.
The teddy bear is cute in itself, and the heart in his hands helps create a romantic mood.
If the heart is small, the drawing scheme will be as follows:
- To depict the head, draw a circle and divide it into 4 parts of approximately equal size using 2 intersecting lines at right angles.
- On the horizontal auxiliary line draw 2 small circles. These will be the bear's eyes.
- Place a large oval under the eyes. This will be the muzzle.
- Draw the ears, imagining them as semicircles.
- At the top of the large oval (muzzle) draw a smaller oval. This will be the nose.
- Draw a small semicircle under the nose. This will be the mouth.
- Draw a heart under the head. It is small and should not be larger than the head.

- Draw 1 oval on each side of the heart. They should be stretched up and down. These will be the bear's paws, in which he holds a small heart.
- Use lines running from the head to the paws to depict the shoulders.
- Draw 2 more ovals under the heart. These will be the legs. They should have the same shape as the arms, but be larger in size.
- Connect the legs to the body.
- Remove unnecessary lines.
- Add patches and seams. You can draw unique details, such as hearts on the paws.
- Color the image. The bear's body should be brown, the heart should be red, and the nose can be blue.
Teddy bear with a big heart
A teddy bear with a big heart in its paws should be drawn in the following steps:
| No. | Stage | Description |
| 1 | Head | At the top of the face, draw a circle that will become the head in the future. Inside the circle, draw 2 lines intersecting at right angles. These will be auxiliary elements that will simplify drawing parts of the bear's face. Since the bear's head will be slightly tilted to the right, the lines drawn inside the circle should also be slightly tilted. The horizontal line should be slightly tilted to the left, and the vertical line, passing strictly perpendicularly, will itself be slightly tilted. |
| 2 | Parts of the face | It is necessary to draw:
|
| 3 | Seams | Along the vertical line at the top of the head runs 1 of the seams. When drawing it, it is important not to forget about the threads, which can be represented by short strokes running across the main line. On the right side of the head, you can draw a couple more seams. One of them can be represented by a rhombus, and the other by a straight line. |
| 4 | Auxiliary lines | It is necessary to delete all auxiliary lines, and then draw new ones that will determine the position of the heart that has not yet been depicted and its size.
The main auxiliary line for the heart should be slightly to the right of the head. In relation to the bear itself, it should be located to the left of it. The main line will be the middle of the heart. It should go from top to bottom, while deviating slightly to the left.
After drawing the auxiliary line that determines the position of the heart, draw several lines that will characterize its size:
|
| 5 | Heart | Once it is drawn, you can delete all the auxiliary lines, as well as the part of the bear's head that is hidden behind the heart. |
| 6 | Upper paws | The bear should hug the heart with them. His right paw is fully visible and covers the right side of the heart. The left paw is only partially visible above the top of the heart. |
| 7 | Sides and legs | With a rounded line you need to draw the right side of the bear. The left side is not visible, it is hidden behind the heart. Then you can draw the right leg, the lower torso and the left leg. |
| 8 | Limb sutures and folds | You can depict the seams:
There should be folds on the heart where the bear's paws touch it. They should be depicted with short lines. |
| 9 | Congratulation | A congratulatory wish can be written on the heart or under the drawing. The exact wording of the phrases depends on the holiday and the purpose of the drawing. For example, you can confess your love or congratulate on your birthday. |
| 10 | Coloring | This can be done with pencils or paints. The brightest object will be the heart, which should be red or scarlet.
The bear's nose can be painted blue, the muzzle can be left white, and fur can be depicted over the entire surface of the body using many short strokes. |
With a ball
A teddy bear (pencil drawing) will look cute with a balloon in his hands. It can have any shape, such as a circle, oval, diamond or heart.
The stages are as follows:
- Draw a sketch. It is done with a regular pencil. First, draw 2 intersecting circles: one should be located under the other. The sizes of the circles should be the same. At the same time, do not press hard on the pencil so that you can always make corrections to the drawing. All unnecessary lines can be removed with a simple eraser.
- Draw paws and ears for the bear. The lower limbs and ears are drawn identically to the previous versions. The upper paws have some special features: since Teddy holds a balloon in them, they should be tucked behind his back. This simplifies the artist's work, because it is enough to simply draw a couple of lines that go behind his back.
- Draw the face of the bear. This will require an auxiliary line, which should be drawn from top to bottom along the center of the head. It should be slightly rounded, repeating the round shape of the head. At the bottom of the head, draw a small oval, stretched to the left and right. A slightly rounded auxiliary line should also run along the body from top to bottom.
- Detail the bear cub's face. In the oval located at the bottom of the head, inscribe another oval, smaller in size. This will be the nose. Above it are 2 eyes.
In this case, it is better to imagine them not as dots, but as 2 small semicircles. Then it will turn out that the Teddy bear has closed his eyes. Finish drawing the eyebrows, seams and patches. Add a few seams and patches to the body and paws of the bear cub.

- Draw a balloon. The string that the bear holds it by comes out from behind the head. The ball itself can have any shape.
- Color the picture, using only a simple pencil for this.
- Create an outline of the drawing. A simple pencil is also used for this purpose.
- Draw fur over the entire surface of the body, except for the muzzle and nose. It is depicted with numerous short strokes. In doing so, you should slightly go beyond the outlined contour.
- Color the picture. To color the nose, you should choose a blue pencil, but you should not color it completely. You need to leave a small gap, this will be a highlight. To color the ball, you can choose any pencil. Bright shades are best.
With a flower
A teddy bear (pencil drawing) with a flower in its paws is drawn as follows:
- Draw a circle and a couple of auxiliary lines. The head should be slightly tilted to the left. The muzzle, nose, eyebrows, ears and seams on the head are drawn according to the same principles as in the examples above. The only difference is the eyes. They should not be represented by dots, but by small semicircles. This will make it look like the bear's eyes are closed.
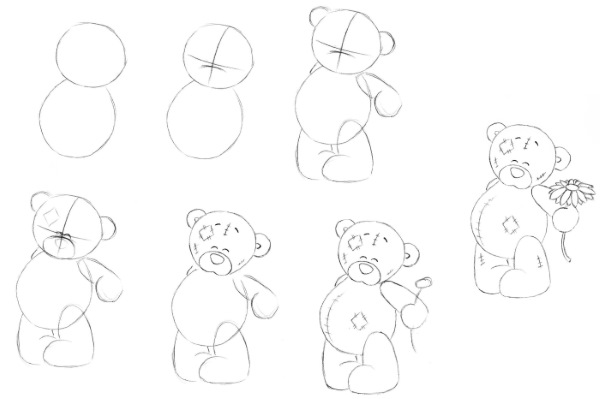
- Draw the body. This will also require an auxiliary circle.
- Draw the lower paws and draw connecting lines. The bear's right upper paw is almost invisible, and in his left he holds a flower. In this example, it will be a chamomile.
- Start drawing a flower with an oval. This will be its core, and many petals should extend from it. Between the drawn petals, draw additional ones so that the flower turns out more lush. Under the left paw, in which the flower is located, you need to draw a stalk. To do this, it is enough to draw 2 lines and connect them with a small circle at the bottom.
- Draw the seams on the paws and body.
- Color the picture.
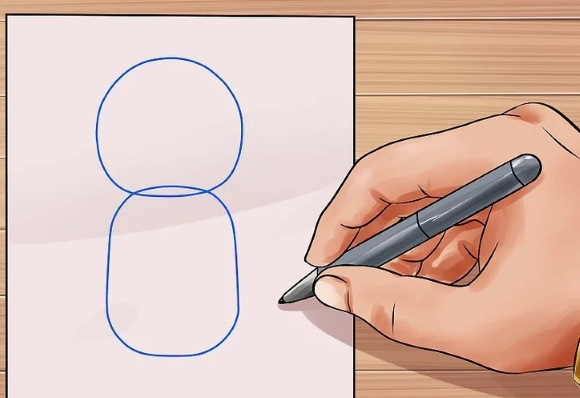
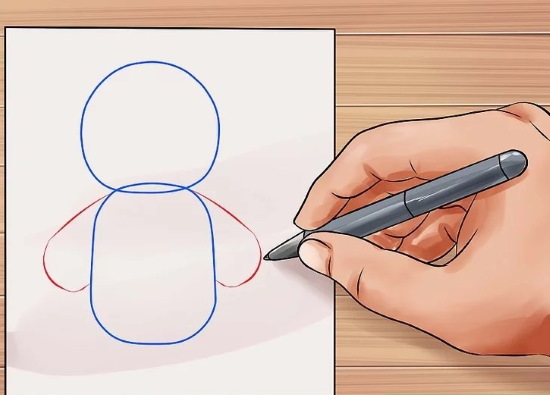
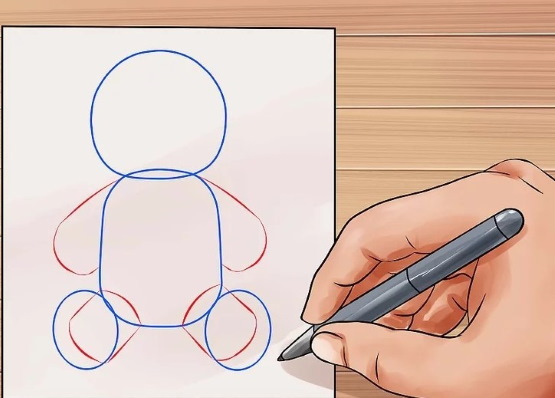
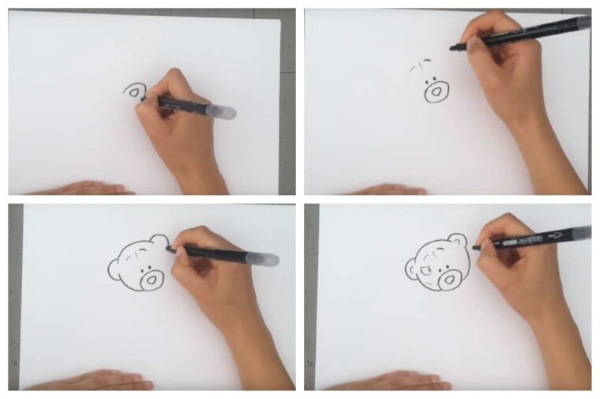
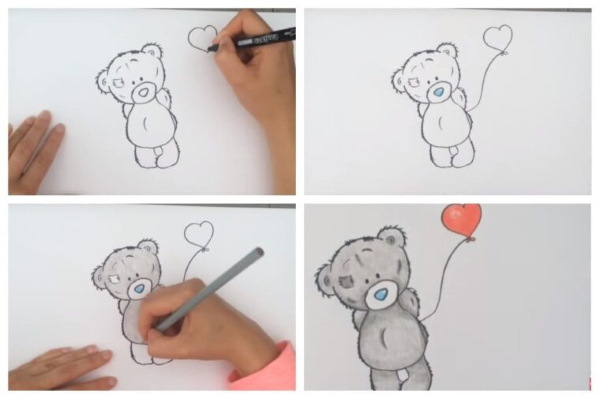
How to draw a sitting bear
A teddy bear (pencil drawing) sitting on a shelf or sofa can be drawn by following these steps:
- Draw ovals. There should be 2 of them: 1 for the head, 2 for the body. The lower oval, which will become the body, should be more elongated up and down, while the upper oval, which will be the head, should be made more like a circle. Also, one oval should overlap the other a little.
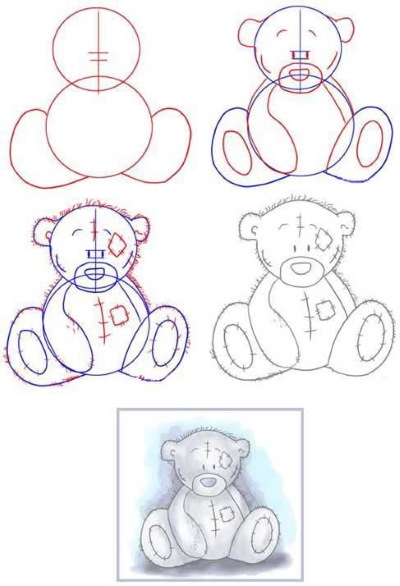
- Add a couple of ovals on the sides of the lower body. These will be the legs.
- Draw auxiliary lines. They should be drawn inside the head. There should be 2 lines: one horizontal, the other vertical. They should intersect at a right angle. With these lines, it is easier to draw the bear's muzzle.
- Where the lines intersect, there should be 2 eyes. Each of them can be represented by one point. In this case, the eyes should be located on a horizontal auxiliary line, and a vertical one should pass between them.
- Draw a large oval under the eyes, stretched to the left and right. This will be the bear's muzzle. Inside this large oval, you need to draw a small one. This will be the nose.
- Add ears. They are located on the sides of the head. Each of them can be represented by a semicircle.
- Draw the bear's upper limbs. They are lowered down and partially hidden behind the legs. To draw the upper limbs, simply draw a couple of arched lines starting from the head and going to the legs.
- Also draw additional lines at the lower ovals to highlight the legs.
- To make the teddy bear look like a real plush toy, give it some fur. It is best to start with the head. It is not necessary to draw strokes over the entire surface, instead you can draw a few lines along the contour of the head.
The Teddy bear must be not only furry, but also old. The effect of antiquity will be given by seams and patches.
- To imitate threads, it is necessary to apply hatching perpendicular to the seam lines. If the seam is in the form of a straight line, the thread strokes are placed across it.
- When drawing seams and patches, it is necessary to imitate threads. To do this, it is enough to draw several short lines at each seam and at each patch. The threads should be perpendicular to the seam lines. If the seam is a straight line, the threads should be located across it. You can make 1 seam on the forehead, a couple on the cheeks and 1 patch to the right of the eyes.
- In the same way, process the body and paws of the bear. You can also draw many strokes along the contours, make several seams and patches. A seam running in the middle of the body will look good. To the left of it, you can draw a diamond-shaped patch, and on the feet, it is best to draw patches in the form of ovals.
- Delete all auxiliary lines, re-select the main contours.
- Color the resulting plush toy.
Although the Teddy bear has an English name, today it is well known to everyone. It is an ordinary plush bear, decorated with numerous patches and seams, which is more reminiscent of a dusty bag. However, due to this feature, it is cute and popular. Its pencil drawing can become a good homemade postcard or picture in a child's room or hallway.
Video about drawing a teddy bear
Teddy Bear Pencil Drawing: